|
The emperor has no clothes
|
 |
« on: December 12, 2018, 03:57:10 PM » |
|
It appears I have encountered the dreaded clutch damper plate rivets giving loose. I was holding out hope it was something else, but after rebuilding the clutch master cylinder I still get the symptoms randomly. The clutch will not disengage completely on occasion, the clutch lever will not pull all the way in on occasion, shifting is very difficult on occasion. And then it will be ok for a while. I am going to order the dampener plate, the friction plates, the clutch cover gasket. My questions are : 1) is there anything else I should order ? 2) will a 6 gallon, 3/4 hp air compressor be enough to power an impact wrench ? 3) if not, will an electric impact wrench work ? 4) are there any tricks or shortcuts I should be aware of ? Thanks  |
|
|
|
|
 Logged
|
|
|
|
gordonv
Member

Posts: 5766
VRCC # 31419
Richmond BC
|
|
« Reply #1 on: December 12, 2018, 04:02:12 PM » |
|
I took mine apart/off the bike over 8 years ago now, in the driveway with hand tools. Just used a chisel to remove the dimple for the nut holding the basket in. The rest, I don't remember.
Are you going to do this job with the engine in the bike or removed?
|
|
|
|
|
Logged
|
1999 Black with custom paint IS   |
|
|
|
The emperor has no clothes
|
|
« Reply #2 on: December 12, 2018, 04:24:26 PM » |
|
I took mine apart/off the bike over 8 years ago now, in the driveway with hand tools. Just used a chisel to remove the dimple for the nut holding the basket in. The rest, I don't remember.
Are you going to do this job with the engine in the bike or removed?
I think with engine in the bike. Previous posts don't sound too bad doing this. |
|
|
|
|
Logged
|
|
|
|
|
sdv003
|
|
« Reply #3 on: December 12, 2018, 04:25:19 PM » |
|
If you need some help, drop me a line and I'll ride down.
|
|
|
|
|
Logged
|
|
|
|
|
matt
|
|
« Reply #4 on: December 12, 2018, 04:29:13 PM » |
|
Rob it is doable in bike. I did not have to remove my cage no damage. I made a couple tools one out of wood get longer bolts and a two by four with a hole big enough for socket so I could use hand tools and to hold engine from spinning over when torque nut
Matt
|
|
|
|
|
Logged
|
|
|
|
|
The emperor has no clothes
|
|
« Reply #5 on: December 12, 2018, 04:37:06 PM » |
|
If you need some help, drop me a line and I'll ride down.
Thanks, Sam. I'm not sure when it will be. Rob it is doable in bike. I did not have to remove my cage no damage. I made a couple tools one out of wood get longer bolts and a two by four with a hole big enough for socket so I could use hand tools and to hold engine from spinning over when torque nut
Matt
Thanks, Matt. If the impact wrench won't do it, I'll go that route. I'm kind of liking an excuse to buying an impact wrench.  |
|
|
|
|
Logged
|
|
|
|
|
F6Dave
|
|
« Reply #6 on: December 12, 2018, 04:47:53 PM » |
|
It's easy with the engine in the bike. I used an electric impact wrench to remove the clutch pack bolt, and a 2x4 with drilled holes to hold everything in place while I torqued the bolt back in place. I ordered the friction plates, damper plate, spring, bolt, and gasket. Didn't even use the gasket, and really only needed to replace the damper plate. I didn't remove the basket.
The only tricky part is aligning the clutch pack so it slips into the basket. I devised a method I posted a few years ago. I'll see if I can find it.
|
|
|
|
|
Logged
|
|
|
|
|
F6Dave
|
|
« Reply #7 on: December 12, 2018, 04:53:37 PM » |
|
Here's my old post on the clutch project. I only cover the tricky parts since most of the job is very easy. After many months I finally got around to replacing the clutch on my ’98 Tourer. As some others have experienced, the rivets in the damper plate failed. This is not uncommon on some high mileage Valks. The job took several hours, but was not difficult at all. Getting the center plastic cover off was more of a PITA than any of the other work. Clearance isn’t as good as in a bike with a more typical transversely mounted engine, but once you have it on a lift with a few pieces removed (I didn’t even remove the tank) there is plenty of clearance to remove the rear cover and clutch center pack without any special tools (not even a wobble joint for your ratchet). Here are of a couple of things I learned: I’d read that the disk alignment must nearly perfect or the compressed clutch center pack will not fit back into the basket. I used a couple of large washers and a spring in 2 places to hold the pack together with some light pressure. This allowed me to align the disks in the basket, and keep them aligned when I compressed the diaphragm spring and replaced the circlip. 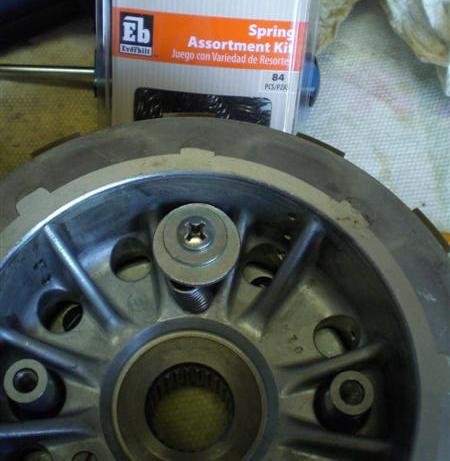 Speaking of compressing the spring, I made a simple tool out of a 2x4, long bolt, a plastic pipe fitting, and an old lawnmower blade. I knew that blade would come in handy one day! This allowed me to use straight tips on the circlip pliers which seem to work better than 90 or 45 degree tips. 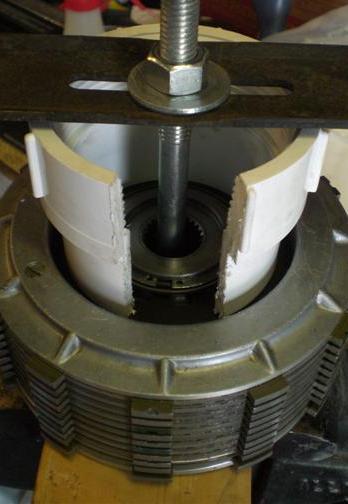 While I used an impact wrench to remove the big clutch nut, I wanted to torque the new one to the Honda spec. Here’s a simple clutch holder tool I made from another 2x4.  |
|
|
|
|
Logged
|
|
|
|
|
matt
|
|
« Reply #8 on: December 12, 2018, 05:01:38 PM » |
|
Rob I think hardest thing was removing kickstand brace. Those bolts were tight lol
|
|
|
|
|
Logged
|
|
|
|
|
The emperor has no clothes
|
|
« Reply #9 on: December 12, 2018, 05:08:26 PM » |
|
Thanks guys the pics and the tips are immensely helpful. |
|
|
|
|
Logged
|
|
|
|
|
F6Dave
|
|
« Reply #10 on: December 12, 2018, 05:34:01 PM » |
|
Rob I think hardest thing was removing kickstand brace. Those bolts were tight lol
True. You can see from the last picture I posted that the bolts holding the stand are prone to corrosion. It wouldn't hurt to spray the bolts with a rust removal solvent the night before. |
|
|
|
|
Logged
|
|
|
|
|
matt
|
|
« Reply #11 on: December 12, 2018, 05:35:38 PM » |
|
Rob, I know your bike probably has double the mileage my had 50,000. All other disks measured same as new. I know its nice to have everything but may not need other plates. I did replace bearing and not only gasket but seal were push rod goes thru. Also when you get cover off I believe oil screen is in bottom right need to clean that screen
|
|
|
|
|
Logged
|
|
|
|
|
Hook#3287
|
|
« Reply #12 on: December 13, 2018, 03:23:08 AM » |
|
Rob, you got all the info you need. Good luck It's a pretty basic job. |
|
|
|
|
Logged
|
|
|
|
|
The emperor has no clothes
|
|
« Reply #13 on: December 13, 2018, 03:42:07 AM » |
|
Rob, you got all the info you need. Good luck It's a pretty basic job. Thanks, Bill. Yeah after reading about others doing it for years now, I think I have a pretty good handle on it. |
|
|
|
|
Logged
|
|
|
|
|


