mello dude
Member

Posts: 999
Half genius, half dumazz whackjob foole
Dayton Ohio
|
 |
« on: September 12, 2019, 05:00:36 PM » |
|
Silly topic, kinda joking in jest, but more beer filled round of cogitation... looking at the pair valve removal, doesnt look all that hard... but removing and especially replacing the airbox looks like it could be a PIA and possibly a few hours of fiddling, fighting, cursing...  What is your experience? - Buy new carb runners? |
|
|
|
« Last Edit: September 17, 2020, 08:02:51 PM by mello dude »
|
 Logged
|
* There's someone in my head, but it's not me.......
* Mr. Murphy was an optimist....
* There's a very fine line between Insanity and Genius.....
* My get up and go, must have got up and went.....
|
|
|
|
Lyle Laun
|
|
« Reply #1 on: September 12, 2019, 05:03:31 PM » |
|
You'll be fine, it isn’t as hard as you’re thinking
Lyle
|
|
|
|
|
Logged
|
Get out & Ride !!
97 Red/White Standard dressed as Tourer
98 Black "Rat Rod" Standard
99 Green/Silver Interstate
|
|
|
|
pancho
|
|
« Reply #2 on: September 12, 2019, 05:31:25 PM » |
|
You have got to learn to do it,, might as well just jump in there. Do it twice just to make sure you got it. It really is no big deal, just make sure the wiring harnesses are all pushed out of the way in the front to give you clearance for reassembly, and leave the lid off until it's in.
|
|
|
|
|
Logged
|
The most expensive things you will purchase, are those things you would not have needed if you had listened and obeyed.
|
|
|
mello dude
Member
Posts: 999
Half genius, half dumazz whackjob foole
Dayton Ohio
|
|
« Reply #3 on: September 12, 2019, 07:43:19 PM » |
|
You have got to learn to do it,, might as well just jump in there. Do it twice just to make sure you got it. It really is no big deal, just make sure the wiring harnesses are all pushed out of the way in the front to give you clearance for reassembly, and leave the lid off until it's in.
Yeah, I hear ya.........just not looking for another debacle... Its always some simple minor little stupid piece of the puzzle holding something up that gives the biggest aggravation.... Should I replace the air cleaner connect tubes? https://www.partzilla.com/product/honda/17253-MZ0-000?ref=e68c319d74a17530450ccd2d953190300343cb62thx  |
|
|
|
« Last Edit: September 12, 2019, 07:47:07 PM by mello dude »
|
Logged
|
* There's someone in my head, but it's not me.......
* Mr. Murphy was an optimist....
* There's a very fine line between Insanity and Genius.....
* My get up and go, must have got up and went.....
|
|
|
|
The emperor has no clothes
|
|
« Reply #4 on: September 12, 2019, 08:03:54 PM » |
|
You have got to learn to do it,, might as well just jump in there. Do it twice just to make sure you got it. It really is no big deal, just make sure the wiring harnesses are all pushed out of the way in the front to give you clearance for reassembly, and leave the lid off until it's in.
Yeah, I hear ya.........just not looking for another debacle... Its always some simple minor little stupid piece of the puzzle holding something up that gives the biggest aggravation.... Should I replace the air cleaner connect tubes? https://www.partzilla.com/product/honda/17253-MZ0-000?ref=e68c319d74a17530450ccd2d953190300343cb62thx No |
|
|
|
|
Logged
|
|
|
|
|
Bagger John - #3785
|
|
« Reply #5 on: September 13, 2019, 06:32:25 AM » |
|
Done it on both mine this summer...plus a bunch of Valkyries prior.
Pay attention to how things line up and seat - especially at the rear of each air tube - and it's not that big of a deal.
|
|
|
|
|
Logged
|
|
|
|
mello dude
Member
Posts: 999
Half genius, half dumazz whackjob foole
Dayton Ohio
|
|
« Reply #6 on: September 13, 2019, 07:26:36 AM » |
|
Done it on both mine this summer...plus a bunch of Valkyries prior.
Pay attention to how things line up and seat - especially at the rear of each air tube - and it's not that big of a deal.
Thanks for your post. Just overthinking about getting 6 intake tubes all at once all lined up and cinch it home...  |
|
|
|
|
Logged
|
* There's someone in my head, but it's not me.......
* Mr. Murphy was an optimist....
* There's a very fine line between Insanity and Genius.....
* My get up and go, must have got up and went.....
|
|
|
|
Steve K (IA)
|
|
« Reply #7 on: September 13, 2019, 10:55:42 AM » |
|
A dental mirror and flashlight will help. Also Harbor Freight has a set of 4 dental picks that will help get around to the back side of those tubes.
|
|
|
|
|
Logged
|
 States I Have Ridden In |
|
|
|
Jess from VA
|
|
« Reply #8 on: September 13, 2019, 11:44:55 AM » |
|
I've read that alcohol is a good short term lubricant, and dries without residual.
I've also read using a ratchet strap (up and over) when reinstalling the box is helpful.
|
|
|
|
|
Logged
|
|
|
|
|
Savage
|
|
« Reply #9 on: September 13, 2019, 11:47:45 AM » |
|
I've read that alcohol is a good short term lubricant...
Especially if you drink it before and during the airbox installation.  |
|
|
|
|
Logged
|
Columbia, South Carolina
|
|
|
|
Pluggy
|
|
« Reply #10 on: September 13, 2019, 02:20:52 PM » |
|
Is there an engine performance benefit to doing this? If there is, is it worth all the described effort?
|
|
|
|
|
Logged
|
|
|
|
|
sandy
|
|
« Reply #11 on: September 13, 2019, 04:24:18 PM » |
|
Is there an engine performance benefit to doing this? If there is, is it worth all the described effort?
There is no improvement in HP or running. It only simplifies the look of the engine and eliminates the vacuum tubing which requires maintenance. |
|
|
|
|
Logged
|
|
|
|
|
|
gordonv
Member
Posts: 5766
VRCC # 31419
Richmond BC
|
|
« Reply #13 on: September 15, 2019, 10:33:50 AM » |
|
It was also mentioned that with the air box cover off, there is more flexibility in the air intake tubes. Making the job easier to get the air box inside of the frame rails.
I've some wide open throttle problems, and want to inspect the connection with an endoscope I have.
|
|
|
|
|
Logged
|
1999 Black with custom paint IS   |
|
|
mello dude
Member
Posts: 999
Half genius, half dumazz whackjob foole
Dayton Ohio
|
|
« Reply #14 on: September 17, 2019, 03:14:58 PM » |
|
Got the airbox off....Jeez, that was fiddly enuff.... Not really looking forward for the return journey....  Now just kinda figuring out what is what of the hoses..... |
|
|
|
« Last Edit: September 17, 2019, 03:51:06 PM by mello dude »
|
Logged
|
* There's someone in my head, but it's not me.......
* Mr. Murphy was an optimist....
* There's a very fine line between Insanity and Genius.....
* My get up and go, must have got up and went.....
|
|
|
|
rug_burn
|
|
« Reply #15 on: September 17, 2019, 03:29:44 PM » |
|
It works best if you manually squeeze the left and right side intake tubes together as you're shoving the airbox forward into place through the frame. It ain't no picnic. I've never had to use the ratchet strap trick. You will have to take some kind of dental pick tool, and go behind a few of the intake tubes and unkink and pull them back around the carb intakes.
|
|
|
|
|
Logged
|
...insert hip saying here..
|
|
|
Grandpot
Member
Posts: 630
Rolling Thunder South Carolina Chapter 1
Fort Mill, South Carolina
|
|
« Reply #16 on: September 18, 2019, 01:05:16 PM » |
|
Get some long wire ties. From inside the box run one tie down through the front right tube then across to the front left tube. Go up the front left tube and into the box. Connect the wire tie together and pull it so the tubes collapse inward. Do the same with the other two pairs. This will keep them tucked in so you can now drop the box in place. When the tubes are over the carbs, cut the ties. The tubes will now slip right over the carbs. Viola, you're done.
|
|
|
|
|
Logged
|
 Experience is recognizing the same mistake every time you make it. |
|
|
baldo
Member
Posts: 6961
Youbetcha
Cape Cod, MA
|
|
« Reply #17 on: September 18, 2019, 02:20:52 PM » |
|
This might be crazy, but would it help to put the box out in the sun for awhile? Is it the type of material that softens with heat?
I've done mine, installing new tubes. That in itself was a fight.....
|
|
|
|
|
Logged
|
|
|
|
mello dude
Member
Posts: 999
Half genius, half dumazz whackjob foole
Dayton Ohio
|
|
« Reply #18 on: September 18, 2019, 07:25:04 PM » |
|
Get some long wire ties. From inside the box run one tie down through the front right tube then across to the front left tube. Go up the front left tube and into the box. Connect the wire tie together and pull it so the tubes collapse inward. Do the same with the other two pairs. This will keep them tucked in so you can now drop the box in place. When the tubes are over the carbs, cut the ties. The tubes will now slip right over the carbs. Viola, you're done.
Interesting idea.... This might be crazy, but would it help to put the box out in the sun for awhile? Is it the type of material that softens with heat?
I've done mine, installing new tubes. That in itself was a fight.....
I like this idea too... maybe a hair dryer would help too? |
|
|
|
|
Logged
|
* There's someone in my head, but it's not me.......
* Mr. Murphy was an optimist....
* There's a very fine line between Insanity and Genius.....
* My get up and go, must have got up and went.....
|
|
|
MarkT
Member
Posts: 5197
VRCC #437 "Form follows Function"
Colorado Front Range - elevation 2.005 km

|
|
« Reply #19 on: September 19, 2019, 06:24:55 AM » |
|
HF has a set of 4 pry bars in 4 lengths. So useful I bought 2 sets. That with a block of wood and leaving the top of the airbox ON gives you leverage to push it down while you manipulate the tubes into alignment. I can always reinstall it in 5 minutes. As far as lubing things to help them slide into place - Wire Pulling Lube is great stuff, it's a wax-based lube, consistency of hand lotion that is made for lubing rubber - won't damage it like petroleum based lubes. Eventually evaporates, mostly. Use it a LOT - eg, lube the grommets to install the side covers w/o breaking off the fwd tab. Lube the inside of fuel lines, like at the petcock so it slides on easy. Comes in a quart squeeze bottle. Grainger, Lowes, Amazon have it among others.  |
|
|
|
« Last Edit: September 19, 2019, 06:28:39 AM by MarkT »
|
Logged
|
|
|
|
mello dude
Member
Posts: 999
Half genius, half dumazz whackjob foole
Dayton Ohio
|
|
« Reply #20 on: September 19, 2019, 08:14:45 AM » |
|
Thanks Mark! |
|
|
|
|
Logged
|
* There's someone in my head, but it's not me.......
* Mr. Murphy was an optimist....
* There's a very fine line between Insanity and Genius.....
* My get up and go, must have got up and went.....
|
|
|
|
pancho
|
|
« Reply #21 on: September 20, 2019, 05:29:24 AM » |
|
I have found that if I need ANY pressure to put the airbox into place, there is an obstruction with the wiring harnesses or other various tubing and miscellaneous items that need to be re positioned.
|
|
|
|
|
Logged
|
The most expensive things you will purchase, are those things you would not have needed if you had listened and obeyed.
|
|
|
mello dude
Member
Posts: 999
Half genius, half dumazz whackjob foole
Dayton Ohio
|
|
« Reply #22 on: September 20, 2019, 07:07:11 PM » |
|
That video is super helpful on what is going on with the Red-eye pair kit. Working on it this evening, --- what a fiddly job! Nothing's hard just stuff was contortionist rated.. On the bolts for the check valves, 3 were easy to get at and out in 1 minute, but #4, the one under the carb cross member was a beach, theres barely room to get a 1/4 inch socket wrench and short 10mm socket in there, and it only turns maybe 20 degrees - out in 30 minutes...   Working it....  |
|
|
|
« Last Edit: May 31, 2020, 06:52:04 AM by mello dude »
|
Logged
|
* There's someone in my head, but it's not me.......
* Mr. Murphy was an optimist....
* There's a very fine line between Insanity and Genius.....
* My get up and go, must have got up and went.....
|
|
|
mello dude
Member
Posts: 999
Half genius, half dumazz whackjob foole
Dayton Ohio
|
|
« Reply #23 on: September 21, 2019, 10:43:09 PM » |
|
Nice parts....   Airbox pair valve vacuum plug  It turns out, that the plug is too big to fit correctly. I went with other options below. |
|
|
|
« Last Edit: May 31, 2020, 06:56:44 AM by mello dude »
|
Logged
|
* There's someone in my head, but it's not me.......
* Mr. Murphy was an optimist....
* There's a very fine line between Insanity and Genius.....
* My get up and go, must have got up and went.....
|
|
|
mello dude
Member
Posts: 999
Half genius, half dumazz whackjob foole
Dayton Ohio
|
|
« Reply #24 on: September 22, 2019, 06:26:43 PM » |
|
Got all the air ports blocked.. Easy stuff. The worst is the removing the pipes from #1 area. The guy in the video used a dremel, but dunno how he sweezed that in there to work. There's too much stuff around there to screw up with a cutoff disc.... no thanks for me... I practiced on one of the other pipes, and figured to crush the sh!t outta the pipe with a vise grip in a strategic spot, then nibble away with wire cutter, bit by bit until it breaks... kinda crude, but got it done. Next task, the return trip with the airbox.... Pipes pipes pipes..  |
|
|
|
« Last Edit: September 22, 2019, 06:50:14 PM by mello dude »
|
Logged
|
* There's someone in my head, but it's not me.......
* Mr. Murphy was an optimist....
* There's a very fine line between Insanity and Genius.....
* My get up and go, must have got up and went.....
|
|
|
mello dude
Member
Posts: 999
Half genius, half dumazz whackjob foole
Dayton Ohio
|
|
« Reply #25 on: September 24, 2019, 05:55:59 PM » |
|
Found that the airbox cap provided is too big/loose, ditched that idea.. replaced with a Doorman vacuum part. Fits much better..   Update on this tidbit.... check last few posts... |
|
|
|
« Last Edit: October 08, 2019, 07:45:21 PM by mello dude »
|
Logged
|
* There's someone in my head, but it's not me.......
* Mr. Murphy was an optimist....
* There's a very fine line between Insanity and Genius.....
* My get up and go, must have got up and went.....
|
|
|
mello dude
Member
Posts: 999
Half genius, half dumazz whackjob foole
Dayton Ohio
|
|
« Reply #26 on: September 24, 2019, 06:05:16 PM » |
|
|
|
|
|
« Last Edit: September 24, 2019, 09:53:45 PM by mello dude »
|
Logged
|
* There's someone in my head, but it's not me.......
* Mr. Murphy was an optimist....
* There's a very fine line between Insanity and Genius.....
* My get up and go, must have got up and went.....
|
|
|
mello dude
Member
Posts: 999
Half genius, half dumazz whackjob foole
Dayton Ohio
|
|
« Reply #27 on: September 24, 2019, 06:43:32 PM » |
|
Air port plug and bracket installed on bike.....#6  #5 - I reversed the bracket, for no reason other than looks...  # 3 and #4 ports seal off  |
|
|
|
|
Logged
|
* There's someone in my head, but it's not me.......
* Mr. Murphy was an optimist....
* There's a very fine line between Insanity and Genius.....
* My get up and go, must have got up and went.....
|
|
|
|
RonW
|
|
« Reply #28 on: September 24, 2019, 08:23:48 PM » |
|
Found that the airbox cap provided is to big/loose, ditched that idea.. replace with a Doorman vacuum part. Fits much better.. You can seal the inside of the PAIR spout with a Dorman ⅛-inch I.D. vacuum cap utilizing it as a plug. That size is available in the Dorman's assorted size package. The second pic is the interior of the airbox with the dome of the vacuum cap (arrow) protruding out of the spout's interior well. The dome on the Dorman vacuum cap is solid rubber as far as durability, (x) in the second pic. Obviously a neoprene nitrile mushroom plug would be ideal but that's for people like redeye to find. Stop n' Go mushroom plugs have a 5/16-inch shaft and that diameter is probably too loose. BOWES brand tire plugs have 7/16-inch shafts and dunno for sure if the shaft can be squeezed into the PAIR spout. The ⅛-inch I.D. hollow in the Dorman vacuum cap makes it easy to squeeze into the PAIR spout even though the actual fit is tight. No adhesive needed. It ain't going anywhere. 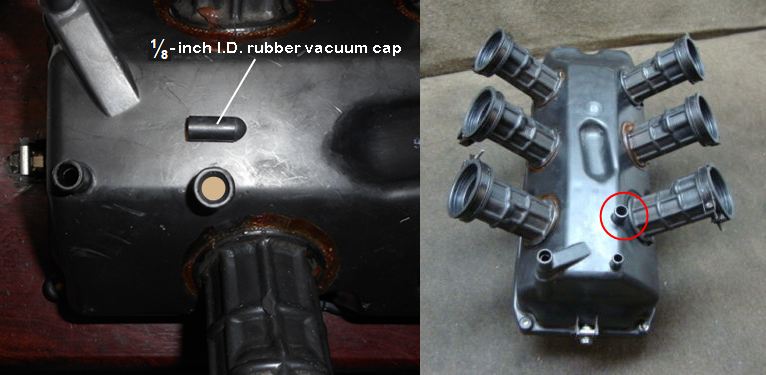  |
|
|
|
« Last Edit: September 25, 2019, 07:09:36 AM by RonW »
|
Logged
|
2000 Valkyrie Tourer
|
|
|
mello dude
Member
Posts: 999
Half genius, half dumazz whackjob foole
Dayton Ohio
|
|
« Reply #29 on: October 04, 2019, 05:36:20 PM » |
|
Generally got the airbox 95% back on, just needs a bit more pushing and checking. The clamps were quite fumby stupid so I ended up leaving the clamps off for the install and will do the unscrew open up and wrap around and then screw the clamps together...  Got to give a big thank you shout out to MarkT Got to give a big thank you shout out to MarkT for the tip on the wire pull lube stuff, it made the task I'm guessing a whole lot easier than with out... If any tube was a bit hung up on the carb, I grabed it and rocked it back and forth and the tube eventually slipped on. - I just added some to a shot glass and Qtip'd around all 6 interiors at the bottom of the tubes.... . Also, on the airbox breather tube and vent, they slipped on no efftort.... Hmmm, I think I will be using this stuff in other spots too!   |
|
|
|
« Last Edit: October 05, 2019, 05:55:39 PM by mello dude »
|
Logged
|
* There's someone in my head, but it's not me.......
* Mr. Murphy was an optimist....
* There's a very fine line between Insanity and Genius.....
* My get up and go, must have got up and went.....
|
|
|
hubcapsc
Member
Posts: 16824
upstate
South Carolina
|
|
« Reply #30 on: October 05, 2019, 03:16:49 AM » |
|
Those little hold-downs are nice you can't get the Honda ones anymore... -Mike |
|
|
|
|
Logged
|
|
|
|
|
luftkoph
|
|
« Reply #31 on: October 06, 2019, 07:17:25 AM » |
|
Keep an eye on those Dorman plugs, I've used them on my ZRX and they started to dry rot in about a years time.
|
|
|
|
|
Logged
|
Some day never comes
|
|
|
mello dude
Member
Posts: 999
Half genius, half dumazz whackjob foole
Dayton Ohio
|
|
« Reply #32 on: October 06, 2019, 08:11:07 AM » |
|
Keep an eye on those Dorman plugs, I've used them on my ZRX and they started to dry rot in about a years time.
Thanks for the tip. |
|
|
|
|
Logged
|
* There's someone in my head, but it's not me.......
* Mr. Murphy was an optimist....
* There's a very fine line between Insanity and Genius.....
* My get up and go, must have got up and went.....
|
|
|
|
Calboy
|
|
« Reply #33 on: October 06, 2019, 10:00:45 AM » |
|
Get some long wire ties. From inside the box run one tie down through the front right tube then across to the front left tube. Go up the front left tube and into the box. Connect the wire tie together and pull it so the tubes collapse inward. Do the same with the other two pairs. This will keep them tucked in so you can now drop the box in place. When the tubes are over the carbs, cut the ties. The tubes will now slip right over the carbs. Viola, you're done.
https://www.youtube.com/watch?v=R3RgzDeriQ4Go to 1:55 |
|
|
|
|
Logged
|
|
|
|
|
RonW
|
|
« Reply #34 on: October 07, 2019, 01:14:31 AM » |
|
Keep an eye on those Dorman plugs, I've used them on my ZRX and they started to dry rot in about a years time.
Lot of vacuum caps are meant to be used for testing purposes, not as a permanent install. The material might not do well exposed daily to sunlight etc. Where specifically on your ZRX did you use the Dorman plugs? Dorman caps are vinyl and vinyl might deteriorate even with the airbox location, dunno. Anyways, should the PAIR spout on the Valk airbox be capped or plugged? Just thinking aloud . |
|
|
|
|
Logged
|
2000 Valkyrie Tourer
|
|
|
mello dude
Member
Posts: 999
Half genius, half dumazz whackjob foole
Dayton Ohio
|
|
« Reply #35 on: October 07, 2019, 01:30:12 AM » |
|
Aw...you guys are sure poking at my OCD..  |
|
|
|
|
Logged
|
* There's someone in my head, but it's not me.......
* Mr. Murphy was an optimist....
* There's a very fine line between Insanity and Genius.....
* My get up and go, must have got up and went.....
|
|
|
|
RonW
|
|
« Reply #36 on: October 07, 2019, 04:07:30 AM » |
|
Thanks for all the effort of posting the photos! Generally got the airbox 95% back on, just needs a bit more pushing and checking. - The clamps were quite fumby stupid so I ended up leaving the clamps off for the install and will do the unscrew open up and wrap around and then screw the clamps together...
Agreed, the clamps are troublesome indeed. I know there must be ways to tape them up so they don't keep falling down, but I just removed them like you've done. |
|
|
|
|
Logged
|
2000 Valkyrie Tourer
|
|
|
mello dude
Member
Posts: 999
Half genius, half dumazz whackjob foole
Dayton Ohio
|
|
« Reply #37 on: October 07, 2019, 08:42:13 AM » |
|
Thanks for all the effort of posting the photos! Generally got the airbox 95% back on, just needs a bit more pushing and checking. - The clamps were quite fumby stupid so I ended up leaving the clamps off for the install and will do the unscrew open up and wrap around and then screw the clamps together...
Agreed, the clamps are troublesome indeed. I know there must be ways to tape them up so they don't keep falling down, but I just removed them like you've done. Thanks Ron , I do enjoy taking photos of stuff and posting up.....(Also, doing it to try to encourage the crew here to post photos on things they work on..  ) Clamps - first trys with the airbox getting in position was crazy enough, the clamp would catch on something or fall off... Getting them out of the way turned out best. Once the airbox was 100% on, putting the clamps on wasn't that hard... --Glad I did this... enjoyed working on things new to me.......On to the next thing..... |
|
|
|
« Last Edit: October 07, 2019, 08:50:03 AM by mello dude »
|
Logged
|
* There's someone in my head, but it's not me.......
* Mr. Murphy was an optimist....
* There's a very fine line between Insanity and Genius.....
* My get up and go, must have got up and went.....
|
|
|
mello dude
Member
Posts: 999
Half genius, half dumazz whackjob foole
Dayton Ohio
|
|
« Reply #38 on: October 07, 2019, 06:54:22 PM » |
|
Keep an eye on those Dorman plugs, I've used them on my ZRX and they started to dry rot in about a years time.
Lot of vacuum caps are meant to be used for testing purposes, not as a permanent install. The material might not do well exposed daily to sunlight etc. Where specifically on your ZRX did you use the Dorman plugs? Dorman caps are vinyl and vinyl might deteriorate even with the airbox location, dunno. Anyways, should the PAIR spout on the Valk airbox be capped or plugged? Just thinking aloud . You guys have officially totally messed with my head.... I had it all buttoned up with new air cleaner and top of the airbox screwed down.. and as they say, a bolt of lightning hits.... AW, damn it all anyhoo.. So off with the Doorman plug, no more on that..... open airbox and off with the air cleaner and another stare down at the pair valve port.... --- -I did a quick bolt size check and it looks like a 8mm bolt will fit tight down the ID of the port... For tommorow --- off to Lowes for a 8mm x 40mm long bolt and nut and shove it down the port...... Ok, this is my final, final, final, FINAL time I'm gonna screw with the little airbox hole.. .. Photos coming.... Keep an eye on those Dorman plugs, I've used them on my ZRX and they started to dry rot in about a years time.
Aw...you guys are sure poking at my OCD.. |
|
|
|
« Last Edit: October 08, 2019, 04:46:05 PM by mello dude »
|
Logged
|
* There's someone in my head, but it's not me.......
* Mr. Murphy was an optimist....
* There's a very fine line between Insanity and Genius.....
* My get up and go, must have got up and went.....
|
|
|
mello dude
Member
Posts: 999
Half genius, half dumazz whackjob foole
Dayton Ohio
|
|
« Reply #39 on: October 08, 2019, 04:56:49 PM » |
|
Port block it up job #4 Got a 40 mm bolt from Lowes and added gasket material on top....  Clean the hole out a bit with 5/16 bit and shove bolt in place...  Room on the bottom to add nut.  |
|
|
|
« Last Edit: October 08, 2019, 07:05:32 PM by mello dude »
|
Logged
|
* There's someone in my head, but it's not me.......
* Mr. Murphy was an optimist....
* There's a very fine line between Insanity and Genius.....
* My get up and go, must have got up and went.....
|
|
|
|


