|
pancho
|
 |
« on: July 31, 2021, 11:08:37 AM » |
|
I have had the "clutch rivet thing" going on for the last couple of years. Every now and again I cannot pull the lever in all the way. It is like hitting a brick wall, solid. It pulls in far enough to disengage the clutch, but not far enough to trigger the switch (starting the bike in gear). Then after a few clutch and gear changes it clears.
It has probably happened five or six times over the last couple of years until this morning when it happened four different times.
My questions are how many rivets are in the plate, do they all end up in the same place and what happens if every last one shears off? I know the job is not much doing it under the bike, but I am wondering if I can keep riding it till winter as I want to drop the motor to paint it, and that would be a good time to do the clutch. I know there are many who have done this job, your input would be helpful.
My main concern is if every rivet shears off, do you still have clutch engagement to get somewhere? I mean, it is a friction plate...
|
|
|
|
|
 Logged
|
The most expensive things you will purchase, are those things you would not have needed if you had listened and obeyed.
|
|
|
|
The emperor has no clothes
|
|
« Reply #1 on: July 31, 2021, 11:24:24 AM » |
|
There are a bunch of rivets. I didn’t count them all. But something to keep in consideration. When my rivets went south it was only maybe 4 to 6 of them. But the debris that is caused from them will wear the friction plates, which clogs up the little plastic filter separating the cases. Mine had so much clogging it I couldn’t even see it at first. I would imagine over time this could create more problems of lubrication losses. I also think once the damper plate starts to lose a certain amount of rivets it’s inevitable that the rest are going to go quickly. It sounds like yours might be there. Along with the rivets are little spring steels in the damper plate. Those will do the most damage as the rivets are a softer brass material.
In short, what I’m trying to say is you should probably do the clutch now instead of risking more damage.
Edit: to answer your question. Your clutch is likely to get where you can’t disengage the clutch. Riding thru Cave Creek stoplights wasn’t much fun with this.
|
|
|
|
« Last Edit: July 31, 2021, 11:28:01 AM by meathead »
|
Logged
|
|
|
|
|
pancho
|
|
« Reply #2 on: July 31, 2021, 12:09:20 PM » |
|
Thanks meathead,,, I actually know better than to keep using something once it has a problem, but you convinced me that I just need to be thankful I made it home, and fix it now! Other than a clutch cover gasket, what parts are are needed? https://www.partzilla.com/catalog/honda/motorcycle/1997/gl1500c-ac-valkyrie/clutchIt is coming into the dog days of summer, so I guess I won't be missing much. I've known for some time I needed a second bike. |
|
|
|
|
Logged
|
The most expensive things you will purchase, are those things you would not have needed if you had listened and obeyed.
|
|
|
|
|
|
The emperor has no clothes
|
|
« Reply #4 on: July 31, 2021, 12:43:34 PM » |
|
Thanks meathead,,, I actually know better than to keep using something once it has a problem, but you convinced me that I just need to be thankful I made it home, and fix it now! Other than a clutch cover gasket, what parts are are needed? https://www.partzilla.com/catalog/honda/motorcycle/1997/gl1500c-ac-valkyrie/clutchIt is coming into the dog days of summer, so I guess I won't be missing much. I've known for some time I needed a second bike. I did more than I needed. I didn’t want to get into it and discover I needed more parts. I probably would have been fine without new fiber discs. The bearing, spring were probably ok also. I would definitely go for a new seal. And rivet plate of course. |
|
|
|
|
Logged
|
|
|
|
|
pancho
|
|
« Reply #5 on: July 31, 2021, 03:27:06 PM » |
|
OK,, I guess the only things I need to figure out are weather I want to just do the clutch, or drop the motor out and paint it while I'm doing this, and check old posts and see how you guys that have done this fabed up special tools. I seem to remember seeing a post where someone used a 2x4 with holes in it to keep things stationary while torquing,
Did you do the job on a lift or a table meathead? clearance problems?
|
|
|
|
|
Logged
|
The most expensive things you will purchase, are those things you would not have needed if you had listened and obeyed.
|
|
|
|
F6Dave
|
|
« Reply #6 on: July 31, 2021, 03:35:47 PM » |
|
OK,, I guess the only things I need to figure out are weather I want to just do the clutch, or drop the motor out and paint it while I'm doing this, and check old posts and see how you guys that have done this fabed up special tools. I seem to remember seeing a post where someone used a 2x4 with holes in it to keep things stationary while torquing,
Did you do the job on a lift or a table meathead? clearance problems?
I made the 2x4 post. It had some other pictures with suggestions for aligning the clutch pack. I'll find it and repost. BTW I bought the gasket but never used it. The old one stuck to the cover so nicely I didn't touch it. No leaks in 40K miles. |
|
|
|
|
Logged
|
|
|
|
|
The emperor has no clothes
|
|
« Reply #7 on: July 31, 2021, 03:46:43 PM » |
|
OK,, I guess the only things I need to figure out are weather I want to just do the clutch, or drop the motor out and paint it while I'm doing this, and check old posts and see how you guys that have done this fabed up special tools. I seem to remember seeing a post where someone used a 2x4 with holes in it to keep things stationary while torquing,
Did you do the job on a lift or a table meathead? clearance problems?
Just a cheap bike jack. A motorcycle table would be a lot better. The up and down is hard on an old man. Taking the engine out would be even better. I would say the hardest part of the job is getting the new clutch pack aligned correctly so that it will go back in. A member here was kind enough to lend me an old clutch basket and some jigs that he made up that made the job much easier. Very nice guy. Maybe he will see this, and do the same for you, if you are interested. |
|
|
|
|
Logged
|
|
|
|
|
F6Dave
|
|
« Reply #8 on: July 31, 2021, 06:07:46 PM » |
|
Here's my old post on the clutch project. I only cover the tricky parts since most of the job is very easy. I should mention that the only part I really needed to replace was the damper plate. As mentioned earlier I ordered the gasket but the old one was fine (and really stuck to the cover) so I left it alone. I replaced the spring but the old one was still within factory specs. I only replaced the big clutch nut because the manual said I should. And the fiber discs looked nearly new and could have been reused. After many months I finally got around to replacing the clutch on my ’98 Tourer. As some others have experienced, the rivets in the damper plate failed. This is not uncommon on some high mileage Valks. The job took several hours, but was not difficult at all. Getting the center plastic cover off was more of a PITA than any of the other work. Clearance isn’t as good as in a bike with a more typical transversely mounted engine, but once you have it on a lift with a few pieces removed (I didn’t even remove the tank) there is plenty of clearance to remove the rear cover and clutch center pack without any special tools (not even a wobble joint for your ratchet). Here are of a couple of things I learned: I’d read that the disk alignment must nearly perfect or the compressed clutch center pack will not fit back into the basket. I used a couple of large washers and a spring in 2 places to hold the pack together with some light pressure. This allowed me to align the disks in the basket, and keep them aligned when I compressed the diaphragm spring and replaced the circlip. 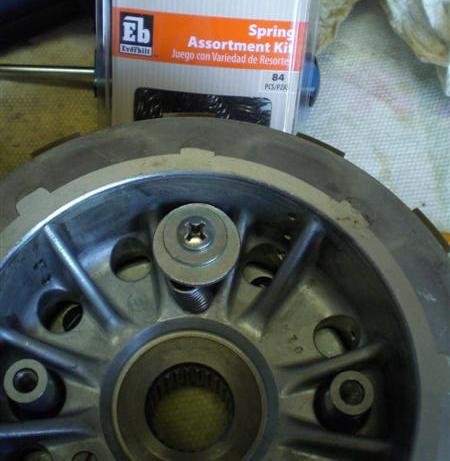 Speaking of compressing the spring, I made a simple tool out of a 2x4, long bolt, a plastic pipe fitting, and an old lawnmower blade. I knew that blade would come in handy one day! This allowed me to use straight tips on the circlip pliers which seem to work better than 90 or 45 degree tips. 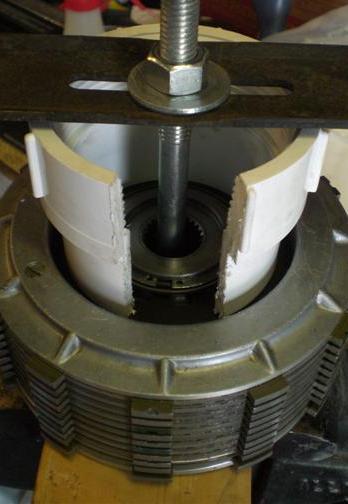 While I used an impact wrench to remove the big clutch nut, I wanted to torque the new one to the Honda spec. Here’s a simple clutch holder tool I made from another 2x4.  |
|
|
|
|
Logged
|
|
|
|
|
pancho
|
|
« Reply #9 on: August 01, 2021, 04:12:32 AM » |
|
Thanks Dave, that is the post I was thinking about. I will follow your lead in the tools compartment. I think I will pull the cover before I buy a gasket, if mine comes off the way yours did, no reason to scrape and gouge the sealing surface up removing the old one.
|
|
|
|
|
Logged
|
The most expensive things you will purchase, are those things you would not have needed if you had listened and obeyed.
|
|
|
|
Hook#3287
|
|
« Reply #10 on: August 01, 2021, 05:33:36 AM » |
|
You should be good on the gasket.
I also bought one when I replaced my revit plate back in 2005 or so.
Still sitting on the parts shelf.
|
|
|
|
|
Logged
|
|
|
|
|
Bagger John - #3785
|
|
« Reply #11 on: August 01, 2021, 05:53:58 AM » |
|
If anyone around Ohio ever gets into this situation:
I bought the Honda tools and will be glad to help turn wrenches if needed.
|
|
|
|
|
Logged
|
|
|
|
|
pancho
|
|
« Reply #12 on: August 01, 2021, 02:17:38 PM » |
|
Did you guys unstake the clutch center lock nut or just power it off and displace the material? I rather not use a grinder in there creating steel dust if I don't need to.
|
|
|
|
|
Logged
|
The most expensive things you will purchase, are those things you would not have needed if you had listened and obeyed.
|
|
|
|
The emperor has no clothes
|
|
« Reply #13 on: August 01, 2021, 02:21:46 PM » |
|
Did you guys unstake the clutch center lock nut or just power it off and displace the material? I rather not use a grinder in there creating steel dust if I don't need to.
I didn’t. I did restake it on installation. |
|
|
|
|
Logged
|
|
|
|
|
-mike-
|
|
« Reply #14 on: August 01, 2021, 11:42:09 PM » |
|
Same problem - friction plates were worn out recently. I purchased a used, low mile clutch pack for less than a set of new friction plates would cost me. 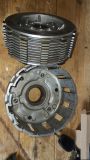 I will have no disc alignment issues, no need for the long 46mm 12-point nut or any other special tool. -mike- |
|
|
|
|
Logged
|
|
|
|
gordonv
Member

Posts: 5766
VRCC # 31419
Richmond BC
|
|
« Reply #15 on: August 02, 2021, 09:43:01 AM » |
|
I have had the "clutch rivet thing" going on for the last couple of years.
One thing I didn't see is what bike/year do you have? I think this was mostly an issue with the 97' model years? As for the stacked nut, I just removed mine with a large breaker bar. But then, I had the motor out at the time, wrecking it. So I never put it back together, it was to get to the starter gears (motor was a grenaded one, broken block). |
|
|
|
|
Logged
|
1999 Black with custom paint IS   |
|
|
|
pancho
|
|
« Reply #16 on: August 02, 2021, 05:33:26 PM » |
|
The bike is a 97 gordonv, didn't know this problem was year specific..? Had some time today and made a clutch holder tool kit out od some scrap aluminum, a piece of brass bar and some misc. hardware to remove the clutch pack. I may mill the holes oblong to be able to place the holder pins correctly for the spring removal, or may use something else like the PVC fitting Dave used. I have a press so it should fairly easy.  I removed the pipes, alternator, and several other things on the shifter side so I didn't need to work from the bottom. The bike is not even on a lift, but with everything out of the way with plenty of clearance, and a 3/4 drive ratchet and socket, the nut came off easily.  The lifter rod has wear on it and is unavailable, so I need to look into what caused that and clean it up.  I'll will disassemble the clutch pack maybe tomorrow afternoon and if there are no further surprises, I'll order some parts, doesn't look like much so far. |
|
|
|
« Last Edit: August 03, 2021, 03:59:03 PM by pancho »
|
Logged
|
The most expensive things you will purchase, are those things you would not have needed if you had listened and obeyed.
|
|
|
|
The emperor has no clothes
|
|
« Reply #17 on: August 02, 2021, 05:48:24 PM » |
|
Nice jig  I would have never thought about removing that stuff, and doing it from the side. Nice work ! |
|
|
|
|
Logged
|
|
|
|
|
pancho
|
|
« Reply #18 on: August 02, 2021, 06:14:29 PM » |
|
I got a picture in my head of pulling the bike off the lift while under it in tight quarters taking off the clutch nut, and figured a better way  |
|
|
|
|
Logged
|
The most expensive things you will purchase, are those things you would not have needed if you had listened and obeyed.
|
|
|
hubcapsc
Member
Posts: 16824
upstate
South Carolina
|
|
« Reply #19 on: August 03, 2021, 06:54:40 AM » |
|
|
|
|
|
|
Logged
|
|
|
|
|
pancho
|
|
« Reply #20 on: August 03, 2021, 03:18:52 PM » |
|
I wonder if anyone else has the same problem Mike? I'm hosting my pictures on Google, same place I have used for several years. Do none of them show or just some of them? Maybe I'm shooting them in too high of a resolution? Have you been canceled by Google? I went ahead and milled slots in the tool instead of holes so I could slide the pins and use it to compress the the clutch spring and remove the snap ring. Works like a charm.   The only damage I found is the plate B (damper plate) and the friction disk B (the one different disk). The spring is well within specs, and the plates and friction disks are like new,, guess I don't do enough burnouts,, sort of embarrassing.  So I ordered the parts I need, not many, but I did get seals as mine were warped from a time when the clutch slave leaked and had to be rebuilt, and I did buy a cover gasket although mine is good, but I am going to paint the clutch cover and the one that is on it may get damaged. I have several days to wait, so plenty of time to clean things up and detail it out. Still may get carried away and lift the bike off the motor to paint it, but that would tie things up for a couple of weeks at least, and I miss my Valk. I would like to have a spare clutch basket to stack up the clutch, not necessary but it would make it easier if I get into the habit of doing these. Anyone got a spare? |
|
|
|
« Last Edit: August 03, 2021, 04:05:06 PM by pancho »
|
Logged
|
The most expensive things you will purchase, are those things you would not have needed if you had listened and obeyed.
|
|
|
hubcapsc
Member
Posts: 16824
upstate
South Carolina
|
|
« Reply #21 on: August 03, 2021, 03:56:16 PM » |
|
I wonder if anyone else has the same problem Mike? I'm hosting my pictures on Google, same place I have used for several years. Do none of them show or just some of them?I suspect there's a button you need to press or something to obtain a sharable link... Look for "share" or some such , that's a favorite buzz word... Have you been canceled by Google?I don't know if they've gotten to me yet  -Mike
|
|
|
|
|
Logged
|
|
|
|
|
pancho
|
|
« Reply #22 on: August 03, 2021, 04:07:11 PM » |
|
I had the pictures in a private album,, forgot to move them over.
|
|
|
|
|
Logged
|
The most expensive things you will purchase, are those things you would not have needed if you had listened and obeyed.
|
|
|
|
|
|
pancho
|
|
« Reply #24 on: August 03, 2021, 04:24:19 PM » |
|
Out of curiosity, how was your plastic filter ?Seems to be just fine. All the debris was laying in the corner of the cover under it. 
|
|
|
|
|
Logged
|
The most expensive things you will purchase, are those things you would not have needed if you had listened and obeyed.
|
|
|
|
Avanti
|
|
« Reply #25 on: August 03, 2021, 07:41:41 PM » |
|
The lifter rod looks like it’s worn where it goes through the seal to the slave cylinder. Clean it up as best as you can and then flip it end to end so the good end passes through the seal.
|
|
|
|
|
Logged
|
|
|
|
|
pancho
|
|
« Reply #26 on: August 04, 2021, 04:10:11 AM » |
|
Yeah Avanti, that was the end that went into the slave. I haven't examined it closely yet to see if it is actually scratched and worn, or if it is surface buildup from the seal and dried out DOT 4. The pocket in the case was all crusted up from when the slave was leaking, I didn't clean it up at the time because of clearance issues working on it from under the bike. I will flip the rod end to end when putting it back together, a good surface on the seal, thanks.
As a side note, the damper plate is all loose and coming apart. It is not like four of the rivets came apart and the rest are good and tight. It is more like all have been moving and wearing until they finally started popping. By the time one comes apart, the assembly has been shot for some time!
|
|
|
|
« Last Edit: August 04, 2021, 04:16:51 AM by pancho »
|
Logged
|
The most expensive things you will purchase, are those things you would not have needed if you had listened and obeyed.
|
|
|
|
pancho
|
|
« Reply #27 on: August 05, 2021, 03:34:57 PM » |
|
Waiting on parts........... Took some time to clean up the bike today,, places where the sun doesn't shine.   The things you'll di when you can't ride!! Not going to pull and paint the motor at this time. After working on the clutch cover I see that it would take at least a week to prepare the motor properly to take and keep a good paint job. I think I'll wait until I get another bike. |
|
|
|
|
Logged
|
The most expensive things you will purchase, are those things you would not have needed if you had listened and obeyed.
|
|
|
|
pancho
|
|
« Reply #28 on: August 18, 2021, 11:05:20 AM » |
|
So after a problem with a received part and having to reorder from another vendor who took almost a week before they shipped, I finally received the last required part yesterday and started to reassemble my bike. I stacked up the clutch, loaded it into the basket for alignment and used springs washers and bolts to keep everything together like I saw on F6Dave's post, and locked it all together with the spring and keeper using the home made clutch tool. Smooth as silk.  Everything is going smoothly, then I notice the cable keeper on the side stand mounting bracket.  The kick stand switch wiring cannot be routed through it, so I figure it must be for either the tank vent or the carburetor drain hose. Can someone verify what belongs in this clamp? |
|
|
|
|
Logged
|
The most expensive things you will purchase, are those things you would not have needed if you had listened and obeyed.
|
|
|
|
matt
|
|
« Reply #29 on: August 18, 2021, 12:01:23 PM » |
|
Tank vent
|
|
|
|
|
Logged
|
|
|
|
|
yrunvs
|
|
« Reply #30 on: August 18, 2021, 12:05:52 PM » |
|
What matt said.
|
|
|
|
|
Logged
|
I'm no gynecologist but hey I'll take a look!
|
|
|
|
Chrisj CMA
|
|
« Reply #31 on: August 18, 2021, 12:46:59 PM » |
|
Nice work. And Pancho, I must say that is one clean bike!!
|
|
|
|
|
Logged
|
|
|
|
|
pancho
|
|
« Reply #32 on: August 18, 2021, 01:52:31 PM » |
|
Tank vent
Thanks Hey Jeff, I was thinking you might approve, but to be honest, I think under close inspection you've got me beat by a mile in that dept. |
|
|
|
|
Logged
|
The most expensive things you will purchase, are those things you would not have needed if you had listened and obeyed.
|
|
|
|
RonW
|
|
« Reply #33 on: August 18, 2021, 06:05:39 PM » |
|
|
|
|
|
|
Logged
|
2000 Valkyrie Tourer
|
|
|
|
pancho
|
|
« Reply #34 on: August 20, 2021, 05:57:51 AM » |
|
Where is that diagram/drawing from RonW? never have seen it in the manual. Got the bike assembled yesterday and went riding, sure did miss my bike. A single part order problem caused it to take 19 days total! (I didn't order all the parts from a single trusted source) I think I'm going to keep my eye open for a second bike. Thanks for all the advice and help, it was much appreciated as always.  |
|
|
|
« Last Edit: August 20, 2021, 06:01:52 AM by pancho »
|
Logged
|
The most expensive things you will purchase, are those things you would not have needed if you had listened and obeyed.
|
|
|
|
RonW
|
|
« Reply #35 on: August 21, 2021, 05:25:42 AM » |
|
That clip is on the front but obverse side of the kickstand bracket. barely seeable.   |
|
|
|
« Last Edit: August 21, 2021, 05:28:12 AM by RonW »
|
Logged
|
2000 Valkyrie Tourer
|
|
|
|


