|
H*GLEG
|
 |
« on: May 17, 2022, 08:25:07 PM » |
|
Hello everyone.
Thanks for all I have been reading.
I went Darkside on the '03.
The Avon was great for the first 7000. Not so much in the next 500.
I put a Firestone TRANSFORCE CV 195/75R16C on.
After lubricating splines, as I learned on here and getting wheel back on,
I can't get the rear caliper back together.???
I'm having trouble getting the rear pads on correctly.
The retainer clip fell out, I've replaced, but can't get pads to set on the rotor.
I've looked for help through the articles, but can't seem to find a resource.
The Honda Manual doesn't seem to address these steps for a novice.
Just looking for someone to counter-steer me in the right direction.
Thanks for any help.
Tom in Mid MO
|
|
|
|
|
 Logged
|
Shifting into 6th
|
|
|
|
sandy
|
|
« Reply #1 on: May 17, 2022, 10:25:07 PM » |
|
Mention where you live. Might be someone in your area to help in person.
|
|
|
|
|
Logged
|
|
|
|
|
H*GLEG
|
|
« Reply #2 on: May 17, 2022, 10:29:32 PM » |
|
Thanks, I'm in mid Missouri north of Hermann
|
|
|
|
|
Logged
|
Shifting into 6th
|
|
|
|
Hook#3287
|
|
« Reply #3 on: May 18, 2022, 03:50:22 AM » |
|
https://www.partzilla.com/catalog/honda/motorcycle/1998/gl1500c-a-valkyrie/rear-brake-caliperGuessing from your post, you're able to get the pads in place, but can't get them to sit right to install the pin (#15)? I believe both the retainer clip (#5) and the spring clip (#3) have tongs to hold them in place. The pad end w/o the pin hole gets installed in place first, then the end with the hole. You can try to install the left (outside) pad, then insert the pin (#15) part way, then install the right (inside) pad. You have to put some pressure on the pads to get the holes to line up.
|
|
|
|
|
Logged
|
|
|
|
|
Chrisj CMA
|
|
« Reply #4 on: May 18, 2022, 05:23:16 AM » |
|
Hello everyone.
Thanks for all I have been reading.
I went Darkside on the '03.
The Avon was great for the first 7000. Not so much in the next 500.
I put a Firestone TRANSFORCE CV 195/75R16C on.
After lubricating splines, as I learned on here and getting wheel back on,
I can't get the rear caliper back together.???
I'm having trouble getting the rear pads on correctly.
The retainer clip fell out, I've replaced, but can't get pads to set on the rotor.
I've looked for help through the articles, but can't seem to find a resource.
The Honda Manual doesn't seem to address these steps for a novice.
Just looking for someone to counter-steer me in the right direction.
Thanks for any help.
Tom in Mid MO
Pictures will help |
|
|
|
|
Logged
|
|
|
|
|
H*GLEG
|
|
« Reply #5 on: May 18, 2022, 07:23:53 AM » |
|
Great Ty that helps, I try to get a pic later, I only had the high resolution and will need to edit pics to uplad.
|
|
|
|
|
Logged
|
Shifting into 6th
|
|
|
|
..
|
|
« Reply #6 on: May 18, 2022, 07:52:14 AM » |
|
Great Ty that helps, I try to get a pic later, I only had the high resolution and will need to edit pics to uplad.
https://postimages.org/Create an account using the SIGN UP box top right. Create a new gallery by clicking on the box towards the top left Upload photos. Do a max of up to 15 at a time or it can take too long. Once uploaded put your cursor on the image you want to put on the VRCC forum Now move your cursor to the symbol to left of the trash bin symbol Click on it Now copy the "Hotlink" for forums. Now go to the VRCC post you want the photo to appear in and right click and paste. Once you then post your comment the photo should appear for all to see. |
|
|
|
|
Logged
|
|
|
|
|
Chrisj CMA
|
|
« Reply #7 on: May 18, 2022, 09:01:23 AM » |
|
Great Ty that helps, I try to get a pic later, I only had the high resolution and will need to edit pics to
Resizing destroys the quality. Just get a hosting site like postimage  |
|
|
|
|
Logged
|
|
|
|
|
H*GLEG
|
|
« Reply #8 on: May 18, 2022, 03:19:47 PM » |
|
here are a few pictures of where im at.
|
|
|
|
|
Logged
|
Shifting into 6th
|
|
|
|
Chrisj CMA
|
|
« Reply #9 on: May 18, 2022, 04:38:22 PM » |
|
Ya. People seem to have trouble anytime the caliper is removed from the caliper plate. For future reference….there is never a reason to separate them. It’s easier to change the brakes when the wheel is off. It’s a little harder but you can change the pads with the caliper on the bike on the plate
|
|
|
|
|
Logged
|
|
|
|
|
Chrisj CMA
|
|
« Reply #10 on: May 18, 2022, 04:40:14 PM » |
|
here are a few pictures of where im at.
At this point. Take the pads out. Remount the caliper to the caliper plate after compressing the pistons and then install the pads after the caliper is reconnected fully PS. I notice the rear spring that hold the rear of the pads appears to be missing. You can re install that spring once the pads are out. |
|
|
|
« Last Edit: May 18, 2022, 05:44:17 PM by Chrisj CMA »
|
Logged
|
|
|
|
|
H*GLEG
|
|
« Reply #11 on: May 18, 2022, 08:31:29 PM » |
|
Ya. People seem to have trouble anytime the caliper is removed from the caliper plate. For future reference….there is never a reason to separate them. It’s easier to change the brakes when the wheel is off. It’s a little harder but you can change the pads with the caliper on the bike on the plate
One of those lessons you only need to learn once  |
|
|
|
« Last Edit: May 18, 2022, 09:59:40 PM by H*GLEG »
|
Logged
|
Shifting into 6th
|
|
|
|
H*GLEG
|
|
« Reply #12 on: May 18, 2022, 08:36:40 PM » |
|
here are a few pictures of where im at.
At this point. Take the pads out. Remount the caliper to the caliper plate after compressing the pistons and then install the pads after the caliper is reconnected fully PS. I notice the rear spring that hold the rear of the pads appears to be missing. You can re install that spring once the pads are out. Thank you. I'm going to figure this out. Appreciate everyone's help above |
|
|
|
|
Logged
|
Shifting into 6th
|
|
|
|
H*GLEG
|
|
« Reply #13 on: May 18, 2022, 09:50:09 PM » |
|
Can you tell me the "spring" part number? 12?
|
|
|
|
|
Logged
|
Shifting into 6th
|
|
|
|
H*GLEG
|
|
« Reply #14 on: May 18, 2022, 09:52:28 PM » |
|
one more post of pics
|
|
|
|
|
Logged
|
Shifting into 6th
|
|
|
|
RonW
|
|
« Reply #15 on: May 18, 2022, 10:07:28 PM » |
|
The spring pad should look like this if it's installed. Try look at the front brakes from the same vantage point.  *The spring pad doesn't appear to be there in your photo. MIA.  |
|
|
|
« Last Edit: May 18, 2022, 10:09:18 PM by RonW »
|
Logged
|
2000 Valkyrie Tourer
|
|
|
|
H*GLEG
|
|
« Reply #16 on: May 18, 2022, 10:50:00 PM » |
|
Ahh Ha. I was putting it inside underneath the pads.
|
|
|
|
|
Logged
|
Shifting into 6th
|
|
|
|
H*GLEG
|
|
« Reply #17 on: May 19, 2022, 05:01:39 PM » |
|
Tried and cant get part 6 loose. (to take pads off)
How do you get part 2 (pads) into part 5 ? Do they snap in?
|
|
|
|
« Last Edit: May 19, 2022, 05:04:21 PM by H*GLEG »
|
Logged
|
Shifting into 6th
|
|
|
|
Chrisj CMA
|
|
« Reply #18 on: May 19, 2022, 05:49:24 PM » |
|
Tried and cant get part 6 loose. (to take pads off)
How do you get part 2 (pads) into part 5 ? Do they snap in?
You need a large correctly fitting screwdriver that fills that slot or you can easily buggar up that plug. The pads don’t snap into that brass spring #5 they just rest their feet in the center of it |
|
|
|
|
Logged
|
|
|
|
|
H*GLEG
|
|
« Reply #19 on: May 19, 2022, 08:06:40 PM » |
|
Thank you Sir you are most helpful.
So i need to get it mounted back to the caliper braket from the front first and get the other bolt mounted towards the back.
Thanks for your time and patience.
|
|
|
|
|
Logged
|
Shifting into 6th
|
|
|
|
RonW
|
|
« Reply #20 on: May 19, 2022, 10:11:23 PM » |
|
The front retainer (5) usually remains in its notch in the caliper after you pull out the brake pads. If it does fall out of the caliper then you gotta figure which is the top and bottom in addition to which orientation is the front vrs. its back side. As Chrisj CMA advised, use the proper screwdriver to remove Plug 14. Myself, I invested in a extra wide flathead screwdriver because if you screw up the slot on the plug, it's a massive disaster. The plug can get frozen in place and anything other than an extra wide flathead screwdriver won't get it out. Also, the same screwdriver will be useful when replacing the front brake pads too. Brake and clutch levers too if I'm not getting my bikes mixed up. It's a good idea to dab anti-seize etc. on the plug on reassembly. I use medium strength loctite since I'm worried about the plug falling off. I believe the loctite has anti-seize properties at least for the plug. A missing plug won't affect the operation of the brake caliper, but the plug protects the allen head recess on Pin 15 which is like a 6mm easy to round off if it's exposed to the weather long term and gets corrosion. I'm sure the plug is there for a reason. It's on most bikes.  The front retainer captures the foot of the brake pad (Part X) if that makes any sense.  |
|
|
|
« Last Edit: May 20, 2022, 01:40:46 PM by RonW »
|
Logged
|
2000 Valkyrie Tourer
|
|
|
hubcapsc
Member

Posts: 16817
upstate
South Carolina
|
|
« Reply #21 on: May 20, 2022, 04:42:59 AM » |
|
The cap and the pin need to be carefully and solidly gone after to keep either from getting buggered up. Putting these parts back with some anti-seize is good advice  ... 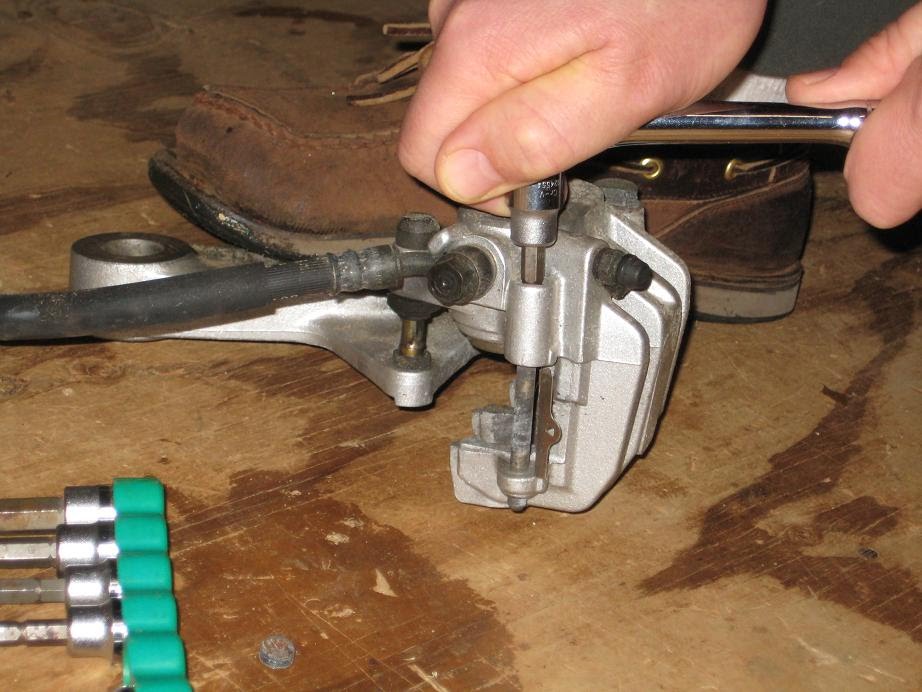 -Mike |
|
|
|
|
Logged
|
|
|
|
|
H*GLEG
|
|
« Reply #22 on: May 20, 2022, 07:53:04 PM » |
|
The original owner was meticulous at lovin this bike. I'm striving to be, I know he used Loctite on every critical part.
I'll find my best screwdriver, and get another if that's not a proper fit.I have new pads might as well put those on too. Even though old ones are fine.
Thanks again guys.
|
|
|
|
|
Logged
|
Shifting into 6th
|
|
|
|
RonW
|
|
« Reply #23 on: May 20, 2022, 11:08:08 PM » |
|
While you're at it, you might put anti-seize etc on the stopper pin. The manual specifies 51-ft lbs torque, but some members said it doesn't have to be nearly that tight and may even contribute to the stopper pin seizing.  |
|
|
|
« Last Edit: May 20, 2022, 11:25:18 PM by RonW »
|
Logged
|
2000 Valkyrie Tourer
|
|
|
|
Chrisj CMA
|
|
« Reply #24 on: May 21, 2022, 03:59:21 AM » |
|
The original owner was meticulous at lovin this bike. I'm striving to be, I know he used Loctite on every critical part.
I'll find my best screwdriver, and get another if that's not a proper fit.I have new pads might as well put those on too. Even though old ones are fine.
Thanks again guys.
Also if the caliper is removed from the plate and you are holding it one hand and using the screwdriver with the other that is a severe handicap. If it’s back on the caliber plate it will be much easier to deal with. Give the screwdriver a tap with a small hammer and then press into it while turning to break it free |
|
|
|
|
Logged
|
|
|
|
|
H*GLEG
|
|
« Reply #25 on: May 21, 2022, 11:23:45 AM » |
|
Thanks again guys
|
|
|
|
|
Logged
|
Shifting into 6th
|
|
|
|
H*GLEG
|
|
« Reply #26 on: May 21, 2022, 01:48:33 PM » |
|
Im at remove rear caliper. So I can get a good handle on that plug. Good thing its raining hard...
|
|
|
|
|
Logged
|
Shifting into 6th
|
|
|
Valker
Member
Posts: 3051
Wahoo!!!!
Texas Panhandle
|
|
« Reply #27 on: May 21, 2022, 02:12:19 PM » |
|
The screwdriver is actually a JIS size rather than an US size. That just works better.
|
|
|
|
|
Logged
|
I ride a motorcycle because nothing transports me as quickly from where I am to who I am.
|
|
|
|
Chrisj CMA
|
|
« Reply #28 on: May 21, 2022, 03:13:18 PM » |
|
Im at remove rear caliper. So I can get a good handle on that plug. Good thing its raining hard...
What exactly are you trying to accomplish? Seems you are doing whatever you are doing the hardest way possible |
|
|
|
|
Logged
|
|
|
|
|
Chrisj CMA
|
|
« Reply #29 on: May 21, 2022, 03:47:06 PM » |
|
The screwdriver is actually a JIS size rather than an US size. That just works better.
I took a very large blade screwdriver and ground it down with parallel sides very carefully so it’s a solid fit. It takes out even stubborn plugs others struggled with |
|
|
|
|
Logged
|
|
|
|
|
Avanti
|
|
« Reply #30 on: May 21, 2022, 04:34:25 PM » |
|
The screwdriver is actually a JIS size rather than an US size. That just works better.
Yes, fitting the drive head to the screw slot is very important. It makes a great deal of difference. I took a very large blade screwdriver and ground it down with parallel sides very carefully so it’s a solid fit. It takes out even stubborn plugs others struggled with |
|
|
|
|
Logged
|
|
|
|
|
H*GLEG
|
|
« Reply #31 on: May 21, 2022, 06:16:54 PM » |
|
I'm definitely doing it the hard way.
I heard take off, to get ahold of the plug and didn't want to strip it out. I have JIS striker type in Phillips style, but thats not a fit. I should be able to break it loose. manual says 1.8 ft lbs.
since these wrists were disassembled many years ago, simple tasks are now a challenge.
Managed to get new red eye bushings replaced in shocks.
But that's about the only success.
|
|
|
|
« Last Edit: May 21, 2022, 06:19:06 PM by H*GLEG »
|
Logged
|
Shifting into 6th
|
|
|
|
Chrisj CMA
|
|
« Reply #32 on: May 21, 2022, 06:24:09 PM » |
|
I'm definitely doing it the hard way.
I heard take off, to get ahold of the plug and didn't want to strip it out. I have JIS striker type in Phillips style, but thats not a fit. I should be able to break it loose. manual says 1.8 ft lbs.
since these wrists were disassembled many years ago, simple tasks are now a challenge.
Managed to get new red eye bushings replaced in shocks.
But that's about the only success.
That’s unfortunate. Leave on to make it easier to break the cap/plug loose |
|
|
|
|
Logged
|
|
|
|
|
RonW
|
|
« Reply #33 on: May 21, 2022, 06:43:41 PM » |
|
I don't know on doing it with a bad wrists but if the plug is seized it's easier to break the plug loose with the caliper still on the bike, as already stated. The Valk is an even heavier bike with your wrists, awesome though. Talking about leaving the caliper on the bike, a lot of dealerships don't remove the caliper to change brake pads. Just pull out the pin and shove in new brake pads. The problem with this is they skip the step of cleaning off the pistons rings. Thicker new pads will retract the pistons deeper into their bores, and the grit and loosened grit particles might damage the seals and cause a leak.   |
|
|
|
« Last Edit: May 22, 2022, 06:35:07 PM by RonW »
|
Logged
|
2000 Valkyrie Tourer
|
|
|
|
Chrisj CMA
|
|
« Reply #34 on: May 21, 2022, 07:26:29 PM » |
|
The problem with this is they skip the step of cleaning off the piston How I clean them before compressing them while the caliper is still on the bike. I take a piece of parachord or a shoelace dipped in brake fluid , wrap it one complete time around each piston one at a time and pul it back and forth. The chord does a great job shining up dirty pistons |
|
|
|
|
Logged
|
|
|
|
|
H*GLEG
|
|
« Reply #35 on: May 21, 2022, 08:11:26 PM » |
|
Ok leaving them on, will secure the caliper and attempt to break plug loose.
|
|
|
|
|
Logged
|
Shifting into 6th
|
|
|
|
RonW
|
|
« Reply #36 on: May 21, 2022, 08:38:31 PM » |
|
The problem with this is they skip the step of cleaning off the piston How I clean them before compressing them while the caliper is still on the bike. I take a piece of parachord or a shoelace dipped in brake fluid ..... I use shoe laces [with the calipers off]. I do extend the piston outta their bores though by squeezing the brake lever using the paint stick trick so the piston's don't end at in the neighbors' yard. |
|
|
|
« Last Edit: May 21, 2022, 08:52:03 PM by RonW »
|
Logged
|
2000 Valkyrie Tourer
|
|
|
|
Jess from VA
|
|
« Reply #37 on: May 21, 2022, 08:54:40 PM » |
|
On the pistons and whole brake assembly, I use gun bore solvent and (my older well used) brass/stainless bore brushes in a GI steel pistol rod. Works great.   Don't scrub the pads. |
|
|
|
« Last Edit: May 21, 2022, 08:57:57 PM by Jess from VA »
|
Logged
|
|
|
|
|
H*GLEG
|
|
« Reply #38 on: May 21, 2022, 09:20:51 PM » |
|
Cleaning the HoGLEG with gun cleaner, I like it. I used some G96 on a few parts.
|
|
|
|
|
Logged
|
Shifting into 6th
|
|
|
|
H*GLEG
|
|
« Reply #39 on: May 23, 2022, 12:54:31 PM » |
|
On the Road Again, thanks guys we got it together. Rides Great! |
|
|
|
|
Logged
|
Shifting into 6th
|
|
|
|


