|
carolinarider09
|
 |
« on: July 29, 2023, 01:48:09 PM » |
|
I am in the process of putting an enclosed sump pump in my crawlspace. Pump is installed in a basin below the crawlspace ground level. It's located about four feet from the brick curtain wall that encloses the crawlspace.
I need to drill a 1 1/2" hole in the brick curtain wall just a little above ground level. I have a Rigid 3/8" hammer drill but it will not provided the impact and energy needed to drill the hole with the Bosch Drill bit I have found (not yet purchased). Also, the 1 1/2" bit has a different "spline" arrangement.
So, I am going to have to rent the drill and bit. I found one about 25 miles away.
My question, is there any reason that I should attempt to drill a "pilot" hole in the curtain wall with the hammer drill and 5/8" bit I do have? Sort of like seeing how it all works..... Maybe making the work for drilling the 1 1/2" hole easier.
It has been some time since I have used the Rigid 3/8" Hammer Drill.
Is there anything else I should be concerned about.
|
|
|
|
|
 Logged
|
|
|
|
Rams
Member

Posts: 16936
So many colors to choose from yet so few stand out
Covington, TN
|
|
« Reply #1 on: July 29, 2023, 04:45:37 PM » |
|
While I do have some experience with such tools, it's been a very long time since I did that kind of thing. The contractor I worked for at the time never had us drill pilot holes but, I don't believe it would be an issue and I do think it would make the job a bit (no pun intended) easier. if you do drill the pilot hole, I'd be careful to follow the same path.
I assume this is a block stem wall you're drilling through. If so, caution should be excercised as to precisely where the hole is drilled, we were never allowed to drill near the block joint nor the center of the block where the center is also the complete brick structural part. Sorry, it's been too long and I don't remember all the terms.
Renting equipment like this for specific tasks is the way to go IMHO. If something breaks just take it back and get another whatever. Good luck and enjoy the project. I'm through crawling around in crawl spaces. Had to do a similar project in my last house, digging that hole for the sump pump was a bitch.
Edited: Be sure to pump that water well away from the house foundation (preferably down hill away from the house), you don't want it draining back into the crawlspace.
Rams
|
|
|
|
« Last Edit: July 29, 2023, 04:48:40 PM by Rams »
|
Logged
|
VRCC# 29981
Learning the majority of life's lessons the hard way.
Every trip is an adventure, enjoy it while it lasts.
|
|
|
|
Jess from VA
|
|
« Reply #2 on: July 29, 2023, 05:26:42 PM » |
|
Given my recent experiences, my first thought was...are there bees, bugs or snakes under there?
I bet if you do some googling, you can find a good Utube or two about that project.
|
|
|
|
|
Logged
|
|
|
|
|
carolinarider09
|
|
« Reply #3 on: July 29, 2023, 06:24:22 PM » |
|
if you do drill the pilot hole, I'd be careful to follow the same path.  I assume this is a block stem wall you're drilling through. If so, caution should be excercised as to precisely where the hole is drilled, we were never allowed to drill near the block joint nor the center of the block where the center is also the complete brick structural part. Sorry, it's been too long and I don't remember all the terms. I assume block stem is a wall of concrete blocks. So, in this case it's just the brick wall that curtains off the underside of the house, between each concert block support pillar (whatever the name is). So the hole will only be through one normal sized brick, the narrower part. Renting equipment like this for specific tasks is the way to go IMHO. If something breaks just take it back and get another whatever. Good luck and enjoy the project. I'm through crawling around in crawl spaces. Had to do a similar project in my last house, digging that hole for the sump pump was a bitch. Edited: Be sure to pump that water well away from the house foundation (preferably down hill away from the house), you don't want it draining back into the crawlspace. Oh yes. The line will exit the house at a low point (probably the lowest but I have never really checked) and will be directed down and away from the foundation/curtain wall some 10 feet or so. It will then probably join another line that drains water from the roof down spouts.Rams Given my recent experiences, my first thought was...are there bees, bugs or snakes under there?
I bet if you do some googling, you can find a good Utube or two about that project.
I will look at Youtube. Have not done that yet for the hole but did for the sump pump. No bees or bugs or snakes. It is actually well sealed just has water entering on a "low" corner at the back. My believe is that when they ran the power line into the house (underground) they cut the pipes that were placed around that part of the house to drain the water away. I finally located the source to be in that general vicinity. On the soil is very heavy clay. Little loose stuff on top but if you did down past about six or eight inches you hit real tough clay.
Thank you both for your comments and feedback. |
|
|
|
|
Logged
|
|
|
|
|
Jersey mike
|
|
« Reply #4 on: July 30, 2023, 04:28:48 AM » |
|
For finish purposes, meaning the exterior part of your concrete block wall and the finished look, it might be best to drill from the outside in.
When drilling like this happens, as you near the end of the wall you can get what some call blowout when the pressure of the drilling breaks apart the surface area surrounding the hole you are drilling and the concrete crumbles away leaving a divot surrounding the hole. This will cause you to have to resurface the exterior part of the foundation which may or may not grab new cement to finish it off.
Most concrete block walls…foundations are hollow in the center which is why many basements flood or get wet, water seeps in and builds up inside the hollows. The spaces in the concrete block are left open for the most part. The only thing usually poured concrete is the footer…what the concrete block basically sits on.
Some good measuring and a long 1/4” bit and pilot hole will allow you to drill through the concrete block to get a good view of where your hole(s) will align. The hard part is keeping them in the same line so yiur piping goes out straight, not angled or pointing in directions that aren’t what you need. There might be a weatherproof escutcheon (a finish trim ring that fits over the pipe) that will allow you to open up hole a little if your alignment is off some.
If your only drilling a 1-1/2” hole, you could drill several 1/4” holes around the perimeter of your 1-1/2” area and clean it up with the larger bit.
One thing I’ve seen around here for discharge pipes like this is people tend to forget about them over time and grass, leaves, mulch and critters will make use of the empty hole causing it to clog and be an issue when pumping is very necessary.
|
|
|
|
|
Logged
|
|
|
|
|
Jess from VA
|
|
« Reply #5 on: July 30, 2023, 05:05:05 AM » |
|
On the soil is very heavy clay. Little loose stuff on top but if you did down past about six or eight inches you hit real tough clay.
I have about a quarter inch of top, then hard clay and mostly root bound. Digging anywhere is hard work and requires an axe and digging bar.
30 years ago, I trenched to bury my sump pump drain (which was nothing but a 10 foot PVC pipe laying on the ground of my backyard, causing an eroded water ditch). I should have used more PVC pipe but used a flexible corrugated tube (cheap bastard that I am). Then built a large deck over the trenched tube. Years later, I can find no water comes out the end of that tube (down at the end of the yard) when the pump is working. I can also find no place where water seems to be percolating up from a broken or collapsed drain tube. I have no idea where the water goes. The pump has been replaced several times, and is working fine, but I worry it is pumping against resistance of a collapsed drain tube. The last thing I feel like doing is re-digging the trench outside my deck to find the drain tube, and follow it until I find a break/collapse. If my sump pump blows up, I may have to.
|
|
|
|
|
Logged
|
|
|
|
|
Jersey mike
|
|
« Reply #6 on: July 30, 2023, 06:05:58 AM » |
|
At the discharge side, it’s better to be a little high than a little low. A inch or two too high will not affect the pumping of water for a good sump pump. This will allow you to determine the pitch of the drain piping. Check your grading and have a plan if you’re burying the pipe before deciding on where you want to drill the discharge pipe.
A pitch of 3/8” - 1/2” on 8’ (1/4” on 4’) is more than sufficient for water to just flow on its own once it clears the rise of the crawl space.
|
|
|
|
« Last Edit: July 30, 2023, 06:30:44 AM by Jersey mike »
|
Logged
|
|
|
|
|
carolinarider09
|
|
« Reply #7 on: July 30, 2023, 06:33:08 AM » |
|
On the soil is very heavy clay. Little loose stuff on top but if you did down past about six or eight inches you hit real tough clay.
I have about a quarter inch of top, then hard clay and mostly root bound. Digging anywhere is hard work and requires an axe and digging bar.
30 years ago, I trenched to bury my sump pump drain (which was nothing but a 10 foot PVC pipe laying on the ground of my backyard, causing an eroded water ditch). I should have used more PVC pipe but used a flexible corrugated tube (cheap bastard that I am). Then built a large deck over the trenched tube. Years later, I can find no water comes out the end of that tube (down at the end of the yard) when the pump is working. I can also find no place where water seems to be percolating up from a broken or collapsed drain tube. I have no idea where the water goes. The pump has been replaced several times, and is working fine, but I worry it is pumping against resistance of a collapsed drain tube. The last thing I feel like doing is re-digging the trench outside my deck to find the drain tube, and follow it until I find a break/collapse. If my sump pump blows up, I may have to.
I have used the same corrugated "pipe" for drains from the roof rain gutters and it is the same as what I used around the house for drainage. I have not noticed any collapses. I do have several "end points" that show me water flow before entering a rock filled drain field. Having said all that, if I were concerned about the pipe collapse, I would consider running one of this metal tape things down the pipe and see how far it goes. Yes, if the pipe is corrugated the round end of the tape might become trapped, but.... It would be a cheap and easy way to start the process of checking. And you do have access to the end point. I have used the metal tape thing to run cables through PVC pipe for antennas and other things. |
|
|
|
|
Logged
|
|
|
|
h13man
Member
Posts: 1904
To everything there is an exception.
Indiana NW Central Flatlands
|
|
« Reply #8 on: July 30, 2023, 07:33:41 AM » |
|
I would use a pilot drill no bigger than 1/4" if the next drill is going to be the finish size drill. I would drill from the the brick side as a exploratory drilling to see where it comes out on the outside. I would use a deep diamond grit hole saw thus you can use the pilot hole from both sides to get a better finish. Hammer drill will likely be a worse finish as the block and brick will be vertical/non supported. Regardless the final height of drain, be sure to have a little tilt downward for full drain of exit pipe.
|
|
|
|
|
Logged
|
|
|
|
Rams
Member
Posts: 16936
So many colors to choose from yet so few stand out
Covington, TN
|
|
« Reply #9 on: July 30, 2023, 07:47:34 AM » |
|
I would use a pilot drill no bigger than 1/4" if the next drill is going to be the finish size drill. I would drill from the the brick side as a exploratory drilling to see where it comes out on the outside. I would use a deep diamond grit hole saw thus you can use the pilot hole from both sides to get a better finish. Hammer drill will likely be a worse finish as the block and brick will be vertical/non supported. Regardless the final height of drain, be sure to have a little tilt downward for full drain of exit pipe.
Good advice. Rams |
|
|
|
|
Logged
|
VRCC# 29981
Learning the majority of life's lessons the hard way.
Every trip is an adventure, enjoy it while it lasts.
|
|
|
|
Jersey mike
|
|
« Reply #10 on: July 30, 2023, 07:47:43 AM » |
|
I would use a pilot drill no bigger than 1/4" if the next drill is going to be the finish size drill. I would drill from the the brick side as a exploratory drilling to see where it comes out on the outside. I would use a deep diamond grit hole saw thus you can use the pilot hole from both sides to get a better finish. Hammer drill will likely be a worse finish as the block and brick will be vertical/non supported. Regardless the final height of drain, be sure to have a little tilt downward for full drain of exit pipe.
“ Regardless the final height of drain, be sure to have a little tilt downward for full drain of exit pipe.” That’s a good one. And don’t forget a check valve and have an extra on hand if you ever need to do a quick repair/replacement. |
|
|
|
|
Logged
|
|
|
|
|
carolinarider09
|
|
« Reply #11 on: July 30, 2023, 12:09:50 PM » |
|
I would use a pilot drill no bigger than 1/4" if the next drill is going to be the finish size drill. I would drill from the the brick side as a exploratory drilling to see where it comes out on the outside. I would use a deep diamond grit hole saw thus you can use the pilot hole from both sides to get a better finish. Hammer drill will likely be a worse finish as the block and brick will be vertical/non supported. Regardless the final height of drain, be sure to have a little tilt downward for full drain of exit pipe.
Understood. Will have to look and see what I have in stock. I had wondered about the difference between the "impact" drilling method and using the diamond hole saw. I assume that the diamond hole saw can be used with a not impact/hammer drill. Actually I would prefer the diamond method but the hole saws I saw were not big enough to penetrate the entire brick's depth. When thinking about the pilot hole I did not compute the ability to use the diamond hole saw. I will try and make the outlet down hill. Might not be doable but, the sump pump pumps directly out of the sump in a vertical (up) direction for about three feet (check valve is in that line). Then goes about four feet horizontally toward the curtain wall. Then about three feet down to where it would penetrate the curtain wall at or near ground level. and then exits. So, nothing should ever be able to enter the system for more than a few inches but.... I can get a 1 3/8" diamond hole saw which has a slot for core removal. It's only 1 1/8" deep so there is no way I could do it without doing it from both sides and stopping several times for core removal. But that being said, it's cheaper than the other method and I have all the tools (except the two drill bits) to complete task. Saving about $50. The one I see on Lowes, does not have a central bit... So... will have to look and see about centering. That would be the only concern, centering the drilling activity on both sides of the curtain wall. |
|
|
|
|
Logged
|
|
|
|
|
carolinarider09
|
|
« Reply #12 on: July 30, 2023, 12:15:48 PM » |
|
And don’t forget a check valve and have an extra on hand if you ever need to do a quick repair/replacement.
Funny thing about the check valve. I bought the basin from a place called the "Crawlspace Depot" in or near Greensboro, NC. Bought the basin to verify it would fit and then purchased a check valve locally when I was looking at sump pumps. Decided on the pump I needed but local store did not have one in stock so I purchased one from the Crawlspace Depot. However, by accident they sent me a package (pump basin, pump, and check valve). So, like a good citizen, I called and told them what happened but told them I wanted the Check valve and did not need the basin. I paid for the check valve and they paid shipping back for the basin. So, by chance, I have a spare check valve. The pump is a Zoeller Model 53 Submersible Sump Pump. |
|
|
|
|
Logged
|
|
|
|
|
carolinarider09
|
|
« Reply #13 on: July 31, 2023, 10:38:03 AM » |
|
After doing some more research and trying to find a suitable "drill thing (bit)" I am going to go into town tomorrow and see what I can rent. Cost will probably be in the $80 - $100. I am going to ask them for some specific stuff, like the diamond coated core drill bits I have seen on several YouTube videos. I liked this one where he drills through the block and rebar. We shall see. https://youtu.be/CFrDj8pXMIc |
|
|
|
|
Logged
|
|
|
|
|
carolinarider09
|
|
« Reply #14 on: August 01, 2023, 05:29:52 PM » |
|
Ok, today I made the decision and went to a local rental place. They did not have the drill bit I needed (did not want an impact bit). The lady suggested I visit another of their stores in the area. Not too much further from home. What I found interesting in the second store was the size of the store, well at least the interior. I expected a bigger store front. But then the other store was the same. Just surprised. However the gentlemen behind the counter was spot on and he knew what I needed, went to the shelf just a couple of feet away and showed me the drill bit. Next he showed me the drill . Rental for a 24 hour periods was about $120. I left the store and started my drive home (about 30 miles). As I traveled along I considered all my options. About 10 miles into the return trip, I turned around and went back to the store and did the rental. The picture below is the drill with bit and handle.  And the drilling results.   Here is the core drilled out. I was surprised by the size of the holes in the brick.  The drill was not hard to use but force was required to cause the drilling to take place. And water was also required. That was easier than I expected since the water attachment had a little shutoff valve and the flow was restricted. So water was used but not a real gusher. After drilling was done, I got cleaned up (it was hot and humid outside) and then took the drill back to the rental place. All and all it was a very satisfying experience. Oh, I wanted a 1 1/2" hole but the smallest drill they had was 2.0 ". Also, I drilled from the outside because it was much easier to do the pushing. I had marked the location by counting bricks on the inside (left to right) and had decided that 2 1/2 bricks was the distance from the access point. I was off by about three inches. But since the outlet piping is suspended from the floor joists it can be moved with no issues to fit into the hole. It has not been fully glued (joints) I will finish that up tomorrow. Once that is done, I will seal the hole with silicon "stuff" and finish the drain stone around the pump basin. Next is to power the pump from the crawl space 120 VAC. That is only an issue due to the number of connections I have in one of the "boxes". Don't know if I can wrap another wire in that bundle. |
|
|
|
|
Logged
|
|
|
|
|
Jess from VA
|
|
« Reply #15 on: August 01, 2023, 06:14:18 PM » |
|
Nice work. The pics remind me I went to the dentist today.  |
|
|
|
|
Logged
|
|
|
|
|
carolinarider09
|
|
« Reply #16 on: August 02, 2023, 04:19:10 PM » |
|
Today, I got the sump pump discharge piping 99% installed. It is installed enough so that it can be used. I also got the temporary power setup. Permanent power will be from the crawlspace power source but I need a second person here to turn the system on and off and just in case something strange happens. Never can tell with what we, in the U. S. Navy called the "Deadly Shipmate" (see last link for YouTube Video we watched in the U. S. Navy). This is where the pump discharge pipe exits the brick curtain wall. 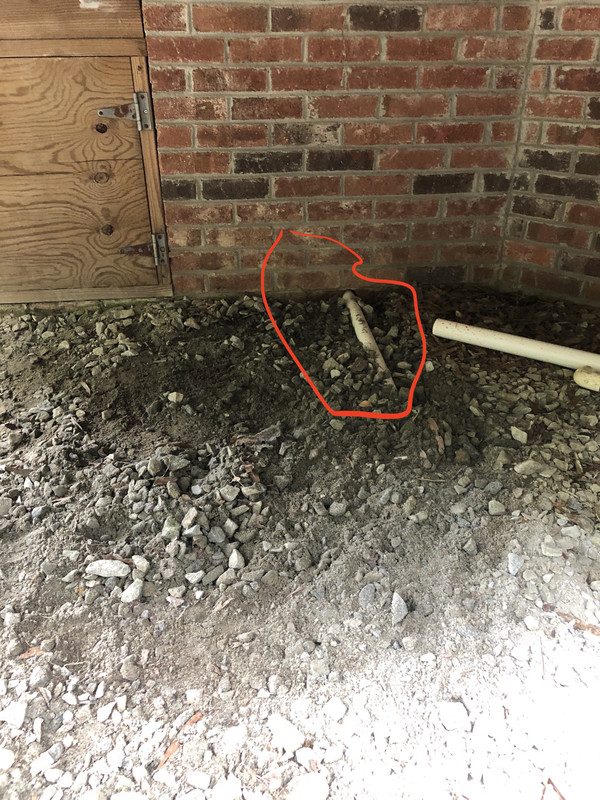 This shows the route of the discharge piping as it exits the deck area and heads away from the building foundation.  This shows I did not purchase enough 1 1/4" PVC piping. But the discharge is out of the foundation area and headed to a drain that is already in place. And yes, the piping is all downhill is verified by a level on the pipe where it exists the curtain wall and where it exits from under the porch.  A view from above that shows the future path of the discharge pipe. How will interface with the "drain" system is not yet known. Still in the works. 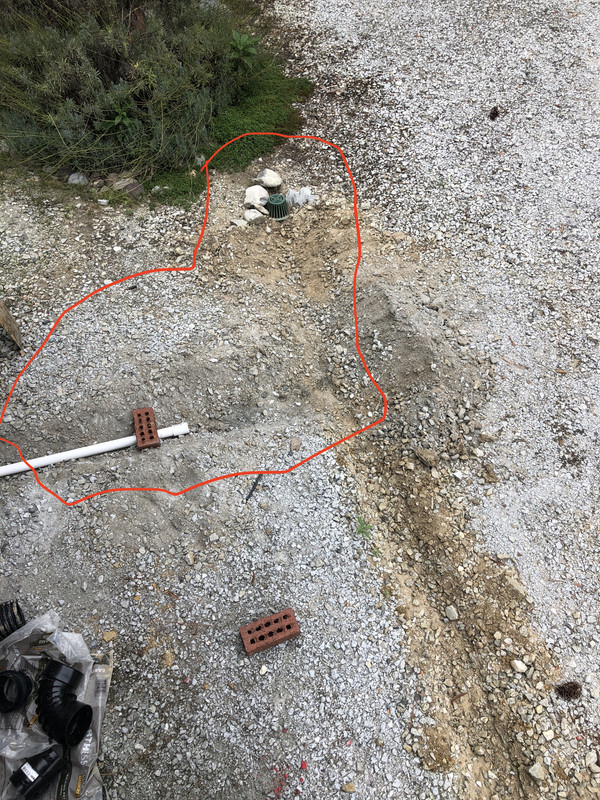 Oh, this is the power cord I installed that will allow me to power the pump from an outside outlet. It uses the same power path under the house as will be used in the future, just right now it is connected to this power line with a 110 VAC male plug.  The link to the YouTube video of the "Deadly Shipmate". https://youtu.be/JQlfWrqDLeEAnd the comments are mostly from those who were there. |
|
|
|
|
Logged
|
|
|
|
|
Jess from VA
|
|
« Reply #17 on: August 02, 2023, 04:53:39 PM » |
|
Nice work. I only dig with pointed shovels, the flat one is only for snow or if I'm scraping a flat for some reason. Flat shovels don't dig for spit (in hard ground). I suppose you could tie the sump drain right into the existing yard drain. But it seems to me all you need to do is dig out a doughnut around the existing drain, say about 12-18 inches deep, and fill it with big stone (dry-well like), and run the sump drain into the drywell of stone (water collector). That way, if some problem develops you don't have to tear a direct coupling of the two apart. Also, I'd cover the drywell of big stone with weed block to keep dirt/silt from filling in your drywell, then cover the weedblock with gravel (to hold it down). If that PVC is only just below surface, you might want to mark the path a bit so you don't do anything heavy on top of it by mistake. Good thing I don't live down there or I'd come over to help. |
|
|
|
|
Logged
|
|
|
|
|
carolinarider09
|
|
« Reply #18 on: August 02, 2023, 05:31:38 PM » |
|
Nice work. I only dig with pointed shovels, the flat one is only for snow or if I'm scraping a flat for some reason. Flat shovels don't dig for spit (in hard ground). I suppose you could tie the sump drain right into the existing yard drain. But it seems to me all you need to do is dig out a doughnut around the existing drain, say about 12-18 inches deep, and fill it with big stone (dry-well like), and run the sump drain into the drywell of stone (water collector). That way, if some problem develops you don't have to tear a direct coupling of the two apart. Also, I'd cover the drywell of big stone with weed block to keep dirt/silt from filling in your drywell, then cover the weedblock with gravel (to hold it down). If that PVC is only just below surface, you might want to mark the path a bit so you don't do anything heavy on top of it by mistake. Good thing I don't live down there or I'd come over to help. Jess some good suggestions and I will strongly consider the "drywall" option. Had not considered it. And yes, I did think about the PVC being close to the surface as a "negative" Will see if I can find a way to mark it. Thanks. Now I just need some water in the sump basin in the crawlspace to see if it works. And no, I don't really need that. It's like I could do the work and prevents the whole event. Not likely but.... We have not had rain here for several weeks maybe longer. |
|
|
|
|
Logged
|
|
|
|
|
carolinarider09
|
|
« Reply #19 on: August 04, 2023, 04:18:37 PM » |
|
Routing for the sump pump discharge line has been completed. It will join the drain that connects to the drain for the roof gutter downspouts.   This shows the final connection and setup of the piping. A hole was drilled in the "collector" and the PVC discharge pipe connected there and silicone cement was used to try and make a seal. The pipe will be under "ground level" so that it will not be in plain site.  |
|
|
|
|
Logged
|
|
|
|
|


