|
RUDE DOG - Steelers
|
 |
« on: April 01, 2009, 09:16:36 PM » |
|
I am adding some billet mini spot lights to my Valk. The previous owner has a toggle switch on the top of the headlight that was used for 4 inch round fog lights. They were not on the bike when I got it. I want to hook my lights up to that toggle. It looks like he just ran a wire directly to the battery and the toggle to the lights. Is that the correct way to do it. I did go to Chets site about hooking up lights and he shows several ways to do it. I think I would like to just have them on and off by the toggle and not by the key on with the headlight. I am very hesitant with electrical thats why Im asking. Thanks, John
|
|
|
|
|
 Logged
|
|
|
|
Hoser
Member

Posts: 5844
child of the sixties VRCC 17899
Auburn, Kansas
|
 |
« Reply #1 on: April 01, 2009, 11:54:51 PM » |
|
That's how I like mine, however be sure it has an inline fuse, and don't forget to turn them off when you shut off the bike, kinda hard on batteries.  hoser |
|
|
|
|
Logged
|
I don't want a pickle, just wanna ride my motor sickle  [img width=300 height=233]http://i617.photobucket.com/albums/ |
|
|
fordmano
Member
Posts: 1457
San Jose, CA. 1999 I/S 232 miles when bought 11/05
San Jose, CA.
|
|
« Reply #2 on: April 02, 2009, 03:35:43 AM » |
|
one word "RELAY" ok 3 words "USE A RELAY" please do yourself a favor and setup you circuit with a fused relay. run one wire from your battery or power supply source with a fuse as close as possible to that supply run that wire out to that toggle switch then use that to drive a relay. Run a fairly heavy gauge like maybe 10gauge directly from battery to a 25-30 amp fuse then out to the relay now from the output from the relay drive your lights and ground them positively back on the actual frame or directly to the battery. Some will have a slightly different approach but this way is a very protected circuit and should serve you for many years reliably without worry of and major meltdown. the key to safety here is fuses on both the trigger circuit and the drive circuit. Oh and use plenty of Dielectric grease on all connections unless you solder them Do yourself a favor and google "how to wire a relay for lights" Here let me save you a little bit of time,,, no relationship just the first response from my google search... http://www.therangerstation.com/tech_library/relays.html Here is another example this is the one I just showed my oldest son when I was showing him how I was planning on wiring up my new driving and fog light sets on my I/S I can never have too much light. http://www.offroaders.com/info/tech-corner/reading/automotive-wiring.htmRelay should be no more than 2-4 dollars depending where you buy it. Any auto store will have them radio shack even walmart, the real trick way to mount one is use a socket that is prewired should be no more than 3-6 dollars for this part, a lot of people don't do this but it makes it So So So easy in the future if the relay ever gives out you can just pop in a new one even if your on the road somewhere away from home. Good luck and share pictures if you manage to take any I always forget to pull out the camera when I am taking on a new project. |
|
|
|
|
Logged
|
  83GS550 93XR650L TARD! 97WR250 99ValkyrieI/S Tri-tone 01YZ125(x2) 05DRZ-125 |
|
|
Gryphon Rider
Member
Posts: 5233
2000 Tourer
Calgary, Alberta
|
|
« Reply #3 on: April 02, 2009, 09:10:06 AM » |
|
Fordmano:
Now, I'm a proponent of using relays when appropriate, but if the switch is rated for the current and STEELER doesn't want to tie the circuit into the headlight or ignition circuit and he's using large enough wiring, what's the point of having a relay?
STEELERS:
Using the switch without a relay should be fine if the switch is rated for the current your lights require and you're not concerned about forgetting to turn them off. I would strongly suggest you put a fuse in the circuit between the battery and the switch. Select a fuse rated at 120% of the expected current.
I.e. if the spots are 55W each, (55Wx2)/12V=9.2A
9.2Ax120%=11A
Next size fuse from 11A is 15A, so use a 15A fuse.
|
|
|
|
|
Logged
|
|
|
|
|
RUDE DOG - Steelers
|
|
« Reply #4 on: April 02, 2009, 11:01:32 AM » |
|
Ok. I've decided to see if I can find out what was done so I know what Ive got. I have attached a picture of the right side of the bike.   In the top picture, the tube with the female ends coming out that I am pointing at with my screw driver is what I am questioning. Is that a stock plugin? To the right of that are two red colored with male connectors and below them is black and white wires with stripped ends. Both of those sets of wires were plugged into those female ends coming out of the boot. One set runs to the headlight switch that was used for fog lights I referenced earlier and the other set goes to a set of LED driving lights on the front of the bike. I will probably remove them anyway. The LED's run to the wires with the red male plugins, but look like they were spliced into an existing wire. This is shown in the second pic. With those wires disconnected the headlight still goes on. I appreciate any help is finding out what the hell was done. Thanks, John |
|
|
|
|
Logged
|
|
|
|
|
mfountain
|
|
« Reply #5 on: April 02, 2009, 01:09:45 PM » |
|
Take it from someone who has wired the driving lights up both ways....use a relay! If not, you'll feel like an idiot (at least I did  ) when you forget to turn the lights off when you switch the bike off. It would be bad enough if that happened once, but for me, it was a regular thing. It's amazing my wife married me after pushing the bike off so many times. She was most pleased when I changed the lights and rewired the whole system with a relay to turn them off with the ignition switch. My current setup is two 4.5" headlights on the Cobra billet light bar which have a high and low beam. I've wired two relays in with one connected to the high beam of the main headlight, and the other connected to the low beam, so the 4.5s change beam with the headlight. As Gryphon Rider pointed out, if your switch is rated to handle the load, then you can wire the lights without a relay, but I would highly recommend the relay. It's a little more headache to install, but it will save you a few down the road. |
|
|
|
|
Logged
|
|
|
|
|
RUDE DOG - Steelers
|
|
« Reply #6 on: April 02, 2009, 04:12:17 PM » |
|
I did buy a relay so I'll probably use that. I guess I should pick up an inline fuse also. Anyone out there answer my questions on the pics I posted?
|
|
|
|
|
Logged
|
|
|
|
fordmano
Member
Posts: 1457
San Jose, CA. 1999 I/S 232 miles when bought 11/05
San Jose, CA.
|
|
« Reply #7 on: April 02, 2009, 11:38:02 PM » |
|
I use a relay for ANY and ALL additional electrical devices... I use the original horn still in the circuit to power my Stebel air horn that is powered from a fully fused Relay ciruit. I am currently adding 2 sets of additional lights and they both are being installed with fused relay ciruits, these 2 sets of lights will run on 2 seperate fused relay circuits with small lighted switchs.    Just because you use a RELAY does not mean you have to tie the circuit into the operating electrical source as the trigger you can still use a switch and be in control of your powered up items. a relay will run indepentantly from the key switch circuit. Over time I have seen plenty of switch only circuits BURN up the switch carrying the full load. The switch will take the full load of teh circuit every time you turn it off or on but in the case of a circuit using a relayteh realy takes the brunt of the electrical jolt. Have fun do it the way you are more comfortable or confident will work for you and if it ever fails using whatever method you decide on PLEASE take pictures and report back for us all to learn from your experience. Thanks Matt |
|
|
|
|
Logged
|
83GS550 93XR650L TARD! 97WR250 99ValkyrieI/S Tri-tone 01YZ125(x2) 05DRZ-125
|
|
|
|
MNBill
|
|
« Reply #8 on: April 03, 2009, 04:45:41 AM » |
|
I used a method I found on the tech board. I wired from the battery to an in line fuse, to a relay (switched by the wire under the side cover) to a fuse block. From there I had multiple fusing options for my lights, added horns, and accessory power point for my GPS. Nothing can be left on to drain the battery that way. +1 for relays though, as fordmano does, I have one for the horn and one for my lights, and wiring the horn like he did I still have the silly beep beep horn if the relay fails or a fuse blows.
|
|
|
|
|
Logged
|
MNBill
SE Minnesota
|
|
|
|
John U.
|
|
« Reply #9 on: April 03, 2009, 06:26:43 AM » |
|
I agree on the fuse block method. The link is for a block that is powered by a relay triggered by the auxilliary pickup under the right side cover. This method will only provide power to the fuse block when the key is on. You will still need another relay to protect the switch if you want to have the option to turn the lights off http://www.electricalconnection.com/power-distribution/pplate.htm |
|
|
|
|
Logged
|
|
|
|
Kingbee
Member
Posts: 486
VRCC# 576
Northern Illinois
|
|
« Reply #10 on: April 03, 2009, 01:22:45 PM » |
|
Those wires you're pointing to are the accessory leads. They are switched with the key, but are only rated for 5 amps. Use them to switch your relay for the lights, or better yet, a fuse panel 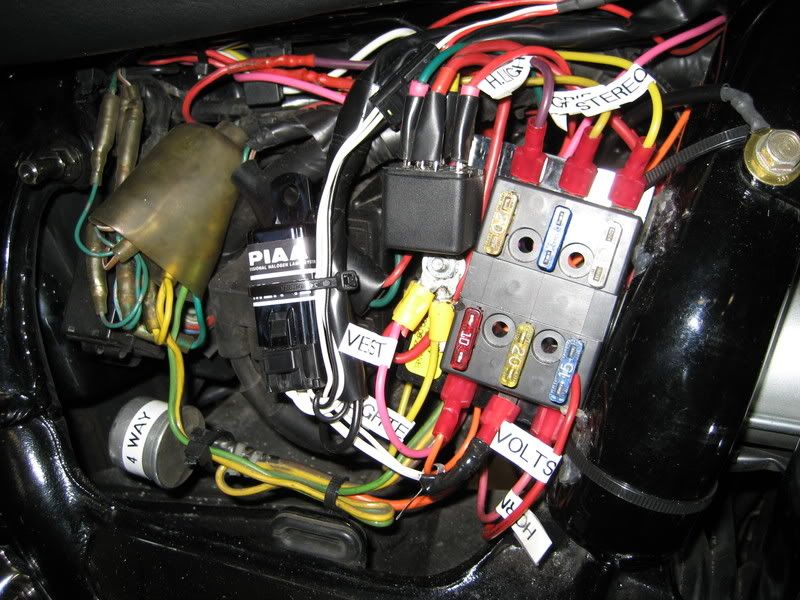 |
|
|
|
|
Logged
|
|
|
|
|
RUDE DOG - Steelers
|
|
« Reply #11 on: April 03, 2009, 02:38:49 PM » |
|
I decided Im starting from scratch. I bought a new switch, relay, inline fuse and wire. Im using Chets instructions to guide me. I also have a fuse block which I guess would enable me to add other lights etc. but Im not sure how to incorporate that in. I figure one mess at a time. I removed the tank so I can reroute everything. I installed the inline fuse into the fuse/fusible top main fuse screw. Tomorrow I will start to run my wire. I'll keep you posted as Im sure I'll have more questions.
|
|
|
|
|
Logged
|
|
|
|
|
RUDE DOG - Steelers
|
|
« Reply #12 on: April 03, 2009, 02:41:05 PM » |
|
Those wires you're pointing to are the accessory leads. They are switched with the key, but are only rated for 5 amps. Use them to switch your relay for the lights, or better yet, a fuse panel Wow, Kingbee, thats some wiring you have there. Id be totally lost trying that. |
|
|
|
|
Logged
|
|
|
|
|
wilmont kid
|
|
« Reply #13 on: April 03, 2009, 03:50:42 PM » |
|
Before all the relays, wiring, positive terminal, earth, ground, etc. the best investment is a 12 volt test light so you can see what those wires do(if anything), when you turn on the switch. Maybe that's taken for granted but ya' gotta' find out what you're starting with---
|
|
|
|
|
Logged
|
|
|
|
Gryphon Rider
Member
Posts: 5233
2000 Tourer
Calgary, Alberta
|
|
« Reply #14 on: April 04, 2009, 06:33:42 AM » |
|
Ok. I've decided to see if I can find out what was done so I know what Ive got. I have attached a picture of the right side of the bike.
In the top picture, the tube with the female ends coming out that I am pointing at with my screw driver is what I am questioning. Is that a stock plugin? To the right of that are two red colored with male connectors and below them is black and white wires with stripped ends. Both of those sets of wires were plugged into those female ends coming out of the boot. One set runs to the headlight switch that was used for fog lights I referenced earlier and the other set goes to a set of LED driving lights on the front of the bike. I will probably remove them anyway. The LED's run to the wires with the red male plugins, but look like they were spliced into an existing wire. This is shown in the second pic. With those wires disconnected the headlight still goes on. I appreciate any help is finding out what the hell was done. Thanks, John
For the previous owner to have run fog lights off of the accessory terminals, he probably had to replace the stock 5A fuse for the circuit with a larger one. BAD IDEA. If he has, make sure you replace it with the proper 5A fuse. If you need a wiring diagram for how to add a fuse block and accessories, email me and I'll reply this evening. |
|
|
|
|
Logged
|
|
|
|
|
RUDE DOG - Steelers
|
|
« Reply #15 on: April 04, 2009, 02:32:51 PM » |
|
OK. So here is what Ive done so far per Chets website. Power wire coming off of top screw of Fuse/Fusible panel under side cover to an inline fuse. Run that to headlight bezel. I have a standard four prong relay in the headlight bezel and a on/off lighted switch mounted on headlight. What I want to be able to do is this. Have control over the driving lights with the switch, but if they are left on, have them go out when the bike is turned off and also work like the headlight and go off when the starter button is engaged. I want to be able to turn the lights on or off with the switch while driving if needed. Im not sure what wires need to be connected where. I spliced into a ground wire in the headlight and also the blue and white wire in the headlight. Im not sure now that I should have tapped into the blue and white wire. Chets instructions say to tap into the dark blue headlight wire and to key on brown wire. Im sure if doing that will accomplish what I want. Can someone please tell me what I need to do to finish this up. I also have not wired the driving lights in yet. Each light has two wires. Thanks, John
|
|
|
|
|
Logged
|
|
|
|
R J
Member
Posts: 13380
DS-0009 ...... # 173
Des Moines, IA
|
|
« Reply #16 on: April 04, 2009, 03:14:46 PM » |
|
I am adding some billet mini spot lights to my Valk. The previous owner has a toggle switch on the top of the headlight that was used for 4 inch round fog lights. They were not on the bike when I got it. I want to hook my lights up to that toggle. It looks like he just ran a wire directly to the battery and the toggle to the lights. Is that the correct way to do it. I did go to Chets site about hooking up lights and he shows several ways to do it. I think I would like to just have them on and off by the toggle and not by the key on with the headlight. I am very hesitant with electrical thats why Im asking. Thanks, John
This is what a starter relay looks like after being used with NO relay in the circuit.......  If it does look like this, then you need these parts to repair it. 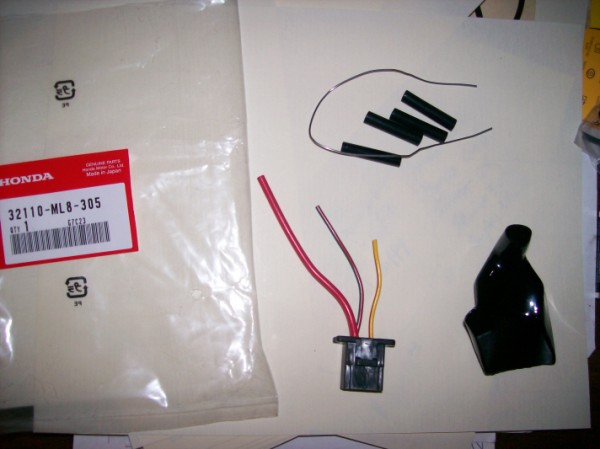 |
|
|
|
|
Logged
|
44 Harley ServiCar   |
|
|
|
RUDE DOG - Steelers
|
|
« Reply #17 on: April 04, 2009, 03:38:51 PM » |
|
Nothing is burned out, Im just adding a new set of driving lights and want to do it the correct way.
|
|
|
|
|
Logged
|
|
|
|
|
Madmike
|
|
« Reply #18 on: April 04, 2009, 04:05:09 PM » |
|
Steelers check your messages
|
|
|
|
|
Logged
|
|
|
|
|
Ricky-D
|
|
« Reply #19 on: April 04, 2009, 06:46:20 PM » |
|
Do you think a starter relay like that little VW relay will stand being in constant "on" for an extended period of time? Is there a better relay for something like that to control something like a pair of lights or similar?
|
|
|
|
|
Logged
|
2000_Valkyrie_Interstate
|
|
|
|
Madmike
|
|
« Reply #20 on: April 04, 2009, 10:28:35 PM » |
|
Do you think a starter relay like that little VW relay will stand being in constant "on" for an extended period of time? Is there a better relay for something like that to control something like a pair of lights or similar?
Get a 30 or 40 Amp Hella light relay and you should have no problems. While you are at it ask for a pigtail for the same thing and you are ready to go. These are a standard 5 terminal relay and so give you the option of either normally open or normally closed circuits depending on what you want to do. Just about any autoparts store should have them at about $10 - $15 for the 2 pieces. Solenoids like those used for "start relays" or "glowplug (engine preheat) relays" are available as constant or intermittent duty. My understanding is that the pull in contacts on the intermittent duty are heavier as they theoretically have to be able to withstand more instances of the contacts make/break and subsequently arcing. Hella gives and explanation on the two different functional styles of relays that are available from them depending on the application they are intended for. www.hella.com/hella-com-en/assets/media_global/TIRelais_GB_TT_14.pdfHere is some info from Cole-Hersee that shows relays up to 70 Amps and some of the various styles and load capabilities of solenoids that they have. If you go down to the relay section of this PDF you will see some schematics that describe operation along with the standard terminal layouts for the various configurations that are generally available. www.colehersee.com/pdf/H-Relays.pdf |
|
|
|
« Last Edit: April 04, 2009, 10:59:07 PM by Madmike »
|
Logged
|
|
|
|
R J
Member
Posts: 13380
DS-0009 ...... # 173
Des Moines, IA
|
|
« Reply #21 on: April 04, 2009, 10:56:55 PM » |
|
Nothing is burned out, Im just adding a new set of driving lights and want to do it the correct way.
That is what I was trying to tell you.... IF, you do not use a relay, that is what your starter relay will look like in a few months....... From the way it sounds like it was wired, just for sheet and grins, I'd check the starter relay before ya get too far along. It is in that big rubber boot under the right side cover........ Only takes a couple of minutes to get to it, and then you will know if he wired it correctly....... |
|
|
|
|
Logged
|
44 Harley ServiCar |
|
|
|
|
|
Scott from FL, now in Maine
|
|
« Reply #23 on: April 07, 2009, 03:50:19 PM » |
|
Well done! I like the light location. I just got back in to town or I would have added this little bit of info earlier. Here is a little tip for those new to using relays that many miss. The relay is triggered by the input of hot to one side and ground to the other. What a lot of people don't realize is that the ground side of the relay can be switched to. I like to mount all relays close the the battery fused as mentioned. Then hook ignition lead (key switched) to the one side of the relay. on the other side I put a wire to the switch and make sure the switch is wired to throw a ground. Works with no problems because the relay requires very little ground strenght to activate. Why do this? All the wires you run to the front won't ever be hot and have potential to chaff a hole and short out. Honda has their hots in the harness and protected to some extent. When we run add wiring, space can get tight and I would rather risk a non fire causing short |
|
|
|
|
Logged
|
|
|
|
|
Madmike
|
|
« Reply #24 on: April 07, 2009, 04:30:14 PM » |
|
Congratulations! They look good. What kinda lights are those??
|
|
|
|
|
Logged
|
|
|
|
|
RUDE DOG - Steelers
|
|
« Reply #25 on: April 07, 2009, 06:26:30 PM » |
|
Hey Mike,
Thanks again for the help. Their Trail Tech Lights. They are for off road dirt bike applications but I liked the look and they are designed to withstand the abuse that quads give. http://trailtech.net/single_hid_mr11.htmlI got them for less than half of the listed price of one. Awesome looking light. I got the MR11 35 watt version.
|
|
|
|
|
Logged
|
|
|
|
|
Madmike
|
|
« Reply #26 on: April 07, 2009, 07:44:30 PM » |
|
Them are nice lights. Interesting to see how they perform.
|
|
|
|
|
Logged
|
|
|
|
|


