|
Bone
|
 |
« Reply #40 on: April 07, 2011, 02:11:20 AM » |
|
Bought my Tourer in 05 and found this Tech site wanting to learn as much as I could about my Valk. CA and Airetime were members then and always giving help to us that ask.
If I was going to coat an intake O-ring I would use a thin film of the Dielectric grease.
|
|
|
|
|
 Logged
|
|
|
|
|
Blackduck
|
|
« Reply #41 on: April 07, 2011, 03:07:12 AM » |
|
With Viton O rings it may not matter what you use as lube.
For Buna O rings mineral oil or grease will cause them to swell slightly giving a better seal.
If no swelling is desired use vegetable oil. Not sure of the effect silicone grease would have.
Need to ask the question of some suppliers on that one.
Cheers Steve
|
|
|
|
|
Logged
|
2001 Standard, 78 Goldwing, VRCC 21411
|
|
|
|
Ricky-D
|
|
« Reply #42 on: April 07, 2011, 08:35:10 AM » |
|
I like to use vasoline for O-ring installation.
Are you sure it's the cut-off valves that are bad.
Most posts say the little tube is the culprit when leaks are present.
***
|
|
|
|
|
Logged
|
2000_Valkyrie_Interstate
|
|
|
|
TGViper
|
|
« Reply #43 on: April 07, 2011, 09:16:07 AM » |
|
Hate to say it but I would seriously consider going back to a "known good" state, when the bike was running correctly. It looks like you made quite a few changes to get to where you are at...
I would go back to factory standard - undo the desmog if possible and then re-synch the carbs and start again.
ORRR, make it as simple as possible, replace the lines with new vacume lines to ensure no leaks and start from there.
|
|
|
|
|
Logged
|
|
|
|
|
Ricky-D
|
|
« Reply #44 on: April 07, 2011, 11:25:06 AM » |
|
I can only envision someone reinstalling smog controls on his motorcycle, him being under extreme pressure emitted from a federal posse of a hundred men with guns drawn!
***
|
|
|
|
|
Logged
|
2000_Valkyrie_Interstate
|
|
|
|
TGViper
|
|
« Reply #45 on: April 07, 2011, 01:35:59 PM » |
|
|
|
|
|
|
Logged
|
|
|
|
fordmano
Member

Posts: 1457
San Jose, CA. 1999 I/S 232 miles when bought 11/05
San Jose, CA.
|
|
« Reply #46 on: April 07, 2011, 02:04:31 PM » |
|
Are you sure it's the cut-off valves that are bad.
Most posts say the little tube is the culprit when leaks are present.
***
Well the change in RPM happens when something is sprayed directly at the Air Cut Valves, it only seems to make an RPM change on 4 CARBS and now that I have 2 of them off and 1 valve tests good and one tests bad(leaks) this is using brand news rubber hose that came in the Red-Eye O-ring kit I did actually plug one end of each rubber hose and pull a vacuum and it held solid no leak. I did not notice a change in RPM when I sprayed around any other portion of the intake system except when the air box was off and I sprayed directly into the carburetor throats, that change was expected and obvious. |
|
|
|
|
Logged
|
  83GS550 93XR650L TARD! 97WR250 99ValkyrieI/S Tri-tone 01YZ125(x2) 05DRZ-125 |
|
|
fordmano
Member
Posts: 1457
San Jose, CA. 1999 I/S 232 miles when bought 11/05
San Jose, CA.
|
|
« Reply #47 on: April 07, 2011, 02:10:28 PM » |
|
Hate to say it but I would seriously consider going back to a "known good" state, when the bike was running correctly. It looks like you made quite a few changes to get to where you are at...
I would go back to factory standard - undo the desmog if possible and then re-synch the carbs and start again.
ORRR, make it as simple as possible, replace the lines with new vacume lines to ensure no leaks and start from there.
I thought seriously about this many hours now and I keep coming back to the same conclusion. How do I "Un-Rebuild 6 CARBS" there is now way to take the CARBS backwards after a rebuild and I am not yet to the buy another entir CARBS rack just to test idea. The smog could be re-installed but I need to buy some rubber tubing and still be workingon rebuilt CARBS. |
|
|
|
|
Logged
|
83GS550 93XR650L TARD! 97WR250 99ValkyrieI/S Tri-tone 01YZ125(x2) 05DRZ-125
|
|
|
|
Chiefy
|
|
« Reply #48 on: April 07, 2011, 08:48:08 PM » |
|
It's late, and I may have missed if you already thought of this. Have you checked the rubber boots where the airbox slides into the intakes? Very-very easy to fold the boots over when you're trying to put the airbox back on. Since you're shooting ether in that general area, wonder if it's getting in there? If you haven't checked yet, it's easy. Run your finger behind the boot and you'll feel if it's wrong.
|
|
|
|
|
Logged
|
 1998 Valk Standard 52,500 miles |
|
|
fordmano
Member
Posts: 1457
San Jose, CA. 1999 I/S 232 miles when bought 11/05
San Jose, CA.
|
|
« Reply #49 on: April 27, 2011, 03:35:56 AM » |
|
Update as of 4-26-2011
Ok I got the carbs all gone through again, did not find very much really wrong.
the Air Cut valves are a little out of spec from what info is provided by Rich at Red-Eye (this is from his documentation I did not call him for more info so it may be interpretation) says that air should pass through valve freely and when 15in of vacuum is applied they should cut off the air flow.
Well maybe my Mity-Vac is wrong but I only had one that shut off completely when 16in was applied and the other were shut off from about 18in -19in so I think that is probably OK since what is the likely hood of all of them really being bad? So I just pulled everything apart and cleaned with spray carb cleaner and blew everything out with compressed air and used the Dielectric grease as suggested on EVERY rubber component installed new rubber pieces including the intake boot between carbs and intake tubes.
I did fine 1 mixture screw adjusted WAY wrong,, it was almost 4 turns out, dummy me did not re-check all of them only the last one I worked on, but I did make 100% sure they are all at 1-3/4 turns out. All the jets looked clean and would pass air through them but I pressure cleaned them anyway.
I also noticed that the intake boots all looked like they were pinched a little bit in one area (kind of bunched up) I guess I managed to get the clamps off of the little location nub/nipple. This would explain an air leak.
Hopefully I will get the rest of the fuel system installed this week and fire her back up by the end of the weekend.
|
|
|
|
|
Logged
|
83GS550 93XR650L TARD! 97WR250 99ValkyrieI/S Tri-tone 01YZ125(x2) 05DRZ-125
|
|
|
|
Jess Tolbirt
|
|
« Reply #50 on: April 27, 2011, 04:43:07 AM » |
|
this problem has been going on to long now,,,
are all the plugs firing at the correct time?
cross wired maybe?
you did use the word backfire as i recall,,,,
|
|
|
|
|
Logged
|
Valkyrie member # 23084
Started out on old forum on day one but lost my member number.
|
|
|
fordmano
Member
Posts: 1457
San Jose, CA. 1999 I/S 232 miles when bought 11/05
San Jose, CA.
|
|
« Reply #51 on: April 27, 2011, 05:05:53 AM » |
|
I totally agree, this has taken WAY to long but I just don't have time or proper work area and the wife considers the bike as a secondary mode of transportation/commuting so I am stuck with at best a couple hours in an entire week and each time I work on the bike I have to pull all the parts and tools back out and get organized then spend whatever few minutes I have to work on whatever is at hand then clean up and put everything away again. Sucks to be me when it comes to projects of any type.
Yes it did have a backfire on occasion but I think that part was solved when I figured out that I must have wired one coil backwards. I am pretty sure it is/was vacuum leak excessive air intake. Hopefully I will be able to try a fire up this weekend.
|
|
|
|
|
Logged
|
83GS550 93XR650L TARD! 97WR250 99ValkyrieI/S Tri-tone 01YZ125(x2) 05DRZ-125
|
|
|
fordmano
Member
Posts: 1457
San Jose, CA. 1999 I/S 232 miles when bought 11/05
San Jose, CA.
|
|
« Reply #52 on: April 28, 2011, 09:27:43 PM » |
|
WOOOOOOOooooooooo HOOOOOOoooooooo   She breaths fire once again,,, first off NO I do not know for sure exactly what was wrong but it seems mostly fixed now. There was only one thing that I ran across that really seemed that it would be a culprit and that is the 1 Pilot screw that was set out at around 4 turns,,, Well I only thought to check this on the very last carb I dis-assembled (dumb on me) anyway I don’t know how I had this one so far out and I also don’t know if maybe there were others adjusted incorrectly. I also am not sure if maybe I had a air leak at the rubber boots between multiple carb throats and air box bottom, also I had 1 intake O-Ring that looked funny when I pulled it out of the groove. The only thing that was specifically done differently was I used silicone Dielectric grease to hold ALL the O-Rings in place and help seal them. It even said the Dielectric grease was and O-Ring sealer, look for yourself. 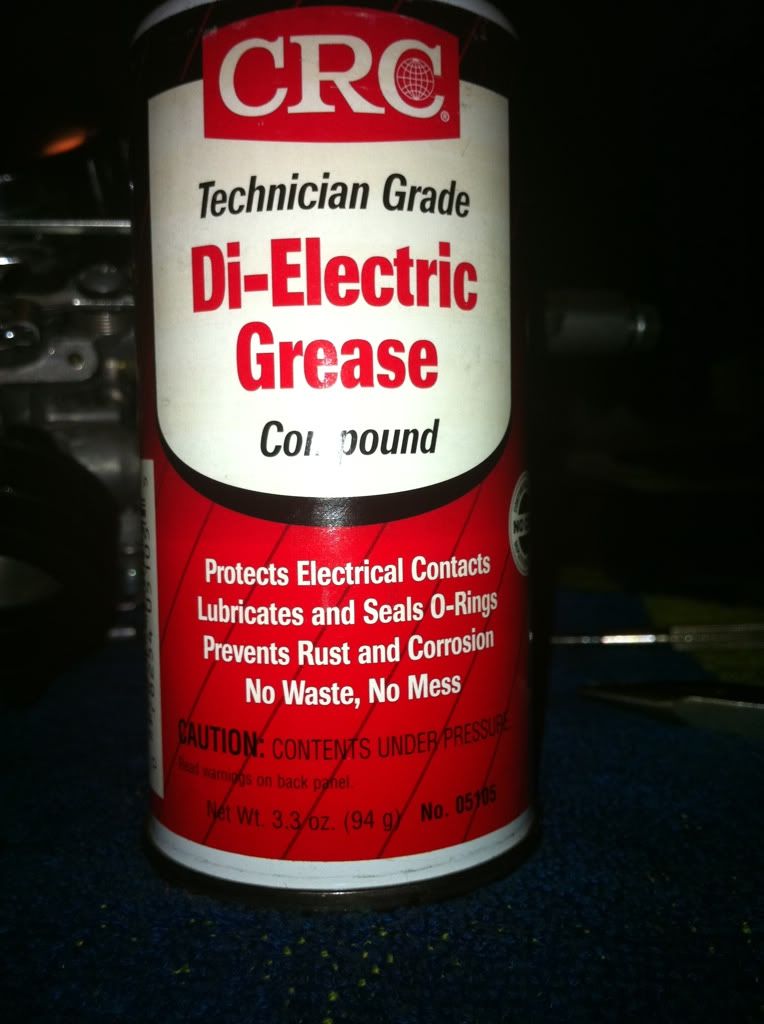 Look closely it does say it "SEALS O-RINGS"....  Now here is the full rack re-assembled and cleaned and even lubed up on all parts that contact any rubber surfaces carb throat and exit I also picked up all new rubber boots that sit between carb and intake runners, there were some that did look like they had been squeezed funny on the inside. 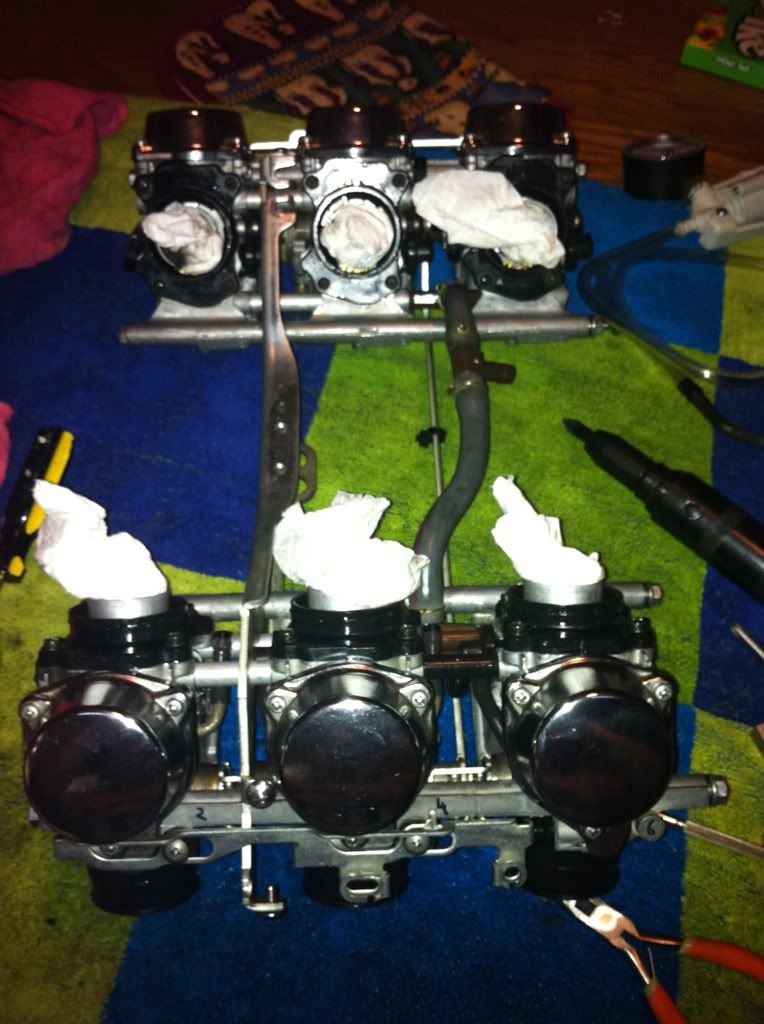 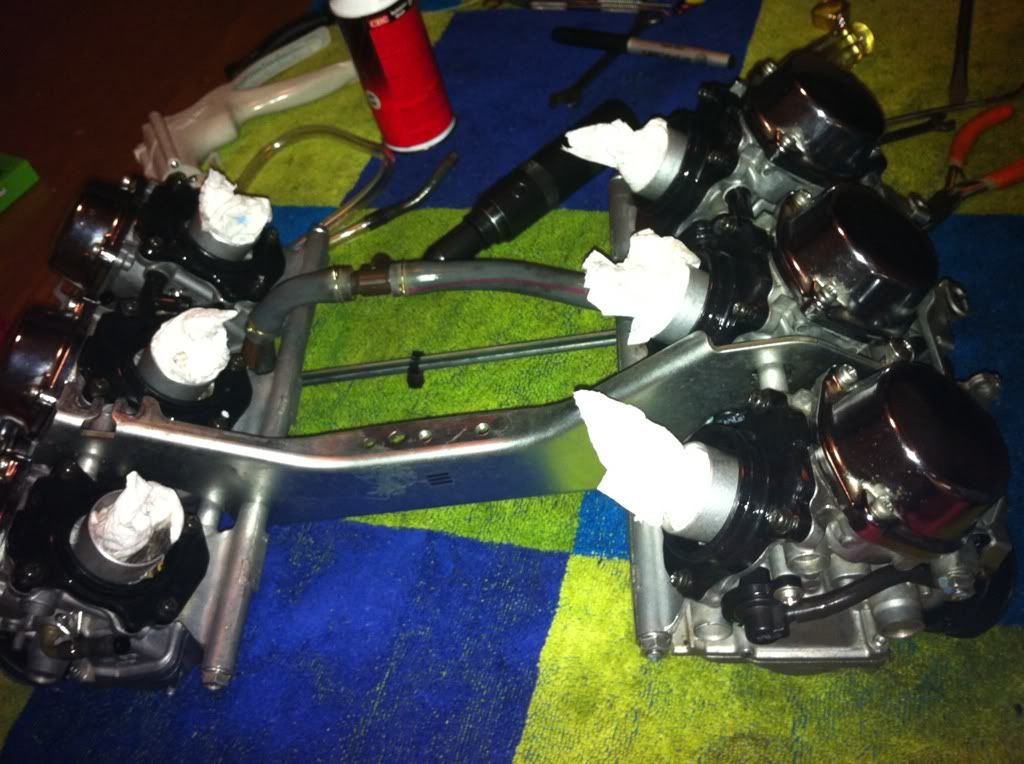 And here is the video from the first fire up I had a little problem with the Dan-Mark fuel valve. I just could not get fuel to the bowls even opened the drains to verify if ANY fuel was getting to the carbs. Nope no fuel ok stick my ear down close nope no click of the Dan-mark valve opening when key is turned on. Verify I have 12v+ at the supply from aux panel, yes full voltage, ok use a needle to puncture the wire close to the valve and yep 12v+ there also so lets check the ground side,,,,,,,, OH HELL, I found that I had originally used the same screw that holds the forward coil to the frame and this time it had slipped behind the frame and I missed it. So I attach the ground wire and hit key switch Yahooooo the valve clicks open and closed now with the key. Pulled the temporary fuel line and put the Dan-mark pack inline and installed the fuel tank opened petcock and turn key switch on and gave it a second hit the starter button, COOL she fires up little rough idle and a fare amount of bluish smoke from both sides. But it will run now at any RPM.
|
|
|
|
« Last Edit: April 28, 2011, 10:38:32 PM by fordmano »
|
Logged
|
83GS550 93XR650L TARD! 97WR250 99ValkyrieI/S Tri-tone 01YZ125(x2) 05DRZ-125
|
|
|
fordmano
Member
Posts: 1457
San Jose, CA. 1999 I/S 232 miles when bought 11/05
San Jose, CA.
|
|
« Reply #53 on: April 28, 2011, 09:33:41 PM » |
|
Thanks to all that offered suggestions advice directions and especially thank you to Gordon V. who actually offered to send me a few spare parts to test with. Gordon, Thank you so much for your extra effort in trying to assist a fellow VRCC brother. |
|
|
|
|
Logged
|
83GS550 93XR650L TARD! 97WR250 99ValkyrieI/S Tri-tone 01YZ125(x2) 05DRZ-125
|
|
|
fordmano
Member
Posts: 1457
San Jose, CA. 1999 I/S 232 miles when bought 11/05
San Jose, CA.
|
|
« Reply #54 on: April 28, 2011, 09:53:32 PM » |
|
Now for the completion of re-assembly of the rest of the Fat Lady.
I have to fine tune the carburetion a little bit also.
After 5-10 minutes of revving her up and letting her idle just getting a little bit warm she seems to idle about as perfect as she ever has. Although I am still getting a little bit of that bluish smoke from the left bank and an occasional little POP from the right side bank. The pop seems like it is a lean pop and the left smoke I think maybe just residue from all the messing around with the Seafoam (I hope) So I will try a synch on the carbs and see if I can figure out which cylinder is creating the pop and maybe just richen it up a little bit on the pilot screw then fill the tank about 1/2 way and run a strong batch of Techron or maybe sea foam and go for a ride around the neighborhood and a little blast down the highway and see how she is doing. Some of the smoke may also be from excessive use of Dielectric grease inside of the carbs and all the passage ways that contact any rubber parts.
It does seem like the pop is at any RPM range and a little bit worse when I let off the throttle it happens a bit worse. But it is just audible at idle and it feels to just have a harsh feeling/sounding type of thing than before and from other motors I have built I would guess this feeling is from MORE horsepower you guys that have built hot motors probably know that sound/feeling.
I will copy just about all of this over to my Multipoint thread as to help keep all my work localized to one location. I hope this is not a problem I will also copy all of this over to the Local bike forum I am a member of the operator/sole admin over there asked me to mirror the Multippoint thread there and I have .
Thanks again.
|
|
|
|
« Last Edit: April 28, 2011, 10:44:43 PM by fordmano »
|
Logged
|
83GS550 93XR650L TARD! 97WR250 99ValkyrieI/S Tri-tone 01YZ125(x2) 05DRZ-125
|
|
|
gordonv
Member
Posts: 5766
VRCC # 31419
Richmond BC
|
|
« Reply #55 on: April 29, 2011, 08:30:14 PM » |
|
Thanks to all that offered suggestions advice directions and especially thank you to Gordon V. who actually offered to send me a few spare parts to test with. Gordon, Thank you so much for your extra effort in trying to assist a fellow VRCC brother. You are most Welcome! It was just a shame that I wasn't closer and just able to lend you the whole carb assembly. I'm most likely going to overhaul the whole thing, and place it in Chrio storage for future use. Glad you got it going right. I need to look for a can of the Di-electric. Is it a bottle or a tube? |
|
|
|
|
Logged
|
1999 Black with custom paint IS   |
|
|
fordmano
Member
Posts: 1457
San Jose, CA. 1999 I/S 232 miles when bought 11/05
San Jose, CA.
|
|
« Reply #56 on: April 29, 2011, 09:00:22 PM » |
|
Thanks to all that offered suggestions advice directions and especially thank you to Gordon V. who actually offered to send me a few spare parts to test with. Gordon, Thank you so much for your extra effort in trying to assist a fellow VRCC brother. You are most Welcome! It was just a shame that I wasn't closer and just able to lend you the whole carb assembly. I'm most likely going to overhaul the whole thing, and place it in Chrio storage for future use. Glad you got it going right. I need to look for a can of the Di-electric. Is it a bottle or a tube? The Die-electric grease I used came from my local Kragens/Oreily's auto parts store.  Sory I don't have a better picture of the can , but it is a small can like we see WD-40 in and it came with a handy little screw on tube with a trigger. I ended up with LOTS of that Die-electric grease all over my hands.. I found a link to exactly what I used just for clarification, thought you (and others) might want to see exactly what it looked like to help make locating it a bit easier. http://www.oreillyauto.com/site/c/detail/CRC0/05105.oap?pt=N0941&ppt=C0139 |
|
|
|
|
Logged
|
83GS550 93XR650L TARD! 97WR250 99ValkyrieI/S Tri-tone 01YZ125(x2) 05DRZ-125
|
|
|
|


