Valkyrie Riders Cruiser Club
June 27, 2025, 02:21:34 PM *
Welcome, Guest. Please login or register.

Login with username, password and session length
Ultimate Seats Link VRCC Store
Homepage : Photostash : JustPics : Shoptalk : Old Tech Archive : Classifieds : Contact Staff
News: If you're new to this message board, read THIS!
 
VRCC Calendar Ad
Pages: [1]   Go Down
Send this topic Print
Author Topic: Front forks removal and seal replacements  (Read 3068 times)
herc770
Member
*****
Posts: 56


Vikings & Dragons 2009/10 NorCal


« on: November 21, 2012, 12:38:26 AM »

Okay fellow weekend Valkyrie mechanics, I'm feeling pretty frisky after successfully removing, repairing, and reinstalling my carbs for the first time on any bike with the advice of many patient forum helpers.

I am now ready for a new challenge: Leaking front forks

It seems to be a really good leak, about 2 table spoons worth every couple days.
Took it to the Honda shop and of course they want almost $600 to replace bushings, seals, brake pads, fresh oil, etc...

Has there been any previous threads about this?
I did notice a very recent discussion here about reinstalling the forks and alignment.

Anyway, looking forward to any and all opinions everyine might have to make the job easier.
Logged

Bone
Member
*****
Posts: 1596


« Reply #1 on: November 21, 2012, 04:07:24 AM »

I've done forks on all of my bikes through the years but never any inverted forks. Here are 2 videos for VTX 1800 forks that are similar to the Valks. Parts 1 & 2 they explain everything,
Goodluck

VTX 1800 Fork Seals Part 1.wmvpowered by Aeva


VTX 1800 Fork Seals Part 2 NSR Tech.wmvpowered by Aeva

Logged
shortleg
Member
*****
Posts: 1816


maryland


« Reply #2 on: November 21, 2012, 04:08:01 AM »

 Check in shoptalk, think there is a write up on it there.
       Shortleg[Dave]
Logged
hubcapsc
Member
*****
Posts: 16779


upstate

South Carolina


« Reply #3 on: November 21, 2012, 04:17:02 AM »


I did it with the manual five years ago, took them all the way apart and changed the
wear parts listed in the manual as well as the seals. And I put progressive springs in,
which turned mediocre forks into good forks.

There's pressure from springs on each side that has to be overcome, I borrowed the
special tool listed in the manual for one side (each side of the forks is different inside).

You need a good way to mash the new seals in without damaging them.

50,000 miles later, one of them started leaking again, and we (most everybody at InZane)
changed it out in the 100 degree parking lot.

Besides the manual, there's lots of stuff in the tech archives and here's some stuff from Dag's site
in Norway...

http://valkyrienorway.com/forksprings.html

-Mike
Logged

98valk
Member
*****
Posts: 13465


South Jersey


« Reply #4 on: November 21, 2012, 04:24:26 AM »

try the film trick first. u need 360 access, using a piece of 35mm film, slide it up into the seals and move around to clean it out. search has pics and more detail instructions. there are also some threads with all the parts needed and pics of a rebuild.
Logged

1998 Std/Tourer, 2007 DR200SE, 1981 CB900C  10speed
1973 Duster 340 4-speed rare A/C, 2001 F250 4x4 7.3L, 6sp

"Our Constitution was made only for a Moral and Religious people. It is wholly inadequate to the goverment of any other."
John Adams 10/11/1798
Hook#3287
Member
*****
Posts: 6433


Brimfield, Ma


« Reply #5 on: November 21, 2012, 04:38:34 AM »

If you can do the carbs, you can do the forks.  Someone closer to you should have the special tool, but if not, I'll send you mine.

Try the film fix, it could work.  Follow the service book, one step at a time.

Another option is to take the forks off and have the dealer rebuild them.  If you buy the parts from them they may give you a deal on the labor.

Good luck;

Hook
Logged
Jess from VA
Member
*****
Posts: 30407


No VA


« Reply #6 on: November 22, 2012, 05:41:35 AM »

RE the film trick.

Try this first.

http://sealmate.net/
Logged
F6Dave
Member
*****
Posts: 2261


« Reply #7 on: November 22, 2012, 08:15:07 AM »

If you just want to replace the seals and maybe the bushings, DON'T FOLLOW THE MANUAL.  Honda makes a lot of things much harder than necessary.  For instance, they tell you to remove the entire exhaust system just to change the rear tire!

Several years ago there was a post on the old board showing how to change the seals without the locknut tool and with the forks still on the bike.  Essentially, you remove the wheel, fender, fork cap, dust seal, and retainer circlip.  Then the fork comes apart any you can replace the seal in minutes.  I kept a PDF of the post if you need it.
Logged
Hook#3287
Member
*****
Posts: 6433


Brimfield, Ma


« Reply #8 on: November 22, 2012, 08:17:44 AM »

F6Dave;

Send me the PDF if you can.  Thanks

Hook
Logged
herc770
Member
*****
Posts: 56


Vikings & Dragons 2009/10 NorCal


« Reply #9 on: November 22, 2012, 04:39:57 PM »

please send me the PDF also.
Thanks!!!
Logged

PhredValk
Member
*****
Posts: 1531


Edmonton, Alberta, Canada


« Reply #10 on: November 22, 2012, 06:59:36 PM »

I have a Word .doc on this. Your email is hidden in your profile. Email me if you want it.
Fred.

falliston@gmail.com
Logged

Growing old is mandatory, growing up is optional.
VRCCDS0237
jimmytee
Member
*****
Posts: 2036


Elizabethtown,KY


WWW
« Reply #11 on: November 23, 2012, 01:46:48 AM »

I'll take one cooldude
Logged

"Go sell crazy somewhere else,we're all stocked up"
F6Dave
Member
*****
Posts: 2261


« Reply #12 on: November 23, 2012, 07:06:33 PM »

Here are the two original posts (merged) from the old message board:

--------------------------------------------------

Ken covers it pretty well in his post.

raise bike, remove calipers, front wheel, front fender.

Pull the fork caps. Then follow ken's post:


I successfully changed my Fork Seals this weekend (with the help of info & photos by Big BF &
Britman. I did buy the Honda pipe bolt Nut Remover Tool (44mm) (Which I did not use). 5/23/2006

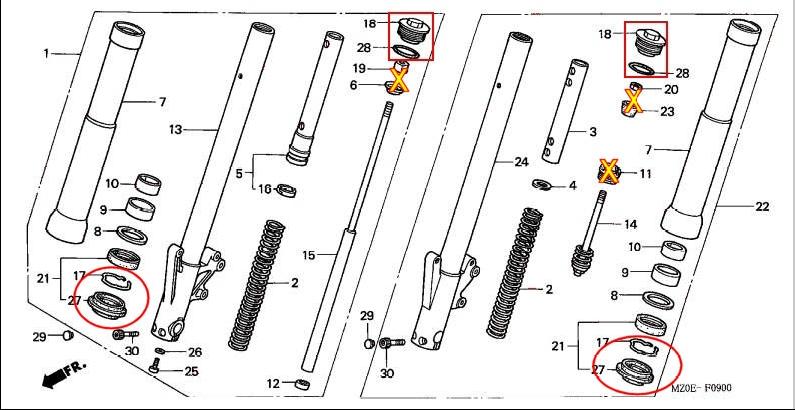
So: If you are just going to change the “seals” and/or the fork “bushings” you do not
have to remove the Left #11 Fork Pipe Bolt or the Right #19 Nut & #6 Spring Seat, which hold in
the springs. Just remove the top “Fork Cap #18 AND the “Dust Seal #27 then the “Seal Retainer
Clip #17 , then the Slider legs will come out with the springs still internally captivated. Just a few
firm slides of the Slider leg against the old seal and she’ll pop right out.

Now another Trick: I did not remove the Fork Tubes from the Valk. I jacked the bike up on my Jak-
Lift high enough so that I could pull the Sliders down out of the Fork Upper Tubes. Of course the
oil came out too, but that I directed (mostly) into my drain pan by wrapping newspaper around the
Fork Tube.

I changed my Fork Bushings too, there was a little play in them (4 bushings aprox $35.). The Seals
ran me $36. (all Honda parts). Took me about 3 hours. Then I had to replace wheel.
Logged
Pages: [1]   Go Up
Send this topic Print
Jump to: