|
Bugslayer
|
 |
« on: June 19, 2009, 05:18:26 PM » |
|
This is my first attempt at syncing my carb's. I started with a warm engine and gave it a few blip's before I started. This is where I started at. (#1 seems to be way outta whack)  |
|
|
|
« Last Edit: June 19, 2009, 06:02:41 PM by Bugslayer »
|
 Logged
|
|
|
|
|
Bugslayer
|
 |
« Reply #1 on: June 19, 2009, 05:22:04 PM » |
|
This is what I finished with. I never could get everything even with #3. I took a short ride afterward's, and it felt good. By looking at it, can someone give me their opinion on how it looks? Thanks.  |
|
|
|
|
Logged
|
|
|
|
Kingbee
Member

Posts: 486
VRCC# 576
Northern Illinois
|
|
« Reply #2 on: June 19, 2009, 06:16:57 PM » |
|
Fun, isn't it? I'd go around it a few more times, you can get them all a lot closer to number 3. I swear, I went around 10 times. 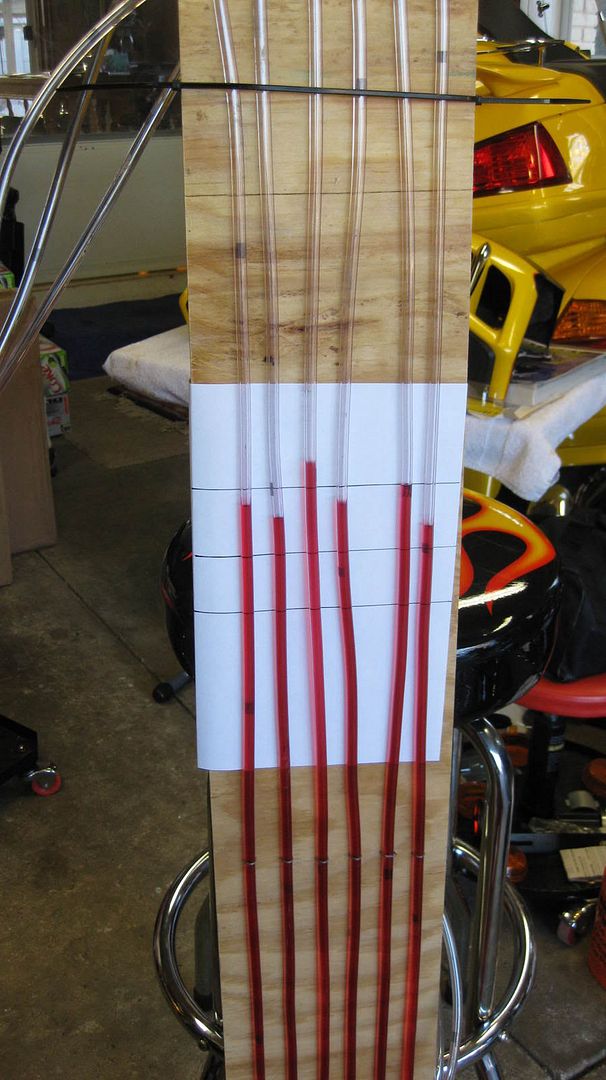 |
|
|
|
|
Logged
|
|
|
|
|
Bugslayer
|
|
« Reply #3 on: June 19, 2009, 07:30:00 PM » |
|
I'll give her another shot tomorrow. One problem I noticed was the heat was effecting the clear rubber tubing where they attach to the intakes. The tubing would get a little warm/soft and try to fold over on itself. I've got some vacuum hose that I'm gonna try to put on the end of the clear tubing. Something that will hold up to the heat a little better.
Thanks for the feedback.
|
|
|
|
|
Logged
|
|
|
|
Kingbee
Member
Posts: 486
VRCC# 576
Northern Illinois
|
|
« Reply #4 on: June 19, 2009, 07:37:35 PM » |
|
That was one of the tech tips on my how-to thread last year 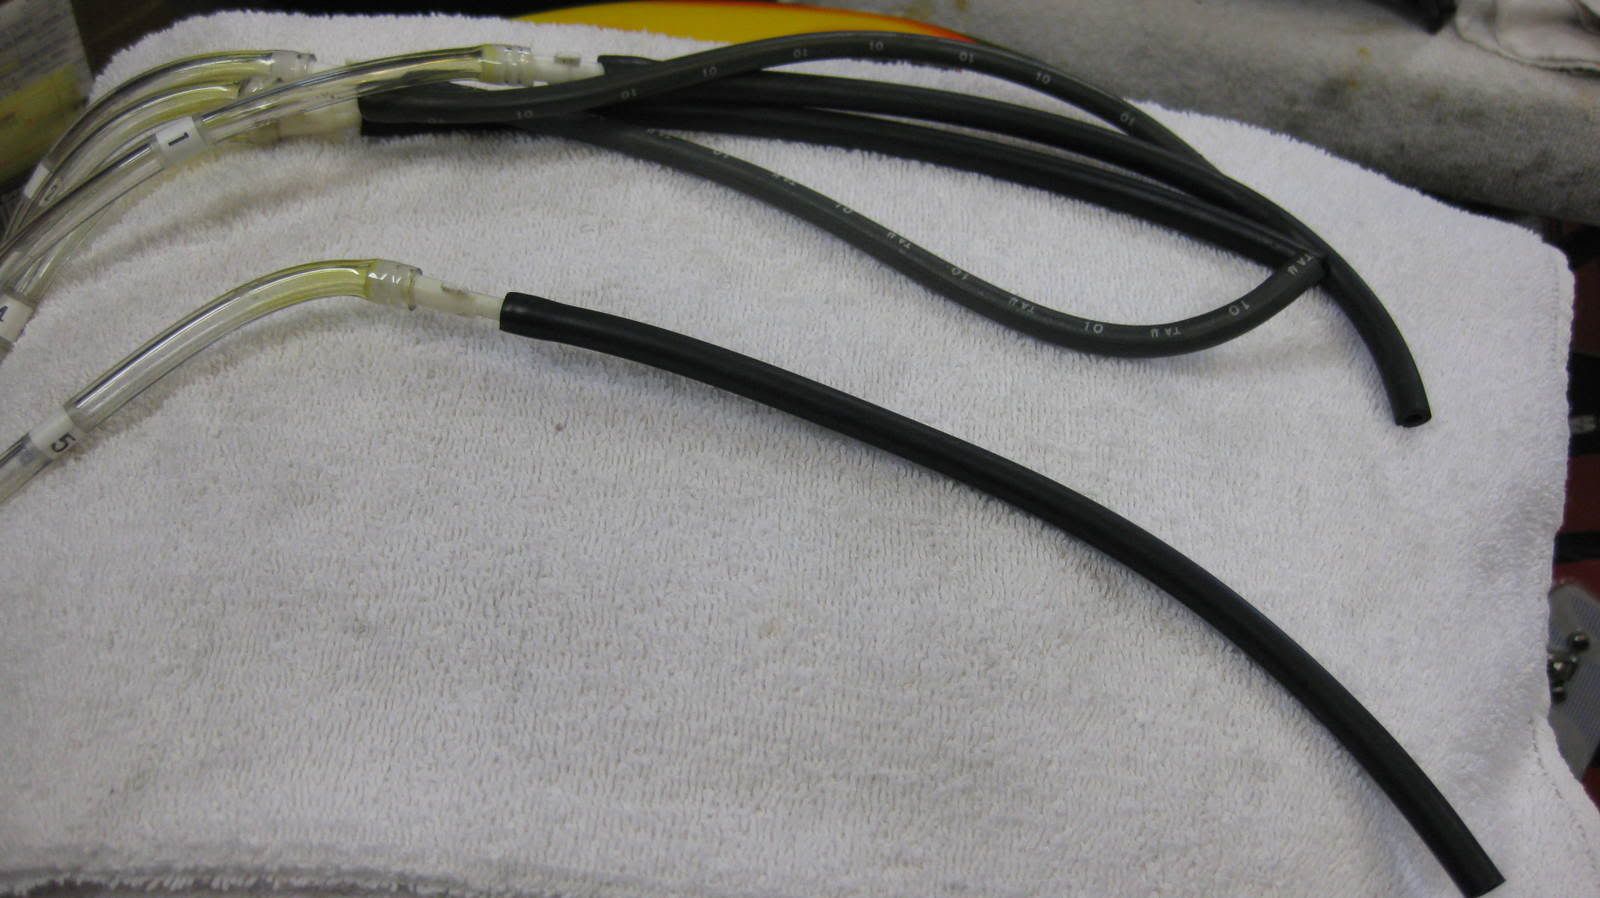 |
|
|
|
|
Logged
|
|
|
|
|
Bugslayer
|
|
« Reply #5 on: June 19, 2009, 07:44:02 PM » |
|
"That was one of the tech tips on my how-to thread last year" That'll fix me up. Thanks!  *Edit* Did you plug vacuum line's 3 & 4 when you synced? |
|
|
|
« Last Edit: June 19, 2009, 08:02:34 PM by Bugslayer »
|
Logged
|
|
|
|
Kingbee
Member
Posts: 486
VRCC# 576
Northern Illinois
|
|
« Reply #6 on: June 20, 2009, 07:57:30 AM » |
|
No, I didn't plug 3 & 4.
|
|
|
|
|
Logged
|
|
|
|
|
Al buquerque
|
|
« Reply #7 on: June 20, 2009, 08:20:45 AM » |
|
Why with this system would you plug #3 and #4 ???????????????
|
|
|
|
|
Logged
|
|
|
|
|
Bugslayer
|
|
« Reply #8 on: June 20, 2009, 08:32:56 AM » |
|
Why with this system would you plug #3 and #4 ???????????????
I don't know.... That's why I asked.  |
|
|
|
|
Logged
|
|
|
|
|
quexpress
|
|
« Reply #9 on: June 20, 2009, 09:44:00 AM » |
|
This is my first attempt at syncing my carb's. I started with a warm engine and gave it a few blip's before I started. This is where I started at. (#1 seems to be way outta whack) Looks great! What kind of nipple did you use to connect each individual hose to the reservoir? Thanks!  |
|
|
|
|
Logged
|
I still have a full deck.
I just shuffle slower ...
|
|
|
|
FLATSIX
|
|
« Reply #10 on: June 20, 2009, 10:21:04 AM » |
|
You did a great job !
I noticed that you work with the carb numbers - I work with 6 different colors - it comes at the same, but with colors you can adjust much quicker and the more and quicker you can adjust, the better the picture gets.
I put on the gauges colors and at each end of the tubes the same color.
|
|
|
|
|
Logged
|
standard '97 - european F6C - red & white - 27.000 KM
|
|
|
|
Al buquerque
|
|
« Reply #11 on: June 20, 2009, 10:59:14 AM » |
|
I posted a thread a while back on how to make and use these manometers. Looks like it is catching on. Check the archives for manometers and you should find them.
There seems to be people mixing apples and oranges on here in regards to the manometer method and individual gauges. The manometer method is basically a tug of war between all intakes/carbs to be pulling evenly. In contrast to the gauge method where your are trying to get a bunch of inaccurate gauges to read a vacuum number compared to ambient pressure.
The manometer gauge trick requires no air leaks to ambient. If there is a line "disconnected" or left off without being capped off somehow, it will suck all the tranny fluid into the cylinders that are hooked up and smoke like hell. That having been done, it's not the end of the world. A small amount of tranny oil will burn off over time, as compared to say gasoline, water, cranberry juce, Scope mouth wash, Kentucky bourbon, etc.
Y'all be careful!
|
|
|
|
|
Logged
|
|
|
|
|
FLATSIX
|
|
« Reply #12 on: June 20, 2009, 11:13:36 AM » |
|
I also syncronised with my lights ON : here in Belgium we must always drive with lamps on - so i think it's better to do the sync also like when I drive.
From time to time shut off the engine - let the 6 gauges come all to place next to each other - and fire the baby back on - this way you will get quicker at the result you want.
|
|
|
|
|
Logged
|
standard '97 - european F6C - red & white - 27.000 KM
|
|
|
|
Bugslayer
|
|
« Reply #13 on: June 20, 2009, 11:27:08 AM » |
|
This is my first attempt at syncing my carb's. I started with a warm engine and gave it a few blip's before I started. This is where I started at. (#1 seems to be way outta whack)
Looks great! What kind of nipple did you use to connect each individual hose to the reservoir? Thanks! Thanks. I found the fitting's at Home Depot. Their brand name is, "DIG" Irrigation Products... 1/4" elbow fitting (10 per pack). They're kind of hard to see in the pic. They're 90* fittings. I also put a 3/4" threaded cap in the top of the reservoir. It made filling it up a lot easier. And a little Teflon tape keeps it air tight.  |
|
|
|
|
Logged
|
|
|
|
|
Bugslayer
|
|
« Reply #14 on: June 20, 2009, 11:37:23 AM » |
|
You did a great job !
I noticed that you work with the carb numbers - I work with 6 different colors - it comes at the same, but with colors you can adjust much quicker and the more and quicker you can adjust, the better the picture gets.
I put on the gauges colors and at each end of the tubes the same color.
Thanks. Yep, I remember your post and how you marked the lines by color. Thats a great idea. I just used numbers instead. Both ends of the tube's have corresponding number's. (The outside number's on the reservoir being the front cylinder's) |
|
|
|
|
Logged
|
|
|
|
|
Bugslayer
|
|
« Reply #15 on: June 20, 2009, 11:51:16 AM » |
|
I posted a thread a while back on how to make and use these manometers. Looks like it is catching on. Check the archives for manometers and you should find them.
There seems to be people mixing apples and oranges on here in regards to the manometer method and individual gauges. The manometer method is basically a tug of war between all intakes/carbs to be pulling evenly. In contrast to the gauge method where your are trying to get a bunch of inaccurate gauges to read a vacuum number compared to ambient pressure.
The manometer gauge trick requires no air leaks to ambient. If there is a line "disconnected" or left off without being capped off somehow, it will suck all the tranny fluid into the cylinders that are hooked up and smoke like hell. That having been done, it's not the end of the world. A small amount of tranny oil will burn off over time, as compared to say gasoline, water, cranberry juce, Scope mouth wash, Kentucky bourbon, etc.
Y'all be careful!
Your original post about manometer's and how to build them is what inspired me to build one. And you're right about it catching on. It's a great tool that's inexpensive to make. Thanks for sharing your plans. When I was asking about plugging # 3 & 4 vacuum lines, I was referring to the vacuum lines on the bike. Not the manometer. With the vac tool hooked up, that leave's two of the bikes vacuum line's (3 & 4) disconnected. I didn't know if plugging them would make a difference in the reading. |
|
|
|
|
Logged
|
|
|
|
|
Al buquerque
|
|
« Reply #16 on: June 20, 2009, 05:46:41 PM » |
|
Oops! I forgot that I de-smogged my bike a long time ago and don't have those lines on #3 and #4 to contend with any more. Sorry about that.
Depending on where you live, you might want to consider doing the de-smog thing and clean a lot of troublesom clutter out of there. Lots of problems with the reed valves and leaking lines, etc. BUT... only in the states where you can get away with it. Wherever thay are? Those states are listed on here somewhere.
Look under "Old Tech Archive" to get some good guidance on de-smogging.
I like your manometer a lot more than my original cave man job. Nicely done!
|
|
|
|
|
Logged
|
|
|
|
|
Bugslayer
|
|
« Reply #17 on: June 20, 2009, 09:28:01 PM » |
|
Oops! I forgot that I de-smogged my bike a long time ago and don't have those lines on #3 and #4 to contend with any more. Sorry about that.
Depending on where you live, you might want to consider doing the de-smog thing and clean a lot of troublesom clutter out of there. Lots of problems with the reed valves and leaking lines, etc. BUT... only in the states where you can get away with it. Wherever thay are? Those states are listed on here somewhere.
Look under "Old Tech Archive" to get some good guidance on de-smogging.
I like your manometer a lot more than my original cave man job. Nicely done!
Thanks. As folk's build their own, the original plans usually get tweaked and changed just a little.But It basically all boils down to your original design. "Oops! I forgot that I de-smogged my bike a long time ago and don't have those lines on #3 and #4 to contend with any more. Sorry about that." Not a problem. Thanks for speaking up though, when you thought something was "not right". |
|
|
|
|
Logged
|
|
|
|
|
Ricky-D
|
|
« Reply #18 on: June 21, 2009, 07:56:52 AM » |
|
Number (3) cylinder is the baseline cylinder that all the others are to match.
It seems to me that it's no.3 that's loafing as shown in the picture.
|
|
|
|
|
Logged
|
2000_Valkyrie_Interstate
|
|
|
|
Bugslayer
|
|
« Reply #19 on: June 21, 2009, 08:14:19 AM » |
|
Number (3) cylinder is the baseline cylinder that all the others are to match.
It seems to me that it's no.3 that's loafing as shown in the picture.
That's what I was thinking. I'm going to give it another shot later today and see if I can get it a little closer. |
|
|
|
|
Logged
|
|
|
|
|
woefman
|
|
« Reply #20 on: June 04, 2010, 02:26:54 AM » |
|
Anyone in Arizona Make one of these yet ???
Wish I could just buy one , I suck at making things.
Where buy the mercury ? (looks like Tranny Fluid to me lol)
|
|
|
|
|
Logged
|
|
|
|
Gryphon Rider
Member
Posts: 5234
2000 Tourer
Calgary, Alberta
|
|
« Reply #21 on: June 04, 2010, 07:59:02 AM » |
|
Anyone in Arizona Make one of these yet ???
Wish I could just buy one , I suck at making things.
Where buy the mercury ? (looks like Tranny Fluid to me lol)
It IS tranny fluid. That way if it happens to get sucked into the engine, no harm done. |
|
|
|
|
Logged
|
|
|
|
|
Sodbuster
|
|
« Reply #22 on: June 04, 2010, 08:16:06 PM » |
|
You might want to check to make sure your air screws are all adjusted the same and prolly even valve adjustment before syncing the carbs ??
|
|
|
|
|
Logged
|
VRCC # 30938 '99 Std. - Black & Silver - "Spirit Horse" Dear God, Seriously .... Thanks for creating beer. You rock !!  |
|
|
|


