DavRed
Member

Posts: 345
Buckeye AZ
Phoenix AZ
|
 |
« Reply #40 on: August 17, 2009, 09:05:24 AM » |
|
Yup, all rattle can...  Inside the Valk House!!!  |
|
|
|
|
 Logged
|
|
|
|
|
roboto65
|
|
« Reply #41 on: August 17, 2009, 09:07:07 AM » |
|
Sweeeeeeeet  have a front fender I need to do. I will be following along!!! |
|
|
|
|
Logged
|
Allen Rugg VRCC #30806 1999 Illusion Blue Valkyrie Interstate 1978 Kawasaki KZ 650 project  |
|
|
|
DFragn
Guest
|
|
« Reply #42 on: August 17, 2009, 10:50:18 AM » |
|
DFragn,
Thanks for the info. I was going to send a PM and ask this question. But thought it should be on the tech board in case someone else needs to know.
I now plan to paint the entire blue part of the faring. You suggested not to sand the blue, once it is put down.
So how do I get rid of the edge after pulling the tape from the silver?
I sanded the primer till I could not feel the edge. There was a big one on that after removing the tape.
Any help is always appreciated.
Right. Do Not wet/dry sand your color coats. As far as the edge of color at your masking area it's extremely difficult to reduce that edge without causing it to finish out like crap. Instead, as I suggested, I recommend choosing a 702 [1/8"] series 3M Scotchcal striping tape http://solutions.3m.com/wps/portal/3M/en_US/3MAutomotive/Aftermarket/Products/Product-Catalog/?PC_7_RJH9U5230GE3E02LECFTDQCEK3_nid=2T5MD9PB53beRH62RP119Xgl to closely match whatever 3rd color Honda used to seperate the silver & blue. Mask high enough so that your new color coat encroches on at least 60% of the 3rd OE seperater color. This way you'll be sure to cover enough of the paint ridge and not leave any of the original stripe color exposed aftar apply the pinstripe. Choose a seller of your choice. The 1/8'x40' [min avail] should not exceed $10.00 Do not sand the ridge left by masking. Instead use the Scotchcal to cover both the ridge and any exposed remaining OE pinstripe. Apply the new pinstripe prior to clear coating!!! Hopefully, if you masked well, you'll be able to bisect the new pinstripe tape with the paint ridge and still cover the stock pinstripe color [in case the pinstripe color isn't a perfect match]. If your color coat isn't cured enough when you pinstripe and you need to pull back any of it and reapply you risk lifting the paint. I would wait at least 2 days unless you think you can pinstripe it the first try. After pinstripping go ahead and spray your entire fairing with the clear coats, over the new pinstripping. The Scotchcal can be cleared over without mishap and should be cleared over. Wet Sanding suggestion: When wet sanding prior to finish polishing only ever so slightly sand any edges or pinstripping. Do not sand as thoroughly these edges as you will the open areas. It's much too easy to sand through them!!! You'll notice, after lightly sanding the edges, small pinhole type divets in the clear. Normally you'll be sanding these out in the field areas, but leave them be over the tape and fairings edges. You'll never see them when your finished and it'll save a ton of headaches for you if you go through the clear. I guarantee you can't get them out without sanding through the clear at the edges. When I finish wet sanded I progressively checked my work by wiping the area down and drying it off to confirm whether or not I've sanded out the "orange peel". With 3 coats of clear there's enough there to remove the orange peel. But, you also want to leave as much clear as possible. Doing it this way your fairing will reflect a better paint finish than stock. It's hard to see. But I used the Scotchcal 70266. Which very closely matched the OEM color separator. It hid the 2nd color ridge quite nicely. The outcome would not have looked so good had I tried to sand the color coat ridge.  |
|
|
|
« Last Edit: August 17, 2009, 11:42:11 AM by DFragn »
|
Logged
|
|
|
|
|
roboto65
|
|
« Reply #43 on: August 17, 2009, 11:28:33 AM » |
|
So much great info on this post alone Thanks guys I am sure I can tackle the paint now !!! |
|
|
|
|
Logged
|
Allen Rugg VRCC #30806 1999 Illusion Blue Valkyrie Interstate 1978 Kawasaki KZ 650 project |
|
|
DavRed
Member
Posts: 345
Buckeye AZ
Phoenix AZ
|
|
« Reply #44 on: August 17, 2009, 11:39:33 AM » |
|
Here is what I got today... I used the Green painters tape because you can bend it around corners. (Thanks YouTube) I followed the highest point of the decal around the silver.  Going around corners… The green stuff stretches good  Masked and ready  Masked  Thought about using an old friend for paint.  Decided this was the best place… Yes I removed the seat cushion  |
|
|
|
|
Logged
|
|
|
|
|
DFragn
Guest
|
|
« Reply #45 on: August 17, 2009, 11:49:22 AM » |
|
Dave, ya sure you don't want to remove that OE chrome vent trim under the screen. Your going to see your paint line otherwise!
You pulled the headlight bezel [I think] and I imagine the inside panel. What's one more piece removed...Once removed just feather your color and clear into that region enough to give a clean appearance once you reinstall the vent trim.
Don't forget to paint and clear the rear fairing edges and carry it slightly into the backside the inside panel nestles up to. You could forgo the headlight opening mask job unless the chrome bezel is under there! If it is you should pull that off to. The only masking you should need is the silver area and just an inch or so into where the chrome trim covers. Doesn't matter if you get over-spray on the back inside. Your instrument panels will conceal it.
I looked again, perhaps the vent trim is removed. Is the masking well to the inside of the trim cover area? Some of your pics still seem to show some chrome under the tape.
If you pull all the chrome accessories your work will look like a $900.00 professional job.
You look like your having fun. Wish I had something else to paint.
Don't forget to use a breather [chemical rated maybe 30-$40.00]. A wall mounted exhaust fan would be good. If none no air
infiltration until your application has flashed over, well over. Dust and insect would be a problem.
The mask will do it's job. But, don't spend more time in there then you have too.
If you must run the AC unit direct it's flow as far away as possible. Watch your temp & humidty levels if your too high you risk having to strip the whole fairing and repaint. If you need to, get a cheap Temp/Humidty gauge. High levels will trash all your work. If you can't reduce these levels hold off painting color/clear. Don't push it just to get it done. You don't want to have to strip your fresh work and but more paint.
|
|
|
|
« Last Edit: August 17, 2009, 12:16:18 PM by DFragn »
|
Logged
|
|
|
|
DavRed
Member
Posts: 345
Buckeye AZ
Phoenix AZ
|
|
« Reply #46 on: August 17, 2009, 12:09:37 PM » |
|
Not sure at all. This is my first experience outside of Model painting, and we all should be able to learn. Feel free to suggest. I looked at the link you provided and am unclear of of what color to get to cover the masked area. I am not opposed to sanding the decal off. Just was hoping to keep it. But if it’s best to loose it. I am there |
|
|
|
|
Logged
|
|
|
|
DavRed
Member
Posts: 345
Buckeye AZ
Phoenix AZ
|
|
« Reply #47 on: August 17, 2009, 12:14:11 PM » |
|
The Chrome vent is already gone. Thanks.
I just didn't want over spray to get through the hole
|
|
|
|
|
Logged
|
|
|
|
|
DFragn
Guest
|
|
« Reply #48 on: August 17, 2009, 12:27:07 PM » |
|
Not sure at all. This is my first experience outside of Model painting, and we all should be able to learn. Feel free to suggest. I looked at the link you provided and am unclear of of what color to get to cover the masked area. I am not opposed to sanding the decal off. Just was hoping to keep it. But if it’s best to loose it. I am there You can leave the silver. If you sand the decal you will force adhesives into the paint underneath it and contaminate any attempt to repaint. Please...Leave it be or paint over it. DON'T SAND IT! If you want to keep it. Just try to match whatever 1/8" color Honda used to separate the silver & blue. As long as it's close it shouldn't be hard to tell it doesn't perfectly match since the fender and tank are far enough away. I don't know, maybe Burgundy [if so use the 70266 Scotchcal], Drk grey maybe? You should have something there from 3M that should work. Can you post a close up pic of your fender or tank detailing the color pinstripe between colors. Maybe I can help locate a pinstripe match. UPDATE: I'm not so sure the silver vent area is a decal like the trunk lid silver is. Maybe I misunderstood you and you've been referencing a 3-color pinstripe only. ??? If it's just the stripe you should be able to detect 2 edges in stead of 1. |
|
|
|
« Last Edit: August 17, 2009, 01:09:58 PM by DFragn »
|
Logged
|
|
|
|
DavRed
Member
Posts: 345
Buckeye AZ
Phoenix AZ
|
|
« Reply #49 on: August 17, 2009, 12:27:39 PM » |
|
The center tape removed  Thanks for all the help |
|
|
|
|
Logged
|
|
|
|
DavRed
Member
Posts: 345
Buckeye AZ
Phoenix AZ
|
|
« Reply #50 on: August 17, 2009, 01:14:02 PM » |
|
Talked to DFragn. What a great guy. I will feather the blue up to the mask, and then no sanding will be required before the clear. (I hope) (no repair work there) at least not in the blue..... Trying to avoid a ridge there. Now where is my feather..... |
|
|
|
|
Logged
|
|
|
|
DavRed
Member
Posts: 345
Buckeye AZ
Phoenix AZ
|
|
« Reply #51 on: August 19, 2009, 05:47:47 PM » |
|
Paint came today. Looks like the right stuff. I will start the prosess in about an hour. Gota cool down a little here in Arizona. I will take pics along the way. Probably post them tomorrow. Thanks for all the support..... I am excited |
|
|
|
|
Logged
|
|
|
|
|
roboto65
|
|
« Reply #52 on: August 19, 2009, 05:56:46 PM » |
|
So am I cannot wait to see the results!!!
|
|
|
|
|
Logged
|
Allen Rugg VRCC #30806 1999 Illusion Blue Valkyrie Interstate 1978 Kawasaki KZ 650 project |
|
|
|
|
KY,Dave (AKA Misunderstood)
Member
Posts: 4146
Specimen #30838 DS #0233
Williamsburg, KY
|
|
« Reply #54 on: August 20, 2009, 09:59:31 AM » |
|
Nice work !! |
|
|
|
|
Logged
|
|
|
|
|
DFragn
Guest
|
|
« Reply #55 on: August 20, 2009, 01:34:09 PM » |
|
Beautiful Dave. Nice job. You can buff in a few days like you said. But, wet sanding out the orange peel then buffing will give you a mirror finish. Remember that rattle can paint has no catylsyt in it [like a proffesional spray job] so it will stay a little soft for awhile. You can wet sand and polish in a few days but you'll probably want to go back and polish [only] again in 30 days when you'll get an even better sheen once it hardens up a bit. I found using a scratch remover prior to waxing works very well. |
|
|
|
|
Logged
|
|
|
|
DavRed
Member
Posts: 345
Buckeye AZ
Phoenix AZ
|
|
« Reply #56 on: August 20, 2009, 03:10:40 PM » |
|
I plan on wetsanding it Saturday with 2000 grit. Then Polish it and complete it with scratch remover.
Hope to have it all put back together by Monday...
Thanks for the help
|
|
|
|
|
Logged
|
|
|
|
|
DFragn
Guest
|
|
« Reply #57 on: August 20, 2009, 03:47:57 PM » |
|
I plan on wetsanding it Saturday with 2000 grit. Then Polish it and complete it with scratch remover.
Hope to have it all put back together by Monday...
Thanks for the help
Trust me Dave. Start with 800 grit. When the dimples get down to pin holes or a little bigger go to 1500. Then the 2000. It will save a lot of time. I actually only used the 800 & 1500 and it turned out like glass. I used Turtle Wax Scratch Remover [really good stuff] following Mothers Power Ball [primary] and soft terry rags & Polishing Compound. But hey I can be a bit anal  |
|
|
|
« Last Edit: August 20, 2009, 03:54:58 PM by DFragn »
|
Logged
|
|
|
|
|
roboto65
|
|
« Reply #58 on: August 20, 2009, 04:27:14 PM » |
|
Hey Dave if you don't mind me asking what did the paint and clear cost from Colorrite I see 3 cans of clear did you get 3 cans of color then?
Awesome job and so ready to tackle mine !!!
|
|
|
|
|
Logged
|
Allen Rugg VRCC #30806 1999 Illusion Blue Valkyrie Interstate 1978 Kawasaki KZ 650 project |
|
|
DavRed
Member
Posts: 345
Buckeye AZ
Phoenix AZ
|
|
« Reply #59 on: August 20, 2009, 05:34:02 PM » |
|
Clear was $15.95 per can and the Blue was around $35 a can. I used about 1 full can of the Blue. Some from each can. I switched to the new can for the final coat of blue because I didn't want to run out during the process of spraying the last coat, and have the thing sputtering paint.
Might have been enough in there to get it done, but I didn't want to chance it.
I am doing the 2 side pods and the lids on the saddlebags next. I will use that can for the first coat on them. Then it should be about empty.
|
|
|
|
|
Logged
|
|
|
|
|
roboto65
|
|
« Reply #60 on: August 20, 2009, 05:44:05 PM » |
|
Was that ColorRites clear or someone elses?
|
|
|
|
|
Logged
|
Allen Rugg VRCC #30806 1999 Illusion Blue Valkyrie Interstate 1978 Kawasaki KZ 650 project |
|
|
DavRed
Member
Posts: 345
Buckeye AZ
Phoenix AZ
|
|
« Reply #61 on: August 20, 2009, 06:22:45 PM » |
|
Correct...It was ColorRite color and Clear
|
|
|
|
|
Logged
|
|
|
|
DavRed
Member
Posts: 345
Buckeye AZ
Phoenix AZ
|
|
« Reply #62 on: August 20, 2009, 06:25:27 PM » |
|
I plan on wetsanding it Saturday with 2000 grit. Then Polish it and complete it with scratch remover.
Hope to have it all put back together by Monday...
Thanks for the help
Trust me Dave. Start with 800 grit. When the dimples get down to pin holes or a little bigger go to 1500. Then the 2000. It will save a lot of time. I actually only used the 800 & 1500 and it turned out like glass. I used Turtle Wax Scratch Remover [really good stuff] following Mothers Power Ball [primary] and soft terry rags & Polishing Compound. But hey I can be a bit anal Will do DFragn |
|
|
|
|
Logged
|
|
|
|
|
Baloo
|
|
« Reply #63 on: August 21, 2009, 09:52:58 AM » |
|
Nice work Dave! Congrats on a job very well done! |
|
|
|
|
Logged
|
Never ride any faster than your guardian angel can fly...
|
|
|
|
Cleaner Man
|
|
« Reply #64 on: August 21, 2009, 08:42:33 PM » |
|
Very interesting thread. thanks for the info, looks like a very good job.
|
|
|
|
|
Logged
|
|
|
|
DavRed
Member
Posts: 345
Buckeye AZ
Phoenix AZ
|
|
« Reply #65 on: August 22, 2009, 08:52:32 PM » |
|
Got the Fairing polished tonight. I have got to wait 20 days before I can put any wax on it. I will get it put back together tomorrow and back on the road for that 20 days. Then will polish it again and then I can wax it. Here is a link to the slide show. http://s479.photobucket.com/albums/rr159/davred_photo/Fairing%20paint/?albumview=slideshowsome may be out of order. But you will get the idea...  If you want to do this, there are some up and downs in the process. But only UP's in the outcome....Are well worth it!!!! Thanks for all the help from this group..... |
|
|
|
« Last Edit: August 22, 2009, 10:11:21 PM by DavRed »
|
Logged
|
|
|
|
|
DFragn
Guest
|
|
« Reply #66 on: August 23, 2009, 03:32:57 AM » |
|
Got the Fairing polished tonight. I have got to wait 20 days before I can put any wax on it. I will get it put back together tomorrow and back on the road for that 20 days. Then will polish it again and then I can wax it. Here is a link to the slide show. http://s479.photobucket.com/albums/rr159/davred_photo/Fairing%20paint/?albumview=slideshowsome may be out of order. But you will get the idea... If you want to do this, there are some up and downs in the process. But only UP's in the outcome....Are well worth it!!!! Thanks for all the help from this group..... Dave, The transition at the pinstripe turned out very well. Nice job! |
|
|
|
|
Logged
|
|
|
|
|
roboto65
|
|
« Reply #67 on: August 23, 2009, 04:33:43 AM » |
|
Awesome that is looking great !!!! Great job Dave |
|
|
|
|
Logged
|
Allen Rugg VRCC #30806 1999 Illusion Blue Valkyrie Interstate 1978 Kawasaki KZ 650 project |
|
|
DavRed
Member
Posts: 345
Buckeye AZ
Phoenix AZ
|
|
« Reply #68 on: August 23, 2009, 01:57:03 PM » |
|
Ran out of bolts. All put back together. Think I will go find some lonely roads tomorrow. It has been a great project. If I had it to do again. I would. I can still say after 2 years and 2 Valks, and 20,000 miles... I am the only one to work on them!!!! http://s479.photobucket.com/albums/rr159/davred_photo/Fairing%20paint/?albumview=slideshowNever tell me I CAN"T!!!! I will never listen!!!  Thanks again for all the help. AND PHONE CONVERSATIONS!!! I COULD NOT DONE AS GOOD AS I DID WITHOUT YA'LL |
|
|
|
|
Logged
|
|
|
|
PAVALKER
Member
Posts: 4435
Retired Navy 22YOS, 2014 Valkyrie , VRCC# 27213
Pittsburgh, Pa
|
|
« Reply #69 on: August 23, 2009, 02:28:58 PM » |
|
Looks great. Nice Job. With all that said and done, what would you think it is worth to get done, taking into consideration all the tools, materials, time and labor? |
|
|
|
|
Logged
|
John  |
|
|
DavRed
Member
Posts: 345
Buckeye AZ
Phoenix AZ
|
|
« Reply #70 on: August 23, 2009, 02:37:33 PM » |
|
All I can say is: I Did it and to me it is PRICELESS!!!!!! PUMPING CHEST>>> LOL |
|
|
|
« Last Edit: August 23, 2009, 02:39:33 PM by DavRed »
|
Logged
|
|
|
|
|
stude31
|
|
« Reply #71 on: August 26, 2009, 09:03:43 PM » |
|
Very well done Dave!! Thanks for all the pictures and to those members who contributed to the posts. Dfrag, it is great to know that their are those that are willing to share their info as you have demonstrated.. Great job Once again great members to a great bike! I had the great fortune of seeing my I/S laying on her side in a grassy ditch. I bought new parts and replaced the cowl that Dave repainted because of the scuffs in the fairing and the crack that was left next to one of the turn signal housings. I also replaced the fronts of the pods. They all came from honda and were the OEM black and was ready to be put on... However... When she laid over it put pressure on one of the saddlebags and cracked the bag on the bottom. It is not seen but I need to fix it cause it looks to be spreading. I have drilled holes to stop the "bleeding" but I was curious to know what compound you used and where you got it to fill the crack in the fairing and should I patch from the inside or the outside or both?? Thanks and great job Dave!!! |
|
|
|
|
Logged
|
|
|
|
DavRed
Member
Posts: 345
Buckeye AZ
Phoenix AZ
|
|
« Reply #72 on: August 27, 2009, 05:58:58 AM » |
|
This is what I used to repair the crack. I used the tape on the inside. 3 Layers in differant directiond and then added some to the outside. Let it dry and sand toll smooth. 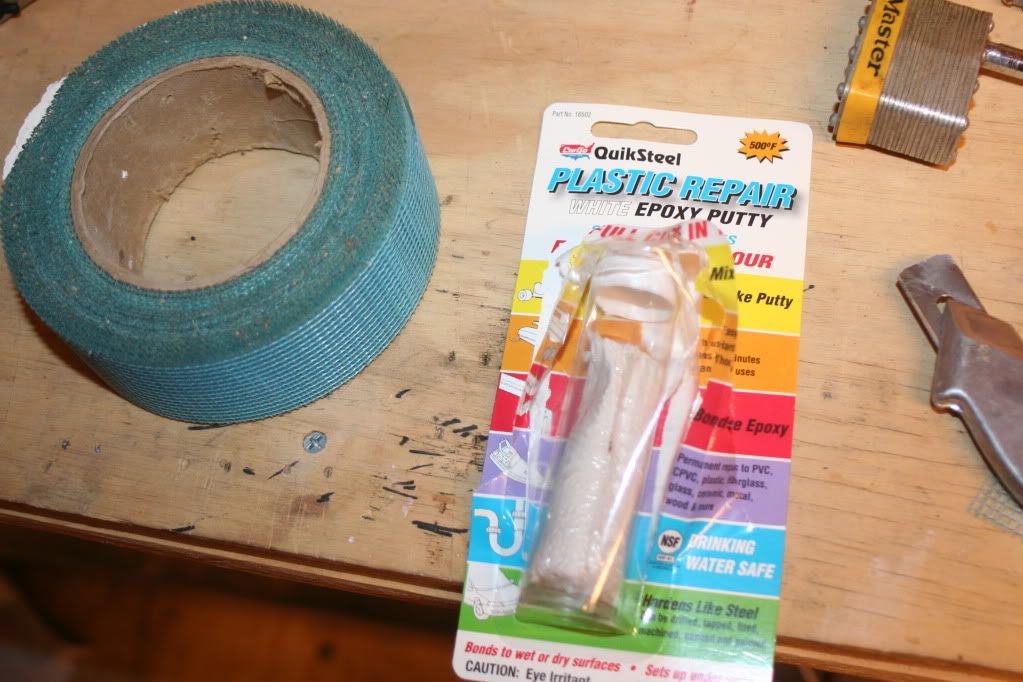 |
|
|
|
|
Logged
|
|
|
|
|


