John Schmidt
Member

Posts: 15371
a/k/a Stuffy. '99 I/S Valk Roadsmith Trike
De Pere, WI (Green Bay)
|
 |
« on: May 11, 2015, 05:49:14 PM » |
|
I have a leaker on one of my new tires(rear) mounted on the 1200 project bike. I have a set of 90 deg. metal stems but don't want to pull the wheel so decided I'd try the C-clamp approach. Is there anything special I need other than the clamp, anything I need to watch for? The front wheel is coming off in the near future so I can rework the forks so that one won't be so bad. The rear wheel....different story. It's as big a PITA to pull as the Valk.
I figure I should be able to use a ratcheting tie down strap around the perimeter to help reseat the bead, but still open to suggestions.
|
|
|
|
|
 Logged
|
|
|
|
gordonv
Member
Posts: 5766
VRCC # 31419
Richmond BC
|
|
« Reply #1 on: May 11, 2015, 06:17:12 PM » |
|
Sounds like you didn't buy the 90' with the nut on the outside?
|
|
|
|
|
Logged
|
1999 Black with custom paint IS   |
|
|
John Schmidt
Member
Posts: 15371
a/k/a Stuffy. '99 I/S Valk Roadsmith Trike
De Pere, WI (Green Bay)
|
|
« Reply #2 on: May 11, 2015, 06:28:14 PM » |
|
That's what I'm putting in, the guy that sold and mounted the tires for me used a normal straight stem. It's impossible to get to it inside the 1200 wheel.....plus the stem leaks. As luck would have it, it didn't start leaking until after I had it fully installed on the bike....and the new stems hadn't come in yet. I just don't want to remove the rear wheel for this so was asking what the usual procedure is using a large c-clamp.
Re. the 90 deg. metal stems, I've been running them on the Valk for years.
|
|
|
|
|
Logged
|
|
|
|
|
Pappy!
|
|
« Reply #3 on: May 11, 2015, 07:30:02 PM » |
|
John, I have only done it that way one time but the tire only broke loose on one side, which is perfect. Never had to do anything but let go with the C-clamp and hit it with air. Nothing around the tire was needed.
|
|
|
|
|
Logged
|
|
|
|
|
vanagon40
|
|
« Reply #4 on: May 11, 2015, 07:52:22 PM » |
|
It's not a Valkyrie, but it is a Honda. (I believe there was a small wood scrap on the other side, but I might be wrong.) 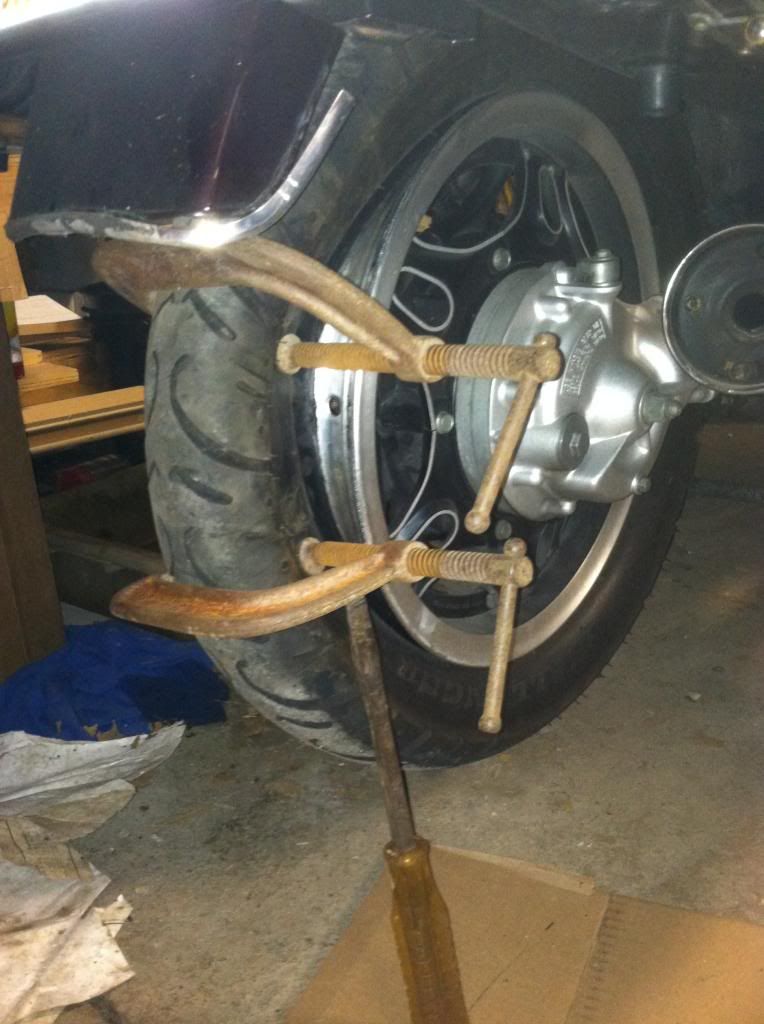 |
|
|
|
« Last Edit: May 11, 2015, 07:54:43 PM by vanagon40 »
|
Logged
|
|
|
|
hubcapsc
Member
Posts: 16816
upstate
South Carolina
|
|
« Reply #5 on: May 12, 2015, 02:30:51 AM » |
|
I would use boards or something to spread the load of the clamp(s)...  -Mke |
|
|
|
|
Logged
|
|
|
|
|
Thunderbolt
|
|
« Reply #6 on: May 12, 2015, 05:36:02 AM » |
|
What Mike said John. I have done it a few times. On the side that you want to break loose put the board on only the tire. On the other side put the board on the rim. Works better on the front with the skinny tire but will work on the rear too. It is just stiffer. Like Pappy said just remove the clamps and air it back up. Had a rider from Texas passing through and his was leaking when he stopped in Tallahassee a few years ago. I drove the car up and took along a small compressor and a new 90 degree stem and we changed his in the parking lot of the hotel.
|
|
|
|
|
Logged
|
|
|
|
John Schmidt
Member
Posts: 15371
a/k/a Stuffy. '99 I/S Valk Roadsmith Trike
De Pere, WI (Green Bay)
|
|
« Reply #7 on: May 12, 2015, 06:51:02 AM » |
|
OK, thanks guys. I only have one clamp big enough to encircle the tire but maybe the use of a board will suffice. I'm hoping the size of metal stem I have will fit, don't recall the size just now but the way my luck runs.....probably won't. Hope to give it a try the next day or so.
|
|
|
|
|
Logged
|
|
|
|
|
Cracker Jack
|
|
« Reply #8 on: May 13, 2015, 03:20:40 PM » |
|
If you use the large clamp you might be able to squeeze the tire enough to get a smaller clamp over the fat part of the tire. I have done that in the past to break a bead when I only had one large clamp.  |
|
|
|
|
Logged
|
|
|
|
John Schmidt
Member
Posts: 15371
a/k/a Stuffy. '99 I/S Valk Roadsmith Trike
De Pere, WI (Green Bay)
|
|
« Reply #9 on: May 15, 2015, 03:29:16 PM » |
|
Well, I've done about everything except stand on my head while doing it and I still can't get the tire to break loose. I've squeezed that sucker down so far I worry about damaging it in the casing. The core was removed before I started, using double clamps with a piece of wood on both sides. All I get is a distorted tire and a lot of exercise, really beginning to bug me. Any suggestions? It simply won't pull away from the rim enough to even get a large screwdriver or pry bar in there.
|
|
|
|
|
Logged
|
|
|
|
|
Pete
|
|
« Reply #10 on: May 15, 2015, 05:12:43 PM » |
|
Use a small piece of wood on the screw side on the tire.
Shape the small piece of wood to match the contour of the tire.
So the clamp is starting flat on each side.
Have the ends of the clamp as close to the rim as possible without hitting the rim.
I only use one clamp just off center of the valve so I can easily access the hole.
Technique is important, else it becomes a bear.
|
|
|
|
|
Logged
|
|
|
|
John Schmidt
Member
Posts: 15371
a/k/a Stuffy. '99 I/S Valk Roadsmith Trike
De Pere, WI (Green Bay)
|
|
« Reply #11 on: May 15, 2015, 07:43:22 PM » |
|
I think it's snake oil, being able to compress the tire enough to change the valve stem without pulling the wheel. I just tried it again a couple different ways, compressed the sidewalls until they're literally touching each other and it still won't break from the rim. I've used a couple pry bars and it just won't let go. It's the back wheel on the 1200 and for all the time I've spent trying this method I could have pulled the fool thing, changed the stem, and had it back together again. I'm done screwing with it for now.  |
|
|
|
|
Logged
|
|
|
|
|
Pete
|
|
« Reply #12 on: May 16, 2015, 06:31:29 AM » |
|
If the side walls are touching???
Your clamp is not close enough to the bead.
It may be sliding away from the bead as you compress it. If it is sliding away from the bead it will never break loose.
As it starts to compress, it is helpful if the small block of wood, actually eases behind the screw side - closer to or on the bead.
I have done two in the last 10 days, 1 front and 1 rear on valkyries, so yes it does work. Having the clamp on or as close to the bead is key, and having it not slide down the side wall is also key.
The square corner on the wood and the friction of the wood really helps.
|
|
|
|
« Last Edit: May 16, 2015, 06:34:02 AM by Pete »
|
Logged
|
|
|
|
hubcapsc
Member
Posts: 16816
upstate
South Carolina
|
|
« Reply #13 on: May 16, 2015, 07:27:34 AM » |
|
The square corner on the wood and the friction of the wood really helps. No doubt  ... the wood is the trick. I ran out of clamps and still couldn't break the bead the first time I tried it.  Keeping the pinch happening near the bead and not letting the clamp or wood slide outwards is also key... I did it easy (well, it got hard to turn the clamp strength-wise near the end) with just this one clamp... -Mike
|
|
|
|
|
Logged
|
|
|
|
John Schmidt
Member
Posts: 15371
a/k/a Stuffy. '99 I/S Valk Roadsmith Trike
De Pere, WI (Green Bay)
|
|
« Reply #14 on: May 16, 2015, 07:30:36 AM » |
|
I'll see what today brings in the way of success. These are new tires and I'm fearful of damaging the sidewall. I have two clamps like those in the link, I can get one side down next to the bead but the other side is out a bit. Apparently due to the clamp not as deep as I would like it to be. I've tried using wood under both sides, then one side, none....nothing seems to work to break the bead away. http://www.homedepot.com/p/HART-6-in-C-Clamp-with-Quicktight-Technology-HCC0601/205035964 |
|
|
|
|
Logged
|
|
|
|
hubcapsc
Member
Posts: 16816
upstate
South Carolina
|
|
« Reply #15 on: May 16, 2015, 07:54:49 AM » |
|
I bet your clamp is your problem... after fooling with it several times, including on the road, I wouldn't even try it without an 8 inch C clamp. I carry an 8 inch C clamp in my saddlebag after this day...  -Mike |
|
|
|
|
Logged
|
|
|
|
|
Pete
|
|
« Reply #16 on: May 16, 2015, 11:00:16 AM » |
|
The wood block on the screw side is way to large.
Mine is about 1.5 to 2 inches wide and about 2 to 2.5 inches long.
The length is toward the tread, but does not extend on to the tread.
It helps if the corner stops just short of the ridge where the tread would start.
That keeps it from sliding.
The non screw side of the clamp needs to be close to the rim also, so the pressure is directly across or even slightly angled so the screw side is biased toward the inside of the rim.
|
|
|
|
|
Logged
|
|
|
|
John Schmidt
Member
Posts: 15371
a/k/a Stuffy. '99 I/S Valk Roadsmith Trike
De Pere, WI (Green Bay)
|
|
« Reply #17 on: May 16, 2015, 12:19:19 PM » |
|
Last I talked to a friend, he was off tomorrow and was coming over. Maybe an extra set of hands will help. Well, it's now a few hours later and with nothing else pressing for the moment I decided to try again. Used a small block on either side as suggested, a larger clamp, and when it appeared the bead was starting to pull away I used a pry bar to "urge" it along. Again, the sidewalls were almost touching and the blocks were positioned right at the edge of the rim on both sides. And again....snake eyes. So, I'm done. I'll put the core back in and inflate the tire, let it leak as it will for now. Sometime in the future I'll pull the rear end apart and take both the wheels to a tire shop and let them break it down. As it is, I feel the sidewalls most likely are now damaged internally. Kinda pisses me off.  |
|
|
|
« Last Edit: May 16, 2015, 02:50:04 PM by John Schmidt »
|
Logged
|
|
|
|
|
Pete
|
|
« Reply #18 on: May 17, 2015, 02:20:11 PM » |
|
John I just did another one today.
Rear on an IS with Dunlop Elite 3.
It was kinda tough but using the technique I outlined it took me about an hour start to finish.
The small block only goes on the screw side of the clamp, right up against the rim edge.
Use the large wood on the other side, overlapping the rim and tire.
As the small block clears the rim, let it move in behind the rim more onto the bead.
Once you have done once it is easier.
The first one I ever did I had issues like you are experiencing after a couple of hours, I realized I was just not doing it right.
Think about it, pressure on the bead on one side and on the rim and tire on the other side.
It will come loose when aligned correctly and pressure applied.
|
|
|
|
|
Logged
|
|
|
|
John Schmidt
Member
Posts: 15371
a/k/a Stuffy. '99 I/S Valk Roadsmith Trike
De Pere, WI (Green Bay)
|
|
« Reply #19 on: May 17, 2015, 03:02:32 PM » |
|
OK Pete, the one thing I missed was the "non-screw" side and that block was not on the rim. Makes sense now, busy this evening but will try that approach tomorrow. I have one small block maybe 3" long, a piece of 1x2 and was putting it under the screw side. The rest of that piece is about 6" long and should work fine resting against the rim. The short piece I tried running it lengthwisw parallel to the rim. Tomorrow I'll do it the same way but with the other side against the rim. Let you know.
PS: got the email, I'll hang on to the number for now. Thanks.
|
|
|
|
|
Logged
|
|
|
|
|
da prez
|
|
« Reply #20 on: May 18, 2015, 01:42:26 PM » |
|
John , when the tire bead pulls away , a little squirt of liquid dish soap and then let the tire relax , and try again. It will slide off and when ready , slide back on.
da prez
|
|
|
|
|
Logged
|
|
|
|
John Schmidt
Member
Posts: 15371
a/k/a Stuffy. '99 I/S Valk Roadsmith Trike
De Pere, WI (Green Bay)
|
|
« Reply #21 on: May 18, 2015, 05:44:01 PM » |
|
Thanks Ross, I'll give it a try. So far all I've done is squeezed the tire together and the bead only starts to roll back, but never lets go....even with a prybar. It's about to get on my last nerve.  I have an idea for a mechanical bead breaker but need someone to do some welding for me. I have a small welder but it's not worth a flip and I'm not good with it anyway. When it comes to welding, I make a good gardner. OK, here's where I am later the same day. That tire will not move off the rim; PERIOD! After this picture was taken, I was able to use a hammer and move the block closer to the rim. Results were no different. You can see the wet marks running down the sidewall, I soaked that sucker good. All I got was a clean tire. The screw side block I actually ground out the end of it to match the curve of the rim, then cut a depression with a hole saw to keep the foot of the clamp from sliding off. In this first picture, I have actually backed off the clamp a little so I can tap the block in against the rim. Prior to this pic, the tire was actually squeezed together much more, a good 1.5-2.0", almost had the sidewalls touching. As I said before, I'm afraid I've probably already damaged the tire so figured at this point I had nothing to lose. Made no difference how much I squeezed it, it simply will not move off the rim. So, in the next few days I'll pull both wheels and take them to a tire shop and have new metal stems installed.  This is the other side of the clamp, it's solid against the rim.  |
|
|
|
« Last Edit: May 18, 2015, 07:49:59 PM by John Schmidt »
|
Logged
|
|
|
|
|
pancho
|
|
« Reply #22 on: May 19, 2015, 05:02:43 AM » |
|
The point where the screw is seated needs to be much closer to the rim,,,, the pressure is being applied to the wrong spot John,, also the clamp is sort of at the wrong angle to get the pressure where it needs to be. Try a different wood block on the screw side without the depression for the screw,,, you want the block and screw to be able to move (or be tapped up) under the rim a bit if possible.
You may try making the screw side block from a piece of 1X4 hardwood instead of a 2X4,, the shape looks good, the depression for the screw needs to go, maybe the plastic cap. It is all about applying undeniable pressure to the right point and your rig is missing it.. The bike really looks good John, and I doubt that you have permanently hurt the tire.
|
|
|
|
« Last Edit: May 19, 2015, 05:16:18 AM by pancho »
|
Logged
|
The most expensive things you will purchase, are those things you would not have needed if you had listened and obeyed.
|
|
|
|
The emperor has no clothes
|
|
« Reply #23 on: May 19, 2015, 05:34:06 AM » |
|
The point where the screw is seated needs to be much closer to the rim,,,, the pressure is being applied to the wrong spot John,, also the clamp is sort of at the wrong angle to get the pressure where it needs to be. Try a different wood block on the screw side without the depression for the screw,,, you want the block and screw to be able to move (or be tapped up) under the rim a bit if possible.
You may try making the screw side block from a piece of 1X4 hardwood instead of a 2X4,, the shape looks good, the depression for the screw needs to go, maybe the plastic cap. It is all about applying undeniable pressure to the right point and your rig is missing it.. The bike really looks good John, and I doubt that you have permanently hurt the tire.
+1, it's got to go all the way next to the rim. It looks like the tire is keeping the clamp from being able to get there. |
|
|
|
|
Logged
|
|
|
|
|
Pete
|
|
« Reply #24 on: May 19, 2015, 08:42:30 AM » |
|
John,
The small block is to long, it needs to stop before it encounters the tread.
Slightly shorter that the sidewall. That lets the sidewall move in without the tread.
And the small block needs to slide in behind the rim as son as possible.
3/4 in thickness is plenty.
Suggestion: tr
turn the large wood block 90 degrees so it runs with the tire.
You are on the right track.
|
|
|
|
|
Logged
|
|
|
|
John Schmidt
Member
Posts: 15371
a/k/a Stuffy. '99 I/S Valk Roadsmith Trike
De Pere, WI (Green Bay)
|
|
« Reply #25 on: May 19, 2015, 04:17:56 PM » |
|
Tried one last time, no joy. So, I put the core back in and pumped up the tire. I'll address it another day, down the road when I have reason to remove the wheel or I get the stem to stop leaking air. Either way, I'm done with it for now. With all the futile time and effort spent so far, I could have had that wheel off and drove halfway to Texas and back, then reinstalled it. Would have saved me a lot of time and aggravation. Thanks for all the suggestions, I'll leave it for another day. |
|
|
|
|
Logged
|
|
|
|
|


