|
cogsman
|
 |
« on: May 14, 2016, 11:15:34 AM » |
|
Hi All, I've never done my bearings before. Being hard of hearing, I can't tell by listening when the bearing is seated. I think I got them, but the seal seems to be protruding just a tad. I don't want to leave them if they are not correct. Do these look correct to you? Left:  Right:  |
|
|
|
|
 Logged
|
|
|
|
|
flash2002
|
|
« Reply #1 on: May 14, 2016, 02:38:44 PM » |
|
Make sure the spacer in between the bearings is in the center if it's not, the bearings wont seat all the way. Install the pin to make sure the spacer is in the center and try to drive the bearings a bit more. From the first pictures, it should go in more.
|
|
|
|
|
Logged
|
|
|
|
|
Chrisj CMA
|
|
« Reply #2 on: May 14, 2016, 04:33:44 PM » |
|
On the left side (brake rotor) side, if that dust seal is touching the bearing, then the bearing is not fully seated
Or maybe the dust seal is sticking out because you might have put the thicker right side bearing on the left by accident and the left on the right.....that wouldn't be good
|
|
|
|
« Last Edit: May 14, 2016, 04:50:51 PM by Chrisj CMA »
|
Logged
|
|
|
|
|
Chrisj CMA
|
|
« Reply #3 on: May 14, 2016, 04:47:55 PM » |
|
That right side bearing looks like a left, did you possibly use two of the same bearings (lefts) if so you should not run it that way. Or did you switch them by mistake?
|
|
|
|
« Last Edit: May 14, 2016, 06:22:34 PM by Chrisj CMA »
|
Logged
|
|
|
|
|
cogsman
|
|
« Reply #4 on: May 14, 2016, 07:14:03 PM » |
|
The thicker bearing is on the final drive side.
Am I able to remove the seal and reseat it or will I destroy it if i take it out now?
|
|
|
|
|
Logged
|
|
|
|
|
longrider
|
|
« Reply #5 on: May 14, 2016, 10:29:16 PM » |
|
The Bly way to safely remove it would be to drive or pull the bearing back. This will push the seal back nicely with no damage. Then press the bearing back in. Remember to have the axle installed through the bearings to line up the centre tube
|
|
|
|
|
Logged
|
|
|
|
|
Chrisj CMA
|
|
« Reply #6 on: May 15, 2016, 04:43:29 AM » |
|
You got enough grease on that puppy it should come out with a pic. If you mess it up it's only a dust seal, new one cheaper than a bearing. Don't do anything to the bearing except press it in all the way
|
|
|
|
|
Logged
|
|
|
|
|
cogsman
|
|
« Reply #7 on: May 15, 2016, 06:32:55 AM » |
|
|
|
|
|
|
Logged
|
|
|
|
|
flash2002
|
|
« Reply #8 on: May 15, 2016, 09:42:48 AM » |
|
It looks good, I normally use an old race that just fit the bearing, I grind the outside so it don't get stuck then use it to hammer the bearing all the way.
|
|
|
|
|
Logged
|
|
|
|
|
Chrisj CMA
|
|
« Reply #9 on: May 15, 2016, 10:15:21 AM » |
|
Much better
|
|
|
|
|
Logged
|
|
|
|
|
indybobm
|
|
« Reply #10 on: May 15, 2016, 12:25:46 PM » |
|
Cogsman, you put a picture of your damper plate in another post. I replied to it here. Does this look normal? These indentations that conform to the shape of the dampers seem odd...  Cogsman, actually it does not look normal. You had posted about the bearings not being seated. I had a question about the bearing on the right side of the wheel. When you took the old bearing out, was there a 'lip' around the opening for the bearing. It looked to me like the drive flange had been wearing into the wheel around the bearing. The surface around the bearing should be absolutely flat with no ridge or protrusions. This flat area along with the thrust washer between the wheel and the drive flange helps to keep the drive flange from wobbling. Then I saw the picture of the damper plate and it does look like it has been gouged by the metal inserts on the dampers. If the dampers were worn that much then the danger is that the drive flange is allowed to wobble. This can cause excessive wear on the drive flange splines, final drive splines, and the surface around the right rear bearing area on rear wheel. I would take a very close look at the drive flange splines, final drive splines, and the area around the right wheel bearing for excessive wear. Maybe post more pictures and get some more opinions. |
|
|
|
|
Logged
|
So many roads, so little time
VRCC # 5258
|
|
|
|
cogsman
|
|
« Reply #11 on: May 15, 2016, 12:41:25 PM » |
|
Quoted from other thread: Hi Indy, thanks for the post. Here are some pics. The splines look fine to me, unless I don't know what I'm looking at. Your opinions are welcome. As I pulled the final drive, I found the depths to which my mechanic had f****d me over. The damper plate was NOT bolted on. It was being held by friction only. There was NO thrust washer in the final driven gear and no O-ring around the flange. I looked at the other pic I posted with the bearing; while I noticed that the bearing lip inside the wheel was a bit mangled, it was there, and the bearing seems to be sitting solidly on it. as for the outer lip around the bearing once seated, there are a couple of dings but overall it doesn't look damaged. Again, assuming I am properly interpreting what I'm looking at. I certainly hope I don't need to replace the whole wheel for these things. I've ordered new bolts and based your message, a new damper plate as well. Do the dampers themselves look ok to you?      |
|
|
|
|
Logged
|
|
|
|
|
The emperor has no clothes
|
|
« Reply #12 on: May 15, 2016, 12:53:47 PM » |
|
I am on a phone but it looks like you have some wear on the pinion side of the driveshaft and some on flange. I don't think it's catastrophic but it will likely get worse over time. I would be on the look out for a good pumpkin
|
|
|
|
|
Logged
|
|
|
|
|
Chrisj CMA
|
|
« Reply #13 on: May 15, 2016, 12:54:18 PM » |
|
The dampeners look ok, Id order new (IS) ones for next time though. However looks like you need a new drive shaft and pinion cup.
I think that flange looks alright, with proper lube and assembly it should last years, but that drive shaft is toast.
|
|
|
|
« Last Edit: May 15, 2016, 12:59:15 PM by Chrisj CMA »
|
Logged
|
|
|
|
|
cogsman
|
|
« Reply #14 on: May 15, 2016, 02:33:27 PM » |
|
Ok, can you guys help me to understand what you're seeing that leads you to believe the drive shaft is toast?
It was riding fine last season. Never had any slippage issues. All of these problems are popping up right now because I am finding those deficiencies.
A used final drive is going to run me $700 CAD, and with all the other expenditures to get this thing running, I simply cannot drop that right now.
I am hoping I can get one more season out of this one and then swap it all out next year.
Don't get me wrong, it's not that I don't accept your answer, I just want to learn how to read the signs.
|
|
|
|
|
Logged
|
|
|
|
|
The emperor has no clothes
|
|
« Reply #15 on: May 15, 2016, 02:48:25 PM » |
|
Ok, can you guys help me to understand what you're seeing that leads you to believe the drive shaft is toast?
It was riding fine last season. Never had any slippage issues. All of these problems are popping up right now because I am finding those deficiencies.
A used final drive is going to run me $700 CAD, and with all the other expenditures to get this thing running, I simply cannot drop that right now.
I am hoping I can get one more season out of this one and then swap it all out next year.
Don't get me wrong, it's not that I don't accept your answer, I just want to learn how to read the signs.
You won't need a new pumpkin right now or maybe never. What you will need is the driveshaft and a pinion cup. If memory serves about $100 total. |
|
|
|
|
Logged
|
|
|
|
|
Chrisj CMA
|
|
« Reply #16 on: May 15, 2016, 03:00:34 PM » |
|
Yours is toas because the teeth on the pinion splines are too thin, should look like this  |
|
|
|
« Last Edit: May 15, 2016, 03:05:31 PM by Chrisj CMA »
|
Logged
|
|
|
|
|
indybobm
|
|
« Reply #17 on: May 15, 2016, 04:38:35 PM » |
|
I think the dampers are in really bad shape. If you enlarge the picture you can see how the metal insert has wallowed (technical term) the rubber around them. The inserts must be very loose. As mentioned before, replace with the ones for the InterState. They are cheaper and much more durable.
|
|
|
|
|
Logged
|
So many roads, so little time
VRCC # 5258
|
|
|
gordonv
Member

Posts: 5766
VRCC # 31419
Richmond BC
|
|
« Reply #18 on: May 15, 2016, 09:45:37 PM » |
|
Before you worry too much about that $700, do a few searches. Most likely you only need a new spline, which you can get off of a GW GL1500. I paid $25 for a final drive for a GW.
Also, different places have different prices for the same item. Procaliber seems cheapest. But I always go to my local Honda dealer and give them a chance to lower their price to something closer to what I can buy it for online. Remember that there usually is no shipping charge, figure out the exchange, and it only takes a few days to get it (their next delivery of parts from the warehouse).
If I see your picture right, the splines on your drive shaft have rounded off on the tops.
|
|
|
|
« Last Edit: May 15, 2016, 09:58:21 PM by gordonv »
|
Logged
|
1999 Black with custom paint IS   |
|
|
|
Chrisj CMA
|
|
« Reply #19 on: May 16, 2016, 05:28:10 AM » |
|
Cogsman, you put a picture of your damper plate in another post. I replied to it here. Does this look normal? These indentations that conform to the shape of the dampers seem odd... Cogsman, actually it does not look normal. You had posted about the bearings not being seated. I had a question about the bearing on the right side of the wheel. When you took the old bearing out, was there a 'lip' around the opening for the bearing. It looked to me like the drive flange had been wearing into the wheel around the bearing. The surface around the bearing should be absolutely flat with no ridge or protrusions. This flat area along with the thrust washer between the wheel and the drive flange helps to keep the drive flange from wobbling. Then I saw the picture of the damper plate and it does look like it has been gouged by the metal inserts on the dampers. If the dampers were worn that much then the danger is that the drive flange is allowed to wobble. This can cause excessive wear on the drive flange splines, final drive splines, and the surface around the right rear bearing area on rear wheel. I would take a very close look at the drive flange splines, final drive splines, and the area around the right wheel bearing for excessive wear. Maybe post more pictures and get some more opinions. After reading this quote from indybobm, I looked at the pic and I agree with his concern over the hub area. I hope it's just a lighting thing but the hub that rides under the flange where the double row (thicker) bearing is. With the wheel laying on its side, brake rotor down, there should be one flat even surface with the bearing being flush with the end of the hub. Flat from one edge of the hub across the bearing all the way to the opposite side of the hub, smooth and flat. If not then you need a new wheel |
|
|
|
« Last Edit: May 16, 2016, 05:33:25 AM by Chrisj CMA »
|
Logged
|
|
|
|
|
cogsman
|
|
« Reply #20 on: May 16, 2016, 06:45:03 AM » |
|
All great advice thank you. So I can use a shaft from a 1997 goldwing? Only 97 or will other years fit too?
|
|
|
|
|
Logged
|
|
|
|
|
indybobm
|
|
« Reply #21 on: May 16, 2016, 07:31:28 AM » |
|
All great advice thank you. So I can use a shaft from a 1997 goldwing? Only 97 or will other years fit too?
Not sure what you mean by 'shaft'. All GW driveshafts are too long, about 3/4" longer than the Valk. GW Final Drives do not interchange either. There are many parts that are in the GW Final Drive that are interchangeable. The most important being the ring gear hub that has the final drive splines (where the drive flange plugs in). Also the Pinion Joint Cup (where the driveshaft plugs into the Final Drive). Replacing the Valk spline hub requires that both the GW and Valk Final Drive be disassembled and the spline hub pressed out of both ring gear assemblies. The worn Valk hub is discarded and the hub from GW is pressed into the Valk ring gear. The Valk ring gear bearing and spacer shouid also be used, not the one from the GW. This helps keep the gear backlash to where it is supposed to be. As for the wear on the bearing face of the wheel. It does not look real bad but it is not ideal either. You might want to consider putting two thrust washers in there, greased up of course. This is a picture of an un-worn bearing face. 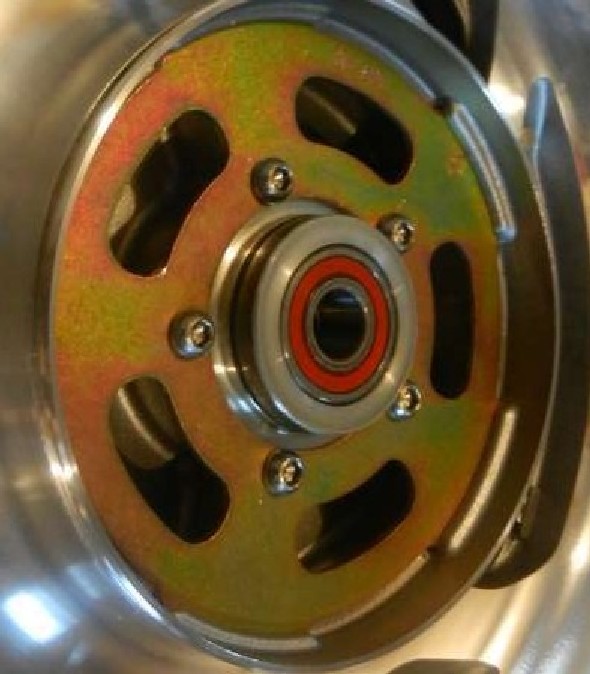 This is what my wheel looked like when I took it off after i bought the bike (no thrust washer). 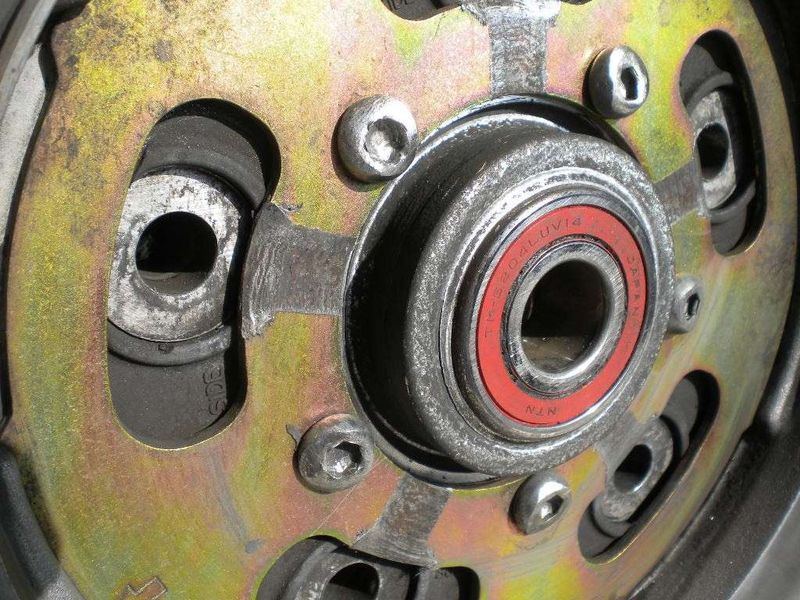 |
|
|
|
|
Logged
|
So many roads, so little time
VRCC # 5258
|
|
|
|
heavyd
|
|
« Reply #22 on: May 16, 2016, 02:17:00 PM » |
|
Based on the one picture at the top of the thread there definitely looks like the shoulder is worn off around the bearing. Was there a thrust washer in there when you took it apart? And those dampeners look like toast to me. I went through the same thing myself a few years ago, can get pretty pricey but you caught it earlier than me. http://www.valkyrieforum.com/bbs/index.php/topic,42992.msg414547.html#msg414547 |
|
|
|
|
Logged
|
|
|
|
|
Chrisj CMA
|
|
« Reply #23 on: May 17, 2016, 11:57:38 AM » |
|
All great advice thank you. So I can use a shaft from a 1997 goldwing? Only 97 or will other years fit too?
Valkyrie drive shafts are still available. Why would you try to put a wing part in your Valkyrie if you don't have to? |
|
|
|
|
Logged
|
|
|
|
|
cogsman
|
|
« Reply #24 on: May 17, 2016, 09:02:59 PM » |
|
Unless I misread a previous post I was told gw 1500 shaft would be compatible and cheaper.
|
|
|
|
|
Logged
|
|
|
|
|
Bighead
|
|
« Reply #25 on: May 17, 2016, 10:11:43 PM » |
|
Unless I misread a previous post I was told gw 1500 shaft would be compatible and cheaper.
No he was taking about the spline. I think the GW shaft is too long for a Valk. |
|
|
|
|
Logged
|
1997 Bumble Bee
1999 Interstate (sold)
2016 Wing
|
|
|
gordonv
Member
Posts: 5766
VRCC # 31419
Richmond BC
|
|
« Reply #26 on: May 18, 2016, 04:52:46 PM » |
|
Unless I misread a previous post I was told gw 1500 shaft would be compatible and cheaper.
You had mentioned the final drive costing $700, not the drive shaft. I mentioned a GW drive is a lot less. The intention, as mentioned, is to use the GW drive spline as a replacement for the Valkyrie (the usual problem with a Valk final drive). The GW drive shaft and u-joint, was replaced with the Valkyrie's, as they are better (stronger). |
|
|
|
« Last Edit: May 18, 2016, 05:09:10 PM by gordonv »
|
Logged
|
1999 Black with custom paint IS |
|
|
|
|
|
The emperor has no clothes
|
|
« Reply #28 on: May 19, 2016, 05:27:25 PM » |
|
They definitely have wear. How much more you can get out of them I don't know. They also have curious wear on the ends of the teeth. I'm assuming this is do to the lack of a thrust washer. If you go with the new to you pumpkin I would also get a new flange also.
|
|
|
|
|
Logged
|
|
|
|
|
Ricky-D
|
|
« Reply #29 on: May 20, 2016, 07:21:03 AM » |
|
The teeth on that spline show less than 25% wear. they will be good for many, many more miles.
***
|
|
|
|
|
Logged
|
2000_Valkyrie_Interstate
|
|
|
|
Chrisj CMA
|
|
« Reply #30 on: May 20, 2016, 07:52:13 AM » |
|
OK, one more thing...where is the spacer that goes in the final drive? If it was assembled without that spacer, that is why your wheel is now ruined. Keep that final drive, get a spacer put back in and spend the $$ on a new (used) wheel and of course a drive shaft and pinion cup. Make sure, however, that you clean EVERY BIT of old grease and dirt out of the splines for that grease no doubt contains lots of ground aluminum from the hub. Final drive with spacer  Without grease....that spacer can only go in one way. skinny part first  |
|
|
|
« Last Edit: May 20, 2016, 10:13:21 AM by Chrisj CMA »
|
Logged
|
|
|
|
|
indybobm
|
|
« Reply #31 on: May 20, 2016, 12:28:33 PM » |
|
Do you have the spacer shown in Chris's picture? If not, that is one of the common pieces between the GW Final Drive and the Valk Final Drive.
|
|
|
|
|
Logged
|
So many roads, so little time
VRCC # 5258
|
|
|
|
cogsman
|
|
« Reply #32 on: May 20, 2016, 03:47:44 PM » |
|
I don't have the spacer but I'll get one. On another note I have a line on a rear wheel off a 2001 interstate. Do all wheels fit all models all years?
|
|
|
|
|
Logged
|
|
|
|
hubcapsc
Member
Posts: 16817
upstate
South Carolina
|
|
« Reply #33 on: May 20, 2016, 03:58:40 PM » |
|
I don't have the spacer but I'll get one. On another note I have a line on a rear wheel off a 2001 interstate. Do all wheels fit all models all years?
If you match the rotor and the wheel, yes... 97-99 STD/Tourers have one kind of wheel/rotor. 99 Interstates and everything else have the other kind. All wheel/rotors fit on all bikes, but don't mix the wrong wheel with the wrong rotor... -Mike |
|
|
|
|
Logged
|
|
|
|
|
indybobm
|
|
« Reply #34 on: May 20, 2016, 04:14:07 PM » |
|
There are essentially two rear wheels for a Valk, 1J and 2J. 97-99 Std & Tourer use the 1J. 2J is 2000-2003 Std and all Interstates. 1J wheels have to use the early rotor, 2J wheels use the later rotor. There is a difference in the offset. I looked at the picture of your wheel at the beginning of this post and you have a 1J. The designation can be found in the cavity inside of where the brake rotor attaches. Like Mike said, the IS wheel will work if you use the correct rotor. When switching wheels, you should always check the number on the wheel. Even if you have a 98 Valk, the rear wheel could have been changed to a later one. Like you are getting ready to do.
As for front wheels, 97 front wheels are 1J. 98 and later are all 2J. All Valk front wheels use the same rotor though. The difference is in the front wheel bearings and possibly the front inner bearing spacer.
|
|
|
|
« Last Edit: May 20, 2016, 04:18:35 PM by indybobm »
|
Logged
|
So many roads, so little time
VRCC # 5258
|
|
|
|
cogsman
|
|
« Reply #35 on: May 21, 2016, 06:19:28 AM » |
|
I made this video. Hopefully easier to see the situation. As always, any advice is appreciated. https://youtu.be/TvYpXbE_HRg |
|
|
|
|
Logged
|
|
|
|
|
Chrisj CMA
|
|
« Reply #36 on: May 21, 2016, 06:57:17 AM » |
|
My .02 fwiw
First, running two thrust washers (maybe 3)may let you limp that wheel along
If you replace the final drive try to get the flange that goes with it. If that cannot be done and the splines of the replacement are like new, then get a new flange. In other word's only run the flange you have on the drive you have, not in the new one
It does not matter if you put the thrust washer on the hub or the inside the flange (6to one 1/2 doz the other)
Lastly, I would recheck that new drive and flange after a few hundred miles to see if all is going good
|
|
|
|
« Last Edit: May 21, 2016, 07:01:55 AM by Chrisj CMA »
|
Logged
|
|
|
|
Tfrank59
Member
Posts: 1364
'98 Tourer
Western Washington

|
|
« Reply #37 on: May 21, 2016, 07:03:03 AM » |
|
Good video. I wish you had wiped the grease off around that bearing so we can see if in fact the low area is from wear to the casting – is it? You said your dampers were toast --could it be that there was some grinding against the casting going on there? The next question (and I see somebody else commented on this) is what about the spacer that sits inside the hub between the two bearings? If you reach in there can you feel whether that spacer is snug against both inner races? That's a key thing to avoid bearing failure later on, because you don't want excessive sideload on your wheelbearings, and a lot of that depends on that spacer being the correct length and fitting snug between the two inner races. And that brings up another question – what about the other wheel bearing, is that seated correctly? In other words does that sit flush with the top of the casting on the other side? if so, and the spacer between the two bearings inside is correct, then I think you can use this wheel without a problem. You did well to get a second thrust washer because I'm thinking wear is why the casting around the drive side bearing is lower –evidently your previous owner didn't take care of things.
|
|
|
|
« Last Edit: May 21, 2016, 07:05:10 AM by Tfrank59 »
|
Logged
|
-Tom
Keep the rubber side down. USMC '78-'84
'98 Valkyrie, ‘02 VTX 1800, '96 Royal Star, '06 Drifter, '09 Bonneville, '10 KTM 530, '04 XR 650, '76 Bultaco, '81 CR 450, '78 GS 750...
|
|
|
|
The emperor has no clothes
|
|
« Reply #38 on: May 21, 2016, 07:06:26 AM » |
|
I'm just a novice but it looks toast to me. You mentioned you had a 2j wheel you could get cheap. I'd grab it. It might be possible to modify a thrust washer to fit around the bearing to make up for the wear but I don't know if it will hold up. Don't beat yourself up too much, shy of removing everything and inspecting before a purchase it would be hard to see this. Have you tried Pinwall for a used rotor ? |
|
|
|
|
Logged
|
|
|
|
|
Ricky-D
|
|
« Reply #39 on: May 21, 2016, 07:08:38 AM » |
|
I think you will not have much success with running that rear wheel regardless of how many thrust washers you employ. The reason I say this is because of the stack up dimension has been lost due to the loss of material from the bearing boss. That loss allows the flange to work in a way that was not designed and resulted in the damage you see to the dampers and the damper retaining plate, and the splines, not to mention the wheel itself.
There have been some who have had their wheel repaired (from the same damage) with good success.
***
|
|
|
|
|
Logged
|
2000_Valkyrie_Interstate
|
|
|
|


