|
lilgeo
|
 |
« on: February 28, 2019, 02:26:11 PM » |
|
Hi everyone, After letting my 2000 Interstate sit in the garage for five years I decided to try to start it a month ago. Much to my chagrin, gas started leaking out of the carbs onto the floor. I googled "rebuild carbs on a valkyrie" and found an excellent series of youtube videos by D-Ray Smith https://www.youtube.com/watch?v=ITyszhh4XHsI decided to try to rebuild the carbs myself and ordered a rebuild kit from parts unlimited. After many bruised knuckles, the bike is running for the first time in five years! My question is this... in the service manual under the section on Pilot Screw Adjustment it mentions using a tachometer with graduations of 50rpm or smaller that will accurately indicate a 50 rpm change. Can someone recommend a tach that I can use that costs less than a Digi Sync? I decided to do this on a budget and for the cost of a Digi Sync I can probably take it to a shop to have it done. Thanks! George |
|
|
|
|
 Logged
|
|
|
|
|
The emperor has no clothes
|
|
« Reply #1 on: February 28, 2019, 02:40:17 PM » |
|
Might try posting on the Florida board. Maybe somebody near has a DigiSync.
|
|
|
|
|
Logged
|
|
|
|
|
JimC
|
|
« Reply #2 on: February 28, 2019, 02:42:54 PM » |
|
George,
There is a very active group of Valkyrie owners in Florida. I would bet that it won't take long for one of them to reach out to you with an answer to your problem.
Jim
|
|
|
|
|
Logged
|
Jim Callaghan SE Wisconsin
|
|
|
|
longrider
|
|
« Reply #3 on: February 28, 2019, 03:21:20 PM » |
|
Although the method used in the manual is good it is really not required. Open each pilot 2.25 turns and synchronize the carbs. Set the idle speed to 900 give or take a hair and ride on.
|
|
|
|
|
Logged
|
|
|
|
|
lilgeo
|
|
« Reply #4 on: February 28, 2019, 04:07:39 PM » |
|
Thank you very much. I did set the pilot screws to 2 1/4 turns out and the bike is running ok. Not purring like I remember though.
One biiiig question..... Florida board??????
Thanks!
|
|
|
|
|
Logged
|
|
|
|
|
|
|
lilgeo
|
|
« Reply #6 on: February 28, 2019, 04:41:59 PM » |
|
Yes thanks again!
|
|
|
|
|
Logged
|
|
|
|
nogrey
Member

Posts: 939
Live every day as if it were your last
Nampa, Idaho

|
|
« Reply #7 on: March 01, 2019, 05:22:54 AM » |
|
Your pilot screw adjustment of 2-1/4 turns out should be adequate. One reason it may not be purring like you remember is because it needs to by synced. I know D-Ray’s videos and he shows you how to “bench sync” the carbs. It is a good method, but the digisync is spot on and makes quite a difference (in my experience). But lets move away from the carbs for a moment. Let’s say they are fine. Vacuum issues are probably the no.1 reason why we have issues on these bikes. If you still have all the original hoses and vacuum caps, there is a good possibility that you are experiencing a vacuum leak. You can simply replace them, or as many have done, you can remove them all permanently. There are many writeups on doing a “de-smog” on this forum. Do a search in the 1500 tech board on “desmog” and you’ll find lots of help. My personal preference, because it is simple and effective is a kit sold by Rick. You can get one here: https://redeye.ecrater.com/p/8464393/shiny-desmog-kit-ver-2-hondaHe also sells a host of other high quality supplies. One thing to note should you go this route is that you will need to also purchase a vacuum hose for your petcock. Once de-smogged and the petcock hose is replaced, you will have eliminated all possible vacuum leaks. |
|
|
|
|
Logged
|
|
|
|
|
lilgeo
|
|
« Reply #8 on: March 01, 2019, 07:43:26 AM » |
|
Oh boy....... Vacuum leaks... I don't know if I mentioned it but I am not a very competent mechanic. When I started this project, I took about 100 pictures as I took everything apart and put it all back together again. Unfortunately, I would up with one bracket left over and I cannot figure out where it goes. There were two on my bench.. I found a picture of one on the number 6 carburetor but I don't have any pictures showing the second one. And I scoured the Service Manual and it only shows the one on the number 6 carb. How can I attach a picture... perhaps you may know where it goes? I love the idea of desmoging the bike but I really don't ever want to take it apart again!!!! The kit you sent the link for seems complete and it is very reasonably priced but it doesn't mention directions. I found a link to De-smog by QueXpress but it doesn't look like an easy job.... and it means I would have to take it apart agin..  What is the likelihood that I can find a leak using carb cleaner? |
|
|
|
|
Logged
|
|
|
|
|
lilgeo
|
|
« Reply #9 on: March 01, 2019, 08:00:32 AM » |
|
|
|
|
|
|
Logged
|
|
|
|
hubcapsc
Member
Posts: 16799
upstate
South Carolina
|
|
« Reply #10 on: March 01, 2019, 08:05:51 AM » |
|
That's one of the holder-downers for the smog caps on top of the motor...
-Mike
|
|
|
|
|
Logged
|
|
|
|
|
lilgeo
|
|
« Reply #11 on: March 01, 2019, 08:12:15 AM » |
|
Thank you Mike, I have two. One on the number 6 carburetor. Any idea where this one goes?
|
|
|
|
|
Logged
|
|
|
|
hubcapsc
Member
Posts: 16799
upstate
South Carolina
|
|
« Reply #12 on: March 01, 2019, 08:14:53 AM » |
|
Thank you Mike, I have two. One on the number 6 carburetor. Any idea where this one goes?
I'm not in front of my bike right now, but I remember one is harder to see than the other. Look in the same place on the other side of the engine... ? The cap doesn't look like it is missing anything, but it needs the holder-downer to keep from blowing out I guess... if you left off the cap, there's a big hole in your engine  -Mike |
|
|
|
|
Logged
|
|
|
|
|
lilgeo
|
|
« Reply #13 on: March 01, 2019, 08:23:55 AM » |
|
I searched everywhere (except where this goes I guess). I cannot find a spot to put it. I would appreciate it if you could check your bike whenever you get a chance and see if you can find the spot.
George
|
|
|
|
|
Logged
|
|
|
|
|
lilgeo
|
|
« Reply #14 on: March 01, 2019, 08:36:17 AM » |
|
I'm so sorry, I have my left and right mixed up. The bracket that I know where it goes on on the number 5 intake, not number 6 carb. It is on the right side of the bike. I went out and took pictures of the numbers 5&6 intakes. Hopefully I can get them to post. Still one left on the bench either way. 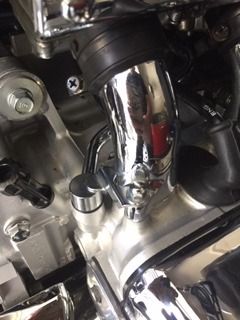 Number 5, right side 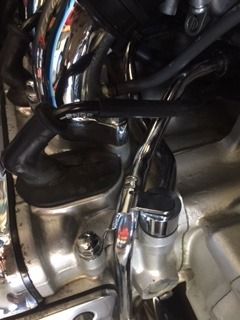 Number 6, left side |
|
|
|
|
Logged
|
|
|
|
hubcapsc
Member
Posts: 16799
upstate
South Carolina
|
|
« Reply #15 on: March 01, 2019, 08:42:22 AM » |
|
Look in those same locations at the front of your motor, where it is hard to see. I just went and took pictures of the ones in your pictures, without stooping all in there to get a pic of the two in the front... my bike has been ridden three or four times without washing it and it is dusty and sweaty with condensation in our 100 percent humidity... yours sure is clean Here's a shoptalk article that talks about where all four smog caps are: http://www.valkyrieriders.com/shoptalk/smog.htm-Mike |
|
|
|
« Last Edit: March 01, 2019, 08:44:27 AM by hubcapsc »
|
Logged
|
|
|
|
|
lilgeo
|
|
« Reply #16 on: March 01, 2019, 03:02:02 PM » |
|
Lol. The only reason it looks so clean is because while I had it apart my buddy who was helping me insisted that I clean and polish everything before putting it back together!
|
|
|
|
|
Logged
|
|
|
|
|
3W-lonerider
|
|
« Reply #17 on: March 01, 2019, 03:44:32 PM » |
|
I bet that bracket goes on the left side if the engine in the front right behind the radiator. That one is hard to see and its fun putting back in to.
|
|
|
|
|
Logged
|
|
|
|
|
lilgeo
|
|
« Reply #18 on: March 02, 2019, 06:59:54 AM » |
|
YES!!!! Thank you lonerider that was where it goes. Added another picture to my collection!
Oh, and I found someone in my town who has a digi sync so I am no longer in need of a tach.
Thank you all!
George
|
|
|
|
|
Logged
|
|
|
|
|


