Valkorado
Member

Posts: 10514
VRCC DS 0242
Gunnison, Colorado (7,703') Here there be twisties.
|
 |
« on: March 28, 2019, 05:37:41 AM » |
|
Thinking seriously about getting one of these, if I like it probably one for each bike. Anyone tried Jersey's mod? Easy install for a non mechanic? It seems like every other season I'm replacing a seal, and scrubbing the underside of a bike with a toilet brush. Slop aside, it would be worth it if it prevents that.
|
|
|
|
|
 Logged
|
Have you ever noticed when you're feeling really good, there's always a pigeon that'll come sh!t on your hood? - John Prine 97 Tourer "Silver Bullet" 01 Interstate "Ruby"  |
|
|
|
fraziarwp
|
|
« Reply #1 on: March 28, 2019, 06:15:25 AM » |
|
I just installed the Jersey mod. Simple installation. Instructions simple to follow. Made shifts a little crisper. I like it.
|
|
|
|
|
Logged
|
1998 GL1500CW - Blue/Ivory
2007 Yamaha FJR1300
2017 Honda CTX700 DCT
|
|
|
baldo
Member
Posts: 6961
Youbetcha
Cape Cod, MA
|
|
« Reply #2 on: March 28, 2019, 06:48:43 AM » |
|
Does anyone have Jersey's mod on a bike with boards?
|
|
|
|
|
Logged
|
|
|
|
|
The emperor has no clothes
|
|
« Reply #3 on: March 28, 2019, 07:48:04 AM » |
|
Does anyone have Jersey's mod on a bike with boards?
I don’t Bob, but it shouldn’t make any difference. |
|
|
|
|
Logged
|
|
|
|
|
Fixjet
|
|
« Reply #4 on: March 28, 2019, 08:10:35 AM » |
|
Does anyone have Jersey's mod on a bike with boards?
I do, with Cobra boards. Works fine and does make shifting more precise. Had a similar setup on my 1500 Wing and missed it on the Valk. |
|
|
|
|
Logged
|
|
|
|
|
WintrSol
|
|
« Reply #5 on: March 28, 2019, 08:20:09 AM » |
|
If you have a power drill and a good drill set, maybe a bench vice, that's all you need. The rest is just lining the parts up and tightening bolts.
|
|
|
|
|
Logged
|
98 Honda Valkyrie GL1500CT Tourer
Photo of my FIL Jack, in honor of his WWII service
|
|
|
|
Chrisj CMA
|
|
« Reply #6 on: March 28, 2019, 08:57:40 AM » |
|
There was a post of another shifter mod that just slipped over the shifter shaft. Looked neat but didn’t look like it would be as sure as Jersey’s. Post seemed to have vanished.
|
|
|
|
|
Logged
|
|
|
|
MarkT
Member
Posts: 5196
VRCC #437 "Form follows Function"
Colorado Front Range - elevation 2.005 km

|
|
« Reply #7 on: March 28, 2019, 09:25:05 AM » |
|
I have one, for George (red bobber below) not installed yet but will soon - weather finally better. I have already done Ammpro's version slightly modified for my BBT (modified) forward controls on Deerslayer and Jade. The Jersey mod is specifically for this purpose, not assembled from a general parts bin. Definitely worth it.
|
|
|
|
|
Logged
|
|
|
|
|
SCain
|
|
« Reply #8 on: March 28, 2019, 12:41:07 PM » |
|
The admin have deleted my posts, its ok, if you read the Rules of the Road there is no advertising on the message boards, period. Exceptions are made for paying vendors. PM myself or F6BANGER
Thanks
Steve
|
|
|
|
|
Logged
|
Steve  |
|
|
|
..
|
|
« Reply #9 on: March 28, 2019, 03:18:10 PM » |
|
If the idea is to move the shifter to the left? I Have blue pinstriping on my bike. I found some blue PVC pipe that coincidentally matches the blue pinstripe. I cut a 1 1/4 inch section and pushed it over the shifter. Now my shifter is about 3/4 of an inch longer  |
|
|
|
« Last Edit: March 29, 2019, 12:13:56 AM by Britman »
|
Logged
|
|
|
|
Valkorado
Member
Posts: 10514
VRCC DS 0242
Gunnison, Colorado (7,703') Here there be twisties.
|
|
« Reply #10 on: March 28, 2019, 03:37:40 PM » |
|
Thanks for the input guys. I saw both designs, and both look pretty good. Maybe I'll try one of each!  |
|
|
|
|
Logged
|
Have you ever noticed when you're feeling really good, there's always a pigeon that'll come sh!t on your hood? - John Prine 97 Tourer "Silver Bullet" 01 Interstate "Ruby" |
|
|
|
WintrSol
|
|
« Reply #11 on: March 28, 2019, 07:00:46 PM » |
|
If the idea is to move the shifter to the right?
No, the mod supports the end of the shifter that connects to the transmission, to keep it from wobbling around when you shift, and putting excess wear on the seal and bearings. Jersey's mod, and the other one linked, do not change the length of the shifter you press your toe against. |
|
|
|
|
Logged
|
98 Honda Valkyrie GL1500CT Tourer
Photo of my FIL Jack, in honor of his WWII service
|
|
|
|
oldskool
|
|
« Reply #12 on: March 29, 2019, 09:38:13 AM » |
|
My bike had a very wobbly gear shifter and it leaked out of the seal. I changed the seal 3 times in the last 2 years. Still leaked. Anyway, I added the Jersey shifter bracket this week... And it works Great!!! Quality item! No leaks, shifts perfectly, zero wobble and the shiny chrome looks good! 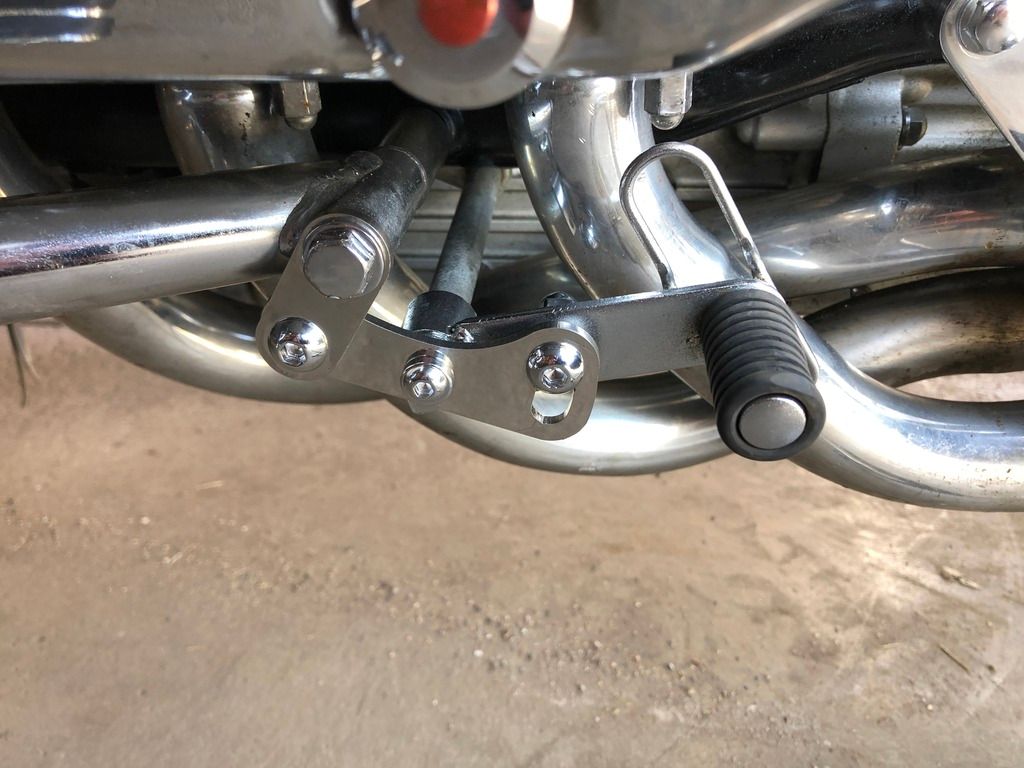 |
|
|
|
« Last Edit: March 30, 2019, 05:08:01 AM by RetroRob »
|
Logged
|
|
|
|
|
3W-lonerider
|
|
« Reply #13 on: March 30, 2019, 03:02:31 PM » |
|
got my first ride in today. and i must say my shifter was great, shifted crisper than it has in a long time. and at no point today did it jump out of first or second gear. the last couple of years it would jump out of first gear at least twice in a hundred miles. mainly because if i did'nt really mash on the shifter when going into first it would jump out 10 feet after taking off. today i shifted into first like any normal bike should and it was great. did'nt have to mash it to go into any gear. the kick shifter worked great since i had to mod it to work with the new set up. thanks jersey for that great setup.  |
|
|
|
|
Logged
|
|
|
|
Jersey
Member
Posts: 545
VRCC #37540
Southern Maryland
|
|
« Reply #14 on: April 07, 2019, 06:53:23 AM » |
|
First, THANKS!! to all the great feedback everyone's given on the Jersey Bracket. It's been amazing how global this has suddenly gotten... Europe, Canada, Australia. Really appreciate that! Regarding the installation. It is necessary to drill one hole in the side of the shift lever. If you look over the Instructions on the website Support page, you'll see that it's very straight forward as others have mentioned. My STRONG recommendation is to drill this hole in a three step process: 1. Use a SetPunch to create a divit where you want to drill. 2. Drill a small hole FIRST -1/8" or so. 3. Drill the final hole 11/32". (Good technique to partially drill from one side then finish up drilling on the other side... this will eliminate any burring of the edges.) This is actually a very easy process. Take your time and work on a piece of wood to provide a solid support. This can easily be drilled by HAND, EVEN for the inexperienced. A bench vise is always good. A drill press is just gravy! I hope that helps and of course don't hesitate to email me directly via the website. I'll be at InZane Taos! If you're really concerned about doing this, I'll have the tools with me and can assist you in drilling the hole and installing the Jersey Bracket (or any of our other products) on the spot. And for a cold Guiness ... Let me know!! Thanks! Jersey JerseyMCProducts.com
|
|
|
|
« Last Edit: April 07, 2019, 07:06:54 AM by Jersey »
|
Logged
|
Jersey
|
|
|
|
Scottrtho
|
|
« Reply #15 on: April 07, 2019, 07:54:39 AM » |
|
What..? I just checked out the youtube video of this product in action. I swear t looks like the shift shaft is being bent/deflected up and down with each shift. I was expecting to see the shaft end stable and the shift lever move up and down in the slotted bracket hole...but it doesn't.
What am i missing??
|
|
|
|
|
Logged
|
|
|
|
Jersey
Member
Posts: 545
VRCC #37540
Southern Maryland
|
|
« Reply #16 on: April 07, 2019, 08:34:36 AM » |
|
What..? I just checked out the youtube video of this product in action. I swear t looks like the shift shaft is being bent/deflected up and down with each shift. I was expecting to see the shaft end stable and the shift lever move up and down in the slotted bracket hole...but it doesn't.
What am i missing??
The OEM geometry stays the same. Take a peek underneath and you'll see there's an offset extension that is mounted on the spline post right near the Transmission housing and is used to get around the exhaust pipe. THIS SPLINE POST is the centerline of the shifting rotation. In the video you'll see how the Jersey Bracket provides a second support point that rotates on this same Centerline. The slotted hole is for finetuning the placement of the Jersey Bracket on the Shift Lever. The Instructions explain how to do this in the final step. Does that help? |
|
|
|
|
Logged
|
Jersey
|
|
|
|
WintrSol
|
|
« Reply #17 on: April 07, 2019, 08:43:54 AM » |
|
What..? I just checked out the youtube video of this product in action. I swear t looks like the shift shaft is being bent/deflected up and down with each shift. I was expecting to see the shaft end stable and the shift lever move up and down in the slotted bracket hole...but it doesn't.
What am i missing??
The OEM geometry stays the same. Take a peek underneath and you'll see there's an offset extension that is mounted on the spline post right near the Transmission housing and is used to get around the exhaust pipe. THIS SPLINE POST is the centerline of the shifting rotation. In the video you'll see how the Jersey Bracket provides a second support point that rotates on this same Centerline. The slotted hole is for finetuning the placement of the Jersey Bracket on the Shift Lever. The Instructions explain how to do this in the final step. Does that help? Because that arm is offset, and is so long, shifting places sideway forces on the end. The stock configuration, while functional, can become sloppy with wear, and the end the short foot lever attaches to begins to wobble more with each shift. The support the bracket provides stops these forces from pressing on the sides of the transmission seal and bearings, while allowing it to rotate normally. If you search for the original thread, the geometry is shown, which should explain it better (picture, and all). I just rode another 60 miles on back roads, and shifting quickly is so much easier, and it just drops into neutral without any fuss. IMO, one of the best mods to a bike with miles on it. |
|
|
|
|
Logged
|
98 Honda Valkyrie GL1500CT Tourer
Photo of my FIL Jack, in honor of his WWII service
|
|
|
|
Scottrtho
|
|
« Reply #18 on: April 07, 2019, 10:06:12 AM » |
|
Thanks for pointing out what I was missing. My bike needs this. I am ordering one now.
|
|
|
|
|
Logged
|
|
|
|
|
-mike-
|
|
« Reply #19 on: April 10, 2019, 08:51:06 AM » |
|
Installed the bracket and I'm impressed. Straightforward instructions, easy to do mod. The whole job was finished in under 30 Minutes. Looks great and works even better! Thanks, Jersey! Just a minor tip: I had to loosen the whole left engine brace slightly to get the longer bolt straight in easier.   -mike- |
|
|
|
« Last Edit: April 10, 2019, 10:03:07 AM by -mike- »
|
Logged
|
|
|
|
Jersey
Member
Posts: 545
VRCC #37540
Southern Maryland
|
|
« Reply #20 on: April 12, 2019, 03:25:52 PM » |
|
Installed the bracket and I'm impressed. Straightforward instructions, easy to do mod. The whole job was finished in under 30 Minutes. Looks great and works even better! Thanks, Jersey! Just a minor tip: I had to loosen the whole left engine brace slightly to get the longer bolt straight in easier. -mike- Glad you like! Yes, the engine brace can throw off aligning the longer bolt threads. Glad you got it in smooth!!! |
|
|
|
|
Logged
|
Jersey
|
|
|
Jersey
Member
Posts: 545
VRCC #37540
Southern Maryland
|
|
« Reply #21 on: April 13, 2019, 06:02:40 PM » |
|
Installed the bracket and I'm impressed. Straightforward instructions, easy to do mod. The whole job was finished in under 30 Minutes. Looks great and works even better! Thanks, Jersey! Just a minor tip: I had to loosen the whole left engine brace slightly to get the longer bolt straight in easier. -mike- Glad you like! Yes, the engine brace can throw off aligning the longer bolt threads. Glad you got it in smooth!!! Taking a closer look at the pictures. It appears on the engine brace (long) bolt that the washer is in between the brace and the engine bar...and that this is putting excessive angle on the rotation. You should try and move the washer to the outside directing under the bolt head. Let the brace be directly against the crash bar. Also, you can move the nylon washers to also finetune the alignment. Let me know. Jersey. |
|
|
|
|
Logged
|
Jersey
|
|
|
|
RonW
|
|
« Reply #22 on: April 13, 2019, 08:57:54 PM » |
|
Anybody know how the factory got this texture (red arrow)? 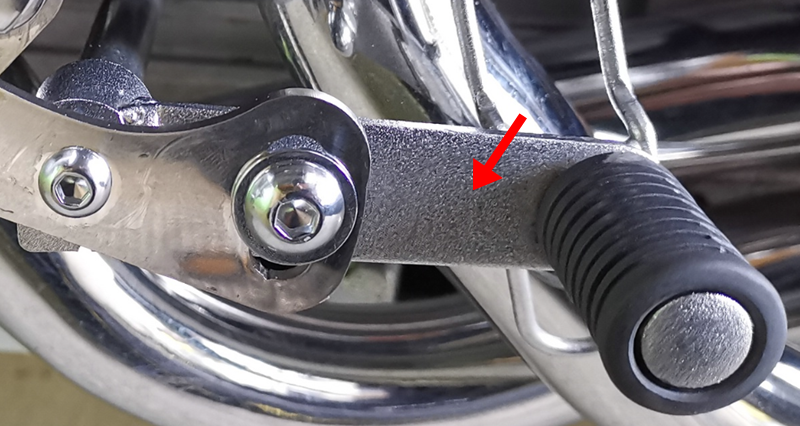 |
|
|
|
|
Logged
|
2000 Valkyrie Tourer
|
|
|
|
Chrisj CMA
|
|
« Reply #23 on: April 14, 2019, 05:57:54 AM » |
|
Anybody know how the factory got this texture (red arrow)? In gun making they do glass beading, kinda like sand blasting only with glass. Could be a similar process https://m.youtube.com/watch?v=GhL3vNvlX1s |
|
|
|
« Last Edit: April 14, 2019, 06:09:43 AM by Chrisj CMA »
|
Logged
|
|
|
|
|
-mike-
|
|
« Reply #24 on: April 14, 2019, 10:54:20 AM » |
|
Taking a closer look at the pictures. It appears on the engine brace (long) bolt that the washer is in between the brace and the engine bar...and that this is putting excessive angle on the rotation. You should try and move the washer to the outside directing under the bolt head. Let the brace be directly against the crash bar. Also, you can move the nylon washers to also finetune the alignment. Let me know. Jersey.
Thanks for your feedback. I just checked the alignment - all straight as it should be. The macro-optics seem to mess with the picture. Using two washers was by purpose to correct the angle, as it has been off with the brace directly on the crash bar mount. It did not came to my mind to move the nylon washers, though. |
|
|
|
|
Logged
|
|
|
|
|
tech787
|
|
« Reply #25 on: April 15, 2019, 11:08:11 AM » |
|
Just installed the Jersey shifter mod. Seems to work fine, nicely made
|
|
|
|
|
Logged
|
|
|
|
Jersey
Member
Posts: 545
VRCC #37540
Southern Maryland
|
|
« Reply #26 on: April 15, 2019, 11:16:29 AM » |
|
Just installed the Jersey shifter mod. Seems to work fine, nicely made
THANKS! |
|
|
|
|
Logged
|
Jersey
|
|
|
|
Paladin528
|
|
« Reply #27 on: April 24, 2019, 09:18:29 AM » |
|
just ordered one. Hope the testimonials are correct.
|
|
|
|
|
Logged
|
|
|
|
|
Glenn-B
|
|
« Reply #28 on: April 26, 2019, 05:22:40 AM » |
|
Hi Mr Jersey. Thank you for shipping mine to good Ol England. I've fitted it and it works great. A bit too good if anything. I got used to the free sloppy play. So I've had to adjust up the shifter to get my big boot under the shifter peg. A small price to pay for a better gear shift |
|
|
|
« Last Edit: April 26, 2019, 05:52:47 AM by Glenn-B »
|
Logged
|
|
|
|
Jersey
Member
Posts: 545
VRCC #37540
Southern Maryland
|
|
« Reply #29 on: April 26, 2019, 08:38:58 AM » |
|
just ordered one. Hope the testimonials are correct.
I think you'll be very satisfied, but do contact me directly via email if you have any problems! Don't forget to download the installation instructions from the website! |
|
|
|
|
Logged
|
Jersey
|
|
|
Jersey
Member
Posts: 545
VRCC #37540
Southern Maryland
|
|
« Reply #30 on: April 26, 2019, 08:40:39 AM » |
|
Hi Mr Jersey. Thank you for shipping mine to good Ol England. I've fitted it and it works great. A bit too good if anything. I got used to the free sloppy play. So I've had to adjust up the shifter to get my big boot under the shifter peg. A small price to pay for a better gear shift You are very welcome, mate! Glad it's tightened things up a bit. |
|
|
|
|
Logged
|
Jersey
|
|
|
|
RipVanWinkle
|
|
« Reply #31 on: April 27, 2019, 04:41:12 AM » |
|
I just ordered one for my valk as well. After reading this post and then seeing all the play in my shifter was a no brainer.
|
|
|
|
|
Logged
|
|
|
|
rekit
Member
Posts: 61
Let's Go!
77532
|
|
« Reply #32 on: April 29, 2019, 06:19:57 AM » |
|
I put one on my IS, great improvement. Easy install. Don't worry about the 11/32 drill. 12/32 is 3/8" that you probably have, it's not critical as it bolts tightly to a slotted piece. Jersey Mike, if you want to comment? Some might be put off running around for a special drill they don't have.
|
|
|
|
|
Logged
|
Bought a brand new Z1 in 74 and sold it later to get a "family car" DOH!! My brother had a Kaw H1 at the time as well. Oh well, good times! Lately Mean Streak, CBX, Nighthawk 750, Connie, KZ1000, Yamaha TTR 250, KTM 250
|
|
|
Jersey
Member
Posts: 545
VRCC #37540
Southern Maryland
|
|
« Reply #33 on: April 29, 2019, 10:59:04 AM » |
|
I put one on my IS, great improvement. Easy install. Don't worry about the 11/32 drill. 12/32 is 3/8" that you probably have, it's not critical as it bolts tightly to a slotted piece. Jersey Mike, if you want to comment? Some might be put off running around for a special drill they don't have.
Good Point! thanks for the Feedback. I just wanted it to have a tight fit. But yes, a 3/8" drill works perfectly fine! Jersey Steve |
|
|
|
|
Logged
|
Jersey
|
|
|
|
Paladin528
|
|
« Reply #34 on: May 01, 2019, 03:31:58 AM » |
|
Jersey. I sent you a message on our website. I received the kit (thing of beauty BTW) however it seems to be missing the main bracket post bolt and associated hardware.
|
|
|
|
|
Logged
|
|
|
|
|
Paladin528
|
|
« Reply #35 on: May 01, 2019, 03:39:13 AM » |
|
looks like spacers are missing as well.
I have a photo but cannot post it here
|
|
|
|
|
Logged
|
|
|
|
Jersey
Member
Posts: 545
VRCC #37540
Southern Maryland
|
|
« Reply #36 on: May 03, 2019, 04:18:06 AM » |
|
Jersey. I sent you a message on our website. I received the kit (thing of beauty BTW) however it seems to be missing the main bracket post bolt and associated hardware.
Thanks. Got them out to you. Sorry for that! |
|
|
|
|
Logged
|
Jersey
|
|
|
|
Paladin528
|
|
« Reply #37 on: May 07, 2019, 06:20:01 AM » |
|
It's all good brother. hopefully they will arrive today.
Question for you though. The hole drilled through the shift lever for the bolt and nut. Would there be an issue drilling that to the correct size and tapping the hole then threading it in? is there enough meat there?
|
|
|
|
|
Logged
|
|
|
|
Jersey
Member
Posts: 545
VRCC #37540
Southern Maryland
|
|
« Reply #38 on: May 07, 2019, 10:58:09 AM » |
|
It's all good brother. hopefully they will arrive today.
Question for you though. The hole drilled through the shift lever for the bolt and nut. Would there be an issue drilling that to the correct size and tapping the hole then threading it in? is there enough meat there?
I thought about that when originally designing this and was concerned with the type of metal... if it would hold the threads over time. I prefer to design things that only need touching once - when you install it - and you never have to worry about it again. Thanks why I went with the compression approach using bolt and nut. A little Loctite in final assembly and Bob's your Uncle! |
|
|
|
|
Logged
|
Jersey
|
|
|
|
3W-lonerider
|
|
« Reply #39 on: May 07, 2019, 01:22:46 PM » |
|
i don't think you'd get enough threads to get it done properly. even if you used a fine threaded bolt i think you'd only get 2 maybe 3 threads in the hole. before coming out the back.
it would strip in no time.
|
|
|
|
|
Logged
|
|
|
|
|


