|
pancho
|
 |
« on: April 15, 2019, 12:53:08 PM » |
|
I might be the last one in the world who didn't know this, but I just discovered that having the lid off the airbox when installing it makes things much easier. Was doing some maintenance and had the air filter out and lid off when I reinstalled the air box, and it dropped right into place. I always had installed it assembled and while it was not much of a problem, it goes in much easier with the lid off.....
Just mentioning this for anyone else who haven't discovered this yet.
|
|
|
|
« Last Edit: April 15, 2019, 01:04:12 PM by pancho »
|
 Logged
|
The most expensive things you will purchase, are those things you would not have needed if you had listened and obeyed.
|
|
|
|
|
|
Fireman973
|
|
« Reply #2 on: April 15, 2019, 01:07:26 PM » |
|
I might be the last one in the world who didn't know this, but I just discovered that having the lid off the airbox when installing it makes things much easier. Was doing some maintenance and had the air filter out and lid off when I reinstalled the air box, and it dropped right into place. I always had installed it assembled and while it was not much of a problem, it goes in much easier with the lid off.....
Just mentioning this for anyone else who haven't discovered this yet.
Well played sir well played  |
|
|
|
|
Logged
|
|
|
|
|
pancho
|
|
« Reply #3 on: April 15, 2019, 01:09:25 PM » |
|
Not positive it was that or if it was the alignment of the planets, but everything just lined up nicely and went right into place. I always install it by pushing the front in first folding the legs in as I go, top off seems to give more clearance.
|
|
|
|
|
Logged
|
The most expensive things you will purchase, are those things you would not have needed if you had listened and obeyed.
|
|
|
|
Glaserbeam
|
|
« Reply #4 on: April 15, 2019, 02:16:32 PM » |
|
I hope I never have to remove my carbs again, but if I do, consider this an advance Thank You for your airbox-installing hack!!!
Ken
|
|
|
|
|
Logged
|
|
|
|
|
Chrisj CMA
|
|
« Reply #5 on: April 15, 2019, 02:58:48 PM » |
|
I have removed and reinstalled the air box on three Valkyries, all in the fully assembled configuration. I don't think doing it sans lid would make any difference. In fact, without the lid it would be harder to get a strap on it.
|
|
|
|
|
Logged
|
|
|
|
|
Avanti
|
|
« Reply #6 on: April 15, 2019, 04:11:51 PM » |
|
I have removed and replace the air box many times and have never had it assembled. Goes in easily and I have never used the straps.
Filter in and cover on after installed.
|
|
|
|
|
Logged
|
|
|
|
gordonv
Member

Posts: 5766
VRCC # 31419
Richmond BC
|
|
« Reply #7 on: April 15, 2019, 04:38:39 PM » |
|
Think about it, with the lid on the sides are rigid. No lid, and the sides flex.
I'll find out soon enough, once I get the fairing back on for my project, and the wires through the frame, I'll need to remount the air box to the carbs, and will find out for the first time.
|
|
|
|
|
Logged
|
1999 Black with custom paint IS   |
|
|
|
Jim in Idaho
|
|
« Reply #8 on: April 16, 2019, 05:42:08 AM » |
|
Thanks for the tip! ...will definitely give it a try next time.
|
|
|
|
|
Logged
|
|
|
|
|
SCain
|
|
« Reply #9 on: April 16, 2019, 06:57:15 AM » |
|
I have removed and replace the air box many times and have never had it assembled. Goes in easily and I have never used the straps.
Filter in and cover on after installed.
I have always removed the lid and filter, no reason why just thought it was the best way. I have never needed straps. My .02 |
|
|
|
|
Logged
|
Steve  |
|
|
Skinhead
Member
Posts: 8748
J. A. B. O. A.
Troy, MI
|
|
« Reply #10 on: April 16, 2019, 07:34:55 AM » |
|
Makes sense. Thanks for the tip.
|
|
|
|
|
Logged
|
 Troy, MI |
|
|
|
pancho
|
|
« Reply #11 on: April 17, 2019, 06:07:17 AM » |
|
Just as a side note, the first thing I discovered about installing the airbox which made it manageable even with the cover on without the aid of "straps" or any other forceful methods, was removing the intake clamps before putting it in place. Also taking a picture of the clamps orientation on both sides before removal helps as some of them work much better and give proper clearance in a particular direction.
|
|
|
|
« Last Edit: April 17, 2019, 06:41:05 AM by pancho »
|
Logged
|
The most expensive things you will purchase, are those things you would not have needed if you had listened and obeyed.
|
|
|
|
RWhitehouse
|
|
« Reply #12 on: April 17, 2019, 06:32:27 AM » |
|
If I have to pull the carbs again I'll keep that in mind.
I last put mine on assembled. I used a long prybar shoved under the gusset right at the headstock, leaning against the lid of the airbox to shove and hold it down while I tightened the clamps. It was fiddly and a hassle like most people said it would be but eventually got all six boots on all the way and clamped.
|
|
|
|
|
Logged
|
|
|
|
|
pancho
|
|
« Reply #13 on: April 17, 2019, 06:40:03 AM » |
|
I don't understand the need for force, makes me wonder if the wiring harnesses are out of place and causing interference? I seem to remember having to work and massage mine the first time I had to do the job.
|
|
|
|
« Last Edit: April 17, 2019, 06:56:06 AM by pancho »
|
Logged
|
The most expensive things you will purchase, are those things you would not have needed if you had listened and obeyed.
|
|
|
Tfrank59
Member
Posts: 1364
'98 Tourer
Western Washington

|
|
« Reply #14 on: April 17, 2019, 06:54:32 AM » |
|
I've not pulled my airbox yet but thanks for the tip if I ever have to
|
|
|
|
|
Logged
|
-Tom
Keep the rubber side down. USMC '78-'84
'98 Valkyrie, ‘02 VTX 1800, '96 Royal Star, '06 Drifter, '09 Bonneville, '10 KTM 530, '04 XR 650, '76 Bultaco, '81 CR 450, '78 GS 750...
|
|
|
|
WintrSol
|
|
« Reply #15 on: April 17, 2019, 08:17:02 AM » |
|
Just as a side note, the first thing I discovered about installing the airbox which made it manageable even with the cover on without the aid of "straps" or any other forceful methods, was removing the intake clamps before putting it in place. Also taking a picture of the clamps orientation on both sides before removal helps as some of them work much better and give proper clearance in a particular direction.
The clamps have a small round hole, which fits over a bump on the rubber tube, so orientation should be fixed for all. A few of mine were installed incorrectly, and the bumps compressed to the point that they didn't force the correct orientation, but when I mounted them, I looked for them, and put them on in the right place, anyway. I've only removed/replaced the air box 3 or 4 times, but always with the cover off. I start at the front end, and make sure the tubes slide down all the way. I also wipe a thin film of silicone grease inside the ends, to make it easier. |
|
|
|
|
Logged
|
98 Honda Valkyrie GL1500CT Tourer
Photo of my FIL Jack, in honor of his WWII service
|
|
|
|
Avanti
|
|
« Reply #16 on: April 17, 2019, 08:25:18 AM » |
|
First, make sure all wiring harnesses are in there proper location and all aftermarket wiring is not restricting installation of the Air Cleaner Housing.
Next install the Air Cleaner Housing (no cover or filter) with Air Cleaner Connecting Tubes and the Band Clamps rotated 180 degrees (facing to the inside) by tipping the Air Cleaner Housing and sliding the left bank Air Cleaner Connecting Tubes in first.
Gently fold the right side Air Cleaner Connecting Tubes in one at a time by hand, while at the same time, pushing the right side down using hand pressure.
The Band Clamps can now be turned back to there correct rotational position.
The Air Cleaner Connecting Tubes can be installed by using hand down pressure on the Air Cleaner Housing while working from front to back making sure they slide all the way into position.
Lastly, tighten all Band Clamps (do not over tighten).
|
|
|
|
|
Logged
|
|
|
|
|
pancho
|
|
« Reply #17 on: April 17, 2019, 12:08:12 PM » |
|
Just as a side note, the first thing I discovered about installing the airbox which made it manageable even with the cover on without the aid of "straps" or any other forceful methods, was removing the intake clamps before putting it in place. Also taking a picture of the clamps orientation on both sides before removal helps as some of them work much better and give proper clearance in a particular direction.
The clamps have a small round hole, which fits over a bump on the rubber tube, so orientation should be fixed for all. A few of mine were installed incorrectly, and the bumps compressed to the point that they didn't force the correct orientation, but when I mounted them, I looked for them, and put them on in the right place, anyway. I've only removed/replaced the air box 3 or 4 times, but always with the cover off. I start at the front end, and make sure the tubes slide down all the way. I also wipe a thin film of silicone grease inside the ends, to make it easier. Since I remove the clamps completely when installing the airbox, even with the bumps and holes they can still be installed upside down and place the screw in the wrong position,,, so the pictures. Next time I may try what Avanti suggested and see if rotating the clamps 180 will work for me. Been on my mind since I wrote that ,, and actually the "nubs and holes" are only on the intake runner clamps,, the airbox clamps do not have a locating nub and if put on upside down they can be in an awkward position to tighten. Tell me if I'm mistaken,,, I'm sure someone will. Grin  |
|
|
|
« Last Edit: April 17, 2019, 03:03:49 PM by pancho »
|
Logged
|
The most expensive things you will purchase, are those things you would not have needed if you had listened and obeyed.
|
|
|
|
BINOVC
|
|
« Reply #18 on: April 18, 2019, 04:17:57 PM » |
|
Pancho I guess you were not the last one in the world!
I always did it that way though.
And I hope that there are no nubs for those clamps because I thought I checked pretty closely a few days ago when I replaced my vacuum lines! I just rotated them to where they seemed to fit best.
|
|
|
|
|
Logged
|
|
|
|
|
SCain
|
|
« Reply #19 on: April 19, 2019, 05:59:12 AM » |
|
Pancho,
You are correct, there are no nubs on the air box to carb clamps. I also just orient them facing to the rear of the bike.
|
|
|
|
|
Logged
|
Steve |
|
|
|
Bigwolf
|
|
« Reply #20 on: April 19, 2019, 06:52:56 PM » |
|
I have had the air box out of my Valkyrie and put it back in several times. I have never had any trouble installing the air box. I always install it without the filter and lid, then put them on later. One thing I do that I think helps a lot is I put a light coat of silicone lubricant on the tubes where they slide onto the carbs.
|
|
|
|
|
Logged
|
|
|
|
|
pancho
|
|
« Reply #21 on: April 20, 2019, 04:52:00 AM » |
|
Bigwolf and WinterSol have both mentioned using silicone lubricant on the rubber tube ends when installing the airbox,, good idea. Keep in mind that silicone grease and PTFE are the ONLY lubricants I know of that can be safely used on the airbox tubes. Never use petroleum jelly, grease, oil or any other petroleum based product as they are likely to cause degradation of the tubes.
|
|
|
|
« Last Edit: April 20, 2019, 06:00:33 AM by pancho »
|
Logged
|
The most expensive things you will purchase, are those things you would not have needed if you had listened and obeyed.
|
|
|
|
Chrisj CMA
|
|
« Reply #22 on: April 20, 2019, 06:17:21 AM » |
|
Bigwolf and WinterSol have both mentioned using silicone lubricant on the rubber tube ends when installing the airbox,, good idea. Keep in mind that silicone grease and PTFE are the ONLY lubricants I know of that can be safely used on the airbox tubes. Never use petroleum jelly, grease, oil or any other petroleum based product as they are likely to cause degradation of the tubes.
If you want/need lube you want it to be short lived so those tubes stay put. Best thing is rubbing alcohol. Dries fast but is slippery when wet. |
|
|
|
|
Logged
|
|
|
|
hubcapsc
Member
Posts: 16804
upstate
South Carolina
|
|
« Reply #23 on: April 20, 2019, 07:19:41 AM » |
|
There's a rumor on the Internet that wd40 is not a lubricant and that it eats rubber. wd40 is a GREAT short lived lubricant and cleaner and I've sprayed so many gallons of it onto my dirt bikes after cleaning them at the 25cent car wash (it was years ago  ) that I'm sure it won't eat anything. If it gets into your top end, don't worry, it works great as a starting fluid. -Mike "and it is both a floor wax and a desert topping!" |
|
|
|
|
Logged
|
|
|
|
|
WintrSol
|
|
« Reply #24 on: April 20, 2019, 08:07:24 AM » |
|
Been on my mind since I wrote that ,, and actually the "nubs and holes" are only on the intake runner clamps,, the airbox clamps do not have a locating nub and if put on upside down they can be in an awkward position to tighten. Tell me if I'm mistaken,,, I'm sure someone will. Now that you mention it, I do recall feeling around for the bumps, and, not finding them, just turned the clamps to make it easiest to tighten them. Bigwolf and WinterSol have both mentioned using silicone lubricant on the rubber tube ends when installing the airbox,, good idea. Keep in mind that silicone grease and PTFE are the ONLY lubricants I know of that can be safely used on the airbox tubes. Never use petroleum jelly, grease, oil or any other petroleum based product as they are likely to cause degradation of the tubes. I don't know about PTFE, but GM recommends silicone grease on all door seals to extend their life. I use it on anything similar to a door seal, for assembly and life extension, even the seals on my saddle bags and turn signals. |
|
|
|
|
Logged
|
98 Honda Valkyrie GL1500CT Tourer
Photo of my FIL Jack, in honor of his WWII service
|
|
|
|
Chrisj CMA
|
|
« Reply #25 on: April 20, 2019, 08:29:26 AM » |
|
There's a rumor on the Internet that wd40 is not a lubricant and that it eats rubber. wd40 is a GREAT short lived lubricant and cleaner and I've sprayed so many gallons of it onto my dirt bikes after cleaning them at the 25cent car wash (it was years ago ) that I'm sure it won't eat anything. If it gets into your top end, don't worry, it works great as a starting fluid. -Mike "and it is both a floor wax and a desert topping!" Ya, when I was stationed in Okinawa I bought a new Yamaha Maxim 650. Everything rusts in Okinawa. I used a can of WD-40 a week on that bike and it never ever rusted anywhere and no rubber parts were damaged. |
|
|
|
|
Logged
|
|
|
|
|
..
|
|
« Reply #26 on: April 20, 2019, 08:33:57 AM » |
|
Been on my mind since I wrote that ,, and actually the "nubs and holes" are only on the intake runner clamps,, the airbox clamps do not have a locating nub and if put on upside down they can be in an awkward position to tighten. Tell me if I'm mistaken,,, I'm sure someone will. Now that you mention it, I do recall feeling around for the bumps, and, not finding them, just turned the clamps to make it easiest to tighten them. Bigwolf and WinterSol have both mentioned using silicone lubricant on the rubber tube ends when installing the airbox,, good idea. Keep in mind that silicone grease and PTFE are the ONLY lubricants I know of that can be safely used on the airbox tubes. Never use petroleum jelly, grease, oil or any other petroleum based product as they are likely to cause degradation of the tubes. I don't know about PTFE, but GM recommends silicone grease on all door seals to extend their life. I use it on anything similar to a door seal, for assembly and life extension, even the seals on my saddle bags and turn signals. I too grease saddlebags seals. |
|
|
|
|
Logged
|
|
|
|
gordonv
Member
Posts: 5766
VRCC # 31419
Richmond BC
|
|
« Reply #27 on: April 20, 2019, 03:42:37 PM » |
|
Pancho,
You are correct, there are no nubs on the air box to carb clamps. I also just orient them facing to the rear of the bike.
Working on the bike today, I took some pictures of the carbs/air box. carb  box 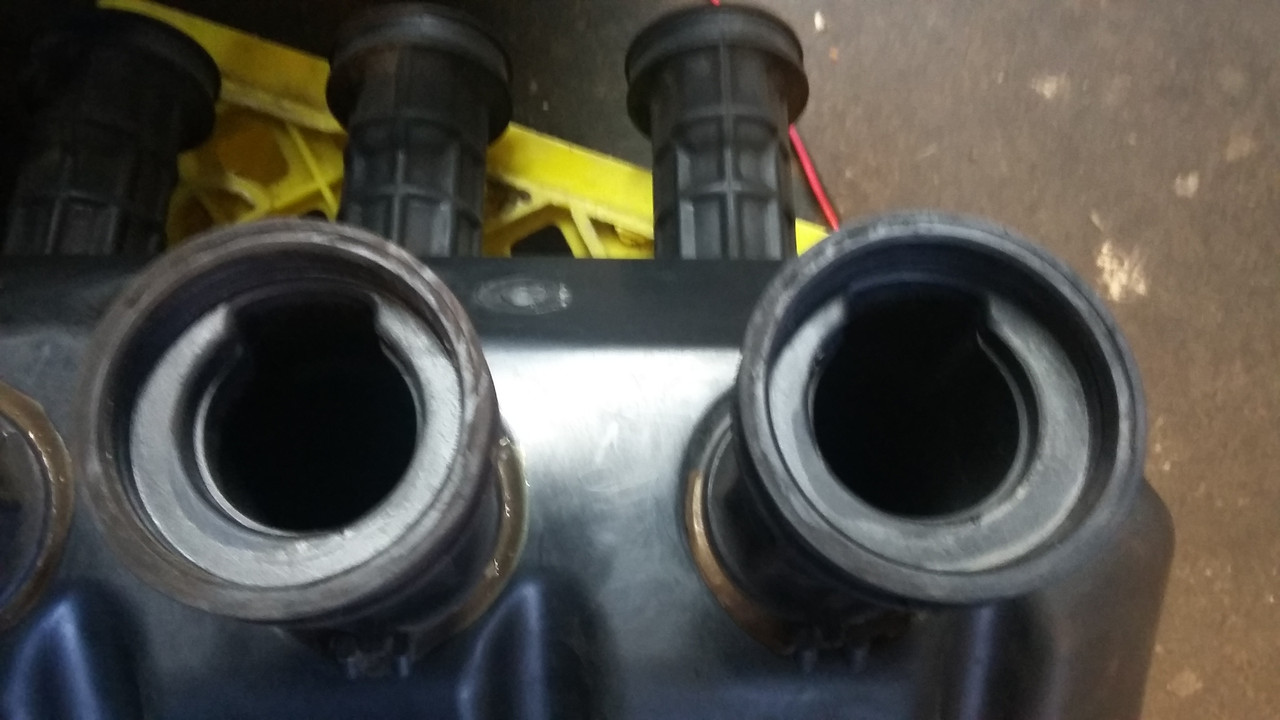 |
|
|
|
|
Logged
|
1999 Black with custom paint IS |
|
|
|
pancho
|
|
« Reply #28 on: April 21, 2019, 05:14:20 AM » |
|
HA,, Hey Mike, Chris, reminds me of someone saying "been smoking for 15 years, hasn't hurt me,, cough cough" . WD 40 now make a formulation called "specialist" https://www.wd40specialist.com/products/silicone-lubricant/silicone based, they claim it is safe for rubber. Some formulations, like Hepatitis C, will take quite awhile to show their effects. If you do a bit of research, it will show that silicone and PTFE are the recommended lubrication products for synthetic and natural rubber compounds for good reason. Hope you made some progress on your project gordonv. |
|
|
|
« Last Edit: April 21, 2019, 05:22:59 AM by pancho »
|
Logged
|
The most expensive things you will purchase, are those things you would not have needed if you had listened and obeyed.
|
|
|
|
dpcarson
|
|
« Reply #29 on: March 23, 2020, 04:56:02 PM » |
|
I know I am late to this party, but thanks for that advice. I have gone through 3 dictionaries of profanity and a bottle of vodka trying to get the dang thing on tonight. I remember it being a pain, but I certainly didn't remember it being that difficult. Of course, right now I am waiting on back surgery again, no strength in my dominant hand at all is making it all a lot more difficult.
|
|
|
|
|
Logged
|
"""""""""""""""""""""""""""""" In war, there are no unwounded soldiers.  |
|
|
|
Jess from VA
|
|
« Reply #30 on: March 23, 2020, 05:19:31 PM » |
|
John Schmidt once wrote that a good trick was throwing a ratchet strap over the box, then ratcheting it down slowly while working on all the air tubes. Both hands available for work that way.
|
|
|
|
|
Logged
|
|
|
|
|
dpcarson
|
|
« Reply #31 on: March 23, 2020, 07:04:40 PM » |
|
John Schmidt once wrote that a good trick was throwing a ratchet strap over the box, then ratcheting it down slowly while working on all the air tubes. Both hands available for work that way.
That might work but I prefer the joy of kicking and screaming Jess. |
|
|
|
|
Logged
|
"""""""""""""""""""""""""""""" In war, there are no unwounded soldiers. |
|
|
|
Jess from VA
|
|
« Reply #32 on: March 23, 2020, 08:17:00 PM » |
|
John Schmidt once wrote that a good trick was throwing a ratchet strap over the box, then ratcheting it down slowly while working on all the air tubes. Both hands available for work that way.
That might work but I prefer the joy of kicking and screaming Jess.LMAO DP. You know they make antidepressants and other meds for that condition buddy. |
|
|
|
|
Logged
|
|
|
|
|
dpcarson
|
|
« Reply #33 on: March 24, 2020, 03:40:16 AM » |
|
Yeh, I pick up a bottle every once in a while. I think frustration is really pulling the girl back apart 5 years after the hydrolock repair. Luckily carbs were in great shape. Probably didn't even need to pull them apart. Tank was full of rust though. As soon as the new petcock filter comes in I am hoping she will be back up and running....again. Then I get to pull out the other one and start fresh on her. I think I am going to just clean the tank on that one first and see how it goes.
|
|
|
|
|
Logged
|
"""""""""""""""""""""""""""""" In war, there are no unwounded soldiers. |
|
|
|
Fazer
|
|
« Reply #34 on: March 24, 2020, 06:39:14 AM » |
|
I too am getting in here late, but the one time I had mine off, for de-smogging, I used the zip tie method that is described in, I believe, a Norway Valk video. Zip ties around two rubber intakes for a total of three, tightened enough to pull the tubes in towards the center. Then the unit, with or without the top will easily go into the space it resides. Clip the ties and slide the tubes over the intakes. I had no difficulty. Pretty sure the top of the airbox was off when I did it. A dentist's mirror and flashlight to see behind the intakes to insure you are not folding them over and it's done.
|
|
|
|
|
Logged
|
Nothing in moderation...
|
|
|
|
dpcarson
|
|
« Reply #35 on: March 24, 2020, 10:20:01 AM » |
|
I use the zip tie method also. Makes it much easier to me, but for some reason, probably my limited use of my right hand, I was having a fit getting it back in. That zip tie method is slick!!
|
|
|
|
|
Logged
|
"""""""""""""""""""""""""""""" In war, there are no unwounded soldiers. |
|
|
|


