|
Foozle
|
 |
« on: December 16, 2019, 06:35:10 AM » |
|
Over the years, this forum has provided me with a great deal of technical expertise. I’m happy to finally be able to contribute an experience of my own that may actually prove beneficial to others. This isn’t a magical fix or a flash of genius – it’s just something that worked for me. As always, YMMV.
I recently acquired a 1997 Tourer (37K) in good shape but in need of some general “refreshment.” Up until recently, everything I’ve tackled has gone pretty smoothly. Enter the front brake calipers – one of which was leaking.
Upon removal, I found 3/4 pistons to be seized. After searching the archives, I subjected the offending parts to a steady barrage of penetrating oil, heat, and air pressure in an attempt to force them out. I even immersed them in a soapy, hot water solution in an ultrasonic cleaner. Nothing worked; they remained embedded - frozen solid.
Just as I was about to throw in the towel and begin looking for a pair of new (used) calipers, I decided to try pulling rather than pushing them out. However, since the pistons were fully retracted in their cylinders, there was little to access. (The three pistons had been slightly extended on removal; in an attempt to break them free, I had used a c-clamp to push them completely in. In retrospect, I’m not sure I’d do this again. While it probably saved them from a mangled, ham-handed extraction using a pair of channel-locks, it also seemed to further cement them into the caliper).
Since the inside diameter of a front caliper piston is ~22.3 mm, I took an ~8” piece of 1” pine dowel and reduced the bottom 2” down to just over this dimension. I used a small wood lathe, but one could probably get the same effect with a little patience, a sharp knife, and some sandpaper. The sizing doesn’t have to be NASA-precise, but it should be in-the-ballpark. (Oak, being much harder wood, might actually be less forgiving in this respect).
I then used several medium strikes with a hammer to firmly seat the reduced dowel end into the first stuck piston. There’s no need for a sledge; remember, the goal is to reuse the undamaged parts. Once inserted, secure a hefty pair of vise-grips to the opposite (extended) end; this is your handle for turning. Next, apply heat to the caliper area surrounding the piston. I used a heat gun, but a propane torch or other flame should also work. You don’t need to get the metal glowing; you just want to soften the interior “gunk” that’s binding the piston to the caliper.
Finally, slowly but firmly rotate the dowel using the vise-grips – paying close attention to verify the piston is rotating in the cylinder. If so, gently pull the dowel outward while continuing to rotate. It may feel sticky, but the piston should gradually release from the caliper. If the piston fails to rotate with the dowel – or the dowel itself fails to turn - more heat and/or a firmer seating may be required. Repeat as needed.
After the first piston surprised me by actually coming out, the remaining two went pretty quickly. Just take your time and be deliberate; steady persistence – and not brute force – will carry the day.
If you previously used brake cleaner or penetrating oil to unseat the stuck pistons, make sure this is completely dry before inserting the dowel. Any liquid only serves as a lubricant – which you don’t want.
For my particular calipers, this did the trick. If you’re facing seized pistons, it might also work for you.
Terry
P. S. If this general approach has been previously cited, I respectfully defer to the original source; however, I didn't run across anything in my search.
|
|
|
|
« Last Edit: December 16, 2019, 06:42:35 AM by Foozle »
|
 Logged
|
|
|
|
|
da prez
|
|
« Reply #1 on: December 16, 2019, 06:47:03 AM » |
|
Metric grease fittings. Pump with a grease gun. Block the piston that starts to come out first.
I used this method on a restoration. The piston was seized for about 40 years.
da prez
|
|
|
|
|
Logged
|
|
|
|
|
Foozle
|
|
« Reply #2 on: December 16, 2019, 07:00:26 AM » |
|
Metric grease fittings. Pump with a grease gun. Block the piston that starts to come out first.
I used this method on a restoration. The piston was seized for about 40 years.
da prez
Thanks. I ran across this approach, but didn't have a grease gun or the metric fittings. Instead, I tried "home" air pressure - which didn't work. I've also heard very high (commercial) air pressure may do the trick. Terry |
|
|
|
|
Logged
|
|
|
|
hubcapsc
Member

Posts: 16804
upstate
South Carolina
|
|
« Reply #3 on: December 16, 2019, 07:12:50 AM » |
|
Metric grease fittings. Pump with a grease gun. Block the piston that starts to come out first.
I used this method on a restoration. The piston was seized for about 40 years.
da prez
Thanks. I ran across this approach, but didn't have a grease gun or the metric fittings. Instead, I tried "home" air pressure - which didn't work. I've also heard very high (commercial) air pressure may do the trick. Terry I went through all that. I destroyed my 97's rear brake pistons getting them out with channel locks. I tried the wimpy air compressor that I had at the time. I found that a good air compressor (I got one now  ) will usually do it. But maybe the best way, which everyone has access to, is to remove the caliper from its mount, put some paint sticks or something between the pads to stand in for the rotor so the pistons won't shoot out, and use the bike's hydraulic pressure to force the pistons out. I resisted this method, since I was sure I'd just spray brake fluid everywhere, but I finally tried it a few times and like it. I think if you try this method to release stuck pistons, it is still way worth it to rebuild your calipers after you get the pistons unstuck... If this general approach has been previously cited, I respectfully defer to the original source;
however, I didn't run across anything in my search. Your idea seems really cool, and I've never heard of anyone else suggesting it. -Mike |
|
|
|
|
Logged
|
|
|
|
|
RonW
|
|
« Reply #4 on: December 16, 2019, 07:43:32 AM » |
|
This guy on youtube posted a method using a brake piston extractor tool (below) ..... with a diy puller. https://youtu.be/T6nVwC23JRU?t=21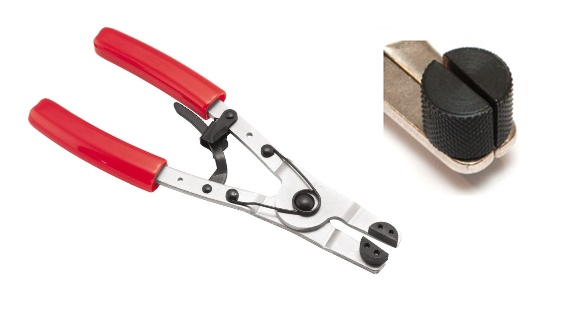 |
|
|
|
|
Logged
|
2000 Valkyrie Tourer
|
|
|
Skinhead
Member
Posts: 8748
J. A. B. O. A.
Troy, MI
|
|
« Reply #5 on: December 16, 2019, 10:02:33 AM » |
|
A method I have used several times, if the pistons aren't fully collapsed into the caliper, caliper off the bike.
Remove the banjo bolt and fitting, fill the caliper with brake fluid and install a bolt, (I found that one that holds the rear footpeg bracket to the frame works) with one of the crush washers from the banjo fitting. Tighten the bolt in the hole the banjo bolt goes in, and then use a C clamp on one piston to free the stuck piston. If both are stuck, free one then switch to the other. This will only work if there is little to no air in the caliper.
I like like hubcaps idea as well, but had already removed the calipers before I realized they were seized.
There is more than one way to skin a cat.
|
|
|
|
|
Logged
|
 Troy, MI |
|
|
John Schmidt
Member
Posts: 15348
a/k/a Stuffy. '99 I/S Valk Roadsmith Trike
De Pere, WI (Green Bay)
|
|
« Reply #6 on: December 16, 2019, 10:06:59 AM » |
|
The rebuild I did of the GL1200 a while back involved just that problem....one piston wouldn't budge no matter what I did. I used all the suggested methods listed above and have always worked over the years, but not this time. For the one piston I finally drilled a hole in the center of it and then cut threads in that hole. I believe I used a 3/8" bolt long enough to extend out far enough to get a wrench or socket on it. I then screwed it in and by doing so, the bolt pushes against the bottom of the orifice the piston sits in. That broke it loose and I was able to remove it. I've found quite often that if a piston is frozen in place that solid, chances are it won't be useable anyway due to corrosion so if stuck really bad, I just drill and tap as explained above. I do use a c-clamp to give support on the back side of the offending hole, that way you lessen the chance of cracking the caliper in the area where the bolt is pushing from the inside, even though the metal in that area is quite thick. Understand...this method is sort of a last resort when torches, air, grease guns, etc., don't do the job.
|
|
|
|
|
Logged
|
|
|
|
|
indybobm
|
|
« Reply #7 on: December 16, 2019, 04:54:10 PM » |
|
Metric grease fittings. Pump with a grease gun. Block the piston that starts to come out first.
I used this method on a restoration. The piston was seized for about 40 years.
da prez
Thanks. I ran across this approach, but didn't have a grease gun or the metric fittings. Instead, I tried "home" air pressure - which didn't work. I've also heard very high (commercial) air pressure may do the trick. Terry I'll second that. Makes a mess but gets them out. |
|
|
|
« Last Edit: December 18, 2019, 05:58:42 AM by indybobm »
|
Logged
|
So many roads, so little time
VRCC # 5258
|
|
|
|
RWhitehouse
|
|
« Reply #8 on: December 20, 2019, 09:16:11 AM » |
|
When I ran into this issue, I hooked the caliper back up, bled it, and pumped the brake lever to generate pressure. 150psi shop air would not budge either of them. Master cylinder can generate several thousand psi. With virtually zero effort pumped both of them out. Used a c-clamp to hold one in place and force the second out. Gently wriggle them with soft jaw pliers (I used channel locks with a bead of hot snot put on the jaws), you'll feel when they clear the actual pressure seal as they will get loose. At that point you should be able to just yank them out. If you keep pumping it will certainly pop them out, while making a giant mess of brake fluid going everywhere.
On the same note, if using air pressure, be careful. If one of those pistons pops with 150psi behind it it'll fly across the shop like a bullet. Cram a rag into the caliper and hold it open end down to prevent a ballistic piston. Also, pulse the air pressure slowly once it starts to move- if air pressure does, for me it did not.
I replaced the seals/wipers, cleaned up the grooves with a brass wire wheel on a dremel (tons of crud and junk in those grooves), lightly polished the pistons- no pitting so fine to re-use- and the new ones popped in with minimal effort and easily slid in by hand. The brake feel was tremendously improved and of course no more dragging brakes, which was my issue initially.
Freshly rebuilt calipers, fresh fluid, new ebc HH pads, and stainless lines, was an absolutely night and day transformation. It stops better than any brand new cruiser I've tried in a while, I can see why reviews of it's day reported the Valkyrie had very good brakes.
|
|
|
|
|
Logged
|
|
|
|
|
Foozle
|
|
« Reply #9 on: December 20, 2019, 10:47:18 AM » |
|
When I ran into this issue, I hooked the caliper back up, bled it, and pumped the brake lever to generate pressure. 150psi shop air would not budge either of them. Master cylinder can generate several thousand psi. With virtually zero effort pumped both of them out. Used a c-clamp to hold one in place and force the second out. Gently wriggle them with soft jaw pliers (I used channel locks with a bead of hot snot put on the jaws), you'll feel when they clear the actual pressure seal as they will get loose. At that point you should be able to just yank them out. If you keep pumping it will certainly pop them out, while making a giant mess of brake fluid going everywhere.
On the same note, if using air pressure, be careful. If one of those pistons pops with 150psi behind it it'll fly across the shop like a bullet. Cram a rag into the caliper and hold it open end down to prevent a ballistic piston. Also, pulse the air pressure slowly once it starts to move- if air pressure does, for me it did not.
I replaced the seals/wipers, cleaned up the grooves with a brass wire wheel on a dremel (tons of crud and junk in those grooves), lightly polished the pistons- no pitting so fine to re-use- and the new ones popped in with minimal effort and easily slid in by hand. The brake feel was tremendously improved and of course no more dragging brakes, which was my issue initially.
Freshly rebuilt calipers, fresh fluid, new ebc HH pads, and stainless lines, was an absolutely night and day transformation. It stops better than any brand new cruiser I've tried in a while, I can see why reviews of it's day reported the Valkyrie had very good brakes.
Using a Dremel with a brass wire wheel to clean the seal grooves sounds like a good idea. I've tried tooth brushes, dental instruments, etc., but never feel like I get everything out - especially toward the tops of the cylinders. I'm definitely going to try this. |
|
|
|
|
Logged
|
|
|
|
|
da prez
|
|
« Reply #10 on: December 29, 2019, 08:46:39 AM » |
|
I make a groove cleaning tool but have not worked on a mass production. I have given a few sample tools out. So far , good feed back.
When we get back from vacation , I'll make a few more.
da prez
|
|
|
|
|
Logged
|
|
|
|
|
Foozle
|
|
« Reply #11 on: December 29, 2019, 09:19:20 AM » |
|
I make a groove cleaning tool but have not worked on a mass production. I have given a few sample tools out. So far , good feed back.
When we get back from vacation , I'll make a few more.
da prez
Due to some remaining crud, I actually had to remove and re-install a couple of the new inner seals after they didn't completely seat in the grooves. If you look into the calipers - and the new seals aren't perfectly and uniformly flush with the cylinder walls - the pistons won't insert properly and may, if installed, actually bind on and/or shave off the protruding rubber. Re-wetting everything with brake cleaner (after removing all rubber, obviously) and using a dremel with the circular brass brush did the trick - but you need to extend the brush shaft as far out from the chuck as possible to get the best access. However, I'd love to see your "experimental" groove cleaning tool. For the caliper pistons to seal properly, you simply can't get these areas too clean. Thanks for sharing this. Terry |
|
|
|
|
Logged
|
|
|
|
|


