|
savy265
|
 |
« on: April 06, 2020, 05:32:49 PM » |
|
i noticed some oil residue on the left fork running down to the speed sensor, Are the seals hard to replace? tks bob
|
|
|
|
|
 Logged
|
|
|
|
John Schmidt
Member

Posts: 15348
a/k/a Stuffy. '99 I/S Valk Roadsmith Trike
De Pere, WI (Green Bay)
|
|
« Reply #1 on: April 06, 2020, 05:40:30 PM » |
|
Not really, just don't bother with aftermarket brands for seals and dust seals and go for OEM from the start. You'll be thankful you did, they slip in much easier.  |
|
|
|
|
Logged
|
|
|
|
|
Jess from VA
|
|
« Reply #2 on: April 06, 2020, 06:06:34 PM » |
|
Hundreds of guys have cleaned the seal with 35mm film, or a Sealmate, or the best... Fork Doctor with good results. Best to remove the chrome guard (10mm nuts), carefully pry down the dustseal, and clean out road crud. Me too. Do it several times, and get on the bike and bounce the forks hard between cleanouts. Most of the time, it's just crud up there allowing a small seep. If a chunk of the seal has come off, cleaning won't fix it. But if it was a chunk, there'd probably be more than a slow seep. https://www.amazon.com/Risk-Racing-00-121-millimeters-55-millimeters/dp/B0068G164E |
|
|
|
|
Logged
|
|
|
|
|
|
|
Avanti
|
|
« Reply #4 on: April 06, 2020, 07:11:28 PM » |
|
Not really, just don't bother with aftermarket brands for seals and dust seals and go for OEM from the start. You'll be thankful you did, they slip in much easier. Only use aftermarket if you need more practice and less riding. |
|
|
|
|
Logged
|
|
|
|
MarkT
Member
Posts: 5196
VRCC #437 "Form follows Function"
Colorado Front Range - elevation 2.005 km

|
|
« Reply #5 on: April 07, 2020, 04:57:51 AM » |
|
+1 on Jess advice. I used another brand seal clean tool but it looks like the Seal Doctor has a better hook shape to pull the crud out.
|
|
|
|
|
Logged
|
|
|
|
|
Jess from VA
|
|
« Reply #6 on: April 07, 2020, 05:06:54 AM » |
|
The best deal with the Seal Doctor is you can grip the thing to push it around. The film and Sealmate get fork oily (it seeps when cleaning) and becomes very hard to grip to run around the fork.
|
|
|
|
|
Logged
|
|
|
|
|
franco6
|
|
« Reply #7 on: April 08, 2020, 07:41:54 PM » |
|
Go ahead and order bushings too might as well do a complete rebuild while the forks are on the bench.Last time I changed the seals noticed the bushings were worn ,did not have the parts, so put everything back with new seals for the Tourer Belle .Now the left side is leaking and I have all the parts for a rebuild coming soon Could be about eight years ago, so no bigy if you don t rush to do it!  |
|
|
|
|
Logged
|
Enjoy the ride!
|
|
|
|
Fazer
|
|
« Reply #8 on: April 09, 2020, 12:27:58 PM » |
|
My son and I just replaced his seals and bushings. Not nearly as hard as it appears. We left the forks on the bike. Pry out the dust seals and release the spring clip. Once you get the large nuts off on top, use the bottom as a slide hammer and out they come. One at a time. We had the All Balls product and I will re-affirm what others have said about going OEM. The only difficulty we had was seating the new dust seal. Fortunately, we had one of the seal seating tools that goes around the tube. Lots of guys use a piece of pvc pipe of the correct diameter. We could never have gotten the new seals in without the tool.
The video referenced in an earlier thread is very helpful, but he had the forks completely removed.
It is a messy job, as the oil goes everywhere, but we saved the effort or completely removing the forks. After we got them back together, we used a graduate and carefully measured the correct amount of Honda fork oil. So far everything is good. No leaks.
This is not for replacing the springs. That does look more difficult and requires a special tool.
|
|
|
|
|
Logged
|
Nothing in moderation...
|
|
|
Relax
Member
Posts: 322
Power & elegance...just like the Valk
Oslo, Norway
|
|
« Reply #9 on: April 11, 2020, 07:06:48 AM » |
|
Hundreds of guys have cleaned the seal with 35mm film, or a Sealmate, or the best... Fork Doctor with good results. Best to remove the chrome guard (10mm nuts), carefully pry down the dustseal, and clean out road crud. Me too. Do it several times, and get on the bike and bounce the forks hard between cleanouts. Most of the time, it's just crud up there allowing a small seep. If a chunk of the seal has come off, cleaning won't fix it. But if it was a chunk, there'd probably be more than a slow seep. https://www.amazon.com/Risk-Racing-00-121-millimeters-55-millimeters/dp/B0068G164E[/quote I usd this seal tool my second time yesterday. First time 2 years back with success , so also yesteray. Here is the pic which shows the Dust Seal pulled out for getting access to the Oil seal. 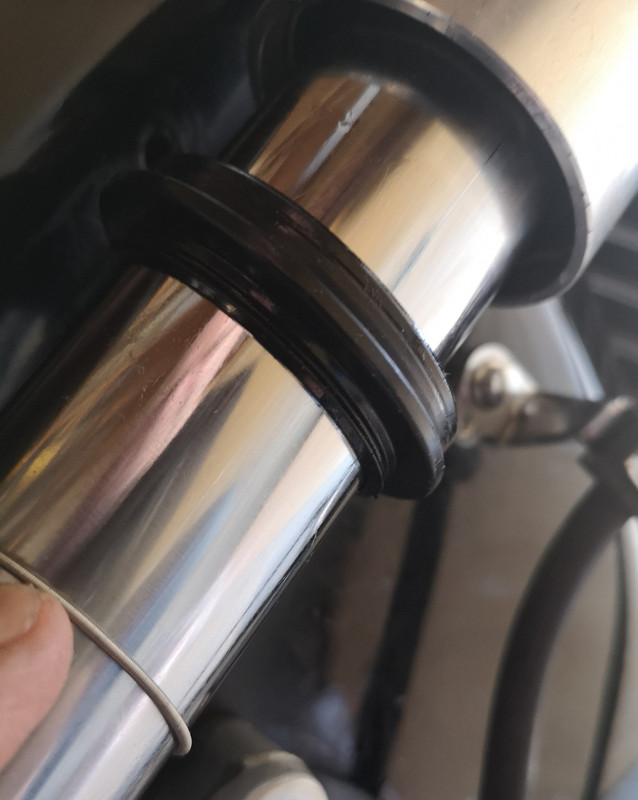 |
|
|
|
|
Logged
|
|
|
|
|
F6Dave
|
|
« Reply #10 on: April 12, 2020, 10:53:11 AM » |
|
My son and I just replaced his seals and bushings. Not nearly as hard as it appears. We left the forks on the bike. Pry out the dust seals and release the spring clip. Once you get the large nuts off on top, use the bottom as a slide hammer and out they come. One at a time. We had the All Balls product and I will re-affirm what others have said about going OEM. The only difficulty we had was seating the new dust seal. Fortunately, we had one of the seal seating tools that goes around the tube. Lots of guys use a piece of pvc pipe of the correct diameter. We could never have gotten the new seals in without the tool.
The video referenced in an earlier thread is very helpful, but he had the forks completely removed.
It is a messy job, as the oil goes everywhere, but we saved the effort or completely removing the forks. After we got them back together, we used a graduate and carefully measured the correct amount of Honda fork oil. So far everything is good. No leaks.
This is not for replacing the springs. That does look more difficult and requires a special tool.
That's the best way to do it. Below is a screenshot from the old VRCC board. I always try cleaning the seal first as that fixes the leak most of the time. The Seal Doctor is the best seal cleaning tool by far. 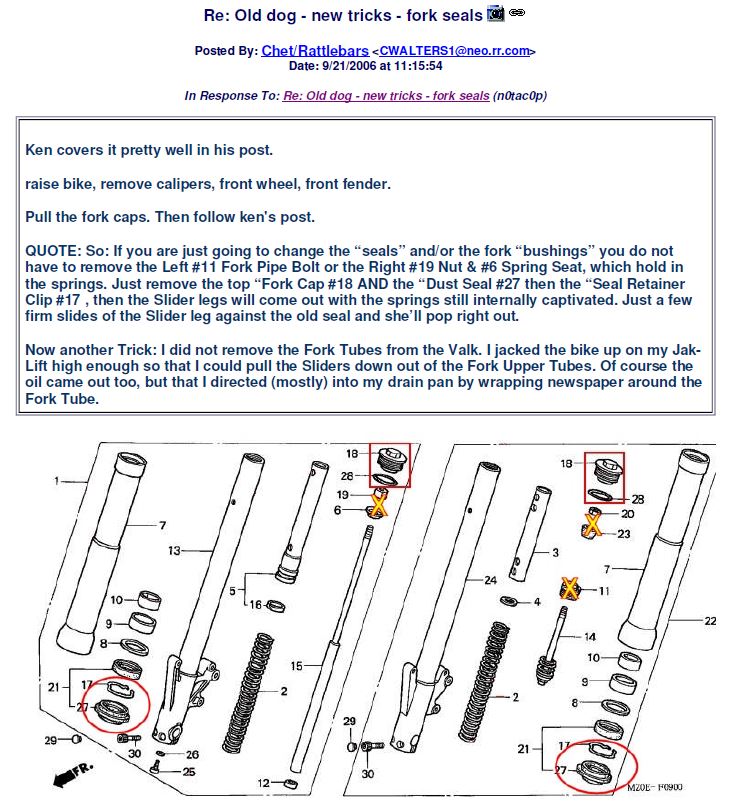 |
|
|
|
|
Logged
|
|
|
|
|
RWhitehouse
|
|
« Reply #11 on: April 13, 2020, 09:56:07 AM » |
|
Just in time- noticed after a ride the other day my left fork had a bit of a dribble running off it- the other side had faint greasy/dirty rings but no drips, so still a minor seep.
I gave both sides a few swipes with a Seal Mate (no kidding, it's not the easiest thing to use as quite a bit of oil leaks out when you insert it, making a mess and the sealmate difficult to grip)- the Seal Doctor looks like a better design. Unfortunately, that seemed to at best do nothing, and maybe even made the leak a bit worse this case. I use it all the time on my off road bikes and it usually works great.
I did this maybe 30k miles ago when I first got my Valk and one leg was a bit damp, and it seemed to cure the problem for some time. But after 22 years and almost 60k miles I suppose it's original seals are long overdue for replacement. Ordered up all OEM parts seals and the four bushings (about $90). Aftermarket wasn't substantially cheaper- All Balls offers both fork seals and bushings, although those totaled about $70- figure over $20 I'll go OEM especially with the reports that aftermarket seals are often difficult to install.
On the right leg, I noticed the oil that leaked past the Sealmate was pretty nasty and a bit glittery, and had the red hue of ATF, so probably good to swap all that out. I ordered some Maxima 10wt fork oil, as 10wt seemed to be the general consensus around here as the favorite.
|
|
|
|
|
Logged
|
|
|
|
h13man
Member
Posts: 1878
To everything there is an exception.
Indiana NW Central Flatlands
|
|
« Reply #12 on: April 15, 2020, 11:10:19 AM » |
|
Received the Seal Doctor and used w/o any problem. Fortunately my hands were small enough to remove the fork shields w/o too much effort. I used a Kobalt angled ratcheting wrench that has the directional "switch" to get the nuts off. When I removed the dust seals I used a plastic window/door carpenter shim/wedge thus avoiding any damage. Unfortunately no seal crap didn't come out so I guess I have to replace the 21 yr. old seals. Came across this in my old IE favorites: http://www.valkyrienorway.com/forksprings.html |
|
|
|
« Last Edit: April 15, 2020, 11:21:00 AM by h13man »
|
Logged
|
|
|
|
MarkT
Member
Posts: 5196
VRCC #437 "Form follows Function"
Colorado Front Range - elevation 2.005 km
|
|
« Reply #13 on: April 15, 2020, 05:30:29 PM » |
|
I'm just now completing a fork overhaul with all new All Balls parts, Progressive springs, and VTXtreme 4° triple trees. While I had it apart I polished the tubes and lower ends and tried to clear powdercoat them but that failed. I got a mottled finish which ruined my polish job - fortunately I had done only one fork tube so I lost a day chemically stripping and repolishing it. Found the All Balls dust seals are a bear to install - even the Motion Pro 45mm oil seal tool won't put it in there. Never mind "using your fingers to work it in". Not happening. I used a steel drift and hammer and struggled for awhile but finally got it in there. Wood Butcher's homemade PVC tool won't work on All Balls oils seals for me. It simply is too flimsy and has no weight. You use the proper tool as a slide hammer to put it in - I borrowed a Motion Pro tool for that. I also made the custom spanner wrench needed for the left fork. Torque on that is 72 ft/lbs - can't imagine a homemade tool of plastic would work as I saw recommended - made mine out of converting a socket wrench and welding it to a piece of exhaust tube, with a plate on the other end and a 3/4" bolt. Also there's an error in Wood Butcher's install sequence, right fork. I'll be advising him on that shortly. I came across several needed techniques to do this in my project, made notes and will attach them to my copy of WB's procedure. I also used both the Honda shop manual and Clymer's. There were differences between them which helped clarify when you have multiple author's procedures to get a better understanding.
This is by far the most complex routine procedure I've done on the Valk. With the possible exception of the Rostra electronic cruise control installation. I have avoided it in the past. As Daryl says, having done it now I see why the $450 labor cost for it. (I had Aurora Honda install the Progressive springs on Deerslayer as I didn't want to go into the forks.) But having done it once now, the learning curve is done though I'm not relishing a repeat of it. However doing just the seals is a smaller job. And another thing - pretty sure the All Balls seals are a much tighter fit - might last longer but what a PITA to install them - especially the dust seals. I have done the seal mate leak fix and re-installing the OEM dust seals was no problem. Maybe the AB seals will install easier after they aren't new, next time I need to fix a leak.
Oh Yeah, gotta mention Daryl at VTXtreme is super helpful. Every company should follow his example. I had issues I wasn't getting anywhere even after hours of struggle and thoroughly digging into 3 manuals. He stepped up with phone support and loaning tools. Attaboy, Daryl.
|
|
|
|
« Last Edit: April 16, 2020, 08:16:20 AM by MarkT »
|
Logged
|
|
|
|
|


