Bret SD
Member

Posts: 4306
***
San Diego, Ca.
|
 |
« on: June 06, 2020, 01:14:56 PM » |
|
Is there a material list here someplace with the specific lubricants, O-rings, gaskets or any other needed parts for overhauling the drive assembly. I want to clean and inspect everything, and use the correct products to do the job right the first time.
Also if anyone has done a tire change using Harbor Freight tire spoons and how that went would be helpful. Being in Ca I doubt if a shop will mount a darkside tire for me.. liability and lawsuits etc.
I have a heavy beam in the garage, was thinking of lifting the bike with come-alongs and heavy straps. Or building a front wheel chock and using a transmission jack to get the job done.
Any help or advice is appreciated greatly.
edit: Willow, I may have posted in the wrong section, apologies if I did.
|
|
|
|
« Last Edit: June 30, 2020, 01:40:32 PM by bretshim »
|
 Logged
|
Bret
02 Standard -- Blue & White
82 Aspencade -- Red
“No man has the right to be an amateur in the matter of physical training. It is a shame for a man to grow old without seeing the beauty and strength of which his body is capable.” Socrates
|
|
|
|
Jess from VA
|
|
« Reply #1 on: June 06, 2020, 01:39:40 PM » |
|
For procedure (and important sequence of reassembly), look at ChrisJ's writeup on Shoptalk. http://www.valkyrieriders.com/shoptalk/rear_end_service.pptxA tub of Belray Waterproof Grease, some moly paste, 3-orings (Carolina Bike and Trike), 75/80-90 sythnetic rear end dope, one metal valve stem (if still rubber), solvents (gas or spray), rags and stiff bristle brushes for cleaning (eye protection) (nitrile gloves). Orings http://www.carolinabikeandtrike.com/ORings.htmBelray https://www.amazon.com/s?k=Bel-Ray+Waterproof+Grease&ref=nb_sb_nossGear lube https://www.amazon.com/Mobil-104361-UNIT-Ounces-75W-90-Synthetic/dp/B000ONZXPK/ref=sr_1_4?crid=3CF7WDPB29K5U&dchild=1&keywords=75+90+synthetic+gear+oil&qid=1591475869&sprefix=75+90+%2Caps%2C180&sr=8-4 |
|
|
|
« Last Edit: June 06, 2020, 02:15:34 PM by Jess from VA »
|
Logged
|
|
|
|
|
old2soon
|
|
« Reply #2 on: June 06, 2020, 01:47:07 PM » |
|
On the list that you found access to the General board look for Shop Talk. Open that. You Will find lotsa information there. Ther are 3 O rings involved in rear end service moly or water proof grease and 80/90 gear oil And The Absolutely Most important Thing I M H O-The Correct Sequence of reassembly. And search the tech board here also. Carolina Bike and Trike has a 15 pack of the 3 O rings you need-5 of each-at a less than each price from Honda. I also copied the photos on the rear end service to put into my loose leaf folder that hangs out with my Maint manuals and my service log. Hope I splained this clear nuff!  RIDE SAFE. |
|
|
|
|
Logged
|
Today is the tommorow you worried about yesterday. If at first you don't succeed screw it-save it for nite check. 1964 1968 U S Navy. Two cruises off Nam.
VRCCDS0240 2012 GL1800 Gold Wing Motor Trike conversion
|
|
|
Valkorado
Member
Posts: 10517
VRCC DS 0242
Gunnison, Colorado (7,703') Here there be twisties.
|
|
« Reply #3 on: June 06, 2020, 02:55:20 PM » |
|
I don't do my own tires. Years ago I told my local shop owner I'd sign a fiery death clause stating I won't return to haunt him if I die a flaming darkside death. I also said I'd sign a no-fault if necessary. No problems since (he never did ask me to sign anything). One other thing on rear end service. I don't own a parts washer. Have a clean oil drain pan, some parts cleaner (or even some gas) and a plastic bristle brush on hand for cleaning the old grease from the splines and pumpkin. Make sure to cean 'em up well and dry thoroughly before applying the new grease. Just saw Jess beat me to this. Oh, yeah. Lots of rags. In addition to the Bel-Ray. Lifetime supply here: https://www.amazon.com/Loctite-234227-LOC51048-Anti-Seize-Compound/dp/B001HWBSJW/ref=sr_1_1?dchild=1&keywords=loctite+moly+paste&qid=1591480842&sr=8-1 |
|
|
|
« Last Edit: June 06, 2020, 03:06:26 PM by Valkorado »
|
Logged
|
Have you ever noticed when you're feeling really good, there's always a pigeon that'll come sh!t on your hood? - John Prine 97 Tourer "Silver Bullet" 01 Interstate "Ruby"  |
|
|
|
da prez
|
|
« Reply #4 on: June 06, 2020, 03:52:10 PM » |
|
I have the long harbor freight tire bars. They work well. Invest in a set of rim protectors. It will help you to keep the rims scratch free.
Be sure to C L E A N the rim where the tire mounts . A slow leak is dangerous. Lube the tire to take it off and to install. Weather you use balance beads or slime , tires need to be balanced.
da prez
|
|
|
|
|
Logged
|
|
|
|
|
Andy Cote
|
|
« Reply #5 on: June 07, 2020, 04:28:45 AM » |
|
Great info already. I might add, in addition to the three o-rings, there is a pinion seal (91261-MY3-003) that I decided to change as long as I was there.
Side track – when I bought my Valkyrie it was late fall and I knew it needed a rear tire. Planned as winter project. I thought I should just pick up the o-rings and seal at my local Honda dealer and save shipping while supporting a local business. They did not have any of the parts in stock. So I asked them, “What if I had come in for a simple rear tire change? Aren’t you supposed to change these parts out?”
Blank looks all around. Just confirmed to me that I should do all my own maintenance.
|
|
|
|
|
Logged
|
2015 Goldwing, basic black
Previously: 2000 Valkyrie Interstate, 1997 Valkyrie Standard, 1988 GL1500, GL1200 Standard, GL1200 Interstate and many other Hondas
|
|
|
|
Pluggy
|
|
« Reply #6 on: June 07, 2020, 06:01:16 AM » |
|
The plastic thrust washer may not require replacement. I had been buying new ones. After measuring used from my bike and a "new in the bag" item, both were the same. Thickness = .043". Slight burnishing was noticed on the used, but no wear. If you have a micrometer, it is worth checking. My recent was cleaned, measured, lubricated and reinstalled.
The thrust washer is not expensive, but the delivery time on parts these days is longer than before.
There are photos of damage that happens if the thrust washer is not installed. Make sure there is one in there when you take the bike apart, and one goes back in when you assemble it.
Pluggy.
|
|
|
|
|
Logged
|
|
|
|
Bret SD
Member
Posts: 4306
***
San Diego, Ca.
|
|
« Reply #7 on: June 07, 2020, 08:42:35 AM » |
|
Thanks for the great info from all you good people. Had a couple nice developments yesterday, the tire arrived at my home.. then I called a local chopper shop and asked if they'd mount and balance a DS tire for me. To my surprise the owner who I spoke to said no problem, 50.00 and 30 mins  . I'll be ordering the parts and building a front wheel chock device to hold the bike upright, I may bolt it to the floor in the garage. Had a couple ideas on a locking type mechanism to securely hold the bike upright and locked in. So far so good.. Thanks again |
|
|
|
|
Logged
|
Bret
02 Standard -- Blue & White
82 Aspencade -- Red
“No man has the right to be an amateur in the matter of physical training. It is a shame for a man to grow old without seeing the beauty and strength of which his body is capable.” Socrates
|
|
|
|
Chrisj CMA
|
|
« Reply #8 on: June 07, 2020, 09:02:52 AM » |
|
Thanks for the great info from all you good people. Had a couple nice developments yesterday, the tire arrived at my home.. then I called a local chopper shop and asked if they'd mount and balance a DS tire for me. To my surprise the owner who I spoke to said no problem, 50.00 and 30 mins . I'll be ordering the parts and building a front wheel chock device to hold the bike upright, I may bolt it to the floor in the garage. Had a couple ideas on a locking type mechanism to securely hold the bike upright and locked in. So far so good.. Thanks again Sounds like you can do some fabrication. I bought a cheap tire chock ($40) it was too skinny where the front tire needed to go. So I cut off the nose and welded in some rebar that I covered with a section of garden hose. Took a half an hour and now it’s a custom Valkyrie tire chock. Holds very securely |
|
|
|
|
Logged
|
|
|
|
|
Chrisj CMA
|
|
« Reply #9 on: June 07, 2020, 09:08:20 AM » |
|
For all you new guys. It really does pay off in the long run to have a lift to work on the phat girl. They are not that expensive. And (at least for me) so convenient. To each his own I suppose.  |
|
|
|
|
Logged
|
|
|
|
Bret SD
Member
Posts: 4306
***
San Diego, Ca.
|
|
« Reply #10 on: June 07, 2020, 09:25:40 AM » |
|
For all you new guys. It really does pay off in the long run to have a lift to work on the phat girl. They are not that expensive. And (at least for me) so convenient. To each his own I suppose. Thanks Chris, this covid debacle has hit me hard financially, delaying or eliminating two good jobs I had scheduled. I'm gonna do some more figgerin to see where I'm at with all this. HF has one for around 100.00 I think, if that's any good.. |
|
|
|
|
Logged
|
Bret
02 Standard -- Blue & White
82 Aspencade -- Red
“No man has the right to be an amateur in the matter of physical training. It is a shame for a man to grow old without seeing the beauty and strength of which his body is capable.” Socrates
|
|
|
|
old2soon
|
|
« Reply #11 on: June 07, 2020, 09:34:56 AM » |
|
Jeff-agree on the Need for a lift for D I Y wrench turners. And Make Sure the lift you purchase has locks so the hydraulic cylinder is NOT the only thing holding yer Gal up. And I myself personally once I git Phatt Ghurl on the lift couple of 1" ratchet straps fer those Oh Crap moments. Sides you git er centered up and pull either wheel the center of gravity shifts. Use yer imagination newbies. RIDE SAFE.
|
|
|
|
|
Logged
|
Today is the tommorow you worried about yesterday. If at first you don't succeed screw it-save it for nite check. 1964 1968 U S Navy. Two cruises off Nam.
VRCCDS0240 2012 GL1800 Gold Wing Motor Trike conversion
|
|
|
|
Chrisj CMA
|
|
« Reply #12 on: June 07, 2020, 09:52:28 AM » |
|
Jeff-agree on the Need for a lift for D I Y wrench turners. And Make Sure the lift you purchase has locks so the hydraulic cylinder is NOT the only thing holding yer Gal up. And I myself personally once I git Phatt Ghurl on the lift couple of 1" ratchet straps fer those Oh Crap moments. Sides you git er centered up and pull either wheel the center of gravity shifts. Use yer imagination newbies. RIDE SAFE.
Yep. In that picture the low tech wooden adapter is in use plus a 1” tie down strap. The lift is on the second safety. I like a lot of room under there. It’s rock steady. Stayed like that for 3 days waiting on a tire |
|
|
|
|
Logged
|
|
|
|
|
old2soon
|
|
« Reply #13 on: June 07, 2020, 10:56:43 AM » |
|
Jeff-agree on the Need for a lift for D I Y wrench turners. And Make Sure the lift you purchase has locks so the hydraulic cylinder is NOT the only thing holding yer Gal up. And I myself personally once I git Phatt Ghurl on the lift couple of 1" ratchet straps fer those Oh Crap moments. Sides you git er centered up and pull either wheel the center of gravity shifts. Use yer imagination newbies. RIDE SAFE.
Yep. In that picture the low tech wooden adapter is in use plus a 1” tie down strap. The lift is on the second safety. I like a lot of room under there. It’s rock steady. Stayed like that for 3 days waiting on a tire I also built one of those low tech wooden adapters-some scrap from other projects actually-and due to circumstances totally beyond my control Phatt Ghurl spent a bit over a week on the lift. H/F Yellow M/C lift-could be the best approx. $70.00 I ever spent. And if you are looking at H/F M/C lifts I personally would stay away from the aluminum one they have-if they still have it-as the reviews mostly mention flexing. Our Gals are right at or a bit over 800 lbs. Yeah Jeff-I SEE you have a good jack already! RIDE SAFE. |
|
|
|
|
Logged
|
Today is the tommorow you worried about yesterday. If at first you don't succeed screw it-save it for nite check. 1964 1968 U S Navy. Two cruises off Nam.
VRCCDS0240 2012 GL1800 Gold Wing Motor Trike conversion
|
|
|
Bret SD
Member
Posts: 4306
***
San Diego, Ca.
|
|
« Reply #14 on: June 07, 2020, 11:49:37 AM » |
|
Jeff-agree on the Need for a lift for D I Y wrench turners. And Make Sure the lift you purchase has locks so the hydraulic cylinder is NOT the only thing holding yer Gal up. And I myself personally once I git Phatt Ghurl on the lift couple of 1" ratchet straps fer those Oh Crap moments. Sides you git er centered up and pull either wheel the center of gravity shifts. Use yer imagination newbies. RIDE SAFE.
Yep. In that picture the low tech wooden adapter is in use plus a 1” tie down strap. The lift is on the second safety. I like a lot of room under there. It’s rock steady. Stayed like that for 3 days waiting on a tire I'm thinking this is the way to go for me, a 3/4" plywood base with needed blocks to level it out on the MC lift from HF.. I have tons of straps and can go ape nut on the safety aspects of lifting the Phatt girl in the air. The idea of having her up higher sounds good for the low back aspect of working on her. I get enough of that doing construction and maintenance work. |
|
|
|
|
Logged
|
Bret
02 Standard -- Blue & White
82 Aspencade -- Red
“No man has the right to be an amateur in the matter of physical training. It is a shame for a man to grow old without seeing the beauty and strength of which his body is capable.” Socrates
|
|
|
Valker
Member
Posts: 3061
Wahoo!!!!
Texas Panhandle
|
|
« Reply #15 on: June 07, 2020, 11:58:34 AM » |
|
Thanks for the great info from all you good people. Had a couple nice developments yesterday, the tire arrived at my home.. then I called a local chopper shop and asked if they'd mount and balance a DS tire for me. To my surprise the owner who I spoke to said no problem, 50.00 and 30 mins . I'll be ordering the parts and building a front wheel chock device to hold the bike upright, I may bolt it to the floor in the garage. Had a couple ideas on a locking type mechanism to securely hold the bike upright and locked in. So far so good.. Thanks again I have a Harbor Freight one. Got it for less than $50. It works great. This one with a 20% off coupon. It can be bolted to the floor, but I move it to my truck if I need to carry the bike. https://harborfreight.com/1800-lb-capacity-motorcycle-standwheel-chock-61670.html |
|
|
|
|
Logged
|
I ride a motorcycle because nothing transports me as quickly from where I am to who I am.
|
|
|
|
old2soon
|
|
« Reply #16 on: June 07, 2020, 12:17:51 PM » |
|
I have a broken secretary chair as my shop chair-broken in the sense it no longer will stay higher then all the way down. So I raise Phatt Ghurl high nuff as to make most of her accessible while parked on my keester. Even that old concrete mostly easy to scoot the chair where ever needed. Thinkin I paid a dollar at a yard sale fer that chair and it's been in my shop 6 or 7 years. How's dat fer return on investment? Can't even git an H/F shop chair That cheap!  RIDE SAFE. |
|
|
|
|
Logged
|
Today is the tommorow you worried about yesterday. If at first you don't succeed screw it-save it for nite check. 1964 1968 U S Navy. Two cruises off Nam.
VRCCDS0240 2012 GL1800 Gold Wing Motor Trike conversion
|
|
|
|
Jess from VA
|
|
« Reply #17 on: June 07, 2020, 12:47:08 PM » |
|
I'm thinking this is the way to go for me, a 3/4" plywood base with needed blocks to level it out on the MC lift from HF.. I have tons of straps and can go ape nut on the safety aspects of lifting the Phatt girl in the air.
The idea of having her up higher sounds good for the low back aspect of working on her. I get enough of that doing construction and maintenance work.I prefer using one jack stand under one front engine guard (while on the jack), over ratchet straps. The first time I dropped the rear wheel, my bike started tipping forward, and the jack may have gone with it. The jack stand in front makes it strong enough to get up and jump up and down on the bike, on the jack. I think you will find only jacking the bike up about a third to half of jack capacity is sufficient for most work, and a nice sturdy squat work stool is perfect. However, I do not remove any exhaust or lower fender half to take off the wheel/tire, so I have to jack it higher so the tire comes out underneath the fender. Many small jobs and washing I don't use a strap or jack stand at all, it's pretty sturdy on flat pavement (as long as you're not pulling hard on wrenches). What must be avoided at all costs, is leaving small tools and parts around the bike while working. Slipping on a screwdriver and falling onto the bike on the jack could be bad. And you're always walking back and forth for more tools or something. So make a habit of putting things either under the bike, or behind you away from the bike. And a couple 2 X 6 foot rolls of remnant carpeting (down each side of the bike) are great for the knees. And a fan to blow mosquitoes (or heat) away is nice .   The small jack under the tire is problematic, but the dang thing is heavy. The really nice trick on reassembly (with new rubber), is to feed the axle through the pumpkin and wheel, but leave the spacer and caliper out on the other side. With the (freshly greased) axle though, you can get the wheel and pumpkin mated up together. Then, you pull the axle out again, just enough to work the caliper and spacer back in. 
|
|
|
|
« Last Edit: June 07, 2020, 01:01:37 PM by Jess from VA »
|
Logged
|
|
|
|
|
Chrisj CMA
|
|
« Reply #18 on: June 07, 2020, 01:49:09 PM » |
|
Jess that idea of using the axle without the caliper plate and spacer is a good idea if you have trouble getting the wheel on the final drive. I have done it so many times now I just pop it on there and then proceed with all the other parts
|
|
|
|
|
Logged
|
|
|
|
Bret SD
Member
Posts: 4306
***
San Diego, Ca.
|
|
« Reply #19 on: June 07, 2020, 03:39:58 PM » |
|
Ok, today I got the HF MC lift at 20% off.. 86.00 and change total, that thing is solid as a rock. Tomorrow I'll gitter lifted and start pulling off some parts.. Thanks for all the tips so far .. now I'm looking forward to getting in there and seeing how everything looks. I like the idea of the jack stand stabilizer, EZ enough, there must be 3-4 pairs of stands floating around here at my place. |
|
|
|
|
Logged
|
Bret
02 Standard -- Blue & White
82 Aspencade -- Red
“No man has the right to be an amateur in the matter of physical training. It is a shame for a man to grow old without seeing the beauty and strength of which his body is capable.” Socrates
|
|
|
|
Andy Cote
|
|
« Reply #20 on: June 08, 2020, 04:06:45 AM » |
|
My biggest challenge was getting the drive shaft back in the u-joint. Lots of wiggling, twisting and swearing for 30 minutes. Then take a break, get a cup of coffee and some fresh air. Then come back to it and it goes right into place.
I have used a jack under the rear tire before. Sometimes I will use a 6 to 8 ft 2x4 and a block to lever the tire up and down. It' s possible to do this by yourself squatting or kneeling beside the bike and then extending your leg straight behind the bike and pushing up and down on the 2x4. Sounds funny (and probably looks like that if someone's watching) but works pretty well for me.
|
|
|
|
|
Logged
|
2015 Goldwing, basic black
Previously: 2000 Valkyrie Interstate, 1997 Valkyrie Standard, 1988 GL1500, GL1200 Standard, GL1200 Interstate and many other Hondas
|
|
|
|
Chrisj CMA
|
|
« Reply #21 on: June 08, 2020, 04:59:46 AM » |
|
My biggest challenge was getting the drive shaft back in the u-joint. Lots of wiggling, twisting and swearing for 30 minutes. Then take a break, get a cup of coffee and some fresh air. Then come back to it and it goes right into place.
I have used a jack under the rear tire before. Sometimes I will use a 6 to 8 ft 2x4 and a block to lever the tire up and down. It' s possible to do this by yourself squatting or kneeling beside the bike and then extending your leg straight behind the bike and pushing up and down on the 2x4. Sounds funny (and probably looks like that if someone's watching) but works pretty well for me.
First of all when reinstalling the final drive and drive shaft the swing arm needs to be level to the floor. Then sit directly behind the opening of the swing arm so you can see the u-joint. Then holding the final drive securely, guide the drive shaft down the center of the swing arm tube until it either goes in or stops. If it stops just give in a gentle wiggle while applying pressure and it will go in. |
|
|
|
|
Logged
|
|
|
|
|
Chrisj CMA
|
|
« Reply #22 on: June 08, 2020, 05:03:45 AM » |
|
My biggest challenge was getting the drive shaft back in the u-joint. Lots of wiggling, twisting and swearing for 30 minutes. Then take a break, get a cup of coffee and some fresh air. Then come back to it and it goes right into place.
I have used a jack under the rear tire before. Sometimes I will use a 6 to 8 ft 2x4 and a block to lever the tire up and down. It' s possible to do this by yourself squatting or kneeling beside the bike and then extending your leg straight behind the bike and pushing up and down on the 2x4. Sounds funny (and probably looks like that if someone's watching) but works pretty well for me.
How are you using a board under the tire to aid in drive shaft installation. The wheel should not be on when installing the driveshaft |
|
|
|
|
Logged
|
|
|
|
|
Jess from VA
|
|
« Reply #23 on: June 08, 2020, 05:36:25 AM » |
|
My biggest challenge was getting the drive shaft back in the u-joint. Lots of wiggling, twisting and swearing for 30 minutes. Then take a break, get a cup of coffee and some fresh air. Then come back to it and it goes right into place.
I have used a jack under the rear tire before. Sometimes I will use a 6 to 8 ft 2x4 and a block to lever the tire up and down. It' s possible to do this by yourself squatting or kneeling beside the bike and then extending your leg straight behind the bike and pushing up and down on the 2x4. Sounds funny (and probably looks like that if someone's watching) but works pretty well for me.
How are you using a board under the tire to aid in drive shaft installation. The wheel should not be on when installing the driveshaft I think he refers to using the board (like I tried with the jack) to work the wheel up and down to get the axle out and the wheel off the bike. I did that too my first time. But then I discovered, after the shocks are off, you don't diddle the wheel up and down, you diddle the jack up and down (bike way down to take axle out over the exhaust (and to clear my bag mounts and heat deflectors), then bike way up to drop the wheel out. It's easier to diddle the jack (and whole bike), than diddle the wheel/pumpkin/swingarm with your upper body, jack or board (ugh). |
|
|
|
« Last Edit: June 08, 2020, 05:51:31 AM by Jess from VA »
|
Logged
|
|
|
|
|
Chrisj CMA
|
|
« Reply #24 on: June 08, 2020, 05:43:10 AM » |
|
To each his own. That all sounds harder than just lifting the wheel into the final and pushing the axle through. Kinda all in one step. Then take a break. The rest is easier
|
|
|
|
|
Logged
|
|
|
|
|
Jess from VA
|
|
« Reply #25 on: June 08, 2020, 05:53:58 AM » |
|
Dissembly, not reassembly.
|
|
|
|
|
Logged
|
|
|
|
|
F6Dave
|
|
« Reply #26 on: June 08, 2020, 12:03:50 PM » |
|
I have a heavy beam in the garage, was thinking of lifting the bike with come-alongs and heavy straps.
I think lifting the bike with a hoist is suggested in the owner's manual. I tried it once. It worked, but I bought a lift before the next tire change. MUCH easier. |
|
|
|
|
Logged
|
|
|
|
|
Jess from VA
|
|
« Reply #27 on: June 08, 2020, 12:06:21 PM » |
|
A lot of the old places I lived in (and garages), I think the roof might come down before the bike went up.
Or my luck, the bike would go up OK, then a while later the roof and the bike would come down, together.
|
|
|
|
|
Logged
|
|
|
|
|
F6Dave
|
|
« Reply #28 on: June 08, 2020, 06:00:04 PM » |
|
A lot of the old places I lived in (and garages), I think the roof might come down before the bike went up.
Or my luck, the bike would go up OK, then a while later the roof and the bike would come down, together.
You lived in garages?! Decades ago my stepdad pulled several truck and car engines with a come-along. We did it in a garage he built. The roof was supported with sturdy home made trusses spaced 2 feet apart. We'd run a 4X4 beam through 4 trusses and hang the come-along in the center. Those cast iron engines had to weigh several hundred pounds but that garage handled it fine. It's amazing what you could do with limited tools. |
|
|
|
|
Logged
|
|
|
|
Bret SD
Member
Posts: 4306
***
San Diego, Ca.
|
|
« Reply #29 on: June 10, 2020, 07:09:30 AM » |
|
Ok, two jack stands under the engine guard and one under the sway bar cross member.. I think it's time to pull the wheel off and get this show going. With the floor jack I can move the wheel up and down for access.. 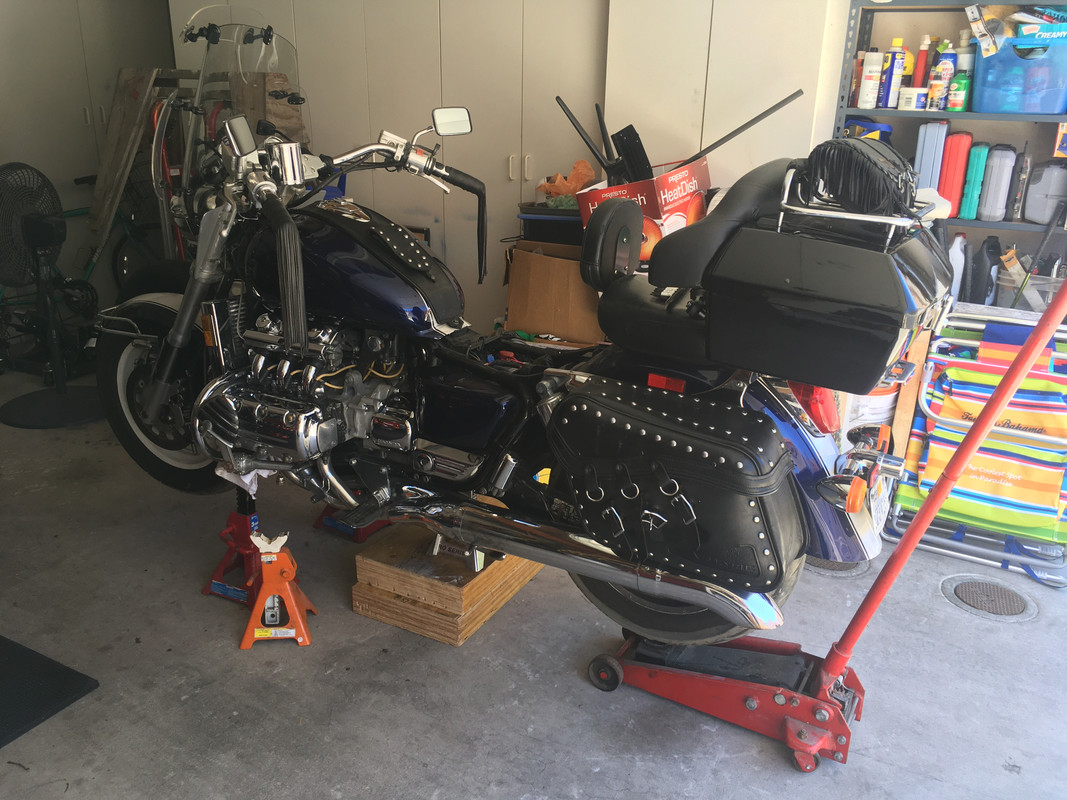 |
|
|
|
|
Logged
|
Bret
02 Standard -- Blue & White
82 Aspencade -- Red
“No man has the right to be an amateur in the matter of physical training. It is a shame for a man to grow old without seeing the beauty and strength of which his body is capable.” Socrates
|
|
|
hubcapsc
Member
Posts: 16824
upstate
South Carolina
|
|
« Reply #30 on: June 10, 2020, 08:09:00 AM » |
|
I wish you luck, but I fear you're doomed. If the "sway bar member" is what I think it is, it is easily bent. A jack is cheap, and an adapter can be made from wood scraps if need be.    -Mike |
|
|
|
|
Logged
|
|
|
|
Bret SD
Member
Posts: 4306
***
San Diego, Ca.
|
|
« Reply #31 on: June 10, 2020, 08:19:24 AM » |
|
I wish you luck, but I fear you're doomed. If the "sway bar member" is what I think it is, it is easily bent. A jack is cheap, and an adapter can be made from wood scraps if need be. -Mike Oh.. ok, I thought that piece was pretty solid.. no worries, I have the MC jack and will just slide it under and use it. Thanks for the heads up Mike! |
|
|
|
|
Logged
|
Bret
02 Standard -- Blue & White
82 Aspencade -- Red
“No man has the right to be an amateur in the matter of physical training. It is a shame for a man to grow old without seeing the beauty and strength of which his body is capable.” Socrates
|
|
|
|
old2soon
|
|
« Reply #32 on: June 10, 2020, 03:49:28 PM » |
|
bretshim-read the reviews on your H/F jack. My H/F M/C-the yellow one-has a slight issue you Really Need too be aware of. When you've finished all the chores and yer ready to git yer Gal back on her tires when lowering the release valve on mine needs to be slammed down hard so the jack lowers slowly. If you just release the lowering valve slowly the M/C drops like a rock. Yup-Exact Opposite of what you'd expect. RIDE SAFE.
|
|
|
|
|
Logged
|
Today is the tommorow you worried about yesterday. If at first you don't succeed screw it-save it for nite check. 1964 1968 U S Navy. Two cruises off Nam.
VRCCDS0240 2012 GL1800 Gold Wing Motor Trike conversion
|
|
|
Bret SD
Member
Posts: 4306
***
San Diego, Ca.
|
|
« Reply #33 on: June 11, 2020, 07:20:07 AM » |
|
bretshim-read the reviews on your H/F jack. My H/F M/C-the yellow one-has a slight issue you Really Need too be aware of. When you've finished all the chores and yer ready to git yer Gal back on her tires when lowering the release valve on mine needs to be slammed down hard so the jack lowers slowly. If you just release the lowering valve slowly the M/C drops like a rock. Yup-Exact Opposite of what you'd expect. RIDE SAFE.
Yep, figured that out quickly and had to bump it down, not the best feeling. Thanks for the heads up on slamming the valve down to make it lower slowly.. crazy and backwards. Other than that it seems to be a very solid setup. |
|
|
|
|
Logged
|
Bret
02 Standard -- Blue & White
82 Aspencade -- Red
“No man has the right to be an amateur in the matter of physical training. It is a shame for a man to grow old without seeing the beauty and strength of which his body is capable.” Socrates
|
|
|
|
old2soon
|
|
« Reply #34 on: June 11, 2020, 08:18:46 AM » |
|
bretshim-read the reviews on your H/F jack. My H/F M/C-the yellow one-has a slight issue you Really Need too be aware of. When you've finished all the chores and yer ready to git yer Gal back on her tires when lowering the release valve on mine needs to be slammed down hard so the jack lowers slowly. If you just release the lowering valve slowly the M/C drops like a rock. Yup-Exact Opposite of what you'd expect. RIDE SAFE.
Yep, figured that out quickly and had to bump it down, not the best feeling. Thanks for the heads up on slamming the valve down to make it lower slowly.. crazy and backwards. Other than that it seems to be a very solid setup. EVEN After reading the reviews the first time I let Phatt Ghurl down off the new then lift I dang near effed it up. And-yes-Agree Very Stable once lifted. Well if owning and working on M/Cs wuz easy Everyone would be doin it! RIDE SAFE. |
|
|
|
|
Logged
|
Today is the tommorow you worried about yesterday. If at first you don't succeed screw it-save it for nite check. 1964 1968 U S Navy. Two cruises off Nam.
VRCCDS0240 2012 GL1800 Gold Wing Motor Trike conversion
|
|
|
Bret SD
Member
Posts: 4306
***
San Diego, Ca.
|
|
« Reply #35 on: June 15, 2020, 01:55:30 PM » |
|
bretshim-read the reviews on your H/F jack. My H/F M/C-the yellow one-has a slight issue you Really Need too be aware of. When you've finished all the chores and yer ready to git yer Gal back on her tires when lowering the release valve on mine needs to be slammed down hard so the jack lowers slowly. If you just release the lowering valve slowly the M/C drops like a rock. Yup-Exact Opposite of what you'd expect. RIDE SAFE.
Yep, figured that out quickly and had to bump it down, not the best feeling. Thanks for the heads up on slamming the valve down to make it lower slowly.. crazy and backwards. Other than that it seems to be a very solid setup. EVEN After reading the reviews the first time I let Phatt Ghurl down off the new then lift I dang near effed it up. And-yes-Agree Very Stable once lifted. Well if owning and working on M/Cs wuz easy Everyone would be doin it! RIDE SAFE. Thanks for all your help old2soon.. today I was able to get everything apart and inspected, splines, pinion cup.. all of it looks to be in great shape. No wear spots on the axle and everything was wet with grease. The chopper shop is closed today so no tire mount & balance today. I'll be ordering the o-rings and lubricants etc today. Any recommendation on rear brake pads? I installed ceramic pads 6000 miles ago and they're nearly toast, likely not the right ones. I also noticed one of the caliper cups hangs up a bit and the pads are slightly worn more on one end.. maybe 1/16" or less, still noticed it though. I don't have time to rebuild the calipers at the moment, and it's not too bad so I'll procrastinate awhile on it. I may try pumping the brake slightly and re-compressing a few times to loosen things up. Nothing leaking or problematic so far as I can see. |
|
|
|
|
Logged
|
Bret
02 Standard -- Blue & White
82 Aspencade -- Red
“No man has the right to be an amateur in the matter of physical training. It is a shame for a man to grow old without seeing the beauty and strength of which his body is capable.” Socrates
|
|
|
|
Jess from VA
|
|
« Reply #36 on: June 15, 2020, 02:23:15 PM » |
|
Without a rebuild, I've had good success detail cleaning my calipers and pistons with gun bore solvent and a pistol cleaning (short) rod with brass and stainless brushes. And compressed air or a can of brake cleaner to blow things out while working. Get the pistons sticking out to clean, but not all the way out. I've used a big C clamp and wood to press them back in for reassembly.
I only use OE pads (I'm sure some others are good, but the idea is to not increase rotor wear with whatever you might choose)
|
|
|
|
|
Logged
|
|
|
|
Bret SD
Member
Posts: 4306
***
San Diego, Ca.
|
|
« Reply #37 on: June 15, 2020, 04:38:13 PM » |
|
Without a rebuild, I've had good success detail cleaning my calipers and pistons with gun bore solvent and a pistol cleaning (short) rod with brass and stainless brushes. And compressed air or a can of brake cleaner to blow things out while working. Get the pistons sticking out to clean, but not all the way out. I've used a big C clamp and wood to press them back in for reassembly.
I only use OE pads (I'm sure some others are good, but the idea is to not increase rotor wear with whatever you might choose)
Thank you Jess, I'll give that a shot.. I have some nice, large c-clamp vice grips so it's pretty easy to push the pistons back in. The rear brake disc is worn down some but looks to have plenty of metal.. I don't have a precision measuring tool, one day soon.. |
|
|
|
|
Logged
|
Bret
02 Standard -- Blue & White
82 Aspencade -- Red
“No man has the right to be an amateur in the matter of physical training. It is a shame for a man to grow old without seeing the beauty and strength of which his body is capable.” Socrates
|
|
|
Valkorado
Member
Posts: 10517
VRCC DS 0242
Gunnison, Colorado (7,703') Here there be twisties.
|
|
« Reply #38 on: June 15, 2020, 04:46:59 PM » |
|
Without a rebuild, I've had good success detail cleaning my calipers and pistons with gun bore solvent and a pistol cleaning (short) rod with brass and stainless brushes. And compressed air or a can of brake cleaner to blow things out while working. Get the pistons sticking out to clean, but not all the way out. I've used a big C clamp and wood to press them back in for reassembly.
I only use OE pads (I'm sure some others are good, but the idea is to not increase rotor wear with whatever you might choose)
Thank you Jess, I'll give that a shot.. I have some nice, large c-clamp vice grips so it's pretty easy to push the pistons back in. The rear brake disc is worn down some but looks to have plenty of metal.. I don't have a precision measuring tool, one day soon.. The Bullet's rear disc is needing replacement before long. I found an almost new OEM one at Pinwalll for like $40. https://pinwallcycle.com/Decent digital micrometer can be had pretty cheap. https://www.ebay.com/itm/333536233968 |
|
|
|
« Last Edit: June 15, 2020, 05:20:46 PM by Valkorado »
|
Logged
|
Have you ever noticed when you're feeling really good, there's always a pigeon that'll come sh!t on your hood? - John Prine 97 Tourer "Silver Bullet" 01 Interstate "Ruby" |
|
|
Bret SD
Member
Posts: 4306
***
San Diego, Ca.
|
|
« Reply #39 on: June 16, 2020, 05:23:11 PM » |
|
Without a rebuild, I've had good success detail cleaning my calipers and pistons with gun bore solvent and a pistol cleaning (short) rod with brass and stainless brushes. And compressed air or a can of brake cleaner to blow things out while working. Get the pistons sticking out to clean, but not all the way out. I've used a big C clamp and wood to press them back in for reassembly.
I only use OE pads (I'm sure some others are good, but the idea is to not increase rotor wear with whatever you might choose)
Thank you Jess, I'll give that a shot.. I have some nice, large c-clamp vice grips so it's pretty easy to push the pistons back in. The rear brake disc is worn down some but looks to have plenty of metal.. I don't have a precision measuring tool, one day soon.. The Bullet's rear disc is needing replacement before long. I found an almost new OEM one at Pinwalll for like $40. https://pinwallcycle.com/Decent digital micrometer can be had pretty cheap. https://www.ebay.com/itm/333536233968Thanks man, I think I'll be ok for now with the disk as it is.. gotta say I HATE having my Phatt Ghurl down.. the GW is nice but it's no Valkyrie.  |
|
|
|
|
Logged
|
Bret
02 Standard -- Blue & White
82 Aspencade -- Red
“No man has the right to be an amateur in the matter of physical training. It is a shame for a man to grow old without seeing the beauty and strength of which his body is capable.” Socrates
|
|
|
|


