|
Canoodle
|
 |
« on: September 13, 2020, 06:14:05 PM » |
|
The fluid in the rear brake reservoir seems a bit low. Tried to fill today, but not succesful in figuring it out.
There is a chrome cover over the reservoir ( not sure if aftermarket or not ?) unbolted the chrome fitting
and imagined the reservoir would be sittting there looking at me and begging to be refilled. But no...
the reservoir was hiding away in the chrome cover and seemed to be bolted on with at leasat another 3
small bolts ( if I remember correctly) presuming I have to loosen all these bolts ? is there an easier way ?
Am I missing something ? seems like a very convoluted process, for such a seemingly simple task.
|
|
|
|
|
 Logged
|
|
|
|
|
Chrisj CMA
|
 |
« Reply #1 on: September 13, 2020, 06:18:30 PM » |
|
Once you remove the chrome cover you should be able to just remove the two screws for the lid to the reservoir. Post a picture of what you are talking about
|
|
|
|
|
 Logged
|
|
|
|
f-Stop
Member
    
Posts: 1818
'98 Standard named Hildr
Driftwood, Texas
|
 |
« Reply #2 on: September 13, 2020, 06:41:31 PM » |
|
There is a Phillips head screw on the underside of the chrome cover to the rear break reservoir. Remove that and the cover comes right off.  |
|
|
|
|
 Logged
|
  Had my blinker on across three states! |
|
|
hubcapsc
Member
    
Posts: 16804
upstate
South Carolina
|
 |
« Reply #3 on: September 13, 2020, 07:00:17 PM » |
|
There is a chrome cover over the reservoir ( not sure if aftermarket or not ?)
Maybe (?) since you're not sure, you might have a set of Kuryakyn transmission
covers on there. I guess (I don't have these covers) when you take the brake
side off, there will still be the plastic OEM reservoir cover there...
Anywho... those two screws on the reservoir cap... be careful... unless you know
you have the right screwdriver (similar to philips) you should use the one in
your OEM tool kit if you have it... they bugger up easily...
-Mike
|
|
|
|
|
 Logged
|
|
|
|
|
Madmike
|
 |
« Reply #4 on: September 13, 2020, 08:07:41 PM » |
|
Have you downloaded the service manual??
|
|
|
|
|
 Logged
|
|
|
|
mello dude
Member
    
Posts: 998
Half genius, half dumazz whackjob foole
Dayton Ohio
|
 |
« Reply #5 on: September 13, 2020, 10:00:42 PM » |
|
The fluid in the rear brake reservoir seems a bit low. Tried to fill today, but not succesful in figuring it out.
There is a chrome cover over the reservoir ( not sure if aftermarket or not ?) unbolted the chrome fitting
and imagined the reservoir would be sittting there looking at me and begging to be refilled. But no...
the reservoir was hiding away in the chrome cover and seemed to be bolted on with at leasat another 3
small bolts ( if I remember correctly) presuming I have to loosen all these bolts ? is there an easier way ?
Am I missing something ? seems like a very convoluted process, for such a seemingly simple task.
First - put it all back together., you are making it way harder than it is... .... Then, there is only 1 bolt to pull the cover off. It uses a 8mm socket to remove.... like the pic....  Then ------ "BOOM" ----- reservoir is in plain view...  Then grab a JIS screw driver and unscrew the 2 "phillips" type screws and you got from there.  |
|
|
|
« Last Edit: September 14, 2020, 12:30:07 PM by mello dude »
|
 Logged
|
* There's someone in my head, but it's not me.......
* Mr. Murphy was an optimist....
* There's a very fine line between Insanity and Genius.....
* My get up and go, must have got up and went.....
|
|
|
|
jnicks01
|
 |
« Reply #6 on: September 14, 2020, 06:05:28 AM » |
|
Sounds like you have the aftermarket Kuryakyn trans covers if you have that many bolts. Just completely remove that and you will see the reservoir as in the photo above.
|
|
|
|
|
 Logged
|
I want to scoop out your brains and eat your knowledge.  |
|
|
|
Canoodle
|
 |
« Reply #7 on: September 14, 2020, 05:15:49 PM » |
|
Hey all
Mello Dude got me started in the right direction-it is indeed only the small 8mm bolt at the bottom that
needs to be undone. 'Nother problem- could only get one screw out the top of the reservoir. The other one
seems to be stripped. Not even my JIS driver could get a grip on it. What's the best way to get this sucker out ? cheers !
|
|
|
|
|
 Logged
|
|
|
|
|
Chrisj CMA
|
 |
« Reply #8 on: September 14, 2020, 05:34:30 PM » |
|
Hey all
Mello Dude got me started in the right direction-it is indeed only the small 8mm bolt at the bottom that
needs to be undone. 'Nother problem- could only get one screw out the top of the reservoir. The other one
seems to be stripped. Not even my JIS driver could get a grip on it. What's the best way to get this sucker out ? cheers !
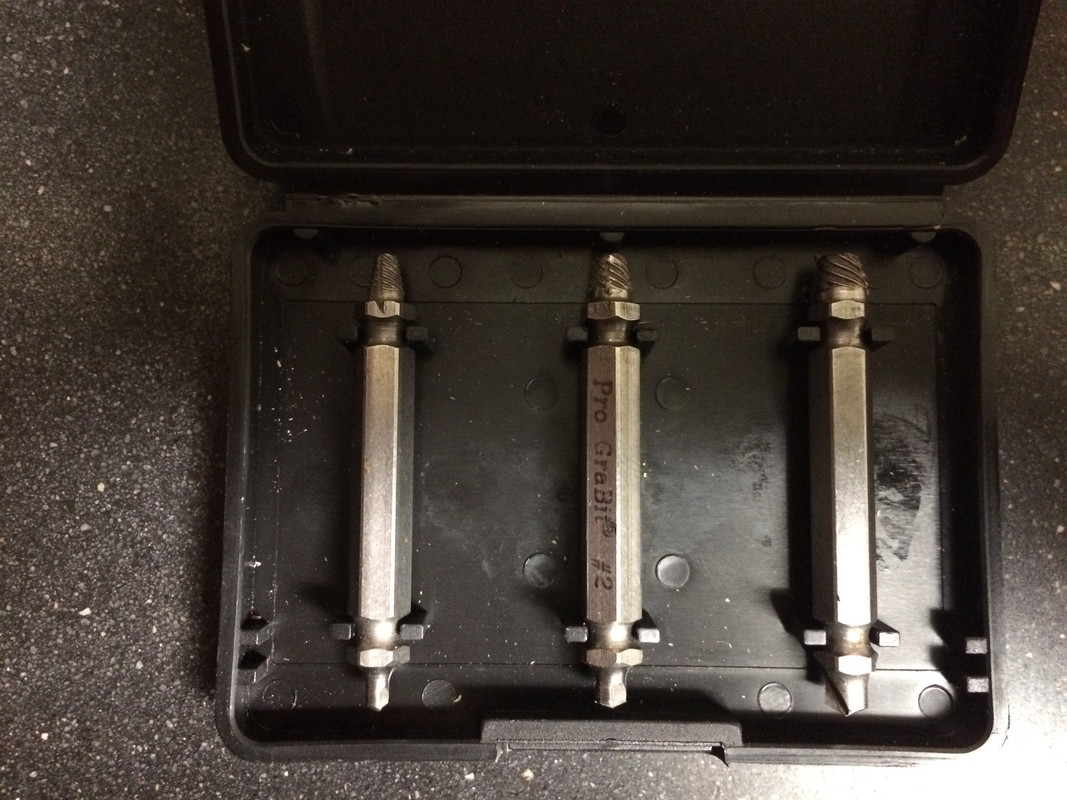
You need this:  |
|
|
|
|
 Logged
|
|
|
|
|
da prez
|
 |
« Reply #9 on: September 14, 2020, 06:21:09 PM » |
|
Valve lapping compound on the screwdriver tip or a drop of oil in the dust from your grinder. Support the cylinder and the screws should come out.
da prez
.
|
|
|
|
|
 Logged
|
|
|
|
gordonv
Member
    
Posts: 5766
VRCC # 31419
Richmond BC
|
 |
« Reply #10 on: September 14, 2020, 08:45:45 PM » |
|
Canoodle, the pictures you sent me didn't have the right side of the bike, only the left. Have you signed up on the picture web hosting site yet? As for the removal of the screw, I've got an impact driver for it. I used it on my IS when I parted it out after my wreck.  I also have a vacuum pump to remove the old oil first, then fill it up. If we meet up at my mom's house, I have all my specialty tools there. Just bring new oil, I think I bought the wrong type. |
|
|
|
|
 Logged
|
1999 Black with custom paint IS   |
|
|
John Schmidt
Member
    
Posts: 15348
a/k/a Stuffy. '99 I/S Valk Roadsmith Trike
De Pere, WI (Green Bay)
|
 |
« Reply #11 on: September 14, 2020, 08:51:07 PM » |
|
Valve lapping compound on the screwdriver tip or a drop of oil in the dust from your grinder. Support the cylinder and the screws should come out.
da prez
.
Really? Ross, I didn't think anyone else knew about that little trick. I learned that from an old auto mechanic while in jr. high school....small world afterall. |
|
|
|
|
 Logged
|
|
|
|
hubcapsc
Member
    
Posts: 16804
upstate
South Carolina
|
 |
« Reply #12 on: September 15, 2020, 04:12:51 AM » |
|
As for the removal of the screw, I've got an impact driver for it.
I used it on my IS when I parted it out after my wreck.
Yow Gordonv... pounding on that plastic reservoir with a hammer? I finally hosed up the head on one of the rear brake reservoir screws last September, I used an easy-out like thing to get it out... I wish I remembered the details  but I didn't put them in my post... it has where to get new screws for less than Honda'$ price, though... http://www.valkyrieforum.com/bbs/index.php/topic,108246.0.htmlI think Da Prez's idea sounds like a detail I'll try to remember... -Mike
|
|
|
|
|
 Logged
|
|
|
|
|
Pluggy
|
 |
« Reply #13 on: September 15, 2020, 07:32:44 AM » |
|
https://www.homedepot.com/p/M4-0-7-x-40-mm-Metric-Socket-Cap-Head-Screw-2-Pack-844658/204283607Hex screws. Also called socket head screws. Try this or the next longer size as a replacement. Look for screws with a fully threaded length. You may want to put a washer under the head. These are preferred for error-reisitance. Just don't overdo it when you tighten them up. These are not expensive.
|
|
|
|
« Last Edit: September 15, 2020, 07:54:33 AM by Pluggy »
|
 Logged
|
|
|
|
|
Canoodle
|
 |
« Reply #14 on: September 15, 2020, 09:15:32 AM » |
|
Gord hi Will you be at your mom's place this Saturday ? could pop over with bike -WPOC ( weather permitting of course) I havent signed up for the pic hosting yet-experiencing some "technical" difficulties with doing so. E-mail me your moms address etc if you will be there Sat. Cheers Canoodle, the pictures you sent me didn't have the right side of the bike, only the left. Have you signed up on the picture web hosting site yet? As for the removal of the screw, I've got an impact driver for it. I used it on my IS when I parted it out after my wreck.  I also have a vacuum pump to remove the old oil first, then fill it up. If we meet up at my mom's house, I have all my specialty tools there. Just bring new oil, I think I bought the wrong type. [/quote] |
|
|
|
|
 Logged
|
|
|
|
Skinhead
Member
    
Posts: 8748
J. A. B. O. A.
Troy, MI
|
 |
« Reply #15 on: September 18, 2020, 04:52:45 AM » |
|
A word (s) of caution: before completely filling your master cylinder, check the condition of your brake pads. If they are worn out replace them before filling the reservoir. If you overfill the reservoir with worn pads, when you later replace them, you may push brake fluid out when you compress the caliper pistons during a later pad replacement. This could result in damaged paint.
|
|
|
|
|
 Logged
|
 Troy, MI |
|
|
h13man
Member
    
Posts: 1878
To everything there is an exception.
Indiana NW Central Flatlands
|
 |
« Reply #16 on: September 18, 2020, 07:40:15 AM » |
|
LH drill bit set comes in handy for this.
FWIW I just changed my rear pads last night with 46,000 mi. on them with about 4 mm left. The new pads had a insulator pad? and a clip on SS contact shim. My old ones were just the pads only. I didn't use the insulators just the contact shims. My bike had 11,000 mi. on it when bought it so I'm assuming the old pads were original.
When doing this I took the reservoir cover off and used paper towel to absorb half of the fluid out, wrapped a rag around it to catch excess in case of overflow from pushing the caliper back.
|
|
|
|
« Last Edit: September 19, 2020, 05:10:28 AM by h13man »
|
 Logged
|
|
|
|
|
Canoodle
|
 |
« Reply #17 on: September 18, 2020, 02:39:27 PM » |
|
Guess there are many ways to skin a cat, especially if you have no clue as to what you are doing !
Tried drilling the screw out-just made a big hole on the top. Then had the bright idea to undo the good
screw , get a flat head screwdriver under the cap and twist up until the obviously weaked bad screw
just broke...which indeed it did. Got a new one, filled up the fluid and all is good. How come no one recommended this method to me -lol !!??
Kinda reminds me of the old screwdriver trick through a stubborn oil filter.
|
|
|
|
|
 Logged
|
|
|
|
mello dude
Member
    
Posts: 998
Half genius, half dumazz whackjob foole
Dayton Ohio
|
 |
« Reply #18 on: September 18, 2020, 03:19:38 PM » |
|
Guess there are many ways to skin a cat, especially if you have no clue as to what you are doing !
Tried drilling the screw out-just made a big hole on the top. Then had the bright idea to undo the good
screw , get a flat head screwdriver under the cap and twist up until the obviously weaked bad screw
just broke...which indeed it did. Got a new one, filled up the fluid and all is good. How come no one recommended this method to me -lol !!??
Kinda reminds me of the old screwdriver trick through a stubborn oil filter.
Interesting idea.... have to remember it.....  |
|
|
|
|
 Logged
|
* There's someone in my head, but it's not me.......
* Mr. Murphy was an optimist....
* There's a very fine line between Insanity and Genius.....
* My get up and go, must have got up and went.....
|
|
|
gordonv
Member
    
Posts: 5766
VRCC # 31419
Richmond BC
|
 |
« Reply #19 on: September 18, 2020, 08:13:38 PM » |
|
I was thinking of that when we looked at it, but that plastic reservoir made me think it would break before the screw. Glad to hear it worked. Yow Gordonv... pounding on that plastic reservoir with a hammer?
I taped the screw gently, but there is only one bolt holding the reservoir to the bike. If I had my Dremel, I would have thought of making a slot and using a flat blade instead. |
|
|
|
« Last Edit: September 18, 2020, 08:16:46 PM by gordonv »
|
 Logged
|
1999 Black with custom paint IS   |
|
|
|
Canoodle
|
 |
« Reply #20 on: September 19, 2020, 02:55:46 PM » |
|
I was thinking of that when we looked at it, but that plastic reservoir made me think it would break before the screw. Glad to hear it worked.
When in doubt bring out the big guns...in my case either a hammer or a drill. |
|
|
|
|
 Logged
|
|
|
|
|
Chrisj CMA
|
 |
« Reply #21 on: September 30, 2020, 10:58:33 AM » |
|
Guess there are many ways to skin a cat, especially if you have no clue as to what you are doing !
Tried drilling the screw out-just made a big hole on the top. Then had the bright idea to undo the good
screw , get a flat head screwdriver under the cap and twist up until the obviously weaked bad screw
just broke...which indeed it did. Got a new one, filled up the fluid and all is good. How come no one recommended this method to me -lol !!??
Kinda reminds me of the old screwdriver trick through a stubborn oil filter.
No one recommended that procedure because even though you got lucky it wasn’t a wise move. Too easy to destroy the plastic reservoir. Now drilling the head off the screw instead of trying a screw removal tool would have been a smarter choice but I m glad you got it done none the less |
|
|
|
|
 Logged
|
|
|
|
|
ridingron
|
 |
« Reply #22 on: September 30, 2020, 02:15:37 PM » |
|
A word (s) of caution: before completely filling your master cylinder, check the condition of your brake pads. If they are worn out replace them before filling the reservoir. If you overfill the reservoir with worn pads, when you later replace them, you may push brake fluid out when you compress the caliper pistons during a later pad replacement. This could result in damaged paint. +1 My other Honda bike brake reservoir still has a usable amount of fluid in it when the pads are down to the metal. Saw this on another bike at a rally. The guys brakes were not working very well. The quick answer was he was low on fluid. Checked the pads to find he was down to the backing plates. Pushed the pistons back in, new pads and the fluid level looked good. New fluid was suggested but rejected by the owner.  |
|
|
|
|
 Logged
|
|
|
|
|

