f6john
Member

Posts: 9975
Christ first and always
Richmond, Kentucky
|
 |
« on: December 04, 2020, 02:04:30 PM » |
|
For as long as I own this house. 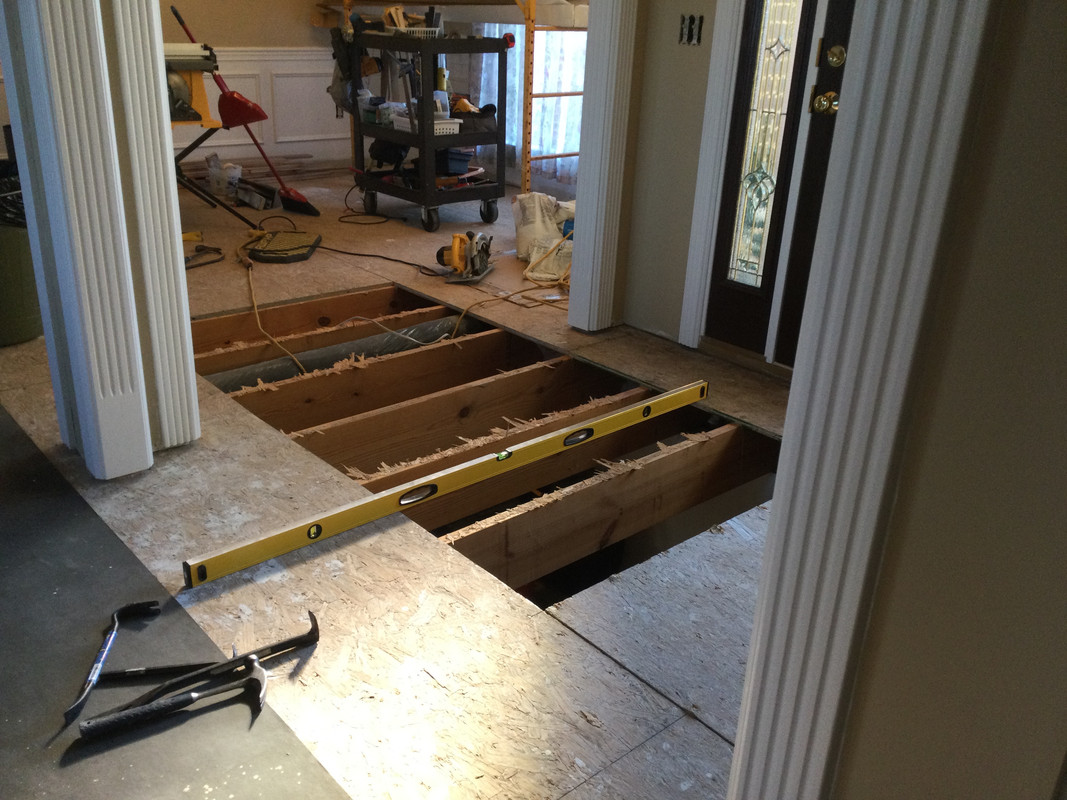 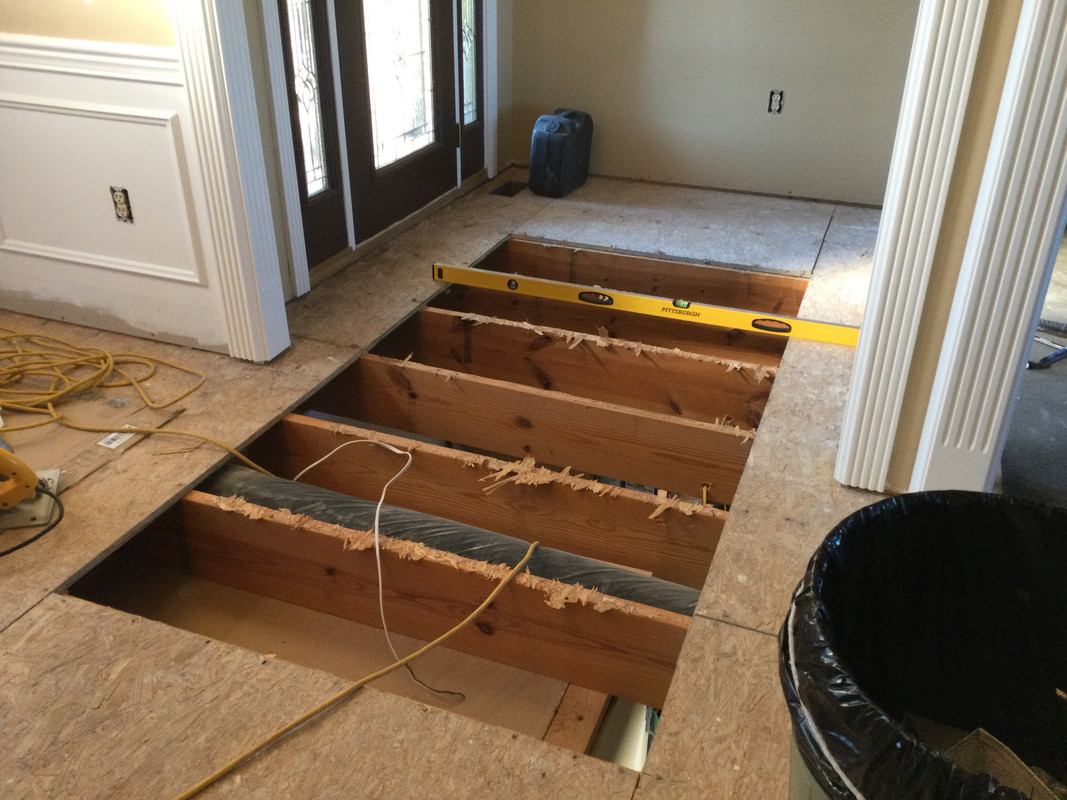 I should have done this job first, over a year ago. I knew the floor was not level but I kept trying to figure out what was the cause. Even with a full basement it didn’t show me the why and the best resolution. Procrastination has not really paid off so here I am with the house 85-90% done and I’m ripping up subfloor. The house has a poured foundation/basement and while I find it hard to accept that they couldn’t get a poured foundation level, it appears that the pour under the front door was high to the tune of 9/16-5/8 “ and I just couldn’t put hardwood or tile over something like that ( the previous owners had carpet but it was still noticeable). I have pulled up the entire foyer floor and a little into the living room hallway. This is 180 degree view from the foyer. All the cardboard on the floor is covering hardwood already laid. I cut the subfloor out to within 2 inches of the hardwood. Next week I will be cutting and notching joists to get the floor as level as I can.  |
|
|
|
« Last Edit: December 24, 2020, 09:53:00 AM by f6john »
|
 Logged
|
|
|
|
|
carolinarider09
|
|
« Reply #1 on: December 04, 2020, 02:17:38 PM » |
|
Having built my present house, myself, I somewhat understand what you are doing.
My previous house had to have the foundation "fixed" (raised) because the footer failed.
|
|
|
|
|
Logged
|
|
|
|
|
Jess from VA
|
|
« Reply #2 on: December 04, 2020, 03:23:35 PM » |
|
And here I thought you were building a surprise for unwanted guests.  The single story side of my 3 level split, has a cracked foundation slab right down the middle (kitchen/living room). About an inch+. It's no big deal on the carpeted living room side, but in the kitchen, it's kind of convenient having anything you drop roll over to the same side all the time (if it's round). The solution is to have them pump concrete (under pressure) under the slab to raise it back up. The hell with that expense and headache. The cause was prior owner allowed the crumbling drain field to get so bad the soil eroded underneath. I had the entire french drain excavated and rebuilt so there's been no more movement of that slab in 25 years. |
|
|
|
|
Logged
|
|
|
|
f6john
Member
Posts: 9975
Christ first and always
Richmond, Kentucky
|
|
« Reply #3 on: December 04, 2020, 03:34:27 PM » |
|
And here I thought you were building a surprise for unwanted guests. Great minds and all that, I sent my mother the same picture and told her I was putting in a trap door for the Covid-19 police! She knows I tease her a lot but she thought I was serious about the trap door. She wanted to know what I was going to do with them once they were in my trap. I hadn’t thought that far ahead.  |
|
|
|
|
Logged
|
|
|
|
|
Jess from VA
|
|
« Reply #4 on: December 04, 2020, 04:23:47 PM » |
|
The stock answer on body disposal is having a friend with a backhoe. |
|
|
|
|
Logged
|
|
|
|
|
msb
|
|
« Reply #5 on: December 04, 2020, 06:28:36 PM » |
|
Beautiful looking house. This is after the fact, but did you consider a self-leveling underlayment, or did you not have enough leeway in your elevations to get it level?
|
|
|
|
|
Logged
|
Mike
'99 Red & Black IS
|
|
|
|
cookiedough
|
|
« Reply #6 on: December 04, 2020, 06:44:48 PM » |
|
that is a lot of work you are doing for little over 1/2 inch uneveness IMO. I guess if it is very noticeable you should fix it but not sure it is worth it? When looking at old homes for 100K or so in my early 20's I went upstairs and in one bedroom and I swear the bedroom flooring was off 6-8 inches rolling downward to one side, very very noticeable. I passed on that old house...
|
|
|
|
|
Logged
|
|
|
|
f6john
Member
Posts: 9975
Christ first and always
Richmond, Kentucky
|
|
« Reply #7 on: December 04, 2020, 07:06:14 PM » |
|
Beautiful looking house. This is after the fact, but did you consider a self-leveling underlayment, or did you not have enough leeway in your elevations to get it level?
If the area in question had been low, I might have been inclined to use a self leveling underpayment but due to the abrupt change in elevation being higher I deemed it better to take out the height. I actually did use the leveling compound in the master bedroom under ceramic tile but I would be concerned with using it under 3/4” hardwood given the expansion and contraction properties. that is a lot of work you are doing for little over 1/2 inch uneveness IMO. I guess if it is very noticeable you should fix it but not sure it is worth it? When looking at old homes for 100K or so in my early 20's I went upstairs and in one bedroom and I swear the bedroom flooring was off 6-8 inches rolling downward to one side, very very noticeable. I passed on that old house...
It is a lot of work but my labor costs are low! I looked at a lot of homes before I bought this one. I looked at one new home in the same price range and I picked it apart so I guess this was destined to be my choice. Of course if I could not do the work myself it would be a whole different story. |
|
|
|
|
Logged
|
|
|
|
|
msb
|
|
« Reply #8 on: December 04, 2020, 07:31:43 PM » |
|
Beautiful looking house. This is after the fact, but did you consider a self-leveling underlayment, or did you not have enough leeway in your elevations to get it level?
If the area in question had been low, I might have been inclined to use a self leveling underpayment but due to the abrupt change in elevation being higher I deemed it better to take out the height. I actually did use the leveling compound in the master bedroom under ceramic tile but I would be concerned with using it under 3/4” hardwood given the expansion and contraction properties. 35 years as a floor prep and tile setting product manufacturer and industry tech consultant... I just had to ask  . You know what you're doing |
|
|
|
|
Logged
|
Mike
'99 Red & Black IS
|
|
|
|
mrtlc
|
|
« Reply #9 on: December 04, 2020, 07:44:48 PM » |
|
Looks like time to put in a gun safe.
|
|
|
|
|
Logged
|
99 Interstate 1500
89 Goldwing sidecar 1500
88 Goldwing 1500
85 Goldwing 1200
84 Gold wing 1200
80 Goldwing 1100
79 Yamaha XT500
78 Honda 750K
+++
|
|
|
|
Robert
|
|
« Reply #10 on: December 05, 2020, 03:51:57 AM » |
|
|
|
|
|
« Last Edit: December 05, 2020, 03:55:56 AM by Robert »
|
Logged
|
“Some people see things that are and ask, Why? Some people dream of things that never were and ask, Why not? Some people have to go to work and don’t have time for all that.”
|
|
|
|
AwesomeDad
|
|
« Reply #11 on: December 05, 2020, 04:17:17 AM » |
|
The stock answer on body disposal is having a friend with a backhoe. Better be a really good friend.... JJ |
|
|
|
|
Logged
|
|
|
|
hubcapsc
Member
Posts: 16824
upstate
South Carolina
|
|
« Reply #12 on: December 05, 2020, 04:18:11 AM » |
|
I had to level this floor before I put down the heart pine (nothing in my house is really exactly level or square  ) ...  To level it, I worked out what the deal was and got some more plywood in different thicknesses... the thickest (half inch?) went on the lowest side. Two/three different thicknesses continued to correct the levelness until I got the the other side. At the transitions I put extra layers of red rosin paper. The pine's been down about 20 years now, not squeaky, seems level :-) ... -Mike "not the recommended way, just my whacky way..." |
|
|
|
|
Logged
|
|
|
|
|
msb
|
|
« Reply #13 on: December 05, 2020, 04:54:15 AM » |
|
I had to level this floor before I put down the heart pine (nothing in my house is really exactly level or square ) ... To level it, I worked out what the deal was and got some more plywood in different thicknesses... the thickest (half inch?) went on the lowest side. Two/three different thicknesses continued to correct the levelness until I got the the other side. At the transitions I put extra layers of red rosin paper. The pine's been down about 20 years now, not squeaky, seems level :-) ... -Mike "not the recommended way, just my whacky way..." "recommended" way isn't necessarily always the best way... it's the method that ultimately works for a particular situation that counts What's the significance of the bag liner/mat... to make your post Valkyrie related? I could use a set of those  |
|
|
|
|
Logged
|
Mike
'99 Red & Black IS
|
|
|
hubcapsc
Member
Posts: 16824
upstate
South Carolina
|
|
« Reply #14 on: December 05, 2020, 04:59:20 AM » |
|
What's the significance of the bag liner/matI scrolled through a couple of picture directories and most "floor pictures" had a cat in them... I'm kind of in dutch for changing threads over to cat threads lately  ...  -Mike
|
|
|
|
« Last Edit: December 05, 2020, 05:05:07 AM by hubcapsc »
|
Logged
|
|
|
|
f6john
Member
Posts: 9975
Christ first and always
Richmond, Kentucky
|
|
« Reply #15 on: December 05, 2020, 05:33:20 AM » |
|
Beautiful looking house. This is after the fact, but did you consider a self-leveling underlayment, or did you not have enough leeway in your elevations to get it level?
If the area in question had been low, I might have been inclined to use a self leveling underpayment but due to the abrupt change in elevation being higher I deemed it better to take out the height. I actually did use the leveling compound in the master bedroom under ceramic tile but I would be concerned with using it under 3/4” hardwood given the expansion and contraction properties. 35 years as a floor prep and tile setting product manufacturer and industry tech consultant... I just had to ask . You know what you're doing I wish the builders had consulted with someone like you. My first project on this house was taking up all the tile and cement board in the kitchen, utility, bathrooms and wet areas. I’m still learning, but I’m mostly past the stupid stage. |
|
|
|
|
Logged
|
|
|
|
|
msb
|
|
« Reply #16 on: December 05, 2020, 06:27:39 AM » |
|
What's the significance of the bag liner/mat
I scrolled through a couple of picture directories and most
"floor pictures" had a cat in them... I'm kind of in dutch for
changing threads over to cat threads lately
-Mike
 Not from me you weren't... I wished someone like you would've "adopted" my neighbours' cats and cared for them properly (whoops, now there I go, getting this thread off onto that track) |
|
|
|
|
Logged
|
Mike
'99 Red & Black IS
|
|
|
|
msb
|
|
« Reply #17 on: December 05, 2020, 06:31:46 AM » |
|
Beautiful looking house. This is after the fact, but did you consider a self-leveling underlayment, or did you not have enough leeway in your elevations to get it level?
If the area in question had been low, I might have been inclined to use a self leveling underpayment but due to the abrupt change in elevation being higher I deemed it better to take out the height. I actually did use the leveling compound in the master bedroom under ceramic tile but I would be concerned with using it under 3/4” hardwood given the expansion and contraction properties. 35 years as a floor prep and tile setting product manufacturer and industry tech consultant... I just had to ask . You know what you're doing I’m still learning, but I’m mostly past the stupid stage. lol.... trust me, then you're well ahead of many of the so called "professional" installers these days |
|
|
|
|
Logged
|
Mike
'99 Red & Black IS
|
|
|
|
Jess from VA
|
|
« Reply #18 on: December 05, 2020, 07:55:52 AM » |
|
Perhaps not on the scale of your renovation, and most of us lack your skills, but it's my observation that virtually all homeowners end up with a degree of job security in the never ending process of:
1. Fixing stuff
2. Scratching our heads and wondering.... Why is that so screwed up, was it always that way and if not how did it get that way, and how can I unscrew it (within my skill set, or do I have to pay it done, again?)
3. Improving or adding stuff
4. Adding storage for more stuff
4. Discovering stuff (like the 25 big loads of stuff my PO's left in the crummy little attic you can only crawl around in. Which begged the question, if it was so important you needed to climb up in there to store it, why wasn't it important enough to take it with you?) And discovering that my PO had putt 3 roofs on the house, three roofs that still leaked and rotted the sheeting because he didn't buy the 25 or 40 year shingles, he used the blue light special 3-week shingles. And discovering a mouse hole in the basement, with associated nonpaying squatters moving in. And discovering that every switch and socket in the house had no ground wire hooked up; it was right there, just not hooked up. And I have one knockout panel behind the master bath in the master closet that I have never pulled in 30 years, because I'm afraid to find what's in there... and ignorance is bliss.
So the homeowners job security is there for all of us..... but the pay sucks a big one.
Sweat equity is just a nice euphemism for nonpaying slave labor.
Of course, you could pay yourself a decent wage for all your own work (but that sounds suspiciously like another plank of the Democratic platform... which of course they would then tax, after you paid all the testing and licensing fees to be allowed to work on your own house)
|
|
|
|
|
Logged
|
|
|
|
f6john
Member
Posts: 9975
Christ first and always
Richmond, Kentucky
|
|
« Reply #19 on: December 05, 2020, 09:35:30 AM » |
|
Perhaps not on the scale of your renovation, and most of us lack your skills, but it's my observation that virtually all homeowners end up with a degree of job security in the never ending process of:
1. Fixing stuff
2. Scratching our heads and wondering.... Why is that so screwed up, was it always that way and if not how did it get that way, and how can I unscrew it (within my skill set, or do I have to pay it done, again?)
3. Improving or adding stuff
4. Adding storage for more stuff
4. Discovering stuff (like the 25 big loads of stuff my PO's left in the crummy little attic you can only crawl around in. Which begged the question, if it was so important you needed to climb up in there to store it, why wasn't it important enough to take it with you?) And discovering that my PO had putt 3 roofs on the house, three roofs that still leaked and rotted the sheeting because he didn't buy the 25 or 40 year shingles, he used the blue light special 3-week shingles. And discovering a mouse hole in the basement, with associated nonpaying squatters moving in. And discovering that every switch and socket in the house had no ground wire hooked up; it was right there, just not hooked up. And I have one knockout panel behind the master bath in the master closet that I have never pulled in 30 years, because I'm afraid to find what's in there... and ignorance is bliss.
So the homeowners job security is there for all of us..... but the pay sucks a big one.
Sweat equity is just a nice euphemism for nonpaying slave labor.
Of course, you could pay yourself a decent wage for all your own work (but that sounds suspiciously like another plank of the Democratic platform... which of course they would then tax, after you paid all the testing and licensing fees to be allowed to work on your own house)
All true! I guess the real determining factor is how much unlevel floors and the like bothers the occupants. While I have never reached perfection in my efforts, I can’t leave some of this stuff alone. The previous owners were in their 60’s when the house was built and in their 80’s when they sold. They paid for most all “repairs” to be done and from my observations they got took every time. My Dad was a jack of all trades, and I don’t ever remember him hiring anyone to fix any thing. One of my earliest memories is of him replacing burnt out tubes in our old tv’s. Even my son picked up on some of these self reliant traits, but in his mind he has reached the point that he considers his time more valuable and pays others to do what Dad can’t step in and handle. |
|
|
|
|
Logged
|
|
|
|
f6john
Member
Posts: 9975
Christ first and always
Richmond, Kentucky
|
|
« Reply #20 on: December 07, 2020, 09:59:32 AM » |
|
Cut some joist!  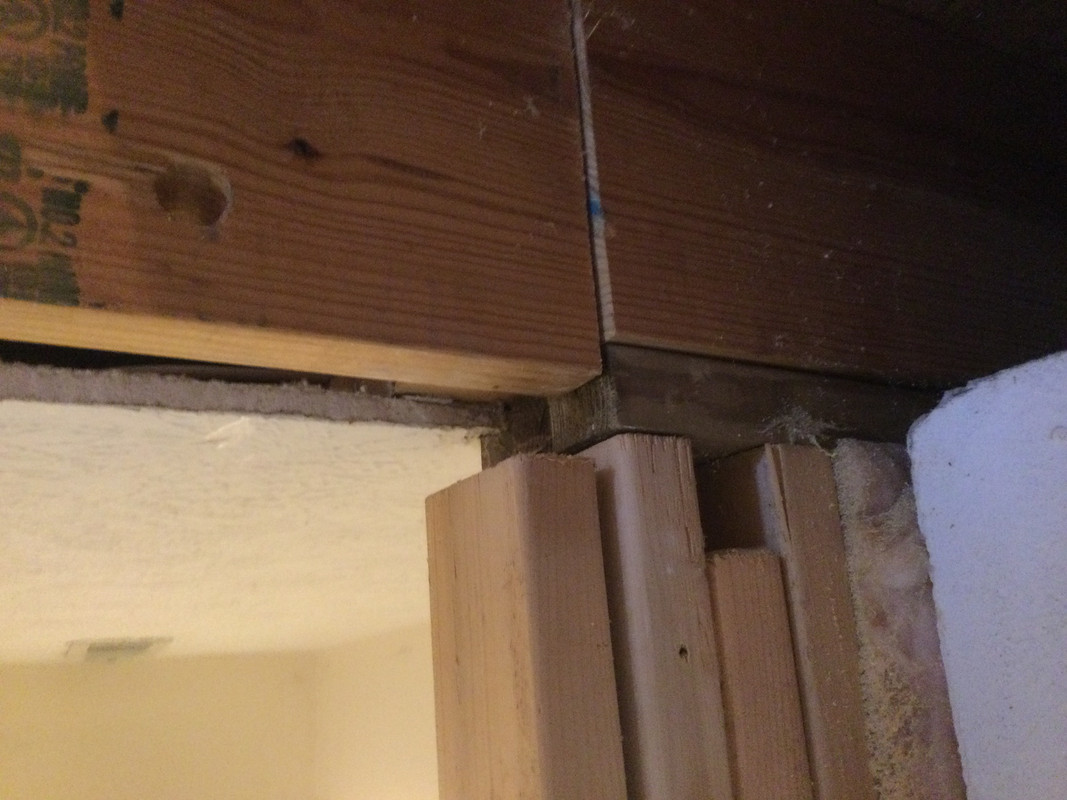 I’ll cut 6 joist all together with the next joist on either side being relatively level. This is showing the bottom of the cut joist just swinging in mid air. 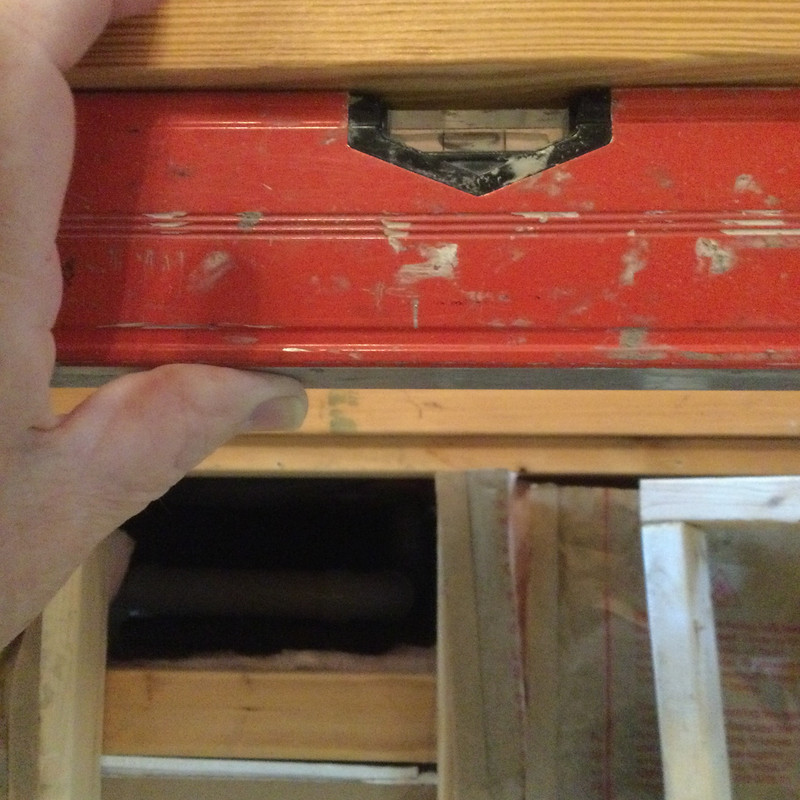 Not the best shot, but still showing a little high on the cut end of the joist, easily brought level. I took out a stud wall in the basement under these joist and I will be putting that wall back up which will give me something to tie the joist down to and provide support for the new tile floor goes back in the foyer. Of course I will tie them back to the stubs of the joist still nailed to the outside band. |
|
|
|
|
Logged
|
|
|
|
henry 008
Member
Posts: 1544
BRP
willard, oh
|
|
« Reply #21 on: December 08, 2020, 06:27:07 AM » |
|
Looks like time to put in a gun safe.
or put in a trap door, to catch the bad guys!  |
|
|
|
|
Logged
|
Safe Winds... Brother  |
|
|
Bret SD
Member
Posts: 4306
***
San Diego, Ca.
|
|
« Reply #22 on: December 08, 2020, 08:27:17 AM » |
|
"Not the best shot, but still showing a little high on the cut end of the joist, easily brought level. I took out a stud wall in the basement under these joist and I will be putting that wall back up which will give me something to tie the joist down to and provide support for the new tile floor goes back in the foyer. Of course I will tie them back to the stubs of the joist still nailed to the outside band."
John, I would probably have ripped the top of those joists down in place, however, since you've already cut them I would sister on at least eight feet of joist to each cut one and bring it over to the original top plate and use appropriate hardware to finish the connection. 2 nails 6in back from the cut and 2 nails 6in from the end of the sistered piece, then stagger 16d sinkers across the length at 6 inch centers. Cinch the nails protruding from the other side. This will maintain the integrity of the frame structure and cover your butt for liability in case of a sale.
Dealing with a high spot is more difficult than dealing with a low spot in the foundation, it looks like you're going to be around 3/4 inch lower at the front door, which means you'll have to figure something out with the door threshold to make it look okay. An inch and a half Oak threshold with material removed to make up the difference should do the job, however that will require cutting the door bottom as well. If you go that route make sure to seal the bottom of the door really well to keep moisture out, if you don't the door bottom will swell and contract with the weather.
|
|
|
|
|
Logged
|
Bret
02 Standard -- Blue & White
82 Aspencade -- Red
“No man has the right to be an amateur in the matter of physical training. It is a shame for a man to grow old without seeing the beauty and strength of which his body is capable.” Socrates
|
|
|
f6john
Member
Posts: 9975
Christ first and always
Richmond, Kentucky
|
|
« Reply #23 on: December 09, 2020, 06:17:45 AM » |
|
The reason I didn’t cut the top of the joists is that these joists run a good 6-7 feet back up under some completed hardwood flooring that was beginning to show the unevenness. By cutting the joist, I’m lowering the joists along the entire length with the majority of the drop being where it’s needed most. There will be a stud wall under all these cut joist so strength will not be an issue. I will still use some short “sister” joist to tie them to the stubs under the door to stabilize the ends until the subfloor goes down. I am now faced with transitioning the floor height going into the dining room which is adjacent to the foyer. This would not have been an issue if there had been a solid wall between the two but instead there is a 5 foot wide arched opening there. I will most likely pull up my subfloor in the dining room and use a portable planer to lower the tops of those joists. I guess I’m just a glutton for punishment. A nice plush carpet with the best pad would have hidden this issue for the most part, but I would have known it’s there. Plus we really like hard surface flooring and the hardwood would have really magnified the problem. If I had been willing to tile the entire house, I could have used leveling compound but I don’t think I would like that look all over. On another front, I found out why I had to add leveling compound to the master bedroom flloor before tiling. 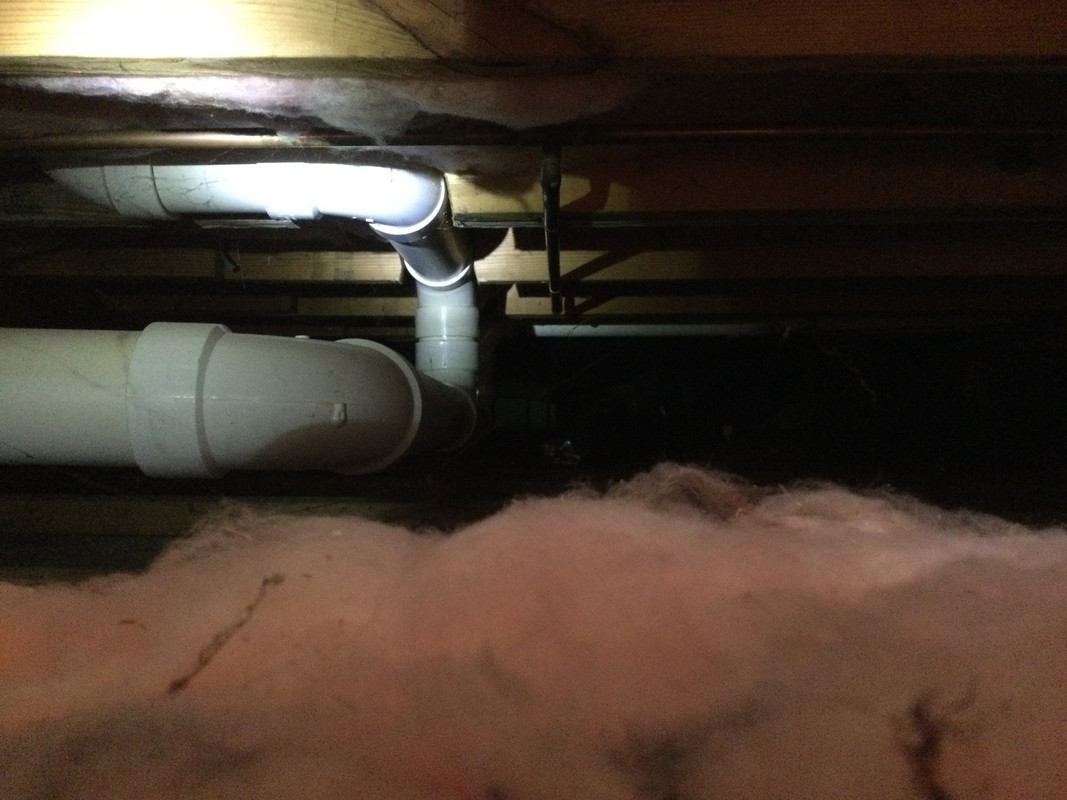 The plumbers cut two adjoining joists, effectively turning 2x10s into 2x6s. This was in one of the few areas in the basement with a finished ceiling. I only gained this access when removing support walls to do the floor work. Just more proof that plumbers are just like doctors, they bury their “mistakes” Also proof that $500.00 home inspections are worthless unless you have no clue about home construction and wouldn’t recognize a problem if it hit you in the face. Also the one year home warranties sold with a lot of real estate purchases isn’t worth the paper it’s written on. |
|
|
|
|
Logged
|
|
|
|
|
msb
|
|
« Reply #24 on: December 09, 2020, 07:20:17 AM » |
|
Looks like you've got yourself well into one of those what I call "begat jobs". Figure you're all good, then another issue pops up, then another....one thing begats another. Appears however, that you don't mind doing the work to take care of these issues in a proper manner. Not sure if you're aware or if it would help on your job there, but these rubber underlay transition pads can work really well bringing one flooring surface up level with another. I used in my current house when I beefed up the substrate in our kitchen in order to accommodate new 24 x 24 porcelain tile. The result was an extra 1/8" height from the uncoupling membrane. I slid lengths of this leveling transition pad under the adjoing engineered hardwood floors...from feather edge to the extra 3/16" height over 18"...dont even notice it. 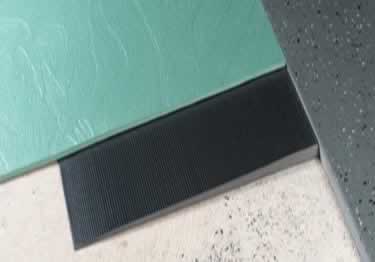 I'm enjoying following along with your project |
|
|
|
« Last Edit: December 09, 2020, 07:31:43 AM by msb »
|
Logged
|
Mike
'99 Red & Black IS
|
|
|
f6john
Member
Posts: 9975
Christ first and always
Richmond, Kentucky
|
|
« Reply #25 on: December 09, 2020, 07:51:53 AM » |
|
Looks like you've got yourself well into one of those what I call "begat jobs". Figure you're all good, then another issue pops up, then another....one thing begats another. Appears however, that you don't mind doing the work to take care of these issues in a proper manner. Not sure if you're aware or if it would help on your job there, but these rubber underlay transition pads can work really well bringing one flooring surface up level with another. I used in my current house when I beefed up the substrate in our kitchen in order to accommodate new 24 x 24 porcelain tile. The result was an extra 1/8" height from the uncoupling membrane. I slid lengths of this leveling transition pad under the adjoing engineered hardwood floors...from feather edge to the extra 3/16" height over 18"...dont even notice it. I'm enjoying following along with your project All I’m seeing is an empty square. Tell me more about these transition pads. And now the picture shows up, but I would like more details. |
|
|
|
|
Logged
|
|
|
|
|
msb
|
|
« Reply #26 on: December 09, 2020, 08:08:47 AM » |
|
Looks like you've got yourself well into one of those what I call "begat jobs". Figure you're all good, then another issue pops up, then another....one thing begats another. Appears however, that you don't mind doing the work to take care of these issues in a proper manner. Not sure if you're aware or if it would help on your job there, but these rubber underlay transition pads can work really well bringing one flooring surface up level with another. I used in my current house when I beefed up the substrate in our kitchen in order to accommodate new 24 x 24 porcelain tile. The result was an extra 1/8" height from the uncoupling membrane. I slid lengths of this leveling transition pad under the adjoing engineered hardwood floors...from feather edge to the extra 3/16" height over 18"...dont even notice it. I'm enjoying following along with your project All I’m seeing is an empty square. Tell me more about these transition pads. And now the picture shows up, but I would like more details. PM sent |
|
|
|
|
Logged
|
Mike
'99 Red & Black IS
|
|
|
Bret SD
Member
Posts: 4306
***
San Diego, Ca.
|
|
« Reply #27 on: December 09, 2020, 08:27:47 AM » |
|
"The reason I didn’t cut the top of the joists is that these joists run a good 6-7 feet back up under some completed hardwood flooring that was beginning to show the unevenness. By cutting the joist, I’m lowering the joists along the entire length with the majority of the drop being where it’s needed most. There will be a stud wall under all these cut joist so strength will not be an issue. I will still use some short “sister” joist to tie them to the stubs under the door to stabilize the ends until the subfloor goes down."
Ah yes, I understand now why you cut the joists.. sorry my perspective is from Ca construction where you could be sued for damages if you didn't disclose what you did to fix the problem. Here you can be sued anyway, even in the event of disclosure if you didn't permit the work and have it signed off by an engineer.
"The plumbers cut two adjoining joists, effectively turning 2x10s into 2x6s. This was in one of the few areas in the basement with a finished ceiling."
I did a room addition awhile back and added a large beam going across the entire wall length to support the gable end of the roof, underneath was a huge sectional glass door for max view.
The plumber notched 3" into a 3 1/2" top plate connection thereby rendering it structurally useless, I called the owner of the plumbing company and told him what his guy did. It's a bigger outfit in town and most of their plumbers are pretty good, but the one they sent me that day wasn't so good and I was off-site when he cut the plates.
Short story I back-charged them 2000.00 for labor to pull the wall apart and re-build it. You can't assume even big outfits know what they're doing, kinda like car dealers repairing cars or motorcycles.
Home inspections are cursory at best and unless something is visible or with crawl access they won't look at it.
When building houses I'd have building inspectors show up at the beginning of a build almost trying to pick a fight with me, trying to test me I guess.. by the end of the job they would barely look at my work as they knew it was spot on and done right.
I did foundation replacements for a number of years also, it was the worst thing I'd ever done. Crawling around under a house and setting up slings to use a 90# jackhammer is brutal, not to mention all the temp support, digging, forming, rebar work and stripping required. You'd think 50-60 thousand dollars for a replacement would make for potentially good profit.. haha, not so much. People HATE spending money on foundations and the work is thankless, dirty and miserable.. definitely not for the weak.
|
|
|
|
|
Logged
|
Bret
02 Standard -- Blue & White
82 Aspencade -- Red
“No man has the right to be an amateur in the matter of physical training. It is a shame for a man to grow old without seeing the beauty and strength of which his body is capable.” Socrates
|
|
|
|
msb
|
|
« Reply #28 on: December 09, 2020, 12:06:33 PM » |
|
Looks like you've got yourself well into one of those what I call "begat jobs". Figure you're all good, then another issue pops up, then another....one thing begats another. Appears however, that you don't mind doing the work to take care of these issues in a proper manner. Not sure if you're aware or if it would help on your job there, but these rubber underlay transition pads can work really well bringing one flooring surface up level with another. I used in my current house when I beefed up the substrate in our kitchen in order to accommodate new 24 x 24 porcelain tile. The result was an extra 1/8" height from the uncoupling membrane. I slid lengths of this leveling transition pad under the adjoing engineered hardwood floors...from feather edge to the extra 3/16" height over 18"...dont even notice it. I'm enjoying following along with your project All I’m seeing is an empty square. Tell me more about these transition pads. And now the picture shows up, but I would like more details. Here's a common version...this one is designed for adhered floorcoverings. Click on the little photo video link once you open it up ...it gives a better description. Since I have loose-laid engineered hardwood that I had to transition up to my new tile floor, I just slipped the transition strips under the hardwood without using an adhesive on the subfloor. It grips well to the plywood subfloor...hasn't moved in over 4 years. Similar versions of this should be available at any floorcovering sundries dealer...less expensive than the ones shown here. https://kofflersales.com/p/johnsonite-sub-floor-leveler.asp?cid=2584 |
|
|
|
|
Logged
|
Mike
'99 Red & Black IS
|
|
|
f6john
Member
Posts: 9975
Christ first and always
Richmond, Kentucky
|
|
« Reply #29 on: December 09, 2020, 12:12:31 PM » |
|
Thanks for the link!
|
|
|
|
|
Logged
|
|
|
|
|
Hook#3287
|
|
« Reply #30 on: December 09, 2020, 02:37:18 PM » |
|
The plumber notched 3" into a 3 1/2" top plate connection thereby rendering it structurally useless, I called the owner of the plumbing company and told him what his guy did. It's a bigger outfit in town and most of their plumbers are pretty good, but the one they sent me that day wasn't so good and I was off-site when he cut the plates. Simpson CTS218 STRAP This is an acceptable fix. |
|
|
|
|
Logged
|
|
|
|
Bret SD
Member
Posts: 4306
***
San Diego, Ca.
|
|
« Reply #31 on: December 10, 2020, 07:46:17 AM » |
|
The plumber notched 3" into a 3 1/2" top plate connection thereby rendering it structurally useless, I called the owner of the plumbing company and told him what his guy did. It's a bigger outfit in town and most of their plumbers are pretty good, but the one they sent me that day wasn't so good and I was off-site when he cut the plates. Simpson CTS218 STRAP This is an acceptable fix. The building inspector required me to have my engineer to sign off on a fix, in this case it wouldn't work.. but yes, sometimes it is an acceptable fix. |
|
|
|
|
Logged
|
Bret
02 Standard -- Blue & White
82 Aspencade -- Red
“No man has the right to be an amateur in the matter of physical training. It is a shame for a man to grow old without seeing the beauty and strength of which his body is capable.” Socrates
|
|
|
f6john
Member
Posts: 9975
Christ first and always
Richmond, Kentucky
|
|
« Reply #32 on: December 24, 2020, 10:30:19 AM » |
|
And this is why leveling compound would not have been a good choice for my problem,  This is along the front outside wall of my dining room. I used my toe kick saw to cut the subfloor flush with the wall before removing it to access the joist. Much to my surprise I needed to cut over an inch off the joist tapering back to 0 over a 10-12 foot span. In the picture you can see where the subfloor is at its original height under the wall plate and you can see a portion of the notched out joist and then the subfloor in its new level resting spot. 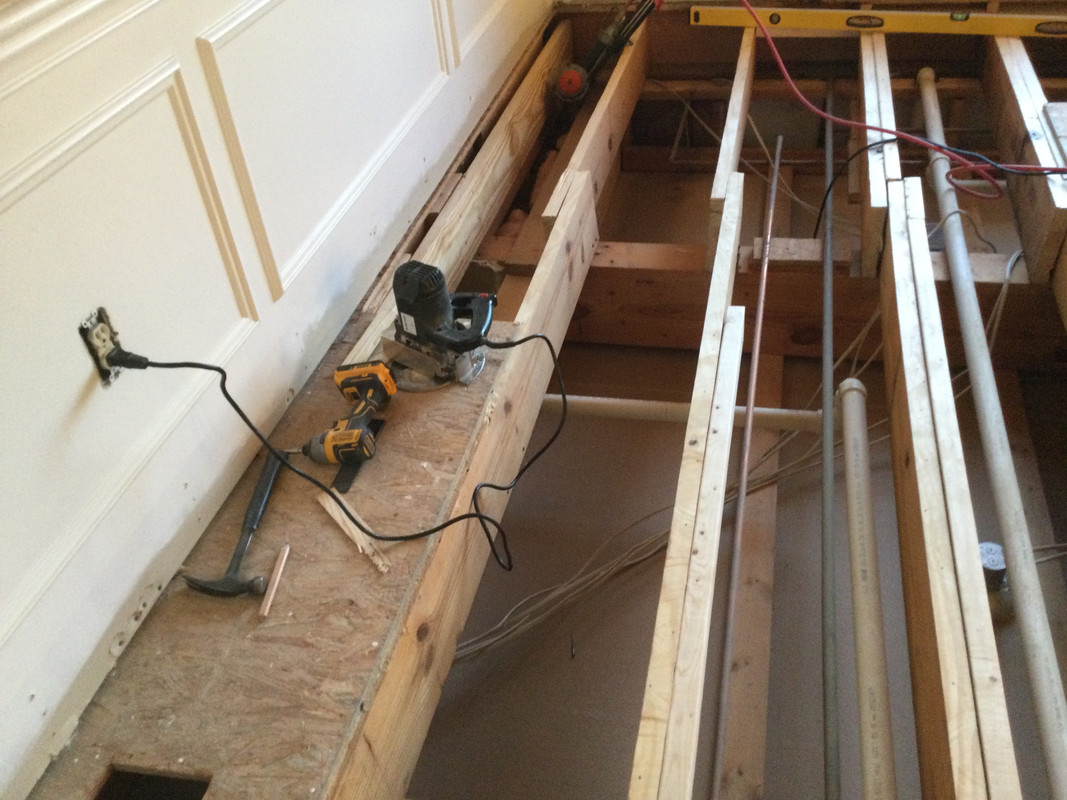 The dining room is over a finished bathroom in the basement so all the leveling had to be done by cutting the top of the joist where as the adjoining foyer was over an unfinished area of the basement so those joist were completely cut off at the wall and allowed to drop to a level height. I have since loose laid all the subfloor back in place and I am very happy with the results. I have to go back and add some insulation, reconnect hvac outlets ect, then I can finally finish laying my hardwood and tiling my foyer. Happy Days! |
|
|
|
|
Logged
|
|
|
|
|


