|
Kevin.Raihala
|
 |
« on: July 01, 2021, 09:43:29 AM » |
|
It appears I can not get the third bolt out without removing the kick stand mount. Will I need some sort of bike lift to rebuild my clutch slave cylindar?
I ride a 97 1520 Kevin
|
|
|
|
« Last Edit: July 01, 2021, 01:00:42 PM by Kevin.Raihala »
|
 Logged
|
|
|
|
|
Chrisj CMA
|
|
« Reply #1 on: July 01, 2021, 10:45:09 AM » |
|
You can use jack stands under the crash bars to hold the bike up without a kickstand. I would definitely find a way to tie it down for security
|
|
|
|
|
Logged
|
|
|
|
hubcapsc
Member

Posts: 16799
upstate
South Carolina
|
|
« Reply #2 on: July 01, 2021, 10:47:00 AM » |
|
It appears I can not get the third bolt out without removing the kick stand mount. Will I need some sort of bike lift to rebuild my clutch slave cylindar?
I ride a 97 1520 Kevin
I have a chock, my bike was in that when I rebuilt my slave cylinder recently. I took my kickstand off. -Mike |
|
|
|
|
Logged
|
|
|
|
|
Kevin.Raihala
|
|
« Reply #3 on: July 01, 2021, 12:49:07 PM » |
|
Thanks, That helps!
|
|
|
|
|
Logged
|
|
|
|
|
Avanti
|
|
« Reply #4 on: July 01, 2021, 12:59:53 PM » |
|
Best way is to remove side stand and center stand if you have both. Than you can easily remove slave cylinder. I recommend flushing out the line really well along with a rebuild of the master cylinder then flush on a regular maintenance schedule. The more I ride in the rain the more often I need to flush and change out the fluid for both clutch and brake master cylinders. Brake fluid likes to attract water.
Torque all lines back to specifications.
|
|
|
|
|
Logged
|
|
|
|
|
RonW
|
|
« Reply #5 on: July 01, 2021, 02:01:07 PM » |
|
I took the kickstand off. How you raise the bike takes some thought. 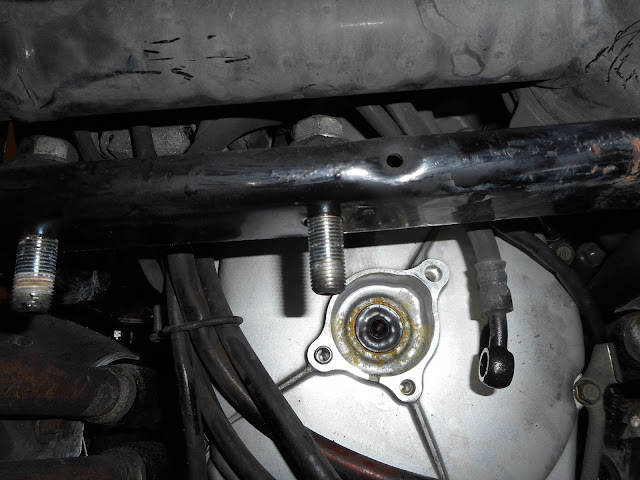 Fyi, this seal isn't part of the replacement set. It's available on the same oem parts page as the replacement set though, *OIL SEAL (8X25X8) (ARAI) 91204-MB0-013). I had a difficult job seating the seal. I asked on this forum if the seal could be pounded in from the outside and the members answered in the affirmative. Many bikes, the seal only goes on from the inside.  |
|
|
|
|
Logged
|
2000 Valkyrie Tourer
|
|
|
|
|
|
|
|
Avanti
|
|
« Reply #8 on: July 01, 2021, 02:27:09 PM » |
|
I took the kickstand off. How you raise the bike takes some thought. Fyi, this seal isn't part of the replacement set. It's available on the same oem parts page as the replacement set though, *OIL SEAL (8X25X8) (ARAI) 91204-MB0-013). I had a difficult job seating the seal. I asked on this forum if the seal could be pounded in from the outside and the members answered in the affirmative. Many bikes, the seal only goes on from the inside. Yes I also removed and replace the seal along with cleaning and flipping the clutch rod end for end to allow a new clean surface for the seal to move on. |
|
|
|
|
Logged
|
|
|
|
|
Chrisj CMA
|
|
« Reply #9 on: July 01, 2021, 02:34:15 PM » |
|
Has anyone replaced that seal from the inside by removing the whole rear cover. Is it any easier that way?
|
|
|
|
|
Logged
|
|
|
|
|
Avanti
|
|
« Reply #10 on: July 01, 2021, 02:48:19 PM » |
|
I replaced it from the outside in five minutes. I do not think it can get any easier. You could drive it out from the inside out but still have to drive it back in from the outside in. I just pulled it out.
|
|
|
|
|
Logged
|
|
|
|
|
Chrisj CMA
|
|
« Reply #11 on: July 01, 2021, 06:42:47 PM » |
|
I replaced it from the outside in five minutes. I do not think it can get any easier. You could drive it out from the inside out but still have to drive it back in from the outside in. I just pulled it out.
Thanks. That’s the kind of first hand info that is needed. What did you use to drive it in? |
|
|
|
|
Logged
|
|
|
|
|
Avanti
|
|
« Reply #12 on: July 01, 2021, 08:30:14 PM » |
|
I used a screwdriver with a shank diameter that just fit in the drain slot on the cover. Pull out the clutch rod and place the tip of the screwdriver in the center of the seal with the shaft of the screwdriver in the slot. With the screwdriver in this position you can pry the seal out with very little effort. Do not use a screwdriver with a shank diameter larger or tight fitting in the cover drain slot or you could crack the cover by wedging it apart. I hope this is understandable and clear.
The drain slot in the cover is visible in the pictures above.
|
|
|
|
« Last Edit: July 01, 2021, 08:32:28 PM by Avanti »
|
Logged
|
|
|
|
|
Chrisj CMA
|
|
« Reply #13 on: July 01, 2021, 08:35:46 PM » |
|
I used a screwdriver with a shank diameter that just fit in the drain slot on the cover. Pull out the clutch rod and place the tip of the screwdriver in the center of the seal with the shaft of the screwdriver in the slot. With the screwdriver in this position you can pry the seal out with very little effort. Do not use a screwdriver with a shank diameter larger or tight fitting in the cover drain slot or you could crack the cover by wedging it apart. I hope this is understandable and clear.
The drain slot in the cover is visible in the pictures above.
Makes sense. Did you need a special tool to install the new seal? |
|
|
|
|
Logged
|
|
|
|
|
Avanti
|
|
« Reply #14 on: July 01, 2021, 08:49:57 PM » |
|
No, I put the clutch rod in with a light coat of grease on it and a light coat of grease on the outside edge of the seal and used a socket that was just under the diameter of the seal and gently drove it in until I felt it stop. Just need to be careful as to drive it straight and keep it straight as it goes in until it bottoms out.
|
|
|
|
« Last Edit: July 01, 2021, 09:10:38 PM by Avanti »
|
Logged
|
|
|
|
|
Avanti
|
|
« Reply #15 on: July 01, 2021, 09:11:39 PM » |
|
Once you put the screwdriver in the seal and start to pry it out do not remove the screwdriver until it is all the way out. You do not want to lose the spring off the back side of the seal inside of the rear cover.
|
|
|
|
|
Logged
|
|
|
|
|
RonW
|
|
« Reply #16 on: July 02, 2021, 03:22:45 AM » |
|
For silicone grease, I used plumber's grease. A dab on the tip of the lifter rod (arrow). 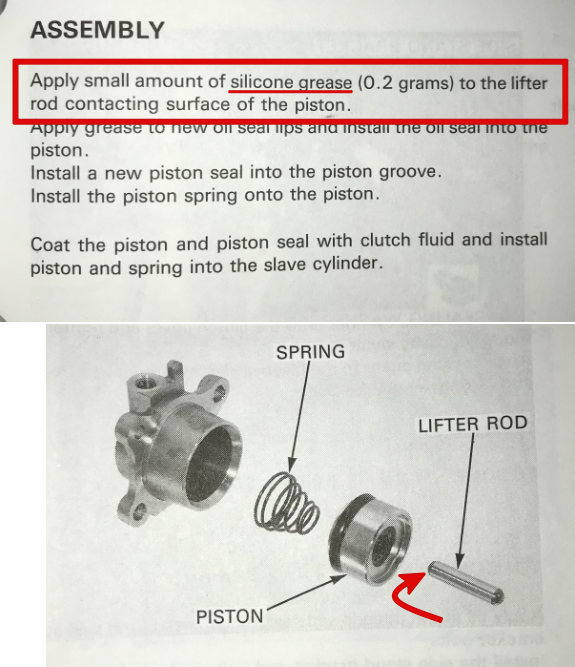 Also, I didn't find it necessary to separate the bleeder pipe from the clutch slave cover, per manual. And didn't want to risk having to install new crush washers on the banjo bolt. Just removed the bleeder pipe's top bolt (arrow) to get the unit out of the way.  |
|
|
|
« Last Edit: July 05, 2021, 02:20:22 AM by RonW »
|
Logged
|
2000 Valkyrie Tourer
|
|
|
|
Avanti
|
|
« Reply #17 on: July 02, 2021, 07:33:37 AM » |
|
RonW is correct. Even if you are replacing the slave cylinder leave the bleeder pipe on and remove all in one piece. I think it would be impossible to torque the bleeder pipe back to specifications if done after replacement of the slave cylinder.
Nice pictures RonW!
|
|
|
|
« Last Edit: July 02, 2021, 07:35:39 AM by Avanti »
|
Logged
|
|
|
|
|
DeathWishBikerDude
|
|
« Reply #18 on: July 06, 2021, 03:20:59 AM » |
|
Thanks for the great pics..job is on my horizon.
Anyone try replacing the clutch master cylinder before moving right onto the slave cylinder?
|
|
|
|
|
Logged
|
|
|
|
hubcapsc
Member
Posts: 16799
upstate
South Carolina
|
|
« Reply #19 on: July 06, 2021, 03:31:52 AM » |
|
Thanks for the great pics..job is on my horizon.
Anyone try replacing the clutch master cylinder before moving right onto the slave cylinder?
I replaced my brake master cylinder once when I refreshed most of the brake components. I don't think there was anything wrong with it. I just recently rebuilt my clutch slave cylinder. It was leaking out a giant mess. It might be that if any of your cylinders need rebuilt, they'll let you know  ... -Mike |
|
|
|
|
Logged
|
|
|
|
|
Avanti
|
|
« Reply #20 on: July 06, 2021, 01:29:40 PM » |
|
Did both at the same time. Slave cylinder lost fluid on floor. Do not want master to lose fluid on tank or any painted surface.
|
|
|
|
|
Logged
|
|
|
|
|
SunshineNomad
|
|
« Reply #21 on: July 06, 2021, 01:45:38 PM » |
|
After reading threads and advice from the forum I recently did a complete cleanout of the clutch master cylinder, hose and slave. I followed the steps outlined (and helpful pics) and all went well. Thanks Shoptalk  |
|
|
|
|
Logged
|
"Keep thy eye on the tach, thine ears on the engine.
Lest thy whirlybits seek communion with the sun"
|
|
|
|


