Valkyrie Riders Cruiser Club
June 19, 2025, 04:55:35 AM *
Welcome, Guest. Please login or register.

Login with username, password and session length
Ultimate Seats Link VRCC Store
Homepage : Photostash : JustPics : Shoptalk : Old Tech Archive : Classifieds : Contact Staff
News: If you're new to this message board, read THIS!
 
VRCC Calendar Ad
Pages: [1]   Go Down
Send this topic Print
Author Topic: Wing reverse motor conversion/installation project...with pics.  (Read 1561 times)
John Schmidt
Member
*****
Posts: 15194


a/k/a Stuffy. '99 I/S Valk Roadsmith Trike

De Pere, WI (Green Bay)


« on: March 02, 2022, 06:34:02 PM »

I'll attempt to keep this thread & pictures strictly for the work done for and during the project. My next step is going to be removing the shock mounts in the motor mounts where the Valk doesn't use them. My idea is to use a long enough bolt to allow me to insert a bolt through a socket small enough to press out the shock mount. On the opposite side I'll have a deeper and slightly larger socket to receive the material as it is pressed out, the bolt will be long enough to go through all the way so I can use a nut on the other end. By tightening the nut on the bolt it should press the shock mount out and into the larger/deeper socket. Here's a repeat picture of my work table, it's at the level that allows me to use my shop stool so I can sit down while working...saves the back. At this point I'm waiting on new belts, I have everything else for the work to be done on the front of the motor except for the water pump cover...delayed shipping until this weekend. I have the Valk water pipes and the t'stat housing base for the two sensors...fan and temp...plus all the o-rings to install them. Picked up the t'stat and gasket Monday so I'll probably do the top of the motor this week. Have rec'd. the parts needed to rebuild a Valk clutch slave cylinder which I ordered off Ebay and is actually quite clean. I'll rebuild it anyway. Has anyone ever used the silicone water hoses? The Valk has three and the lower one is a lot easier to change with the motor on the bench so I'm wondering if they're worth the money or should I stick to OEM?


Today...March 4.
Got the top of the motor cleaned up a bit and assembled the water pipes and t'stat housing after installing new o-rings and gasket where needed. Had to look in the shop manual to see where the little deflector rib in the housing cover goes...front left. Also was able to tap out the six GW shock mounts from the engine mounts on the block, used a bit of heat on the outer area of the mount and was able to tap them out. The four on top were the bottom one in the picture, the two in the bottom mounts are like the one on top. Finally found some hi-temp gasket material so I can make a block off gasket for the  Pair valve tubing where it mounts under the head. I'll cut a piece of metal to bolt in on top of the gasket. New belts coming Tuesday...maybe, water pump cover gasket should be here tomorrow so I'll put the water pump together and if times allows...I'll rebuild/install the clutcth slave.


When I get to replacing the belts, I plan to take a close look at the idler pulleys. If I have any doubts as to their integrity, I'll rebuild them. Now if it would just warm up enough to work in the garage for extended periods. Wisconsin is a beautiful state...when observed from 1400 miles south of here.  Angry
« Last Edit: March 04, 2022, 05:29:25 PM by John Schmidt » Logged

Tazman11
Member
*****
Posts: 148

Idaho


« Reply #1 on: March 05, 2022, 08:21:56 AM »

For winter garage work, I use a propane contractors heater. I turn it on about 45 minutes before I start working. Heats it up to about 80 degrees and slowly cools over the next few hours. I don’t leave it running while I’m working because of the noise and possible health issues. It gets cold here in Idaho and this has allowed many winter projects. Just a thought.
Logged
John Schmidt
Member
*****
Posts: 15194


a/k/a Stuffy. '99 I/S Valk Roadsmith Trike

De Pere, WI (Green Bay)


« Reply #2 on: March 05, 2022, 01:03:28 PM »

For winter garage work, I use a propane contractors heater. I turn it on about 45 minutes before I start working. Heats it up to about 80 degrees and slowly cools over the next few hours. I don’t leave it running while I’m working because of the noise and possible health issues. It gets cold here in Idaho and this has allowed many winter projects. Just a thought.
I'd love to have one of those in my garage but not allowed in Wisconsin when part of an apartment complex. Mine is a town house type with an attached large 2-car garage, all on the ground floor with the apt. above partially covering the garage so that helps but...not when the temps hang around 0-20. I have a couple ceramic heaters I use at times which work quite well, especially in jacking up the electric bill.  Grin

Today...March 5.
A bit of a setback...which is my own fault. I had ordered the parts to rebuild the clutch slave cylinder so today I took it apart; bad news. The old unit isn't worth rebuilding so had to order a new one, my mistake for not pulling it apart and inspecting it first. That would have saved time and money. So it was Service Honda to the rescue...another week wasted. With temps in the 40s predicted for the upcoming week I was hoping to make some headway. Also, the water pump cover gasket was scheduled for delivery today but wasn't, so kinda dead in the water(no pun intended). Oh well...guess I'll wash some clothes, just realized it's March already & I'm tired of walking around them where they're standing in the bedroom.  2funny

Today...March 6.
What I planned to work on didn't materialize. I wanted to install the water pump cover since the gasket was scheduled for delivery yesterday but wasn't. However, the new timing belts that were scheduled for delivery Tuesday showed up today...sitting at the front door when I got home from church. Rock Auto rocks! So I went ahead and swapped the two timing belt covers that mount on the heads behind the belt pulleys, installed the 4 degree T/W and the new belts. The Valk front cover won't fit on the Wing covers so those had to be swapped. Besides...they're ugly black plastic as opposed to the Valk's chrome. I didn't button it all down, thought I'd look into rebuilding the tensioner pulleys first. No major noise and spin quite freely but since I have the motor sitting on a table with easy access...now's the time. I took some pictures but when I went to upload to Postimages I got a server error so maybe tomorrow. I have some notes to post with them so writing it now would be difficult to follow w/o a picture.

OK, Postimages is back on line so here's some pics of today's work. I swapped out the timing belt covers that fit behind the belt sprockets. If you look closely, you'll see they're marked L & R so it's easy to install on the correct side.


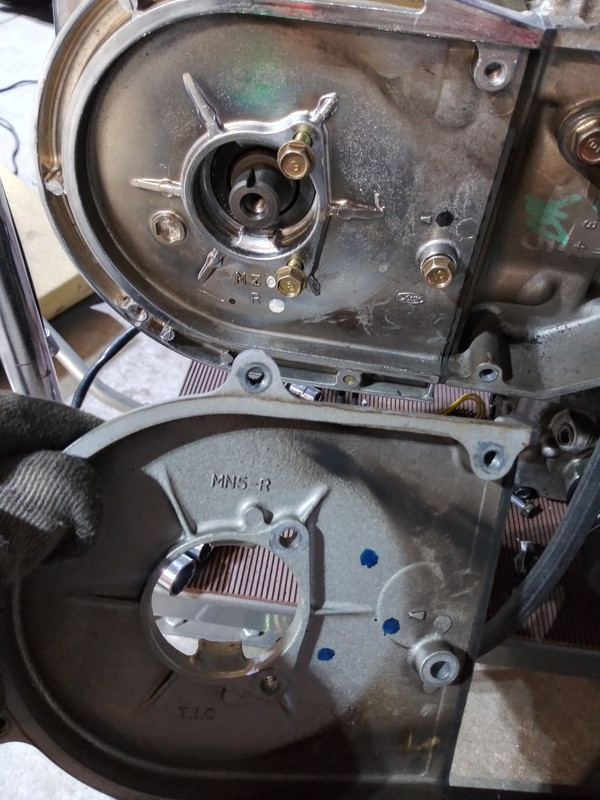
When reinstalling those covers you need to pay attention, the bolt I'm pointing at is longer than the other two. It's mounted on a small shoulder which accounts for the approx. 8mm difference in length.


Woudn't you know it, the gasket that fits on the area marked in red came off in pieces. The other side stayed in place just fine, so out comes the gasket material off the shelf to make a replacement after removing the remnants of the old one. Just used a purple magic marker along the surface and pressed the new gasket material down on it...leaving a very nice outline for the new one to be cut out. A little tip when making a new gasket, especially when the outer edge is narrow as seen in the photo. Cut out the center section first, if you cut out the exterior outline first you end up with a very narrow piece in hand which is easy to either break or cut when you go to remove the center, giving you a chance to start over. For this application, after removing the center portion I cut the exterior line rather wide since it made little difference to the function of it.


At this point I've decided to go ahead and rebuild the tensioner pulleys. Tomorrow I'll go shopping for pulleys and once in hand I'll be looking for the hardware. I've done it a couple times in the past with no problems. Still need an oil pressure switch and a reverse switch, then install the water pump cover, install the starter and I should be about done with converting the Wing motor to Valkyrie applicaiton.
« Last Edit: March 06, 2022, 09:53:54 PM by John Schmidt » Logged

John Schmidt
Member
*****
Posts: 15194


a/k/a Stuffy. '99 I/S Valk Roadsmith Trike

De Pere, WI (Green Bay)


« Reply #3 on: March 07, 2022, 09:25:38 AM »

A note for anyone thinking about rebuilding their timing belt idlers. I just ordered two Gates T42015 pulleys off Amazon for $16.xx each. Add another $3-$4 for new grade 5 or 8 bolts and nuts and I'll have "new" idlers for under $40...as compared over $180 delivered using OEM from a dealer. And these will last longer than I'll be riding. I used my daughter's Amazon Prime account so no shipping cost and might actually be here tomorrow rather than this weekend w/o Prime. Told her I thought about using her CC as well and send her an attachment of someone singing Happy B'day to me. Her answer I'm sure she learned from her mother!  Wink

Today...March 8.
I have a spare but damaged idler/tensioner pulley so decided I'd start removing the pulley on it. That would put me one step ahead on the rebuild when the new pulleys get here...hopefully tomorrow. Well, my efforts were a total failure so far. I don't have anything with a chuck large enough to take a 1/2" bit so tried the largest one that fit...no joy. Won't drill out enough of the stem to drive it out. I tried but all I ended up doing was bending the mounting plate so that's of no use now. Guess I'll have to take it to a machine shop...kinda bugs me cuz I used to have a drill that would take a 1/2" but that burned out and never got replaced, mainly because I seldom had use for it. Plus, I can only work out there for about 1/2 hr. before my hands get too cold even with gloves and I go inside to warm up. To add to the fun, the little brat that lives above me is about 1 1/2 yrs old and is having a screaming fit. Her mother created the problem cuz she always picks her up the second she opens her mouth. Lady...either stuff a sock, a bottle, or a boob in her mouth but just shut her up.
« Last Edit: March 08, 2022, 03:38:05 PM by John Schmidt » Logged

John Schmidt
Member
*****
Posts: 15194


a/k/a Stuffy. '99 I/S Valk Roadsmith Trike

De Pere, WI (Green Bay)


« Reply #4 on: March 11, 2022, 02:29:52 PM »

An aggravating setback has occured. I'm getting close to having the Wing motor ready to install so thought it a good idea to check the operation of the starter I bought. I took it to a neary Advance Auto and after hooking it up...no go. Tripped the circuit breaker twice. Just lovely, so I just sent the vendor a note asking permission to take it to a local rebuild shop or return it if they insist. If I use a local shop, I asked for some financial consideration, not necessarily a full refund. I'll see what they say and go from there.  Angry

Steve UK, what do you think about me buying either an Aspencade or SE wire harness and remove just the part associated with the reverse? That might be overkill but I would like to control the speed when in reverse unless you feel it's entirely possible to control it using the start switch intermittently.
« Last Edit: March 12, 2022, 09:29:08 AM by John Schmidt » Logged

John Schmidt
Member
*****
Posts: 15194


a/k/a Stuffy. '99 I/S Valk Roadsmith Trike

De Pere, WI (Green Bay)


« Reply #5 on: March 13, 2022, 07:36:41 PM »

Sunday...March 13.
Got up to 43 degrees today so a good day to work on the engine. Got the pulleys rebuilt, new belts installed along with previously installed different cover plates behind the belt sprockets so the Valk chrome cover will fit, and a 4 deg. T/W. Got the timing marks lined up on first try, cranked it around by hand a 1/2 dozen times and all marks were spot on each time. Also helps to kinda break in the belts, they had been in the shop in cold temps and were quite stiff. Also swapped the water pump cover, the Wing unit won't work with the Valk hose. Look to the left hanging off the table is a black wire harness. That can be used to let you know what gear you're in, haven't decided about using anything more than the neutral indication. Note the housing below the t'stat cover. That had to be changed from the Wing version due to all the extra plumbing it has, also had to change the water pipes for the same reason.


New starter gear, was missing when I got the motor. Found out it doesn't just slip in, lined it up and used a socket on a 6" extension to tap into place. I dropped it once, fell down into the gears below. Didn't know I could hold my breath that long but using a long pickup magnet I was able to retrieve it.


I installed a new clutch slave cylinder, removing the seal in the rear case cover was a real PITA. Rubber was shot and the internal metal was stuck in place so took a while to dig it out. You don't want to go in with large tools, you don't want to ruin the circular seating area for the new seal. When out, I used a small brush with my Dremel to clean it up before installing the new seal. So, now when I installed the bleeder pipe you can see there's a bit of a difference between the two motors in that area. The slave and bleeder were missing when I got the motor & I had the extra Valk bleeder so I'll just make a short little tab to bolt the top end down. Not spending money on that kind of thing.


While it's still on the table, I think I'll go ahead and replace that lower coolant hose. Was a good productive day, I'm at the point where I need to decide when I want to remove the current motor from the trike, going to see if it's possible to pull it without pulling the carbs and everything above them...airbox, tank, etc.. I'll be moving the alternator over to this engine, still waiting on a decision re. the starter. Think I might just take it to a local rebuild shop I've used in the past and have them go through it. Other than that, the motor should be ready. So far I only have about $200 in parts, gaskets, etc., still haven't addressed the fabrication of an engagement lever on the right side.
Logged

John Schmidt
Member
*****
Posts: 15194


a/k/a Stuffy. '99 I/S Valk Roadsmith Trike

De Pere, WI (Green Bay)


« Reply #6 on: March 17, 2022, 05:57:15 PM »

About 3-4 weeks ago while inspecting the innards of the Wing motor where the starter goes, the reverse idler gear had a couple white streaks on it which I didn't pay much attention to...but should have. I might not have spent the money on parts that I have thus far. This evening I decided to spend some time on the engine and having found out the starter I bought works fine, maybe install it. While inserting the small drive gear for the starter a few days back I again noticed the streaks on the idler gear but again, looked no further. Tonight it was kinda gnawing at me so decided to take a closer look with a flashlight and small mirror. Those white streaks are cracks in the gear itself. Oh how I wish I'd looked deeper early on before spending money. I was sick and disheartened...now what! To replace that gear involves pulling the rear case cover, whifch brings up another question; since that gear is at the very back of the starter opening I'm wondering if I can gain enough room to replace it without fully removing the cover. That's something I've not done, I'm sure others have when repairing a hydrolock. Take a look at #5 in the parts breakdown, that's the broken gear and is just inside the starter opening...kinda at 5 0'clock position.

https://www.procaliber.com/oem-parts?aribrand=HOM#/Honda_Powersports/GL1500AA_(99)_GOLD_WING_ASPENCADE%2c_USA%2c_VIN%23_1HFSC220-XA100001/REVERSE_GEAR/a29b9da9-534b-4d3d-85c3-72261d9dfa6b/b9447628-62f1-45f9-8a6d-2c267d3e62eb/y

Now look at this parts breakdown. Note the two large openings on the right side, the upper one is for the starter. Below and slightly to the right, sitting between two bolt holes is a large casting which is where the shaft is for the gear. There is only a washer between the gear and the back side of that case cover which makes me wonder if the cover will allow r&r without fully removing the cover.

https://www.procaliber.com/oem-parts?aribrand=HOM#/Honda_Powersports/GL1500AA_(99)_GOLD_WING_ASPENCADE%2c_USA%2c_VIN%23_1HFSC220-XA100001/REAR_CASE/a29b9da9-534b-4d3d-85c3-72261d9dfa6b/e03dc9a7-ba23-40e9-a3ce-b0e9ce28aa79/y

Is that cover restricted by the clutch so that has to come off to gain any movement of the cover? I guess I'll fix it but now my heart isn't in it...at least for the time being. I'm open to suggestions or advice.
Logged

gordonv
Member
*****
Posts: 5760


VRCC # 31419

Richmond BC


« Reply #7 on: March 17, 2022, 07:07:08 PM »

Just an FYI my old post about the GW gear indicator, which you have also replied too.
http://www.valkyrieforum.com/bbs/index.php/topic,72533.0.html

I believe I also found a different indicator, but I haven't posted about it yet. Also haven't gotten around to removing the front of the engine to replace the indicator and add the indicator.

note: I added the pic of my latest gear indicator to the end of my original post above.
« Last Edit: March 19, 2022, 07:18:16 AM by gordonv » Logged

1999 Black with custom paint IS

Pages: [1]   Go Up
Send this topic Print
Jump to: