|
F6Ghostrider VRCC #32501
|
 |
« on: April 15, 2022, 12:20:10 PM » |
|
One side of my headlight bezel screw holes has become stripped. Not completely enough to where where the screw falls out, but enough so that the screw won’t snug down.
Has anyone experienced this, and if so, is there a fix other than replacing the bezel?
I ran a search through the VRCC, but did not see any post(s) regarding this.
|
|
|
|
|
 Logged
|
|
|
|
|
Jess from VA
|
|
« Reply #1 on: April 15, 2022, 12:31:04 PM » |
|
One old standby is to find just a hair larger screws or coarser threads. (except the head is usually wrong)
Or wrap your screw threads with plumbers tape.
|
|
|
|
|
Logged
|
|
|
|
|
F6Ghostrider VRCC #32501
|
|
« Reply #2 on: April 15, 2022, 01:03:32 PM » |
|
Dry good idea. I had thought about putting some JB Weld around the screw after running it into the screw hole and then back the screw out. Scared to commit though.  |
|
|
|
|
Logged
|
|
|
|
Valker
Member

Posts: 3051
Wahoo!!!!
Texas Panhandle
|
|
« Reply #3 on: April 15, 2022, 01:11:39 PM » |
|
I've also put some aluminum foil into the threaded holes.
|
|
|
|
|
Logged
|
I ride a motorcycle because nothing transports me as quickly from where I am to who I am.
|
|
|
|
Jess from VA
|
|
« Reply #4 on: April 15, 2022, 01:33:53 PM » |
|
Dry good idea. I had thought about putting some JB Weld around the screw after running it into the screw hole and then back the screw out. Scared to commit though. Not JB Weld. Maybe the blue (not red) threadlocker. The idea is to be able to get them out again.... someday. |
|
|
|
|
Logged
|
|
|
|
|
WintrSol
|
|
« Reply #5 on: April 15, 2022, 01:45:37 PM » |
|
A more permanent fix may be to put a nut on the back side and glue it in place. Melt wax onto the screw threads and put in in the hole, then put some JBWeld or other adhesive on the face of the nut and spin it on. May need a spacer washer. The wax should keep the adhesive from sticking to the screw thread; could try silicone grease, too. Just spit-balling here, but you could look at it to see if this could work. Can't get to mine right now to see for myself.
|
|
|
|
|
Logged
|
98 Honda Valkyrie GL1500CT Tourer
Photo of my FIL Jack, in honor of his WWII service
|
|
|
|
da prez
|
|
« Reply #6 on: April 15, 2022, 04:09:35 PM » |
|
If that is the one in the sheet metal , A hammer and another for back up , you can close the hole by tapping on it. The other way is to get a body clip nut.
da prez
|
|
|
|
|
Logged
|
|
|
|
|
Bagger John - #3785
|
|
« Reply #7 on: April 16, 2022, 07:18:18 AM » |
|
The last two replies are what I'd consider.
Option 3 - if you know someone with a TIG welder that can be set to very low amperage, weld up the holes a bit then drill and tap M6 and re-chrome the part.
|
|
|
|
|
Logged
|
|
|
|
|
Savage
|
|
« Reply #8 on: April 16, 2022, 09:15:32 AM » |
|
You can definitely fill the hole with some JB Weld and put some extra on the backside (inside the headlight bucket). Coat the screw threads with some silicone grease and run it into the JB Weld to create threads. Back the screw out and let the JB Weld dry.
Another option as mentioned above is to epoxy a nut with matching threads inside the bucket and use a slightly longer screw.
|
|
|
|
|
Logged
|
Columbia, South Carolina
|
|
|
|
RonW
|
|
« Reply #9 on: April 17, 2022, 11:00:44 AM » |
|
The bezel screw is 5mm as listed in the oem fische, so you might be able to use a 6mm screw as a replacement. If the screw was 6mm than you wouldn't be able to find a 7mm screw so forth. I don't imagine a problem tapping 6mm threads into a loose 5mm fit. But then there might not be enough meat to tap fully formed 6mm internal treads that have enough purchase. I guess do a trial run on a piece of thin metal.  A metal tab serves as a boss for the screw 22 in fiche above.  The screw doesn't go through the chrome ring part of the bezel. 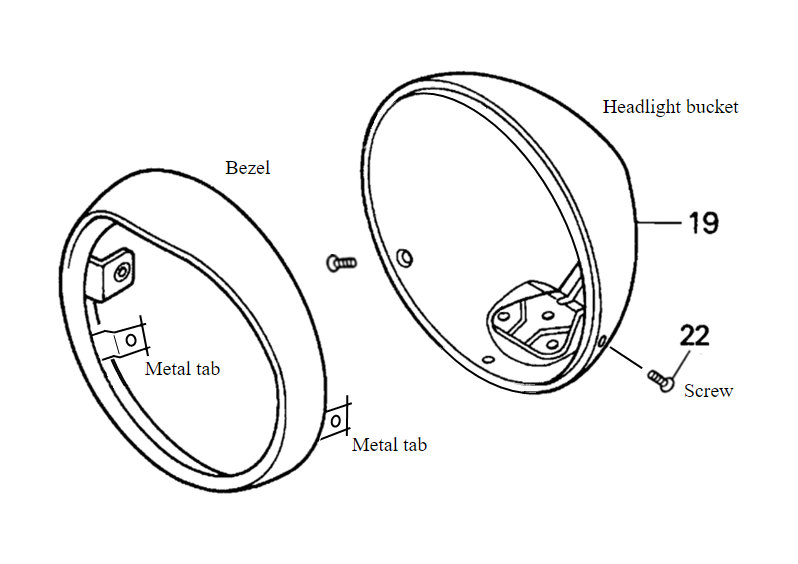 |
|
|
|
« Last Edit: April 19, 2022, 04:52:45 AM by RonW »
|
Logged
|
2000 Valkyrie Tourer
|
|
|
|
F6Ghostrider VRCC #32501
|
|
« Reply #10 on: April 20, 2022, 08:22:44 AM » |
|
Thank you Gentlemen. So many great ideas with pics!  |
|
|
|
|
Logged
|
|
|
|
h13man
Member
Posts: 1892
To everything there is an exception.
Indiana NW Central Flatlands
|
|
« Reply #11 on: April 28, 2022, 05:59:10 AM » |
|
Tap out to 6mm as 5mm is the tap drill size or 1/4 -28 could be an option being fine threads like the M5.
|
|
|
|
|
Logged
|
|
|
|
MarkT
Member
Posts: 5196
VRCC #437 "Form follows Function"
Colorado Front Range - elevation 2.005 km

|
|
« Reply #12 on: April 28, 2022, 07:44:17 AM » |
|
To get it fixed quick & securely - I would get the appropriate threaded nut, run the screw through the tab to hold the nut on the back side. That would ensure the nut is in the right place. MIG weld the nut onto the back side of the tab, Being sure not to get weld on the screw. Go to Ace hardware and get the same screw with tapered head a bit longer. Done. This will work for sure and will be as strong as the original. Actually better, if you use a nut with more depth in the threads than the original tab. If you don't weld, a welder can do it for you for a few bucks. I have replaced threads in similar situations many times. Provided the fix is in a hidden location so it doesn't have to look pretty, while you need to get the job done and move on.
|
|
|
|
|
Logged
|
|
|
|
|


