|
carolinarider09
|
 |
« on: October 09, 2023, 02:01:53 PM » |
|
Since I do have a "mount" for my motorcycle on this trailer it is therefore, marginally Valkyrie related. I have had this trailer for about 20 years (if memory serves). The other day, when I was stepping on it, a board "broke". It was rotted and I knew the boards were going to need replacement. So, my question is about that process. Here is a picture of the trailer and it shows the major issue.   So, I looked at YouTube and found a video about doing the repair. Just remove the screws and replace them and use new boards. Well it's not that simple. First thing is to remove the screws from the boards. I got some super special WD40 and sprayed it from the top an from the bottom on each screw. I did that twice over a period of several days to try and ensure the chemical had a chance to penetrate the wood and metal as needed. I then got out the tools and started to try and remove the screws. These are the first two screws I removed, testing the process. As you can see, the screws failed. (as I sort of expected).  So, I sprayed the remaining screws again and several came out completely, but most did not.  Most of the boards are now out, except one in which the screw head is basically not useable (Torx ) and here is what I have to work with.   So, the question is: How do I replace the board screws. The first option that is most logical is I will have to drill out each rusted screw and rethread the hole for a new, larger screw. I have the tools to do that. The second option is to simply drill and thread new holes. That would be ok but the metal strip that locks down the front of the boards on the trailer would have to be replaced because I could not drill new holes in it. And the new holes being close to the old holes would make the material less stable. All in all I think I will drill out each screw and re-thread. But, I would like input for those who are experienced in this process. I have never done it before and would like to do it right. Oh I have the new boards for the trailer purchased the other day when I went to the local hardware store. And no I did not go the store using the tractor but its only a mile away so I could have. Its just that the trailer is easier to maneuver with the tractor and then with my 1996 Ford Explorer.  |
|
|
|
|
 Logged
|
|
|
|
f6john
Member

Posts: 9973
Christ first and always
Richmond, Kentucky
|
|
« Reply #1 on: October 09, 2023, 03:22:20 PM » |
|
Those screws are of the self drilling and self tapping variety. I don’t know if they make different grades of the screws as I have used them before and they work until you over torque them and then the heads pop. I have at least one bad board on my trailer and to my surprise the manufacturer used a nail to penetrate both the boards and the angle iron supports.
|
|
|
|
|
Logged
|
|
|
|
|
Jess from VA
|
|
« Reply #2 on: October 09, 2023, 03:40:52 PM » |
|
Rather than drill out and use metal tapping screws (again), why not drill out and use bolts (top down) and nuts with washers (underneath)? This is a better mount and not likely to give you trouble like those screws.
Antiseize the bolts and nuts, so they don't get welded together over time.
Maybe counter sink the top bolt heads, if you think they may inhibit loading things. I don't think bolt heads would cause trouble, depending on what you haul on there.
You already bought the 2 by 6s, otherwise, I might have recommended engineered lumber, which costs more but might not rot like regular wood. And maybe lighter too.
|
|
|
|
|
Logged
|
|
|
|
|
carolinarider09
|
|
« Reply #3 on: October 09, 2023, 03:59:06 PM » |
|
Jess, I discussed that very thing, (bolts and nuts) with wife. The only real issue and its easily fixed, keeping the nuts engaged. Lock washers generally work.
I had not thought about engineered lumber. I knew it existed but it did not pop into my mind when I was purchasing.
I will look and see if I can find the proper bolts (head shape). The screws are called "flat head". Don't think I ever looked for flat head bolts.
I mentally considered using stainless steel but, I think that will be unnecessary at my age.
|
|
|
|
|
Logged
|
|
|
|
|
six2go #152
|
|
« Reply #4 on: October 09, 2023, 04:24:49 PM » |
|
Jess, I discussed that very thing, (bolts and nuts) with wife. The only real issue and its easily fixed, keeping the nuts engaged. Lock washers generally work.
I had not thought about engineered lumber. I knew it existed but it did not pop into my mind when I was purchasing.
I will look and see if I can find the proper bolts (head shape). The screws are called "flat head". Don't think I ever looked for flat head bolts.
I mentally considered using stainless steel but, I think that will be unnecessary at my age.
I think I would use stove bolts. The heads are rounded & wouldn't cause any problems with loading any cargo since there are no edges to "snag" things. |
|
|
|
|
Logged
|
|
|
|
|
carolinarider09
|
|
« Reply #5 on: October 09, 2023, 04:38:17 PM » |
|
Jess, I discussed that very thing, (bolts and nuts) with wife. The only real issue and its easily fixed, keeping the nuts engaged. Lock washers generally work.
I had not thought about engineered lumber. I knew it existed but it did not pop into my mind when I was purchasing.
I will look and see if I can find the proper bolts (head shape). The screws are called "flat head". Don't think I ever looked for flat head bolts.
I mentally considered using stainless steel but, I think that will be unnecessary at my age.
I think I would use stove bolts. The heads are rounded & wouldn't cause any problems with loading any cargo since there are no edges to "snag" things. Yes when I was typing the "flat head" the stove bolt shape crossed my mind. Don't need to "counter sink" the hole. And, if I remember, they have sort of a square shape under the "head" to minimize turning. And the thought of "galvanized" metal did not cross my mind until now. |
|
|
|
|
Logged
|
|
|
|
|
Jess from VA
|
|
« Reply #6 on: October 09, 2023, 04:53:18 PM » |
|
If the trailer has to be outside, bolts and engineered lumber are better. If your 2 X 6s aren't pressure treat, paint them with a good sealer before assembly (poly, not Thompsons), and remember most water damage gets in the end cuts more than anywhere else. You don't want slotted or Phillips (to round over with a drill). Flat Allen heads will sink flush with the wood.  |
|
|
|
|
Logged
|
|
|
|
|
carolinarider09
|
|
« Reply #7 on: October 09, 2023, 05:14:55 PM » |
|
Again, that is a good idea and yes, that is the same head used in the bolts I removed, just they (bolts removed) were bigger.
And you are correct the "Allen" shape is best for using a tool that will not slip. That is what the bolts I removed had for a head.
Ok, something else (oh the wood is pressure treated ground contact rated lumber) by using the screws that "screwed" into the metal rails, the likelihood of them get lose was slim.
If I use bolts, then I will have to use one of those nylon nuts to ensure they cannot work themselves loose. And regular washers under the nut not a lock washer.
|
|
|
|
|
Logged
|
|
|
|
|
Jess from VA
|
|
« Reply #8 on: October 09, 2023, 05:22:58 PM » |
|
You crank them down good, they shouldn't come loose, unless you're using the trailer all the time and for distance.
Even pressure treat will suck water from the end cuts.
|
|
|
|
|
Logged
|
|
|
|
|
turtle254
|
|
« Reply #9 on: October 09, 2023, 05:36:49 PM » |
|
The new pressure treated ground contact rated lumber will corroded all screws except SS screws, check with the people that do decks.
|
|
|
|
|
Logged
|
|
|
|
|
carolinarider09
|
|
« Reply #10 on: October 09, 2023, 05:51:28 PM » |
|
The new pressure treated ground contact rated lumber will corroded all screws except SS screws, check with the people that do decks.
While I did not know that, the treated lumber on my decks (that I built) caused the screws I used, initially, to corrode. They were for, I guess, outdoor use is the best way to stay it. In fact they would twist off just like the screws in the boards on this trailer. So when I replaced the decking (even that stuff does not last) I used stainless steel wood screws. The bridge across our creek I built, I used stainless steel screws. Did notice a few non stainless the other day so, I will replace them. Bridge is only two years old. But yes, will probably use stainless. Modified to add: Will have to consider any impact the combination of stainless with the carbon steel of the trailer will/could have. Again, might be over analyzing it. |
|
|
|
« Last Edit: October 09, 2023, 05:58:08 PM by carolinarider09 »
|
Logged
|
|
|
|
|
ridingron
|
|
« Reply #11 on: October 09, 2023, 06:15:36 PM » |
|
By your admission, what you have lasted 20 years. Do you think you'll still be using the trailer 20 years from now? Fix it however is cheapest/easiest/best way for you.
|
|
|
|
|
Logged
|
|
|
|
|
The emperor has no clothes
|
|
« Reply #12 on: October 09, 2023, 06:27:15 PM » |
|
“Again, might be over analyzing it.”
Most definitely. Cut the boards to the correct length, drill pilot holes, install self tapping stainless Allen head screws, stain or paint, be done with it. I did mine a couple years ago. It’s not a hard job. Although mine is aluminum, it’s probably easier to drill the pilot holes.
|
|
|
|
|
Logged
|
|
|
|
Skinhead
Member
Posts: 8762
J. A. B. O. A.
Troy, MI
|
|
« Reply #13 on: October 10, 2023, 07:08:57 AM » |
|
"Modified to add: Will have to consider any impact the combination of stainless with the carbon steel of the trailer will/could have. Again, might be over analyzing it."
Stainless and the steel of the trailer frame are both made from Iron, so there is no problem with galvanic corrosion due to dissimilar metals. As far as bolts/nots loosening goes, use blue loctite thread locker when you assemble it. I agree with you, you are over analyzing it.
|
|
|
|
|
Logged
|
 Troy, MI |
|
|
|
Jess from VA
|
|
« Reply #14 on: October 10, 2023, 07:13:01 AM » |
|
You can't paint or stain new pressure treat until it's dry enough. Stain is better than paint on pressure treat.
|
|
|
|
|
Logged
|
|
|
|
|
Sorcerer
|
|
« Reply #15 on: October 10, 2023, 10:52:15 AM » |
|
I have a trailer i built back in the early 80s. I used 3/4” plywood for decking. It would last around 5-6 years. One year I got fed up with the plywood. 3/16 Diamond plate cut to size by the steel supplier. Was going to bolt it in place but being lazy I welded it in place. Way quicker than burning up drill bits. Being 5’ wide it required 2 plywood sheets. The steel was about 1 1/2 times the cost of wood and only slightly heavier. The rest of the trailer will die before the deck ever does.
|
|
|
|
« Last Edit: October 10, 2023, 10:59:52 AM by Sorcerer »
|
Logged
|
|
|
|
|
carolinarider09
|
|
« Reply #16 on: October 10, 2023, 01:39:51 PM » |
|
I have a trailer i built back in the early 80s. I used 3/4” plywood for decking. It would last around 5-6 years. One year I got fed up with the plywood. 3/16 Diamond plate cut to size by the steel supplier. Was going to bolt it in place but being lazy I welded it in place. Way quicker than burning up drill bits. Being 5’ wide it required 2 plywood sheets. The steel was about 1 1/2 times the cost of wood and only slightly heavier. The rest of the trailer will die before the deck ever does.
Since I have the wood, that's probably how I will go. Nice to hear of alternatives. |
|
|
|
|
Logged
|
|
|
|
|
signart
|
|
« Reply #17 on: October 10, 2023, 01:51:47 PM » |
|
Go to Fastenal. They have the self drillers like you need for trailer floors. They would be similar to what you took out, standard in the truck be/trailer industry. Just predrill the wood slightly so as not to bog your drill, speed is the key with these screws. I like to dip them in oil before installation. Stainless will not self drill. When p/t pine is dry, coat with your used motor oil.  |
|
|
|
|
Logged
|
|
|
|
|
carolinarider09
|
|
« Reply #18 on: October 10, 2023, 03:12:38 PM » |
|
Go to Fastenal. They have the self drillers like you need for trailer floors. They would be similar to what you took out, standard in the truck be/trailer industry. Just predrill the wood slightly so as not to bog your drill, speed is the key with these screws. I like to dip them in oil before installation. Stainless will not self drill. When p/t pine is dry, coat with your used motor oil.  |
|
|
|
|
Logged
|
|
|
|
|
cookiedough
|
|
« Reply #19 on: October 10, 2023, 06:30:03 PM » |
|
You can't paint or stain new pressure treat until it's dry enough. Stain is better than paint on pressure treat.
that is what the trailer dealer owner told me when I just bought a new 7x14 wood deck 2x6's aluminum trailer. He said since new pressure treated wood, wait at least 1 year until next year if want to treat the wood deck. He did not recommend doing it since the deck has a lifetime warranty and he has been in business 30 years or more and only replaced 1 set of 2x6 wood boards. maybe original owners do not keep their trailers over 20 years anymore? His idea if do anything to treat the wood 1-2 years from now is slap on liberally ALL OVER transmission oil he said it soaks into the wood much better than any oil and does not darken the wood as much as oil does. sure beats the stains/oils for pricing even though cheap tranny fluid is not cheap either. |
|
|
|
|
Logged
|
|
|
|
|
da prez
|
|
« Reply #20 on: October 11, 2023, 04:36:47 AM » |
|
I have re-decked many trailers and trucks. Removing the screws are a waste of time. Grind the top smooth , use a blunt punch ( I made a wide chisel ) and break off the screws on the bottom. Re paint or undercoat. Do it the easiest way for you. I use automotive undercoating after cutting lumber to length. Bottoms , sides and ends. Carriage or garage door bolts are second to decking screws. If you leave a gap or install them tight , there will be a crown that you will not see. After install is done , a non-skid sealer will help the surface last. da prez Please send $1000.00 in unmarked bills for tech consult   |
|
|
|
|
Logged
|
|
|
|
|
carolinarider09
|
|
« Reply #21 on: October 11, 2023, 06:52:45 AM » |
|
I have re-decked many trailers and trucks. Removing the screws are a waste of time. Grind the top smooth , use a blunt punch ( I made a wide chisel ) and break off the screws on the bottom. Re paint or undercoat. Do it the easiest way for you. I use automotive undercoating after cutting lumber to length. Bottoms , sides and ends. Carriage or garage door bolts are second to decking screws. If you leave a gap or install them tight , there will be a crown that you will not see. After install is done , a non-skid sealer will help the surface last. da prez Please send $1000.00 in unmarked bills for tech consult Thanks for the information. Was planing on removing (well minimizing) the bolts as you suggested. Letting the treated wood dry before installing. Was going to paint the trailer "metal" with something like Rustoleum (sp) but will look into the automotive undercoating. Re-assembly will have to wait until I find out what the trailer tail light problem is. One good about doing the "deck" replacement is that I now have full access to the wiring. |
|
|
|
|
Logged
|
|
|
|
|
Bigwolf
|
|
« Reply #22 on: October 13, 2023, 10:29:57 PM » |
|
Letting the treated wood dry before installing.
Was going to paint the trailer "metal" with something like Rustoleum (sp) but will look into the automotive undercoating. Re-assembly will have to wait until I find out what the trailer tail light problem is. One good about doing the "deck" replacement is that I now have full access to the wiring.
About the trailer lights,……….just an FYI. I had a bad experience with trailer lighting a couple of years ago. Just before Inzane Athens, Ohio, I put all new wiring on the tailgate of my trailer. From Athens, I went to my brother’s for a couple of weeks and my trailer just sat there in the field. Then I loaded up an old lathe and put my bike on the trailer with it to head home to Tennessee. Somewhere between Belington, WV and Cookeville, TN, I encountered something extremely corrosive. My bike was on the right front side of the trailer and the right side of my bike began to corrode rapidly. It took a lot of deep scrubbing to get that all stopped. But I never thought about the trailer! The next time (3 or 4 months) that I went to use the trailer, I had lights that would not work. A few months later, I had no lights on the trailer. I ran a temporary brand new wiring harness from the truck back to the tailgate and a couple of temporary wires on the tailgate. That got me through that day’s work. This year when I went to use my trailer, I discovered that ALL of the wires on the tailgate were useless! It didn’t take long when starting to repair the problem before I discovered that there was nothing but corrosion for at least 12 inches back inside the insulation of what was at one time (When I took the trailer to Athens) brand new wire. I think that I might/must have unknowingly followed a truck leaking DEF or some other highly corrosive substance. I am about to repaint, refloor, and rewire my 16ft utility trailer. I will be making sure that all of my wiring is extra securely protected. I have always soldered and shrink wrapped every connection and added extra abrasion protection in vulnerable places. Somehow whatever I encountered got though that anyway. I will make sure that any such substance will have to work harder to do any damage in the future. I don’t know how useful that information might be to you, but there it is. Bigwolf |
|
|
|
|
Logged
|
|
|
|
|
da prez
|
|
« Reply #23 on: October 14, 2023, 06:52:21 AM » |
|
Wolf , Carolina , another suggestion!. Get the wiring roughed in. Do not connect. 1/2 inch plastic PVC water pipe protects and holds the wiring. 90s , tee's and crosses can be used for the connections. Install the t's or crosses on the main feed line. Test the wiring before gluing it together. When all done , a squeeze of sealant in the ends of the plastic pipe completes the job. Solder is in my opinion the best way. Scotch-locks need to go in the trash. It is not an easy job , but it is usually only done once.
da prez
|
|
|
|
|
Logged
|
|
|
|
|
carolinarider09
|
|
« Reply #24 on: October 14, 2023, 07:56:34 AM » |
|
Wolf , Carolina , another suggestion!. Get the wiring roughed in. Do not connect. 1/2 inch plastic PVC water pipe protects and holds the wiring. 90s , tee's and crosses can be used for the connections. Install the t's or crosses on the main feed line. Test the wiring before gluing it together. When all done , a squeeze of sealant in the ends of the plastic pipe completes the job. Solder is in my opinion the best way. Scotch-locks need to go in the trash. It is not an easy job , but it is usually only done once.
da prez
Thanks for the feedback. I have not approached the wiring but using the PVC pipe did not cross my mind. They currently use that black plastic stuff that is corrugated and flexible. I have used it in other applications. In this application, the way it was "installed" it sags and is therefore easy to snag. I don't use the trailer in rough road, fields, etc. but.... And PVC is an excellent suggestion, it would seem. I just got through installing some 1/2" PVC in the "crawlspace" getting ready for the installation of a dehumidifier and the needed condensate pump. So.... I have the stuff. Only real issue, first comes to mind, is how to mount the PVC to the trailer frame? |
|
|
|
|
Logged
|
|
|
|
|
scooperhsd
|
|
« Reply #25 on: October 14, 2023, 12:41:22 PM » |
|
Either the clips for plumbing, or use the cable ties.
|
|
|
|
|
Logged
|
|
|
|
|
carolinarider09
|
|
« Reply #26 on: October 14, 2023, 01:11:07 PM » |
|
Either the clips for plumbing, or use the cable ties.
Got both. |
|
|
|
|
Logged
|
|
|
|
|
Bigwolf
|
|
« Reply #27 on: October 14, 2023, 05:42:43 PM » |
|
Wolf , Carolina , another suggestion!. Get the wiring roughed in. Do not connect. 1/2 inch plastic PVC water pipe protects and holds the wiring. 90s , tee's and crosses can be used for the connections. Install the t's or crosses on the main feed line. Test the wiring before gluing it together. When all done , a squeeze of sealant in the ends of the plastic pipe completes the job. Solder is in my opinion the best way. Scotch-locks need to go in the trash. It is not an easy job , but it is usually only done once.
da prez
That’s a good idea! Back when I was running my Boonie bashin Jeep, I ran the wiring through copper tubing and sealed the ends of tubing with silicone sealer. Something along those lines is going to be incorporated this time in rewiring my trailer. I had not thought of pvc but that might be what I use. I will not be using wire ties to hold it up. My experience with those is that they harden over time and break. I will most likely make some U shaped pieces of 1/4 inch steel rod and weld them to the frame to hold the wiring plumbing in place. Bigwolf |
|
|
|
|
Logged
|
|
|
|
|
da prez
|
|
« Reply #28 on: October 15, 2023, 07:35:33 AM » |
|
Wolf , Carolina , another suggestion!. Get the wiring roughed in. Do not connect. 1/2 inch plastic PVC water pipe protects and holds the wiring. 90s , tee's and crosses can be used for the connections. Install the t's or crosses on the main feed line. Test the wiring before gluing it together. When all done , a squeeze of sealant in the ends of the plastic pipe completes the job. Solder is in my opinion the best way. Scotch-locks need to go in the trash. It is not an easy job , but it is usually only done once.
da prez
Thanks for the feedback. I have not approached the wiring but using the PVC pipe did not cross my mind. They currently use that black plastic stuff that is corrugated and flexible. I have used it in other applications. In this application, the way it was "installed" it sags and is therefore easy to snag. I don't use the trailer in rough road, fields, etc. but.... And PVC is an excellent suggestion, it would seem. I just got through installing some 1/2" PVC in the "crawlspace" getting ready for the installation of a dehumidifier and the needed condensate pump. So.... I have the stuff. Only real issue, first comes to mind, is how to mount the PVC to the trailer frame? o2s here. Can't seem to recollect the proper nomenclature but when i was doing electrical install we used a preshaped metal strap with 1 or 2 screw/boltholes. Fastening into wood with pan head sheet metal screws-yuppers that'll work-and using the 2 hole variety should make the job 1 and done! RIDE SAFE. |
|
|
|
|
Logged
|
|
|
|
|
Sorcerer
|
|
« Reply #29 on: October 15, 2023, 08:05:17 PM » |
|
One of our rescue dogs has a “thing” about wiring. She chewed the trailer wiring off 3 times. Once was when I was in the middle of repairs from a previous chew. While in for dinner she snatched my strippers the expensive crimp/ heat shrink connectors and scattered them around my backyard. That is when I went with the gray plastic electrical pipe. I used the heavy duty sip ties to hold it in place.
|
|
|
|
|
Logged
|
|
|
|
|
carolinarider09
|
|
« Reply #30 on: October 16, 2023, 06:32:08 AM » |
|
I am going to ensure the size I want will work (wires fill fit) and probably pick up the grey PVC stuff today.
Clamps maybe also..
|
|
|
|
|
Logged
|
|
|
|
|
da prez
|
|
« Reply #31 on: October 16, 2023, 08:13:18 AM » |
|
Sorcerer , some of the new wiring is plant based insulation.
da prez
|
|
|
|
|
Logged
|
|
|
|
|
Bigwolf
|
|
« Reply #32 on: October 16, 2023, 09:21:41 AM » |
|
Sorcerer , some of the new wiring is plant based insulation.
da prez
^^^^ Exactly! Squirrels and mice love it too! |
|
|
|
|
Logged
|
|
|
|
|
carolinarider09
|
|
« Reply #33 on: October 16, 2023, 09:27:36 AM » |
|
I had forgotten about that. The wiring I have is several years old so..... Don't know for sure.
I was going to use the grey PVC pipe and seal all ends. and put the bare wires in some kind of protective coating. Either the "cable" thingy's or heat shrink tubing.
|
|
|
|
|
Logged
|
|
|
|
|
carolinarider09
|
|
« Reply #34 on: October 27, 2023, 02:21:56 PM » |
|
I have removed all the old boards from the trailer, and began to replace the wiring. I was going to use 1/2 grey PVC pipe, the holes in the frame pieces were just a little to small and I did not want to expand them (by drilling or filing, for fear of affecting the strength of the "beams") so I am going to use 1/2 copper pipe. I had some cable "organizers" from a previous task. But did not have enough. Order some more, what I thought was the same size but opted for "heavy duty". Turns out the "heavy duty" "organizers" are bigger in diameter. Anyway ordered some "standard" they should be in tomorrow. Here is what the "thing" looks like where it splits from the main lead to the left and rigth leads.  This is what the main lead will look like. This is just a part of it.  While I was waiting for the new cable organizers I cleaned and painted the trailer frame. I had the wood down at the workshop, drying out and today I decided it was time to see how it fit. One of the tools I used to remove "free rust" from metal. Anyone want to guess how old it is? (HINT USN)  The wood, trial fit. I was impressed that it all fit using standard 2 x 8 and one 2 x 6.  Only issue is a "bend" in at the end that will have to be corrected.  Oh, I think I told this story before but, just in case, when I was building the house (and still working) I would start my day with breakfast at Waffle House. Made it easier on the wife who was working as well. Anyway, I met this gentleman there who was also working in the "construction" business as a worker. We talked about my project and he sort of offered his and his father's help. I said OK and offered to pay them $10 an hour so we shook hands (it was in 2006). Anyway we worked together on the weekends and the second or third weekend of working he brought two sawhorses for us to use. (no charge but back then I think $10 an hour was pretty good pay, 10 hour day, no taxes withheld ). Well, its now 2023 and I still have them. they are a little ragged but still work. So, last year I built four more using his plans (he said they were based on some plans used by Mexican workers if I remember correctly.). These are two pictures of the ones I built.   This is a picture, September 2006, of the ones he built (he is on the left, his father is working at the sawhorses and I am on the far right. Oh they also brought some tools I did to have. I did learn stuff.  |
|
|
|
|
Logged
|
|
|
|
|
carolinarider09
|
|
« Reply #35 on: October 30, 2023, 03:31:39 PM » |
|
Wiring has been installed and is ready to connect and new boards (flooring) has been installed awaiting the selection/order bolts to be used for attaching the boards to the trailer frame.  |
|
|
|
|
Logged
|
|
|
|
|
Jess from VA
|
|
« Reply #36 on: October 30, 2023, 08:56:37 PM » |
|
Assuming that's southern yellow pine (pressure treat), it probably needs to cure a while before being coated with something. I'm partial to cedar stain over any kind of paint. The grain really pops with stain (not that that may be your goal on a utility trailer). Milled wood sucks more water from the end cuts over time than anywhere else, so the end cuts need a good coat of something. Apparently some bed liners are the best thing going even on wood trailer decks. https://www.durabakcompany.com/blogs/durabak/bed-liner-coating-wooden-deck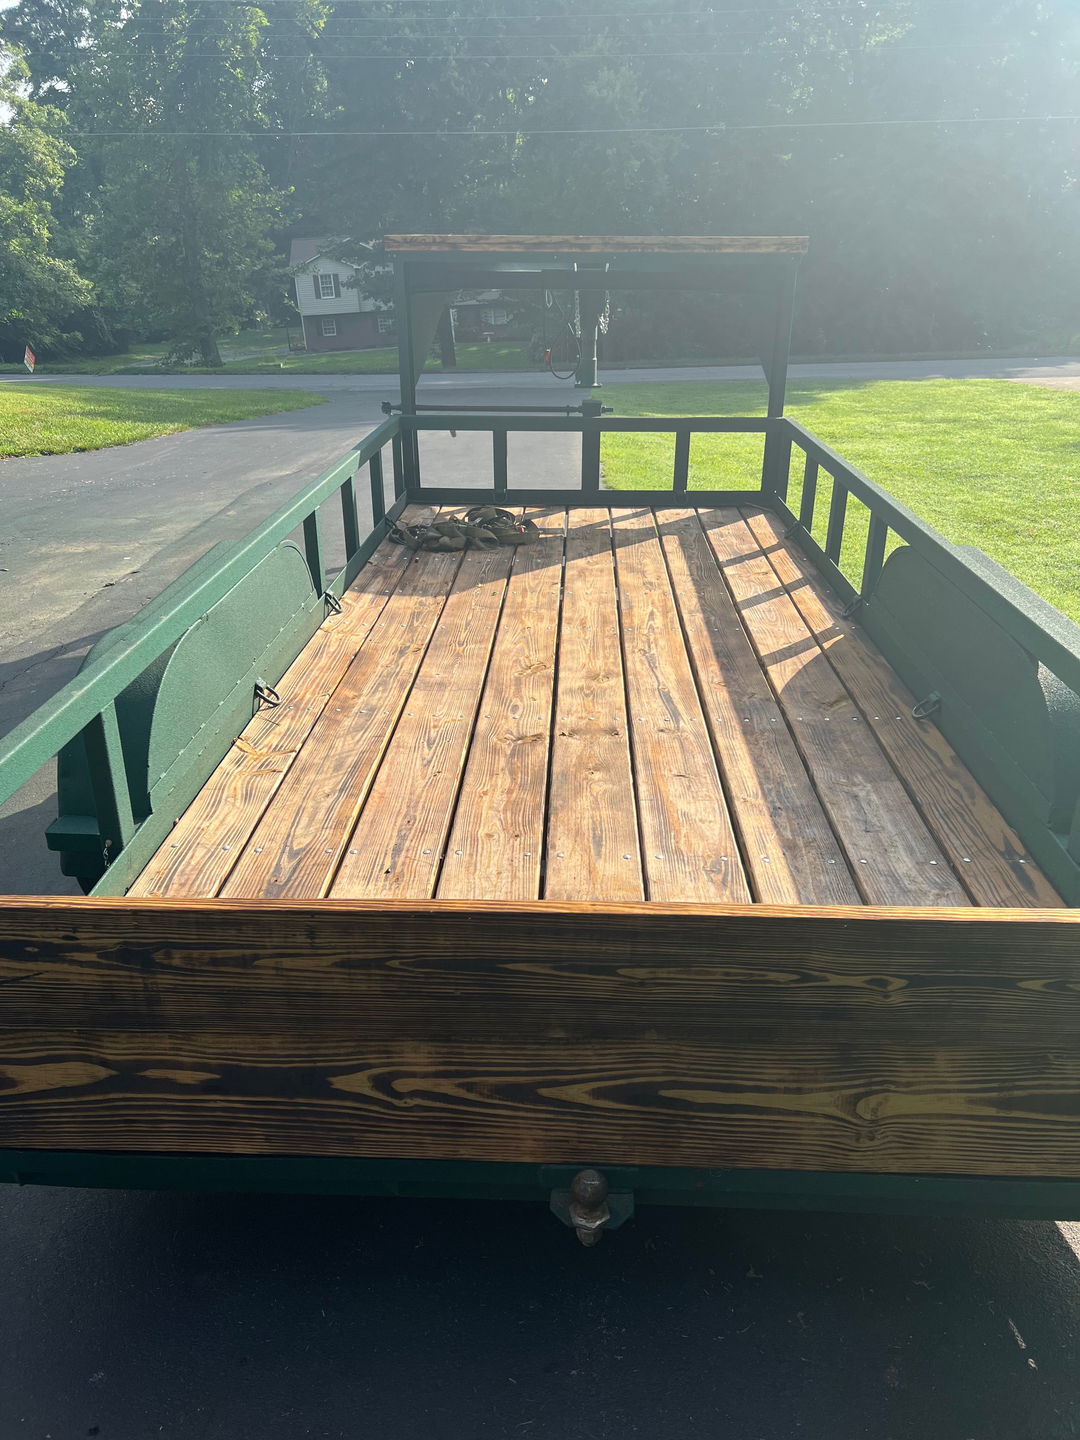 |
|
|
|
|
Logged
|
|
|
|
|
carolinarider09
|
|
« Reply #37 on: November 15, 2023, 07:10:34 AM » |
|
I want to thank you all for the help and suggestions. I did read them all but, in the end, just went with the standard "ground contact" treated pine 2x's. Jess's comments on the end cuts was something I did miss and I will treat the ends of the 2x's I have in "stock" to replace the deck boarding on the back uncovered deck. I finished the project yesterday. Took a while to find the correct screws (well shall we say the correct length). I had to go up one size to 1/4" and this required some additional re-drilling of the holes I did get drilled for test purposes and the old holes to remove broken screw ends. I ended up purchasing the screws for e-trailer on line. Don't know how tuff they really are but..... I only rounded off a few of the "heads". Did go through two drill bits and ended up using three drills. The finished product.  The tools.  I have not remounted the motorcycle front wheel "holder" yet. Nor have I mounted the plywood side curtains/screens (so I can carry loose stuff to the local disposal site). |
|
|
|
|
Logged
|
|
|
|
|
|
|
Jess from VA
|
|
« Reply #39 on: November 15, 2023, 12:18:25 PM » |
|
It's like a small deck on wheels. I have no trailer. I only have a wheelbarrow and a dolly.  |
|
|
|
|
Logged
|
|
|
|
|


