|
Gearhead24
|
 |
« on: August 07, 2024, 08:29:14 PM » |
|
trying to get to rear case off and I need to get the clutch off. Not buying the $100 holder plate so I was curious to see what other people have come up with to get around it. On my 77 Goldwing I was able to get away with using a y-shaped tool with knobs at each end wedged with the lifter plate bolts to hold the clutch still. Unfortunately that is not working and I cannot seem to find any information anywhere on any substitutes, even every video I see either skips getting the clutch out or is focusing on the slave cylinder.
Also somebody else has definitely been into the rear case on this motor before, the nut on the final output shaft is all torn up with screwdriver marks and gauges. I know it's not proper to leave it like that but I'm trying to get in and out for as little as possible so if it's not 100% necessary I'll leave it alone.
|
|
|
|
|
 Logged
|
|
|
|
|
98valk
|
|
« Reply #1 on: August 08, 2024, 02:11:56 AM » |
|
search the tech board there are many threads on what others have done and tools they came up with.
I brought a used GW1500 clutch basket from Ebay which greatly helped to align all the plates to reinstall into my existing basket.
air gun will take the clutch nut off with ease.
|
|
|
|
« Last Edit: August 08, 2024, 10:58:35 AM by 98valk »
|
Logged
|
1998 Std/Tourer, 2007 DR200SE, 1981 CB900C 10speed
1973 Duster 340 4-speed rare A/C, 2001 F250 4x4 7.3L, 6sp
"Our Constitution was made only for a Moral and Religious people. It is wholly inadequate to the goverment of any other."
John Adams 10/11/1798
|
|
|
|
-mike-
|
|
« Reply #2 on: August 08, 2024, 03:59:14 AM » |
|
I made my own. A steel plate, 4 bolts and one old 1/2 socket. The hole in the middle has to be big enough for a 32mm socket. Use an air gun for the central nut. Really. I have a 400 Nm wired electric impact driver that is strong enough, too. 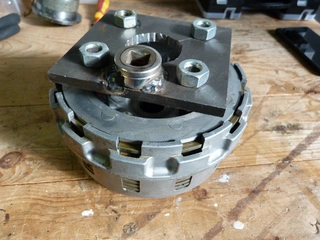 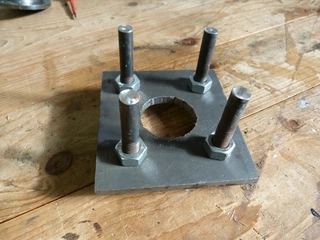 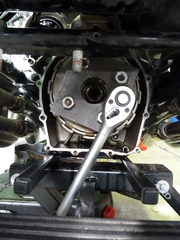 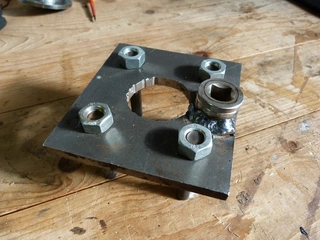 Do what 98Valk said. A 2nd clutch basket helps tremendously. (or you remove the basket, too.) A deep (!) 46mm 12 point socket is needed then. (AND the air gun...) This socket is suitable and doesnt cost a leg and an arm - should be available in US, too. https://www.vgsupplies.net/products/us-pro-46mm-hub-nut-socket-12-point-1-2-dr-100mm-longLast, but not least: To work on the clutch, use MarkT's adapter - other lift adapter plates won't work. -mike- |
|
|
|
« Last Edit: August 08, 2024, 04:15:40 AM by -mike- »
|
Logged
|
|
|
|
|
Gearhead24
|
|
« Reply #3 on: August 08, 2024, 09:23:42 AM » |
|
Thanks, I ended up just using a small electric impact to get the clutch pack off, then saw that there's an even bigger locknut waiting behind it. I didn't take my clutch pack apart and don't plan on it as my mission is inside the rear case. Heading to harbor freight to get the sockets needed to tackle the locknuts on that main shaft and the output shaft
|
|
|
|
|
Logged
|
|
|
|
|
98valk
|
|
« Reply #4 on: August 08, 2024, 11:04:59 AM » |
|
I made my own. A steel plate, 4 bolts and one old 1/2 socket.
The hole in the middle has to be big enough for a 32mm socket.
Use an air gun for the central nut. Really.
I have a 400 Nm wired electric impact driver that is strong enough, too.
Last, but not least:
To work on the clutch, use MarkT's adapter - other lift adapter plates won't work.
-mike-
""Use an air gun for the central nut. Really.""
""An air impact wrench (also known as an air gun, impact gun, or impactor) "" https://bestreviews.com/tools/hand-tools/best-air-impact-wrenches |
|
|
|
|
Logged
|
1998 Std/Tourer, 2007 DR200SE, 1981 CB900C 10speed
1973 Duster 340 4-speed rare A/C, 2001 F250 4x4 7.3L, 6sp
"Our Constitution was made only for a Moral and Religious people. It is wholly inadequate to the goverment of any other."
John Adams 10/11/1798
|
|
|
|
F6Dave
|
|
« Reply #5 on: August 08, 2024, 12:20:05 PM » |
|
Here's my old post on the clutch project. I only cover the tricky parts since most of the job is very easy. I should mention that the only part I really needed to replace was the damper plate. I ordered the gasket but the old one was fine (and really stuck to the cover) so I left it alone. I replaced the spring but the old one was still within factory specs. I only replaced the big clutch nut because the manual said I should. And the fiber discs looked nearly new and could have been reused. After many months I finally got around to replacing the clutch on my ’98 Tourer. As some others have experienced, the rivets in the damper plate failed. This is not uncommon on some high mileage Valks. The job took several hours, but was not difficult at all. Getting the center plastic cover off was more of a PITA than any of the other work. Clearance isn’t as good as in a bike with a more typical transversely mounted engine, but once you have it on a lift with a few pieces removed (I didn’t even remove the tank) there is plenty of clearance to remove the rear cover and clutch center pack without any special tools (not even a wobble joint for your ratchet). Here are of a couple of things I learned: I’d read that the disk alignment must nearly perfect or the compressed clutch center pack will not fit back into the basket. I used a couple of large washers and a spring in 2 places to hold the pack together with some light pressure. This allowed me to align the disks in the basket, and keep them aligned when I compressed the diaphragm spring and replaced the circlip. 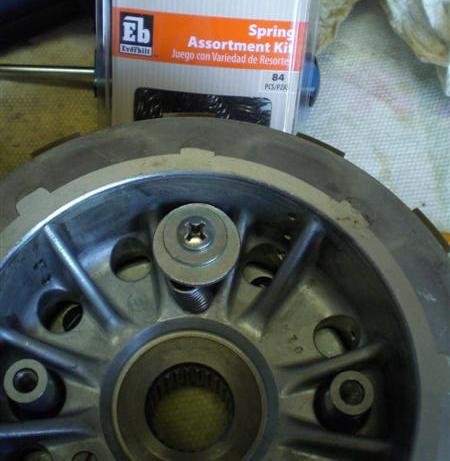 Speaking of compressing the spring, I made a simple tool out of a 2x4, long bolt, a plastic pipe fitting, and an old lawnmower blade. I knew that blade would come in handy one day! This allowed me to use straight tips on the circlip pliers which seem to work better than 90 or 45 degree tips. 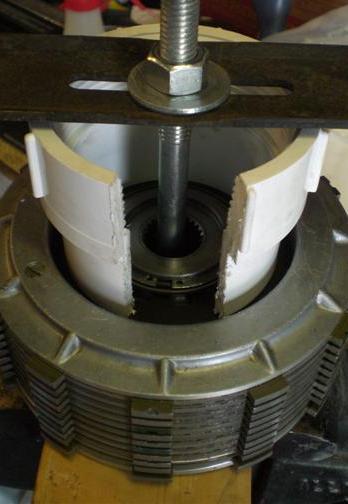 While I used an impact wrench to remove the big clutch nut, I wanted to torque the new one to the Honda spec. Here’s a simple clutch holder tool I made from another 2x4.  |
|
|
|
|
Logged
|
|
|
|
|
Gearhead24
|
|
« Reply #6 on: August 08, 2024, 12:39:03 PM » |
|
I actually have that thread open on another tab right now, that 2x4 will come in handy when I need to put everything back together. Right now I still need to get the clutch basket off and I cannot find the 46mm socket necessary for it. Harbor freight, Ace Hardware, Home Depot, Lowes, Autozone, Oreilleys, and Napa all don't carry it. I have not been able to find a thread where somebody rigs up something to work on that locknut
|
|
|
|
|
Logged
|
|
|
|
|
Hook#3287
|
|
« Reply #7 on: August 09, 2024, 05:13:50 AM » |
|
Try a 1-13/16 socket.
|
|
|
|
|
Logged
|
|
|
|
|
Bagger John - #3785
|
|
« Reply #8 on: August 09, 2024, 06:47:53 AM » |
|
Wondering how well an M18 Fuel in 1/2" drive will work on that locknut. Haven't had to do mine yet (knock wood) but I'm always looking for an excuse to buy tools.
I managed to get a Honda clutch holder tool for around $50 if memory serves correctly. Been slowly acquiring every shop tool in the service manual as deals present themselves. Some day I'm going to need them. Compared to what the area shops are charging for an hour's labor, even $100 for the clutch holder isn't a bad price.
|
|
|
|
|
Logged
|
|
|
|
|
F6Dave
|
|
« Reply #9 on: August 09, 2024, 09:08:54 AM » |
|
I actually have that thread open on another tab right now, that 2x4 will come in handy when I need to put everything back together. Right now I still need to get the clutch basket off and I cannot find the 46mm socket necessary for it. Harbor freight, Ace Hardware, Home Depot, Lowes, Autozone, Oreilleys, and Napa all don't carry it. I have not been able to find a thread where somebody rigs up something to work on that locknut
I don't have a 46 mm socket, so as I remember I used an SAE size that was close. Maybe a 1-13/16". It's interesting how I got that socket. Years ago my stepdad was driving on an unpaved deserted road and saw a big 3/4" drive S-K socket. He stopped to pick it up. A few hundred feet later there was another, then another, then an extension, ratchet, and finally the metal tool box. There were no vehicles or homes in the area so he no idea who to return it to. He kept them and eventually gave them to me. |
|
|
|
« Last Edit: August 09, 2024, 09:11:09 AM by F6Dave »
|
Logged
|
|
|
|
|
F6Dave
|
|
« Reply #10 on: August 09, 2024, 09:33:20 AM » |
|
UPDATE: After making that earlier post I was in the garage, and after 11 years the old clutch spring and nut were still on the workbench! That nut is a 32 mm, while the nut holding the basket must be 46 mm. I only removed the 32 mm nut and the compressed clutch pack, but left the basket in place. I had read that aligning the plates before compressing the pack was critical, and some owners had to try several times before the pack would slide in. That's why I came up with this method of using a spring, washers, and a screw in 2 places hold the pack together under pressure. It allowed me to move the plates around until the pack would fit, then it held them in that position while I compressed the pack with my home-made tool. The assembled pack fit perfectly the first time, without the need to remove the basket or align it by trial and error. |
|
|
|
« Last Edit: August 09, 2024, 01:57:49 PM by F6Dave »
|
Logged
|
|
|
|
LadyDraco
Member

Posts: 2051
TISE
Bastian, VA. Some of the best roads in the East
|
|
« Reply #11 on: August 09, 2024, 11:14:35 AM » |
|
I had a great step b step on clutch removal full both inner and outer baskets and the things we made for holding packs.. Sadly they have been lost when VRCC moved to a different server and we lost the Justpics site..  And I can't find the disk that had all my pics on it... |
|
|
|
|
Logged
|
Life is what you make of it~If it don't fit make alterations...
One does not speak unless one knows.
Never underestimate the power of a woman !
It's a Poor Craftsman who blames their Tools !
This is the way
|
|
|
|
Hook#3287
|
|
« Reply #12 on: August 09, 2024, 01:45:45 PM » |
|
UPDATE: I never removed the clutch basket, just the clutch pack. It only needed a 32 MM socket as I remember, which is darn close to 1.25 inches.
It's been 20 years since I removed my clutch, but that size sounds familiar. |
|
|
|
|
Logged
|
|
|
|
|
Gearhead24
|
|
« Reply #13 on: August 10, 2024, 11:33:29 AM » |
|
It's all good, I hopped on amazon and got a 46mm deep socket in 3/4 drive. They only had a 6 point socket available soon enough so I cut it into a 12 point. then I used a 36mm axle socket on the final output locknut. Just got the rear case off and it's worse than I thought but I brought it upon myself so whatever. Got to replace the spindle the starter connects to along with the idler gear. Quick question for anybody that might know, but is the rear case made of aluminum or steel?
To answer Bagger John's question, I used a small makita 1/4" drive impact to get the 32mm, 36mm, and 46mm locknuts off and it worked like a charm. I'm sure the Milwaukee 1/2" will have enough if not too much torque to get it.
|
|
|
|
|
Logged
|
|
|
|
LadyDraco
Member
Posts: 2051
TISE
Bastian, VA. Some of the best roads in the East
|
|
« Reply #14 on: August 10, 2024, 04:55:20 PM » |
|
I believe it's alum .. Hey check it with a magnet,,  |
|
|
|
|
Logged
|
Life is what you make of it~If it don't fit make alterations...
One does not speak unless one knows.
Never underestimate the power of a woman !
It's a Poor Craftsman who blames their Tools !
This is the way
|
|
|
|
Gearhead24
|
|
« Reply #15 on: August 10, 2024, 11:10:00 PM » |
|
If only, in my house magnets disappear like 10mm sockets do. The slot in the rear case for the dowel that the idler gear rides on broke so officially I have a broken case. If it was steel I planned on mig welding it back together but JB weld will have to hold until I can throw $300+ towards a single part. The bit that broke held itself in place perfectly until I removed the case so I'm confident JB weld will be good enough for now, as much as I hate putting JB on engines I don't have other options. Thanks
|
|
|
|
|
Logged
|
|
|
|
LadyDraco
Member
Posts: 2051
TISE
Bastian, VA. Some of the best roads in the East
|
|
« Reply #16 on: August 11, 2024, 04:49:16 AM » |
|
you don't have a magnet on a fridge  or one of them long handle shop magnet.. hmmm I have a parts bike I might part with a cover, it's on a 97 . Did ya look on Ebay ? |
|
|
|
|
Logged
|
Life is what you make of it~If it don't fit make alterations...
One does not speak unless one knows.
Never underestimate the power of a woman !
It's a Poor Craftsman who blames their Tools !
This is the way
|
|
|
|
Gearhead24
|
|
« Reply #17 on: August 11, 2024, 11:18:04 AM » |
|
pretty much, no fridge magnets and whenever I get a long shop magnet it disappears. I appreciate the thought but the funds simply aren't there at the moment. The JB should be enough for a temporary fix, I used it once on my 77 goldwing to fix the coolant pipe mount when the screw practically fused with the engine. It broke a whole chunk off so I filled it back in and retapped a new screw hole and it fit perfectly.
|
|
|
|
|
Logged
|
|
|
|
LadyDraco
Member
Posts: 2051
TISE
Bastian, VA. Some of the best roads in the East
|
|
« Reply #18 on: August 11, 2024, 06:22:40 PM » |
|
I love my JB weld and JB quick repairs !  |
|
|
|
|
Logged
|
Life is what you make of it~If it don't fit make alterations...
One does not speak unless one knows.
Never underestimate the power of a woman !
It's a Poor Craftsman who blames their Tools !
This is the way
|
|
|
|
Dirty Dave
|
|
« Reply #19 on: September 02, 2024, 05:56:45 PM » |
|
After removing the alternator I attached a strap wrench to hold the clutch tight enough to pop of
the nut and later to torque it back with the same Milwaukee M12 1/2" snubby. (Not much room)
Used a straight edge to align the frictions enough to persuade the back pack in. Guess I had
forgotten how smooth a new clutch could be. Wow.
|
|
|
|
|
Logged
|
It's weird being the same age as old people
|
|
|
|


