|
carolinarider09
|
 |
« on: July 19, 2025, 08:59:38 AM » |
|
I mentioned, some time back, about an issue I had with my metal roof. The metal roof material “Classic Rib” is from “Metal Sales”, reportedly the nations largest metal roof manufacturer. It was installed by me on the new house we were building (with some help from my daughter) in the spring of 2010. 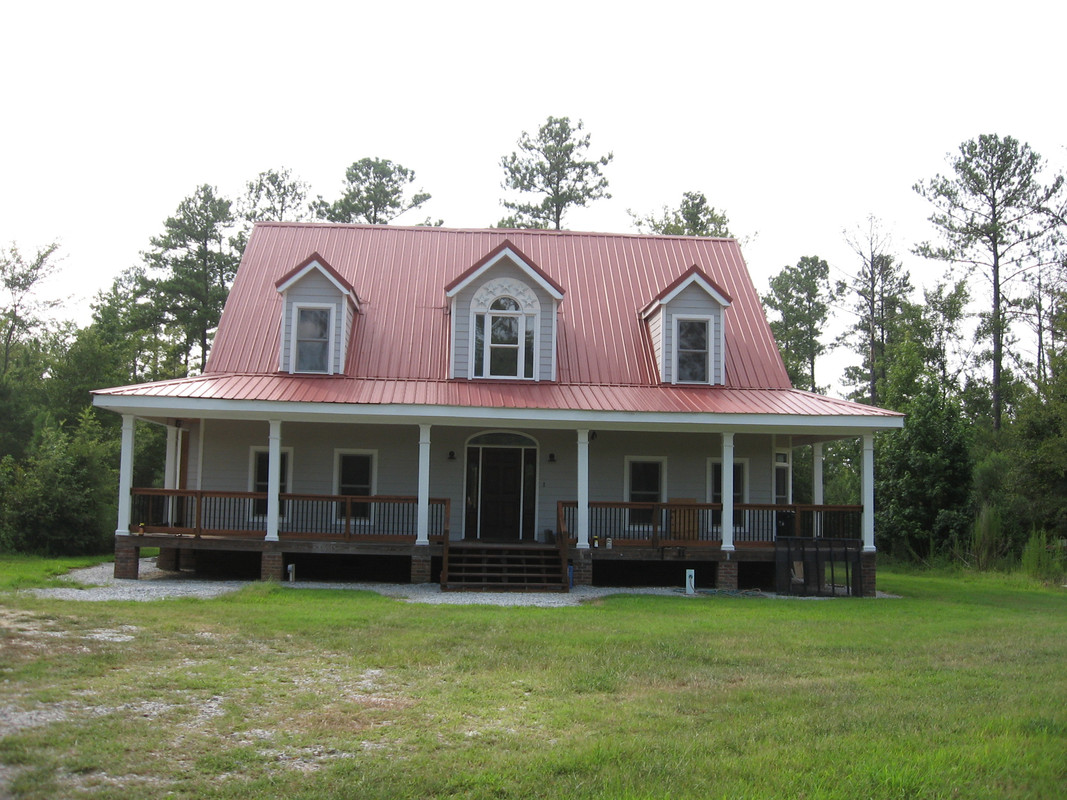 The issue was that some of the screws the were used to install the roofing material were backing out. A picture of the issue (not all, just a sample) is shown below: 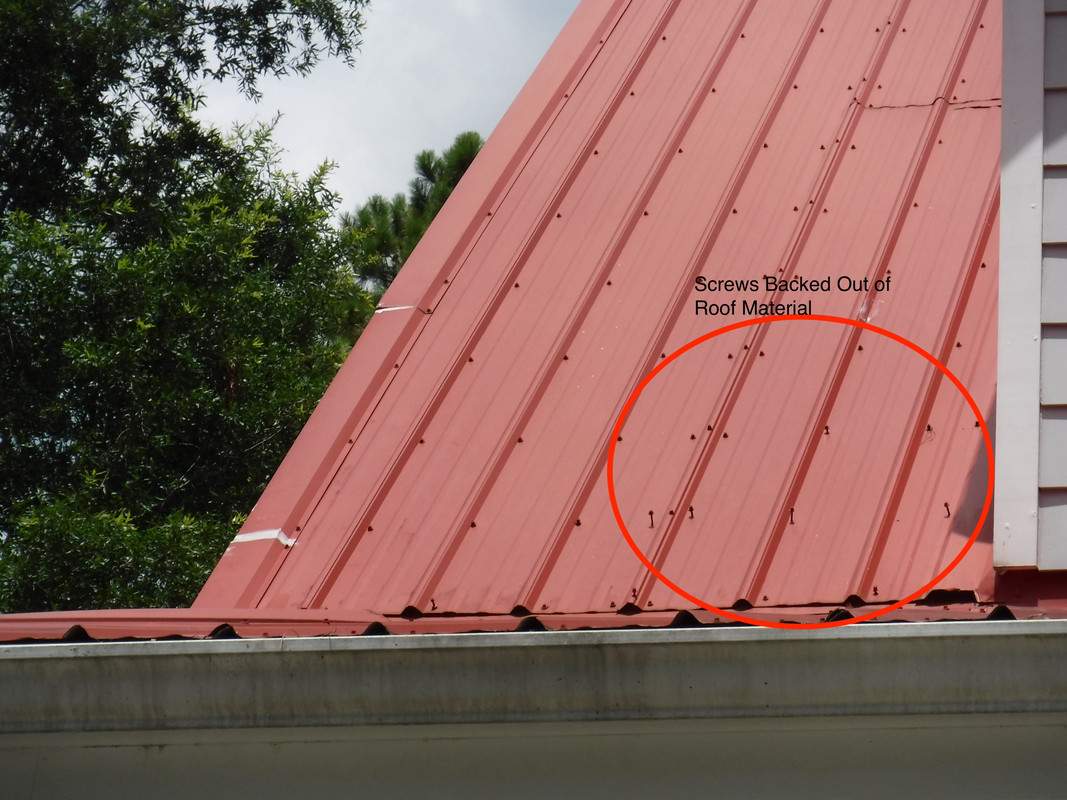 In response to my previous post it was suggested that the screws be replaced with larger (many one size up) screws and the use of liquid nails. I also did some addition research in the following months and found that the information given here was fairly well supported with the exception of the use of the liquid nails. I have put off any work on the project until now (well a few months ago). I did some additional research and began to contact some “contractors” to see if I can get the work done by someone who knew what they were doing. That was almost impossible. First group that responded wanted to replace the entire roofing system including the OSB material underlayment. The issue there, I was told, was that I had insulated the roof using spray in foam insulation between the rafters. That would have to be removed, we were told. 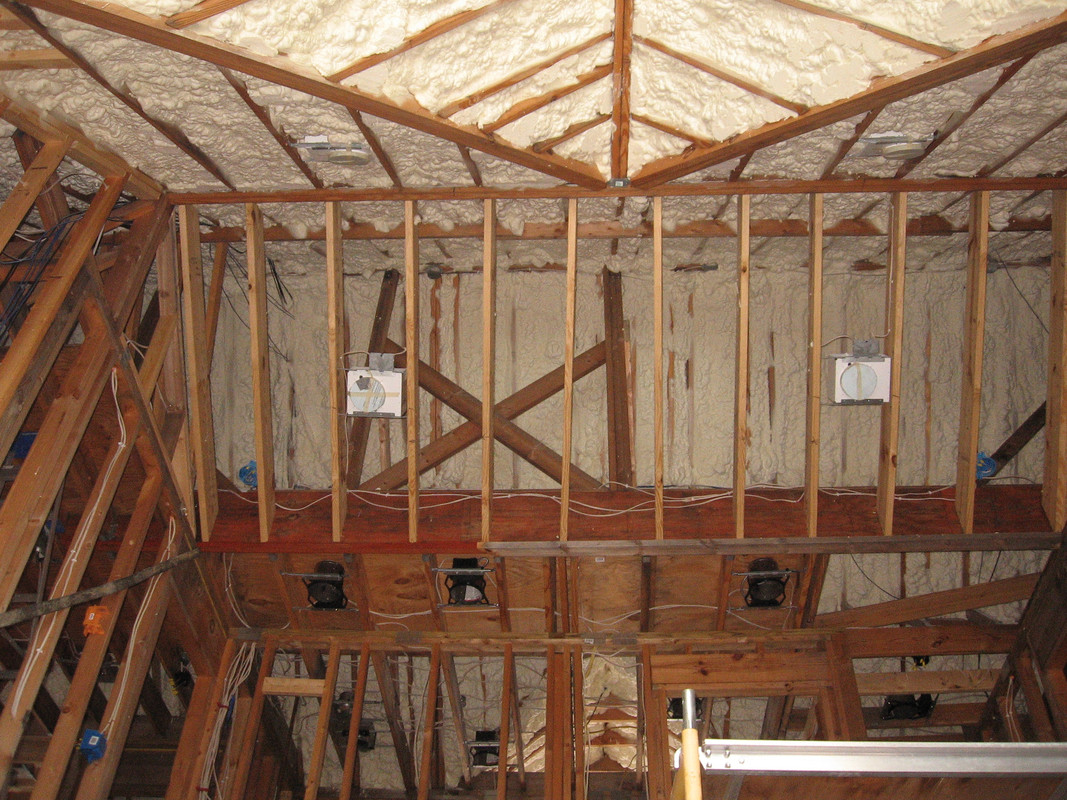 The cost, they suggested, would be $100,000. I never got a real estimate. And I am not sure it the new roof would be metal or asphalt shingles.
They have not contacted me since (been over a week). Second person that came out was licensed but worked for another contractor and this was to be sort of his “second” job. He suggested I replace the metal roof with asphalt shingles. But that would be in the September/October time frame, maybe. He said he would get back to me. Not happened yet. I contacted another group, they build homes and outbuildings and other structures (and was also recommend by our Church’s Pastor). We discussed the issue on the phone for a few seconds and he said basically “use new larger screws”. Again, the same as suggested here. He said he would check to see if he has some “larger” screws and mentioned something about Saturday. Well today is Saturday and no contact yet. He has an office here in town so I believe I will go make a visit next week to get some more information on what and how and when and cost. We have had no real rain here for the past week or two. So, the roof is dry and, with the roofing issue the way it is, I decided I could or would not wait any longer. I might be old but…. I purchased two sets of larger roofing screws from Lowes (size 9 and 12), got my scaffold, that I used to help build the house 15 years ago, got the scaffold boards, with the replaced wooden planking, assembled and waited for today. Not to hot (but humid), got dressed this morning and after coffee, I replace or reinstalled about 72 screws in the south facing part of the roof.
The north facing part of the roof has only two or three screws that are visibly no longer in direct contact with the roof. I will wait and see if the gentleman I spoke with on Thursday drops by today. If not, I might chat with him at church tomorrow. The screws involved from left to right:  Original Screws used to secure roof. Screws removed from the roof today and replaced Screws that were used to replace the above listed screws. The Scaffold used (purchased sometime in 2007). I do have the next level which I did use back then. 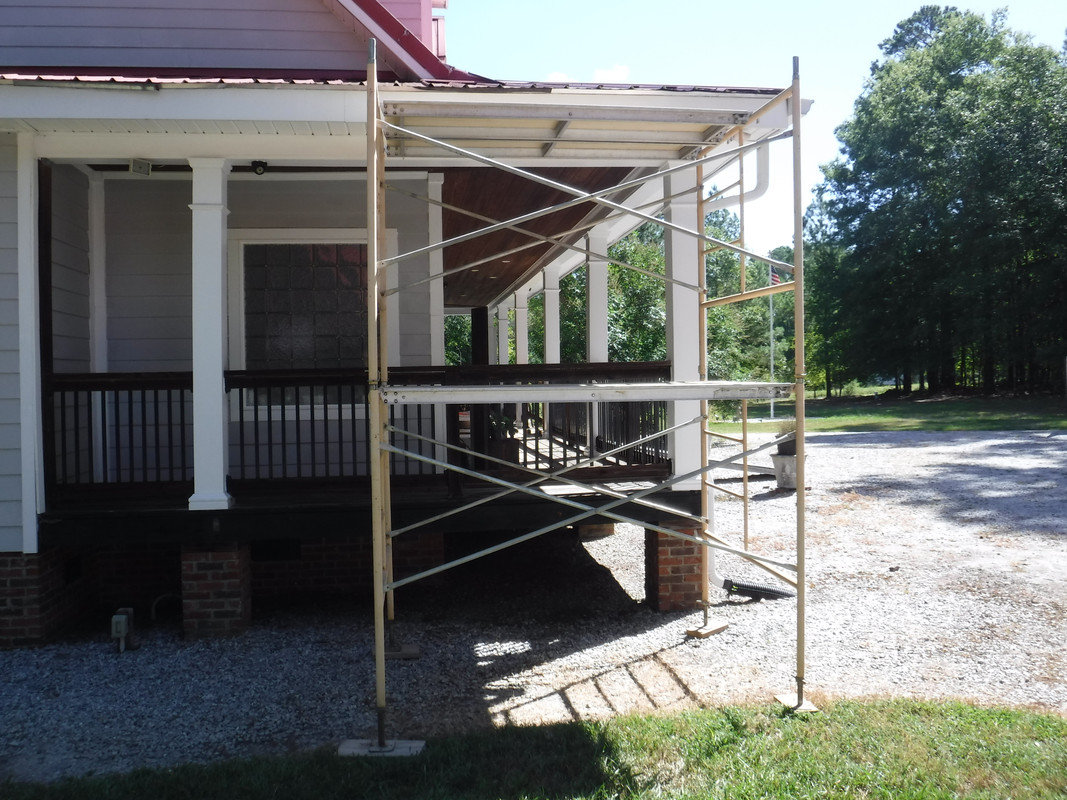 I am still in the investigation stage and looking or a competent "contractor" to discuss a long term solution (well for at least 10 years). |
|
|
|
|
 Logged
|
|
|
|
|
Jess from VA
|
|
« Reply #1 on: July 19, 2025, 09:26:13 AM » |
|
Bill, I'm no expert, but it sounds to me like the guys who want to tear everything off and SELL you a new roof are full of cowsh!t and just want to steal your money.
That is a beautiful roof, and if you have no chronic leaking or other trouble, it seems to me just replacing the backed out screws with larger ones (and maybe a bit longer for those that tap a rafter so they go deeper into wood than the old holes) should fix your problem.
You've replaced a bunch of them now, so are they satisfactorily tapping into your rafters (or something?) and pulling down tight?
Looking at the pictures, it appears there are more rows of roofing screw seams than rafters, so is only every other row of screws tapping a rafter and the alternate rows just tap the overlap in the steel roof panels? If so, perhaps different size and length replacement screws would be called for (for those alternate seams).
|
|
|
|
« Last Edit: July 19, 2025, 09:29:32 AM by Jess from VA »
|
Logged
|
|
|
|
|
Serk
|
|
« Reply #2 on: July 19, 2025, 09:30:47 AM » |
|
Wow. I've seen screws (And nails) get backed out, but those are SERIOUSLY backed out, looks more like a roof gremlin is crawling up there with a drill and doing that intentionally... (Have you tried putting a roof bell up there to ward off roof gremlins?  ) Sorry, nothing constructive to add, I'd also go with just replacing the screws first, seems by several orders of magnitude the least expensive option, and one you could maybe knock out yourself pretty easily with your setup? |
|
|
|
|
Logged
|
Never ask a geek 'Why?',just nod your head and slowly back away...  IBA# 22107 VRCC# 7976 VRCCDS# 226 1998 Valkyrie Standard 2008 Gold Wing Taxation is theft. μολὼν λαβέ |
|
|
Oss
Member

Posts: 12787
The lower Hudson Valley
Ossining NY Chapter Rep VRCCDS0141

|
|
« Reply #3 on: July 19, 2025, 09:54:46 AM » |
|
locktite? dont remember which color in combination with next larger size screw and is that a nylon washer?
|
|
|
|
|
Logged
|
If you don't know where your going any road will take you there
George Harrison
When you come to the fork in the road, take it
Yogi Berra (Don't send it to me C.O.D.)
|
|
|
|
|
|
carolinarider09
|
|
« Reply #5 on: July 19, 2025, 12:31:49 PM » |
|
So, I am impressed by the comments and questions. So, in order..... Bill, I'm no expert, but it sounds to me like the guys who want to tear everything off and SELL you a new roof are full of cowsh!t and just want to steal your money. Agreed but...... That is a beautiful roof, and if you have no chronic leaking or other trouble, it seems to me just replacing the backed out screws with larger ones (and maybe a bit longer for those that tap a rafter so they go deeper into wood than the old holes) should fix your problem. You've replaced a bunch of them now, so are they satisfactorily tapping into your rafters (or something?) and pulling down tight? They are pulling down tight, with one exception of the 73 or so I entered today. But I am confident that the screws are not entering the rafters. I did not mark the rafter locations on the OSB covering the roof.
I think the reason they are puling down tight is because they are sort of like sheet metal screw going its sheet metal. And until you do something to "stress" that area, they will tighten. I did have one today that I over tightened. I did not try and bull it out. So....... I do not know how "reliable" the "OSB" is.
The picture below shows how the roof was "planked" or "covered".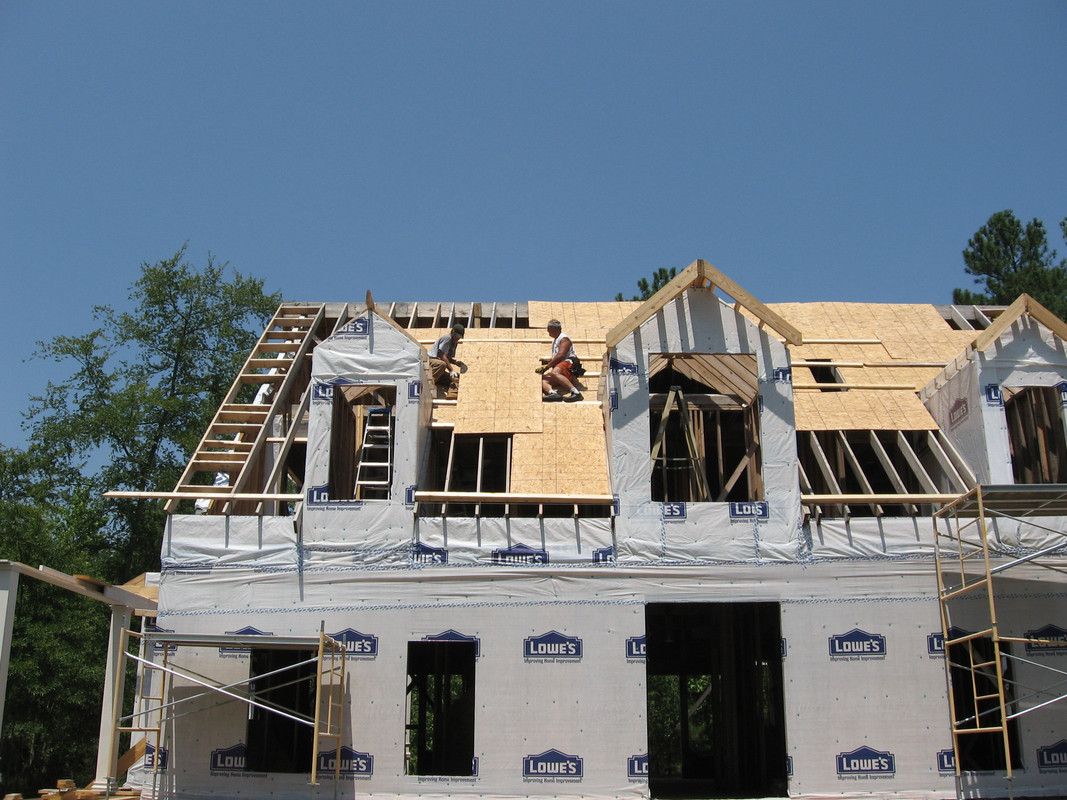 Looking at the pictures, it appears there are more rows of roofing screw seams than rafters, so is only every other row of screws tapping a rafter and the alternate rows just tap the overlap in the steel roof panels? If so, perhaps different size and length replacement screws would be called for (for those alternate seams). The above is a very interesting point. I did not mark the location of the rafters when I installed the metal roofing. I sort of followed the rules which has the screws going the area near a ridge. I will have go out and look but I know that the roof on the garage is plywood with the same roofing material I believe, in hindsight, that plywood is far more "sturdier" than OSB. Other two buildings have no "cover wood" so, as Jess suggests, the screws are into the "rafters". |
|
|
|
|
Logged
|
|
|
|
|
carolinarider09
|
|
« Reply #6 on: July 19, 2025, 12:36:37 PM » |
|
Wow. I've seen screws (And nails) get backed out, but those are SERIOUSLY backed out, looks more like a roof gremlin is crawling up there with a drill and doing that intentionally... (Have you tried putting a roof bell up there to ward off roof gremlins? ) Sorry, nothing constructive to add, I'd also go with just replacing the screws first, seems by several orders of magnitude the least expensive option, and one you could maybe knock out yourself pretty easily with your setup? The only issue is reading the screws that seemingly are "out" in the upper roof areas, which are steeper. The lower areas are not as steep. However,,,,,, It just dawned on me......... Ok, side story, last year I purchased a Drone. My wife does not know I have it. She was sort of against the idea. I have flown it several times (when she goes to town to buy groceries) but........now there seems to be a real good reason to fly it over the house and inspect the roof. So, that is the next task. I guess I can tell her I got it as a gift. No that would not work either. Very costly gift..... Ummmm oh well, life is full of .... |
|
|
|
|
Logged
|
|
|
|
|
carolinarider09
|
|
« Reply #7 on: July 19, 2025, 12:44:46 PM » |
|
locktite? dont remember which color in combination with next larger size screw and is that a nylon washer?
Darn, that never ever dawned on me (using locktite). Just for the record the only part of here screw that touches metal is the part next to and just below the washer. The best is embedded on the OSB. I cannot tell what the material on the new screw is below the washer It's black and feels like rubber but probably not real rubber. I think the original screws might have a "rubber' washer but.... I cannot tell just by looking. The materials feel similar but the new screws have a thicker "rubber" washer with a thin metal washer above. The new screws have the washer thing built into the screw head. Funny thing, if you look at the new screw, there is the head with attached washer, then the rubber washer, then a threaded area, then an area with no thread and then more threads. I wonder if they were designed to not back out because the threads are not complete end to end? |
|
|
|
|
Logged
|
|
|
|
Rams
Member
Posts: 16742
So many colors to choose from yet so few stand out
Covington, TN
|
|
« Reply #8 on: July 19, 2025, 12:44:53 PM » |
|
Screws for metal roofs loosen from normal expansion and contraction of the roof from temperature fluctuations. If the roofer used flexible washers they tend to become brittle over time.
Thermal expansion & contraction is the cause. And not every screw always loosens in my experience.
Some sealant squirted into the screw hole and reinsertion of the screw works well. But, if the screws are galvanized, not stainless steel, the acetic acid that is released by the curing silicone may corrode the screw. Use a caulk that emits no acetic acid (vinegar) odor.
Jess beat me to this but, in my experience, that expansion/contraction is precisely what causes that loose screw issue. Strong winds can also cause damage but, it normally results in much greater damage than just screws (or roofing nails) coming out. Larger/longer screws are the only answer I know of. This is because it's a metal roof and metal screws into wood, if this was an all-metal structure, longer would not be an appropriate answer because it wouldn't matter. Modern technology has made many significant improvements in the last century but, Mother Nature and physics still rule. My new shop uses metal (galvanized) screws and is also insulated with sprayed on closed cell insulation. I'm advised that I shouldn't have a similar problem in that it's all metal structure. I guess we'll see.  Rams |
|
|
|
« Last Edit: July 20, 2025, 07:28:05 AM by Rams »
|
Logged
|
VRCC# 29981
Learning the majority of life's lessons the hard way.
Every trip is an adventure, enjoy it while it lasts.
|
|
|
|
carolinarider09
|
|
« Reply #9 on: July 19, 2025, 12:46:02 PM » |
|
Thanks again Jess. I would do as you suggested when the next screws are replaced. |
|
|
|
|
Logged
|
|
|
|
|
Jess from VA
|
|
« Reply #10 on: July 19, 2025, 02:46:13 PM » |
|
Bill, I'm not trying to be critical or offensive (at all), but you need to do all your homework on this issue before you ever talk to a contractor. You do it, and write down all your questions for him based on your homework. With this knowledge, there's less chance of being buffaloed into overly expensive or invasive or unnecessary repairs.
If you don't think you can do all the work yourself.
|
|
|
|
|
Logged
|
|
|
|
|
carolinarider09
|
|
« Reply #11 on: July 19, 2025, 03:34:18 PM » |
|
Bill, I'm not trying to be critical or offensive (at all), but you need to do all your homework on this issue before you ever talk to a contractor. You do it, and write down all your questions for him based on your homework. With this knowledge, there's less chance of being buffaloed into overly expensive or invasive or unnecessary repairs.
If you don't think you can do all the work yourself.
Fully understood. I am glad or shall we say, "happy" to hear some of you thinking as I am regarding the cause and the potential resolution. It is sort of supposed by the fact that Lowes had these screws in two different sizes there on the shelf. Like it's sort of "normal" to need a bigger screw. As an aside, a handy man came out today to address another issue I want taken care of. He and I discussed the roof and one of the things he suggested was to have the roof "Pressure Washed" to remove the "black stuff" (mold I guess). I don't mind that thought but I wonder what effect a high pressure spray would have on this roof? |
|
|
|
|
Logged
|
|
|
|
LadyDraco
Member
Posts: 2041
TISE
Bastian, VA. Some of the best roads in the East
|
|
« Reply #12 on: July 19, 2025, 04:27:25 PM » |
|
The roof looks good to me , I would just replace the screws and if ya want to use loctight ,silicone,or something in the like do it..
|
|
|
|
|
Logged
|
Life is what you make of it~If it don't fit make alterations...
One does not speak unless one knows.
Never underestimate the power of a woman !
It's a Poor Craftsman who blames their Tools !
This is the way
|
|
|
|
Jess from VA
|
|
« Reply #13 on: July 19, 2025, 04:38:58 PM » |
|
Bill, I'm not trying to be critical or offensive (at all), but you need to do all your homework on this issue before you ever talk to a contractor. You do it, and write down all your questions for him based on your homework. With this knowledge, there's less chance of being buffaloed into overly expensive or invasive or unnecessary repairs.
If you don't think you can do all the work yourself.
Fully understood. I am glad or shall we say, "happy" to hear some of you thinking as I am regarding the cause and the potential resolution. It is sort of supposed by the fact that Lowes had these screws in two different sizes there on the shelf. Like it's sort of "normal" to need a bigger screw. As an aside, a handy man came out today to address another issue I want taken care of. He and I discussed the roof and one of the things he suggested was to have the roof "Pressure Washed" to remove the "black stuff" (mold I guess). I don't mind that thought but I wonder what effect a high pressure spray would have on this roof?Besides the PSI rating (how much power it has), most pressure washers come with a selection of wand tips (mine did). From wide fans to narrower fans and so on down to concentrated streams that will etch concrete. I think you would be OK if you use a fan nozzle and hold the sprayer tip well off the work; the idea being to use just enough pressure to clean the mold but not enough to damage your roof or fasteners. Also, there are likely some liquid cleaners specifically made for mold, but you don't want to discolor your roof either. Some pressure washers come setup to mix cleaners with the water. Doing a small roof area for a test first might also be wise. I've seen guys damage their concrete walks and driveways using pressure washers on them (burning off the float and exposing the fine aggregate beneath, which ages the concrete prematurely and opens it up to dirt and stain). What has worked for me for many years is to pick a day where very light intermittent rain or drizzle is predicted. I mix a gallon of bleach with a gallon of water and use a 2-gallon pump sprayer on fan tip setting to lay down the bleach, and as long as it stays wet the bleach and light rain does all the work for you. Any heavy rain will just wash it all away, and if it drys out, you use a hose on fan to keep it wet, and working. My 30yo concrete is white and looks like new (no pressure washer ever). Of course, this is concrete walks and driveways, not a red metal roof. |
|
|
|
|
Logged
|
|
|
|
|
Oldfishguy
|
|
« Reply #14 on: July 19, 2025, 08:19:44 PM » |
|
  A few years back I had hail damage on the shingles of this shed. I decided to put metal over the top of the shingles. I went to my local lumberyard/building supplies shop and asked for advice on a contractor. The local lumberyard knows what contractors pay the bills and are reliable and good. And it worked. The products were all purchased at the local lumberyard. Use the local lumberyards instead of the big box store. Maybe things have changed but I understand the screws go in the risers, not the valleys. Moisture rides in the valleys. There are 2 x 4’s running length wise under the screws for a solid base. And the butterfly pieces are so snow doesn’t slide off in a big sheet at once. (Minnesota winters). |
|
|
|
|
Logged
|
|
|
|
|
Hook#3287
|
|
« Reply #15 on: July 20, 2025, 05:42:33 AM » |
|
Well Jim, sorry to see your issue.
When researching metal roofing decades ago, the screw down type was 86'd when I saw they made a special tool to find the leaking screw. Since then the only place I'd suggest screw down metal is in agriculture uses.
You could just use larger screws and the ones you show do look better with the 4 wings on the shaft. I believe those are to attach the shaft to the relatively new/wet wood as it loses moisture and shrinks some, hopefully locking the screw in place.
Unfortunately, your rafters are probably all ready dried out.
But I'd be concerned your just kicking the can down the road.
I'd look at either total replacement with asphalt shingles or standing seam metal.
Or, Maybe explore covering what is already there.
Have you noticed any moisture getting into the roofing and spray insulation?
If so and it's only minor, once you stop adding to it, it may just dry out.
|
|
|
|
|
Logged
|
|
|
|
|
Hook#3287
|
|
« Reply #16 on: July 20, 2025, 05:50:50 AM » |
|
I don't believe any type of adhesive will halt the contraction and expansion Mother Nature uses to mess with us.
She will just scoff at the use and make the screws just unscrew anyways.
Imho.
|
|
|
|
|
Logged
|
|
|
|
|
carolinarider09
|
|
« Reply #17 on: July 20, 2025, 06:44:44 AM » |
|
Well Jim, sorry to see your issue.
When researching metal roofing decades ago, the screw down type was 86'd when I saw they made a special tool to find the leaking screw. Since then the only place I'd suggest screw down metal is in agriculture uses.
You could just use larger screws and the ones you show do look better with the 4 wings on the shaft. I believe those are to attach the shaft to the relatively new/wet wood as it loses moisture and shrinks some, hopefully locking the screw in place.
Unfortunately, your rafters are probably all ready dried out.
But I'd be concerned your just kicking the can down the road.
I'd look at either total replacement with asphalt shingles or standing seam metal.
I will consider this as part of the process of keeping the roof intact. It has been suggested by two others but, as I think I noted above, one just suggested $100,000 and never called back.
Or, Maybe explore covering what is already there.
Have you noticed any moisture getting into the roofing and spray insulation?
There is no indication of moisture getting into the spray insulation. The only moisture related issue that has been noted is located at the highest point of the roof and it was addressed by a roofing person a year or so ago. I will add some pictures later.
If so and it's only minor, once you stop adding to it, it may just dry out.
|
|
|
|
|
Logged
|
|
|
|
|
JimmyG
|
|
« Reply #18 on: July 20, 2025, 06:49:17 AM » |
|
Hey Bill, your post caught my eye because I went through exactly the same problem. I built my house back some 14 years ago and decked the roof with osb , put down metal rib , then foam sprayed the inside. Couple years later, screws started backing out. I then began the next twelve years watching and fixing as needed. You name it, I tried it. Two years ago, I threw up my hands and decided to go back to shingles.
Some background. I grew up doing carpenter work. I've put on several roofs over the years. This was the first metal roof I ever did. First mistake is I used OSB to deck the roof. OSB is not rated for metal roofs, I found out through research and help. Besides that, it does not allow enough air movement for the expansion and contraction of the metal. It really needs to be on purlins. the exact roof I built on two other structures I used purlins and they have remained as built with no screws backing out.
Now the bad: When I finally got sick and tired of chasing the problems, I contacted my friend who is a roofer and we discussed replacing my roof. Eliminate the metal, repairs areas where water intrusion damaged the osb. When he tore off the roof, we found several areas that had rotted osb, about three rafters that were rotting and had to be scabbed, and several rafter tails that were rotting and had to be scabbed in. I wound up replacing ten sheets of osb, repairing the rafters and the tail ends of a few. It was a disaster waiting to happen. Thank God I bit the bullet and tore that durn tin off.
I went back to a shingle roof. We put down Ice and water shield first, then the shingles. that was two years ago, and I now don't even give it a thought anymore. Every time I look at my roof, it is pretty as can be, no stupid screws pulling out. I blame myself for not building the roof right. I learned my lesson.
I hope you get yours resolved, be careful.
|
|
|
|
|
Logged
|
|
|
|
LadyDraco
Member
Posts: 2041
TISE
Bastian, VA. Some of the best roads in the East
|
|
« Reply #19 on: July 20, 2025, 06:59:38 AM » |
|
A few years back I had hail damage on the shingles of this shed. I decided to put metal over the top of the shingles. I went to my local lumberyard/building supplies shop and asked for advice on a contractor. The local lumberyard knows what contractors pay the bills and are reliable and good. And it worked. The products were all purchased at the local lumberyard. Use the local lumberyards instead of the big box store.
Maybe things have changed but I understand the screws go in the risers, not the valleys. Moisture rides in the valleys. There are 2 x 4’s running length wise under the screws for a solid base. And the butterfly pieces are so snow doesn’t slide off in a big sheet at once. (Minnesota winters).
You are correct all of my screws are in the highs and NOT the lows, this was when you roof rake there are no issues. My shop and over hangs are 20yrs old so far so good the house roof I have no idea maybe from 79 , Watch I just jinx my self LOL .. W90% of my life was metal roofing from this corgated spaced to Standing seam ( my favorite) A lost art.. Around here we call them snow birds they stop the snow from sliding off the roof in one huge piece. We had them on the standingseam roof, Not on this stuff.. corgated with wide flat spans. But I roof rake for big snows.. |
|
|
|
|
Logged
|
Life is what you make of it~If it don't fit make alterations...
One does not speak unless one knows.
Never underestimate the power of a woman !
It's a Poor Craftsman who blames their Tools !
This is the way
|
|
|
|
da prez
|
|
« Reply #20 on: July 20, 2025, 07:37:46 AM » |
|
The steel roofing I used as siding on the Rhinelander home had no screws exposed to the elements.
The standing seam would snap over the screws and it was a beautiful finish.
da prez
|
|
|
|
|
Logged
|
|
|
|
|
carolinarider09
|
|
« Reply #21 on: July 20, 2025, 12:17:05 PM » |
|
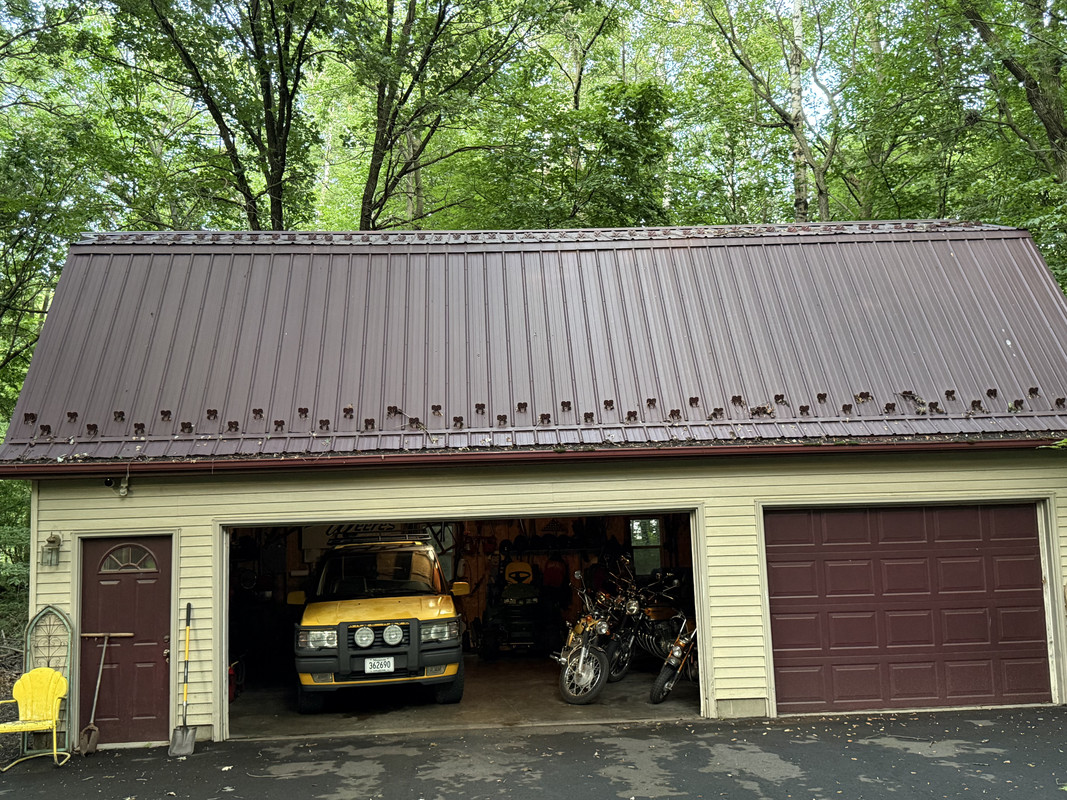
I truly appreciate all the comments. They are informative and provide some first hand information. Just a follow up on the issue and things I mentioned above. This is a page from the Metal Sales document regarding roof installation. The only thing I did not do was us a shorter screw in the “seam” area. Oh, and some of the screws were not placed in the precise area on the metal sheet as shown on the document below. 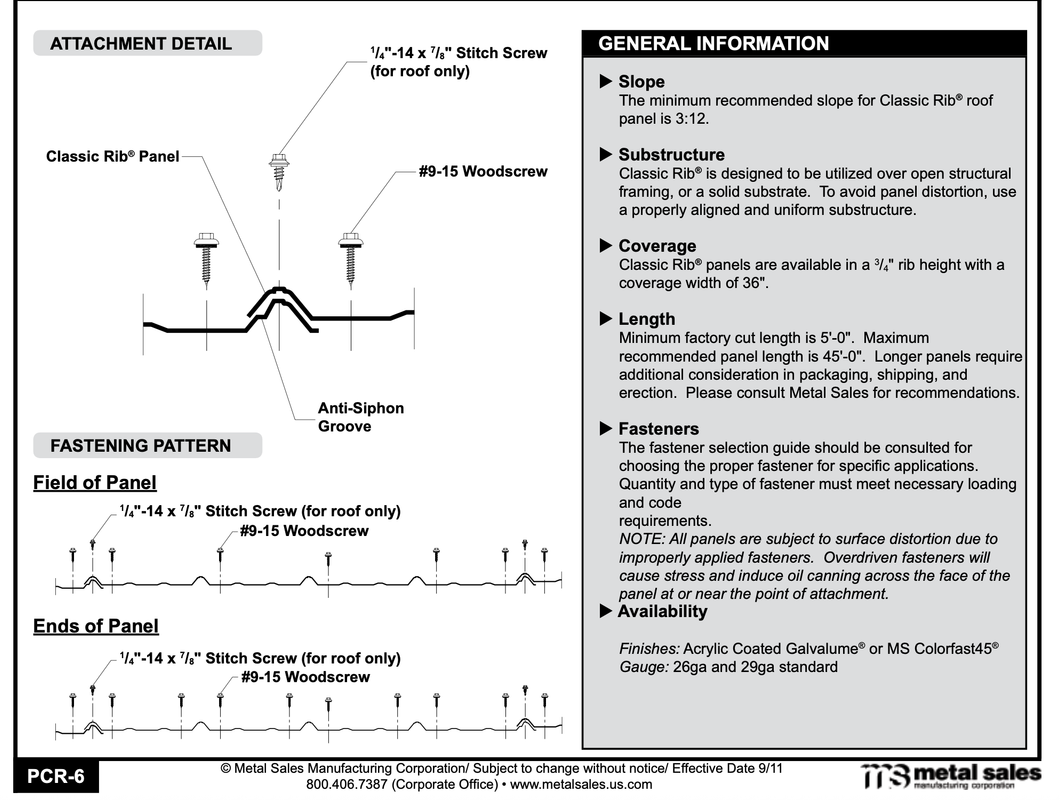 This shows the only area which might have had a “leak”. Hard to say what the cause was, but there was some black mold that showed up on the drywall just below this area. We contacted the local Metal Sales Dealer and they sent someone out to address the issue. As you can also see, it is not the highest point but, because of the interface between the two roofed areas it is a place that could trap liquid flowing down the roof. There is no way to see the underside in this area since the room ceiling is flush against the roofing rafters. 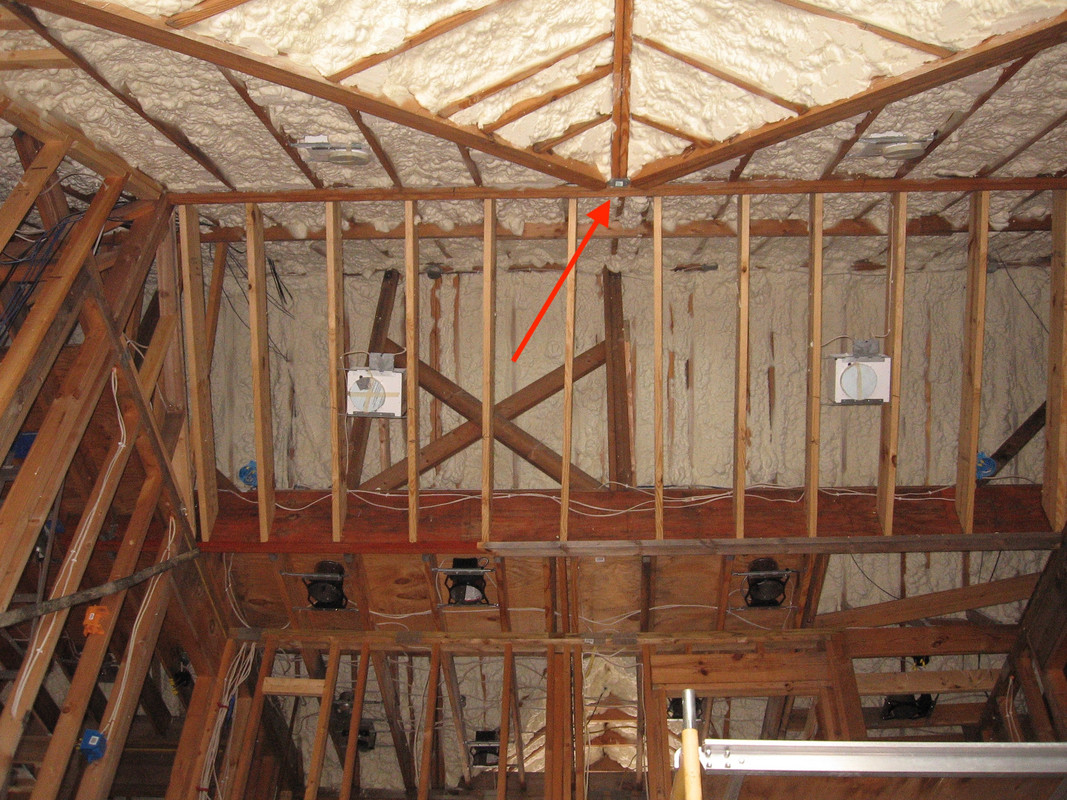 As you can also see, it is not the highest point but, because of the interface between the two roofed areas it is a place that could trap liquid flowing down the roof. There is no way to see the underside in this area since the room ceiling is flush against the roofing rafters. The arrow points to the area that is above the mold in the ceiling. Again, the mold has not grown since it was treated by someone from Metal Sales. 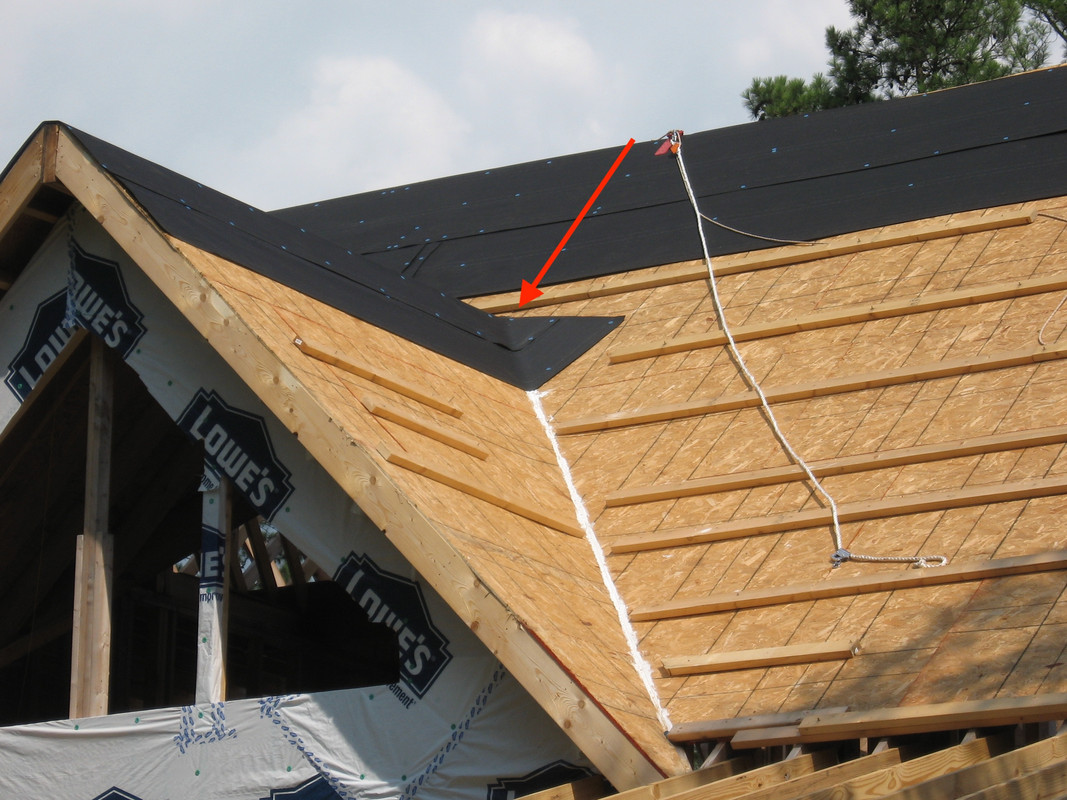 After reading the documentation from Metal Sales that I got back when I was using their metal roofing material, It was noted that the screws that they sold were size “9”. So, the screws I used to replace them with yesterday (Saturday) were size “10”. So, they meet the requirement of being at least one size bigger. Also, as I stated before, the roof being discussed faces south. The other metal roofed structures we have built do not face south but east or west. I will check again this week but, I have not seen any screws backing out of these buildings. That puts the use of OSB into question for use with metal roofs and screws. I did some addition research and, at least back then, OSB was considered acceptable for the use of Metal Roofs. But things do change over time. An example of another building on site built with same roofing material but plywood as an underlayment. And I did inspect the underside of the roof on this building today and there are some roofing screws that have penetrated the plywood sheeting and extend out into the inside of the building.  The same building 20 years later (taken today July 20, 2025). 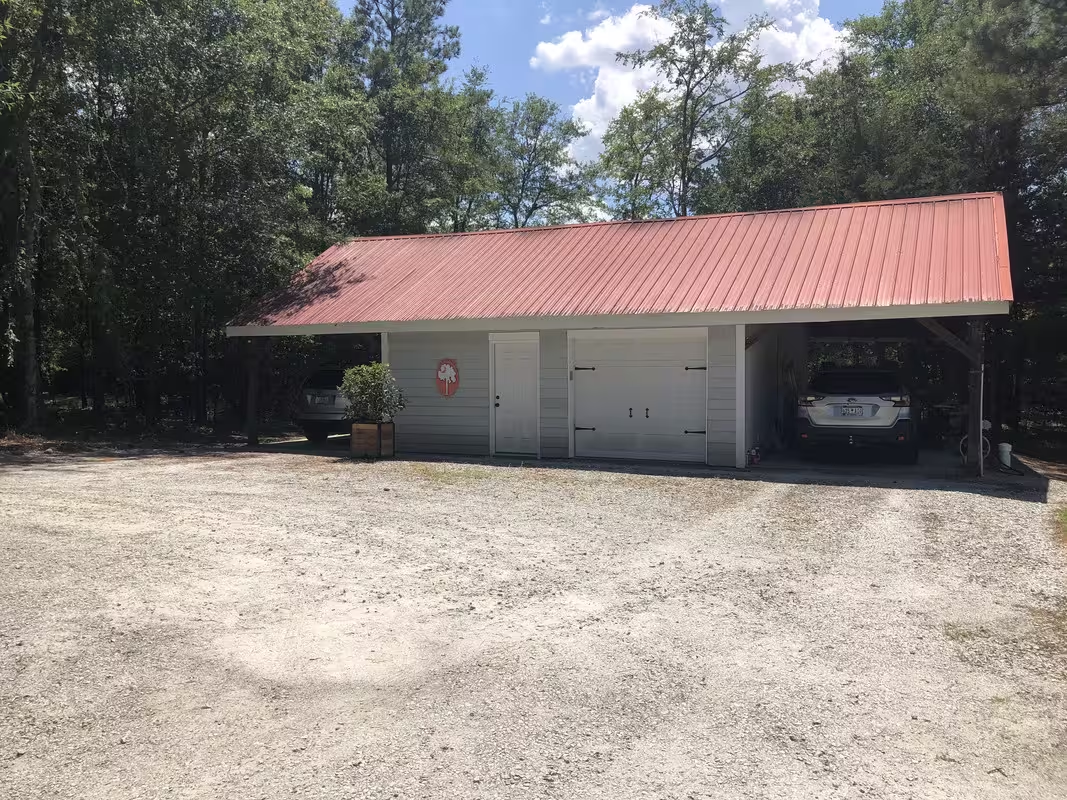 |
|
|
|
|
Logged
|
|
|
|
|
Hook#3287
|
|
« Reply #22 on: July 20, 2025, 03:49:19 PM » |
|
Jim, you have a beautiful home and I remember when you where building it. It sucks your having to deal with this issue now. It has been suggested by two others but, as I think I noted above, one just suggested $100,000 and never called back. Really, all your looking at is a new re-roof with some one going ahead and removing the metal first. I can't see that being $100K. If it was asphalt shingles originally, they would have to be removed first anyways, so removing the metal actually seems easier and reusable to some one building a barn or shed. You just need to find the right person that's not looking at you as an opportunity to cash in. There are so many variables involved in why the screws are "unscrewing" that the reason (s)? may never be found. Also, you may be able to use the new larger screws and call it a day w/o further issue. Who knows? If it were me, I'd do what JimmgG did, replace with some nice looking Architectural Shingles and forget about it for 35-50 years  If I remember correctly, OSB was approved as a under sheathing for the screw down, so I don't believe that is an issue. Also, the screw pattern for the metal panels is 1' OC, I believe, and your rafters look to be 16" OC, so you wouldn't hit but every 4'. Purlins are required and sheet goods work also as a alternative. |
|
|
|
|
Logged
|
|
|
|
Rams
Member
Posts: 16742
So many colors to choose from yet so few stand out
Covington, TN
|
|
« Reply #23 on: July 21, 2025, 06:44:07 AM » |
|
A few years back I had hail damage on the shingles of this shed. I decided to put metal over the top of the shingles. I went to my local lumberyard/building supplies shop and asked for advice on a contractor. The local lumberyard knows what contractors pay the bills and are reliable and good. And it worked. The products were all purchased at the local lumberyard. Use the local lumberyards instead of the big box store. Maybe things have changed but I understand the screws go in the risers, not the valleys. Moisture rides in the valleys. There are 2 x 4’s running length wise under the screws for a solid base. And the butterfly pieces are so snow doesn’t slide off in a big sheet at once. (Minnesota winters). Having re-roofed quite a few buildings in my lifetime. I agree with the placement of the screws holding the metal secure should be on the ribs on stick-built structures. But, in the case of metal structures where the actual structural beams are on (average) 5-foot center, those ribs will almost never be where the beams are at so, screwing to the beams will have to be in the lower part of the metal roof. That's why the screws have soft water seal washers (normally rubber, I think) to keep that rain/moisture from seeping in. Those rubber washers will eventually show their age and deteriorate resulting in a leak. I've been advised that the best way to avoid this issue is to have the entire roof coated. This is something that I'll probably need to have done at some point in the future on my new shop. Also, closed cell (sprayed on) insulation will not normally let that moisture come on through so, about the only thing I believe one can do is to monitor such roofs for signs of leakage/loose screws. Feel free to correct or inform me if there's a better way of addressing such things. Rams |
|
|
|
|
Logged
|
VRCC# 29981
Learning the majority of life's lessons the hard way.
Every trip is an adventure, enjoy it while it lasts.
|
|
|
|
Oldfishguy
|
|
« Reply #24 on: July 21, 2025, 07:18:01 AM » |
|
A few years back I had hail damage on the shingles of this shed. I decided to put metal over the top of the shingles. I went to my local lumberyard/building supplies shop and asked for advice on a contractor. The local lumberyard knows what contractors pay the bills and are reliable and good. And it worked. The products were all purchased at the local lumberyard. Use the local lumberyards instead of the big box store. Maybe things have changed but I understand the screws go in the risers, not the valleys. Moisture rides in the valleys. There are 2 x 4’s running length wise under the screws for a solid base. And the butterfly pieces are so snow doesn’t slide off in a big sheet at once. (Minnesota winters). Having re-roofed quite a few buildings in my lifetime. I agree with the placement of the screws holding the metal secure should be on the ribs on stick-built structures. But, in the case of metal structures where the actual structural beams are on (average) 5-foot center, those ribs will almost never be where the beams are at so, screwing to the beams will have to be in the lower part of the metal roof. That's why the screws have soft water seal washers (normally rubber, I think) to keep that rain/moisture from seeping in. Those rubber washers will eventually show their age and deteriorate resulting in a leak. I've been advised that the best way to avoid this issue is to have the entire roof coated. This is something that I'll probably need to have done at some point in the future on my new shop. Also, closed cell (sprayed on) insulation will not normally let that moisture come on through so, about the only thing I believe one can do is to monitor such roofs for signs of leakage/loose screws. Feel free to correct or inform me if there's a better way of addressing such things. Rams There is no perfect way to do this. Standing seem is by far the best, but the price is significantly higher. This is a simple unheated cold storage shed. Instead of removing the 20 year old hail damaged shingles under the metal, we kept them in place. There are 2 x 4's nailed to the rafters length wise where ever one sees screws. The metal screws then can find a solid home (and look uniform through out). The down side is the metal is lifted off the 2 x 4's by the 11/2 inch lift, so there is spacing under the metal. The shed is not insulated and it has not sprung a leak yet, but time will tell. The cost was similar to new asphalt shingles, maybe 15% higher from what I remember, and a lot less mess. Again, a recommended contractor by a local lumber yard; that was the key I believe. I have standing seem color matching metal on my house in a few places, really just for decorative purposes. The house is a hip roof design and would have cost a fortune to do the entire house with standing seem. And I was advised against it as with various valleys no one was comfortable with long term water leakage. And now the insurance issue: I was advised this last year that my insurance company (State Farm) that they would no longer replace a metal roof with hail dings (unless it penetrated the metal). But for a premium increase of a pretty sizable amount they would still cover ding damage and replace. I can't say I blame them, most insurance companies have taken huge payouts recently just on hail damage. |
|
|
|
|
Logged
|
|
|
|
|
Jess from VA
|
|
« Reply #25 on: July 21, 2025, 09:09:01 AM » |
|
After I replaced my whole roof (small split level 2-roof home, shingles) with a lot of plywood replacement sheeting, which was too dang thin (the thing is bouncy), I developed a small leak right over my dining room table on the one story side. Everyone wanted to replace the whole roof, but I finally found a guy who just tore the roof off up to the leak (6 feet or so). He got identical park bench green shingles and you could not see the repair when he was done. 15 years ago, and no repeat. I did a half ass job fixing the little drywall ceiling leak, and you can see where it was because it has a whiter shade of white paint on it.  I rarely look at it, so it's all good. The entire house (except one bathroom) needs new paint, but I'm not doing it. I keep the lights low (which is a lot less work). I painted my way through college (9 summers in steel mills with a lot of climbing in high places). It paid really well, but it was hard and dangerous work. So I've never been a fan of painting ever since. I had two 8 X 10 wood sheds built at the back of my property line (arrived partially assembled), with shingle roofs over 30 years ago. Both came with really crummy shingles and both leaked after 7-8 years. The new shingle roofs each cost more than the whole shed did. They're better roofs than my house. |
|
|
|
|
Logged
|
|
|
|
|
Jersey mike
|
|
« Reply #26 on: July 21, 2025, 10:14:45 AM » |
|
OSB is difficult to rescrew into even with a larger screw. CDX is a bit more forgiving and there’s more bite.
One way I’ve found that helps is to find a dowel that snugly/tight fits the screw you are replacing and liberally use an exterior wood glue to glue it into place, give it plenty of time to dry, maybe 12 hours.
It may be necessary to open the original hole up some for a larger dowel to be used, but the dowel need to be tight/snug going in along with the exterior wood glue.
It may take some trial and error cut the dowel and to set the dowel at the proper depth below the metal roof and level to sheathing.
You may be able to find large plastic plugs to insert into the original hole as well if going the route of using dowels doesn’t work for you.
If you go this route, you’ll need to drill pilot holes into the dowel to help get the screw started and keep the glue from breaking loose when torquing the screw down.
|
|
|
|
|
Logged
|
|
|
|
LadyDraco
Member
Posts: 2041
TISE
Bastian, VA. Some of the best roads in the East
|
|
« Reply #27 on: July 21, 2025, 12:10:29 PM » |
|
LOL After looking at my house roof it is not the same as the buildings we added 20 yrs ago.. The house roof is like yoursScrews in the low right next the highridge. Hmmm https://youtu.be/krD4hdGvGHM?t=2 |
|
|
|
|
Logged
|
Life is what you make of it~If it don't fit make alterations...
One does not speak unless one knows.
Never underestimate the power of a woman !
It's a Poor Craftsman who blames their Tools !
This is the way
|
|
|
|
carolinarider09
|
|
« Reply #28 on: July 24, 2025, 08:11:50 AM » |
|
OSB is difficult to rescrew into even with a larger screw. CDX is a bit more forgiving and there’s more bite.
One way I’ve found that helps is to find a dowel that snugly/tight fits the screw you are replacing and liberally use an exterior wood glue to glue it into place, give it plenty of time to dry, maybe 12 hours.
It may be necessary to open the original hole up some for a larger dowel to be used, but the dowel need to be tight/snug going in along with the exterior wood glue.
It may take some trial and error cut the dowel and to set the dowel at the proper depth below the metal roof and level to sheathing.
You may be able to find large plastic plugs to insert into the original hole as well if going the route of using dowels doesn’t work for you.
If you go this route, you’ll need to drill pilot holes into the dowel to help get the screw started and keep the glue from breaking loose when torquing the screw down.
I would (no pun intended) like to try some "plastic wood" to see how it drys in OSB and what happens when I put t roofing screw in. The issue would be having to leave the screw out while the "stuff" drys. If I used a "dowel", I would have to glue it in place before drilling for screw insertion. Also, getting the dowel in could be a problem since you have the screw hole in the metal roof to navigate. Using a small dowel might work that would slide through the hole. Just some of my thoughts. Any ideas are good ideas because its simulates discussion and analysis which help better to understand the the problem and potential corrective actions. |
|
|
|
|
Logged
|
|
|
|
|
carolinarider09
|
|
« Reply #29 on: July 24, 2025, 08:14:33 AM » |
|
Drone Roof Inspection I have no idea why I did not consider this before. I have this Drone. It has a 4K video camera. I can sort of fly it (still learning a lot but….. I need to use it more). So, this morning I got out my DJI Drone. Got out my new self made “Launching Pad”, re-read the instructions on startup and use, made sure the drone’s battery and the Controller’s battery was fully charged and set off to see what I could see. The two videos linked below show the Drone’s eye view of the metal roof. I edited the videos to make them just show the roof. I was looking for issues with loose screws and any other potential problems. I should have probably used the camera (still image) and taken single phots to allow them to be enlarged. Will do that next time. I could see not real issues with the roof. No major things that said, “REPLACE ME NOW”. But this is my first inspection and I am not trained. In the second video at time 0:55, is the issue that resulted (we believe) in some black mold forming in the roof peak (inside the house) of the Great Room. I will go back tomorrow and attempt to do better and take “still” images instead of a video. And yes, if the issues on the front roof are the only issues, I think the next step is to use the Drone to take some still images to verity the need for a replacement roof. The main issue I have is “inspection” for potential leakage and other issues. Because the roof is insulated with blown in foam, it is impossible to see any leakage unless the foam itself is “discolored”. I have not seen any discolored foam in the area in question (Front Roof). When I do go into the “attic” the space with the issues (roof screw) is almost fully visible from the “access point”. But I will look again coming days. And tomorrow I will try taking still images for better inspection. Oh, the videos were taken (the specs say) in 4K but Rumble default playback resolution is not 4K. So, you have to select 4K using the “Gear” icon at the boot of the playback videos screen. https://rumble.com/v6wmg44-roof-inspection-july-24-part-one.htmlhttps://rumble.com/v6wmg7c-drone-roof-inspection-part-2.html |
|
|
|
|
Logged
|
|
|
|
|
bassman
|
|
« Reply #30 on: July 24, 2025, 08:41:39 AM » |
|
Have you come up with a good explanation where the drone came from? |
|
|
|
|
Logged
|
|
|
|
|
carolinarider09
|
|
« Reply #31 on: July 24, 2025, 08:51:39 AM » |
|
Have you come up with a good explanation where the drone came from? Not yet.... Still working on that.  |
|
|
|
|
Logged
|
|
|
|
|
Jersey mike
|
|
« Reply #32 on: July 24, 2025, 11:33:01 AM » |
|
OSB is difficult to rescrew into even with a larger screw. CDX is a bit more forgiving and there’s more bite.
One way I’ve found that helps is to find a dowel that snugly/tight fits the screw you are replacing and liberally use an exterior wood glue to glue it into place, give it plenty of time to dry, maybe 12 hours.
It may be necessary to open the original hole up some for a larger dowel to be used, but the dowel need to be tight/snug going in along with the exterior wood glue.
It may take some trial and error cut the dowel and to set the dowel at the proper depth below the metal roof and level to sheathing.
You may be able to find large plastic plugs to insert into the original hole as well if going the route of using dowels doesn’t work for you.
If you go this route, you’ll need to drill pilot holes into the dowel to help get the screw started and keep the glue from breaking loose when torquing the screw down.
I would (no pun intended) like to try some "plastic wood" to see how it drys in OSB and what happens when I put t roofing screw in. The issue would be having to leave the screw out while the "stuff" drys. If I used a "dowel", I would have to glue it in place before drilling for screw insertion. Also, getting the dowel in could be a problem since you have the screw hole in the metal roof to navigate. Using a small dowel might work that would slide through the hole. Just some of my thoughts. Any ideas are good ideas because its simulates discussion and analysis which help better to understand the the problem and potential corrective actions. I didn’t think about the original hole in the steel roof, that could cause an issue trying to insert a dowel. I don’t know about plastic wood, never used it but I have used 2 part epoxy which may work and dries in 10 minutes or so and have seen it in a syringe type applicator. How well it would work on OSB I’m not too certain but with a little experimenting it could be a good solution. |
|
|
|
|
Logged
|
|
|
|
|
bassman
|
|
« Reply #33 on: July 24, 2025, 11:52:51 AM » |
|
I would think a loose fitting dowel with some glue/adhesive through the steel into the wood might be enough to put the screw into the existing hole. Don't think it HAS to be a tight fit but a woodworking expert could correct me. I've used toothpicks for much smaller holes around the inside of the house and they seem to work - NOT suggesting toothpicks for your purposes! Good luck!
|
|
|
|
|
Logged
|
|
|
|
|
carolinarider09
|
|
« Reply #34 on: July 24, 2025, 12:39:46 PM » |
|
I just took a few minutes to more closely look at the video I posted above. I did not know (well I guess I never tried) you could "blow up" the video providing a bigger image.
Anyway, while I was looking at the original video, I thought I saw several locations on the upper front roof that had missing screws. After "blowing up" the image (video) I noticed that these were not missing screws just a color issue.
So, I am going to (rather than go back and take still pictures) "blow up" the image/video and go over the information very slowly to make sure I know the true extent of the issue. (well the best I can with out climbing up the heavily sloped roof).
|
|
|
|
|
Logged
|
|
|
|
|
Jess from VA
|
|
« Reply #35 on: July 24, 2025, 01:18:08 PM » |
|
Bill, I think you're on the right track. Do your homework, maybe try a few different repair experiments (of small areas), to see what seems to work best. Then pick one and go with it. You do not need a new 40 year roof (or that kind of huge expense). Very few of us have 40 years left. I'm in great shape at 72, but it seems doubtful I'll see 112. |
|
|
|
|
Logged
|
|
|
|
|
carolinarider09
|
|
« Reply #36 on: July 25, 2025, 11:08:59 AM » |
|
Just for the recored, today I went out (while the wife was out shopping) and after riding my ST1300 and Goldwing just to give them some "pleasure, and I did try and ride the Valkyrie first but the Clutch did not respond so I need to investigate that , I tried the Drone thing again.
This time I made an error during startup that shifted the image from landscape to portrait, but, in hindsight that was a good move.
I took the drone out and flew it very close to each section of the roof, front and back.
I then took the videos and inspected them in the highest magnification possible on my computer.
I did not find another issue with "loose screws" that I did not already know about. But I will do it again (the review of the video) to ensure I see everything.
But, if the only issue I have is two or three screws that remain and issue ( I cannot reach them personally) I will probably put the use of the drone inspection on a "six month schedule".
We will be going to spend a week in Nags Head, with my two daughters, grandson (and his girl friend) and my oldest daughter's husband who is wheelchair bound, next month. It was my intent to spring the drone out on the family then. It would seem to be a cool thing to do at the beach. So..... we shall see.
Back to the subject at hand. I will re-review the videos in the coming days to ensure I saw all I can.
Then in the coming days or weeks (cataract surgery in August) I will endeavor to find someone I can consult with and, using the videos as "evidence", I will ask their opinions.
We shall see....
Again, I truly appreciate and respect all the comments and suggestions. It is what helps make a project successful.
Thanks again.
|
|
|
|
|
Logged
|
|
|
|
|


