strawbobrob
Member

Posts: 49
It's all in the wrist.
Location: Earth . . . still.
|
 |
« on: July 08, 2011, 06:27:00 AM » |
|
Two days ago I noticed a slight shudder coming off the line in 1st gear. Didn't like that because I'd never experienced it before so I knew it wasn't good. It went away. Yesterday it came back, more pronounced, and now does it every time coming off the line. Then an odd thing happened. The release point started moving around. The release point has always been near the top (far from the grip), and it suddenly moved very close to the grip. Then it moved back out again. Approaching one red light, the release point was out in its usual place. While waiting for the light, there was a light <clunk> and the bike jerked forward slightly, and when I took off, the release point had moved back in. Now the release point is very close to the grip, and to make matters more kooky, my clutch lever will not pull all the way in to touch the grip--it stops hard about 1/2" to 3/4" away. All this happened while riding approximately 100 miles over 2 days. I've decided to declare him sick, let him rest today, and call the doctors. '99 Standard, 80K miles, no trailer, no burnouts, etc.
|
|
|
|
|
 Logged
|
|
|
|
|
six2go #152
|
|
« Reply #1 on: July 08, 2011, 06:45:05 AM » |
|
You're gonna get a lot of different responses on this, but this is EXACTLY how my clutch started acting a couple of years ago and this is what fixed mine..........."new clutch." The clutch rivets had sheared off.
Now unlike a lot of members here, I have a great servicing dealer so that's where I took it to be torn down(I don't do that type of work).
After tearing it down, I was told what new parts would be needed and how much $$. Instead of just replacing the bad parts I told them to just put in an entire new clutch assembly(the bike had 86,000 miles at that time). With the new clutch, the Valk has been like new since that time(well, there was that petcock issue) and going down the road as it should.
|
|
|
|
|
Logged
|
|
|
|
strawbobrob
Member
Posts: 49
It's all in the wrist.
Location: Earth . . . still.
|
|
« Reply #2 on: July 08, 2011, 07:10:50 AM » |
|
Crap. But thanks for letting me know. Do you recall what the dealer charged?
|
|
|
|
|
Logged
|
|
|
|
Joe Hummer
Member
Posts: 1645
VRCC #25677 VRCC Missouri State Representative
Arnold, MO

|
|
« Reply #3 on: July 08, 2011, 07:17:15 AM » |
|
When mine started chattering like that, I replaced the clutch disks and pressure plate myself. The job wasn't too bad but you do need a couple of special tools. Check the forum for information on changing the clutches out if you want to try to tackle the job yourself.
Joe
|
|
|
|
|
Logged
|
1999 Valkyrie Interstate
You pay for the whole bike, why not use it Jerry Motorman Palladino
|
|
|
dalai-lama
Member
Posts: 402
Wish I was out riding...
Watertown CT
|
|
« Reply #4 on: July 08, 2011, 07:54:21 AM » |
|
Exactly the symptoms mine had at 37K and the pressure plate was shot. The springs bunch up causing a different thickness point which will cause the clutch engagement point to change. The good news is that the replacement has lasted 79K miles  And others are correct, it is not that bad of a job to do yourself. the dalai |
|
|
|
|
Logged
|
the dalai
|
|
|
strawbobrob
Member
Posts: 49
It's all in the wrist.
Location: Earth . . . still.
|
|
« Reply #5 on: July 08, 2011, 08:09:07 AM » |
|
Well, with that little bit of encouragement (and the additional motivation of a skinny wallet), I'll look into doing it myself. Thanks.
|
|
|
|
|
Logged
|
|
|
|
Valker
Member
Posts: 2991
Wahoo!!!!
Texas Panhandle
|
|
« Reply #6 on: July 08, 2011, 08:12:27 AM » |
|
The dealer in Amarillo charged a riding pal $400 to replace his for the same reason.
|
|
|
|
|
Logged
|
I ride a motorcycle because nothing transports me as quickly from where I am to who I am.
|
|
|
|
|
|
|
strawbobrob
Member
Posts: 49
It's all in the wrist.
Location: Earth . . . still.
|
|
« Reply #9 on: July 08, 2011, 05:56:02 PM » |
|
Thanks to the five of you who responded with advice and comments and threads. I've never even seen a motorcycle clutch before but I'm going to make the attempt. ...Where's the emoticon with the guy praying?
|
|
|
|
|
Logged
|
|
|
|
strawbobrob
Member
Posts: 49
It's all in the wrist.
Location: Earth . . . still.
|
|
« Reply #10 on: July 08, 2011, 05:57:54 PM » |
|
5=6  |
|
|
|
|
Logged
|
|
|
|
|
Farther
|
|
« Reply #11 on: July 08, 2011, 06:01:33 PM » |
|
Where's the emoticon with the guy praying?
That would be on the other forum! |
|
|
|
|
Logged
|
Thanks,
~Farther
|
|
|
|
DFragn
|
|
« Reply #12 on: July 08, 2011, 06:21:20 PM » |
|
Yep, your dampener plate rivets are failing and stacking. the more the springs [flat type] stack the less function your lever will supply. You could reach a point where your lever barely disengages the clutch plates. You can see 3 springs stacked here on mine due to failed rivets. The bike had become virtually unrideable. If allowed to go too long you can damage the clutch basket. As this was, my friction plates were about half worn @ 55k miles, but I replaced the friction plates as well as the dampener plate. Also, the bearing and clutch spring just for grins.   |
|
|
|
« Last Edit: July 08, 2011, 06:30:53 PM by DFragn »
|
Logged
|
|
|
|
strawbobrob
Member
Posts: 49
It's all in the wrist.
Location: Earth . . . still.
|
|
« Reply #13 on: July 09, 2011, 09:38:12 AM » |
|
Nothing's happened in the garage yet, but I've spent an hour going over the links and the pics You've all provided. Thanks again, it's been very helpful. Using the prices on the Hondaline fische, the parts recommended come to $300--should I also replace/do anything with the slave cylinder while I'm rebuilding the clutch or leave it alone? Also, is there any value to replacing the rubber clutch line with braided steel?
|
|
|
|
|
Logged
|
|
|
|
|
DFragn
|
|
« Reply #14 on: July 09, 2011, 11:46:02 AM » |
|
Nothing's happened in the garage yet, but I've spent an hour going over the links and the pics You've all provided. Thanks again, it's been very helpful. Using the prices on the Hondaline fische, the parts recommended come to $300--should I also replace/do anything with the slave cylinder while I'm rebuilding the clutch or leave it alone? Also, is there any value to replacing the rubber clutch line with braided steel?
Slave should be fine, though be sure to lube the slave pin when you reassemble the slave cylinder. Any grease, hi-temp or not or Moly paste will be fine on the slave pin. Clutch line - inspect it for checking, rot or signs of serious aging. If you feel a need to replace it OEM is just fine. SS braided clutch lines aren't as effective as they are on brake lines and IMHO not necessary unless you matching SS brake lines for aesthetics. Oh yeah, if your not aware - be sure to soak new friction plates in motor [I used my old oil] oil for several hours before installation, overnight is best. Minimum 2-3 hours is ok. An impact wrench is the easiest method to remove/install the staked basket nut. A rear case gasket replacement is generally not required. If you need a service manual - free download from Dag in Norway http://www.valkyrienorway.com/download.html |
|
|
|
« Last Edit: July 09, 2011, 11:49:05 AM by DFragn »
|
Logged
|
|
|
|
houstone
Member
Posts: 377
Can't get enough...
Santa Fe, TX
|
|
« Reply #15 on: July 10, 2011, 02:44:41 AM » |
|
I "marinated" new disks in a ziplock bag. Didn't need near as much oil that way! This seemed a lot easier than installing an alternator...just sayin'!
Good luck!
Jeff
|
|
|
|
|
Logged
|
|
|
|
|
F6Dave
|
|
« Reply #16 on: July 10, 2011, 09:20:27 AM » |
|
As you've probably already read, I replaced my clutch 2 weeks ago. Valkpilot's ( http://www.valkyrieforum.com/bbs/index.php/topic,20870.0.html) post is great, I used it more than the manual. I also posted some pictures and info about my experiences ( http://www.valkyrieforum.com/bbs/index.php/topic,30038.0.html) focusing more on the shortcuts and special tools I used. Overall, the job was much easier than I expected. It does take a lot of time, but a lot of that was because I wanted to be careful and methodical as I hadn't worked on a clutch in many years. As for the clearance, when you first look in there it looks really tight, but once you have the bike on a lift with the kickstand out of the way there's plenty of room. BTW, the only special tools I needed were easily made from hardware store items. I did upgrade my cheap old snap ring pliers to some better ones. As for parts, I only replaced the friction plates, the damper plate, and the diaphram spring. The steel plates were just fine. I measured the old spring and it was still well within the specs in the manual so I could have reused it, too. In reality, everything except the damper plate rivets were in great shape. Quite impressive for 149,000 miles! |
|
|
|
|
Logged
|
|
|
|
strawbobrob
Member
Posts: 49
It's all in the wrist.
Location: Earth . . . still.
|
|
« Reply #17 on: July 12, 2011, 11:31:55 PM » |
|
This tech board is amazingly good. You all diagnosed exactly what was wrong with my clutch, and with the threads, the pics, and the 'watch out for's and 'remember this's and 'in case you didn't know' which I didn't, I've got the clutch out and completely disassembled on my workbench. 4 rivets sheared off, just like you all said. Spring plates all bunched up, just like you all said. I've got a couple decisions to make on whether to replace the two friction rings on both sides of the damper plate that got torn up by the busted rivets, or all of them, or all of them plus the steel rings. I'm going to rebuild the slave cylinder for no good reason except I want to, and I'll replace the other recommended items. Going to sleep very happy tonight. Here's some value-added to the thread I think that some will enjoy. In addition to the ingenious ways you all used to compress the stack in order to remove/reinstall the snap ring, here's one more that was very quick and very sure. You know those oil filter wrenches you use with your 3/8" rachet, with the three arms that move in and out? Well we used my drill press and one of those (um, the drill is never turned on btw). Just stick the drill press tip in the 3/8 square hole of the oil filter wrench, move the arms to where they're in the right place on the spring and so you can get ahold of the snap ring with the pliers, press down with the drill press, lock it in place, and Bob's your uncle--the stack's compressed against the table and you can get at the snap ring. Anyway, thanks again to you all. |
|
|
|
|
Logged
|
|
|
|
strawbobrob
Member
Posts: 49
It's all in the wrist.
Location: Earth . . . still.
|
|
« Reply #18 on: July 20, 2011, 07:36:00 AM » |
|
Buggar! Aligning the clutch plates without the "special" tools tests the patience. The good news is that the new clutch is in and it feels great. I suppose I'm glad I bought all new parts, but I wouldn't do it again. I would just check for what was in spec/out of spec and replace what was out and enjoy doing a clutch replacement inexpensively. After 80K miles, only the damper plate and the friction discs on either side really needed replacing (they were damaged by flying rivets). I could have done the whole thing for $50 or $80 bucks instead of the $283.25 I spent on parts. A Honda mechanic said that if the steel plates are otherwise good, they can siimply be roughed up by rubbing them on concrete for a bit and re-installing. That sounds hokey and I'm sure some readers heads are spinning, but I tend to believe it would work. In addition to the "oil filter wrench on a drill press" method of depressing the clutch spring to install the snap ring, I'll add another couple shortcuts that seemed to work better. First, to re-torque the clutch nut to 94 ft lbs after re-installation of the clutch stack into the basket: a shortcut to building a special tool to hold the clutch in place while you re-torque the nut is to just put the tranny in gear and have someone hold the rear brake down for a minute while you retorque. 94 ft lbs seems like a lot of torquing to do while the bike is on the lift but it's not bad. I don't know if there's a problem wth doing it that way, there didn't seem to be, but since I haven't seen it on the other clutch replacement threads maybe there is a problem; please respond if you think there is. Also, to echo the other threads--aligning the clutch plates is a meticulous process that you need to be ready for. We made three failed attempts before getting it all completely right on the fourth attempt. Each attempt requires re-compressing the stack, removing the snap ring, trying to fix the alignment, re-compressing the stack, and re-installing the clutch spring, so it's tedious and you want to get it right or you could be at it all night. We had no luck in following the manual's instructions of trying to put the uncompressed stack in the basket and then pulling it out again somehow without allowing any plates to move at all, and compressing the stack and installing the snap ring without moving the plates--they always moved on us. I'm sure buying the special alignment tools would have solved the problem and added a bunch more cost! So, instead we used squares and straightedges around the stack simultaneously. preferably tri-squares that can stand up on their own next to the stack. Alignment has to be within I'd say 1/64th on three different planes: (1) the tabs all have to be in alignment; (2) the row of tabs in alignment has to be exactly perpendicular; and (3) all plates have to be exactly centered. It was this third aspect that gave us the most trouble, because there is significant play and if one plate is off, you won't get the clutch stack on the shaft--you'll get a 'hard stop' as the stack's center hub encounters the shaft.. I did not see that aspect mentioned in the other clutch threads so I mention it here, though I may have missed it. How to do the alginment easily? Good luck. You'll figure it out as long as you understand the concept. I feel like I could get it right on the first try next time, because the process of trial and error teaches you how exactly right it all has to be to work.. Thanks again to those how provided feedback and pics and part #s, etc. Also, don't forget to refill with oil before firing it up!  |
|
|
|
|
Logged
|
|
|
|
|
F6Dave
|
|
« Reply #19 on: July 20, 2011, 09:17:34 AM » |
|
I'd read how tricky it could be to align all the disks, so I aligned them in the basket, then replaced the snap ring. I used this method to keep them aligned: 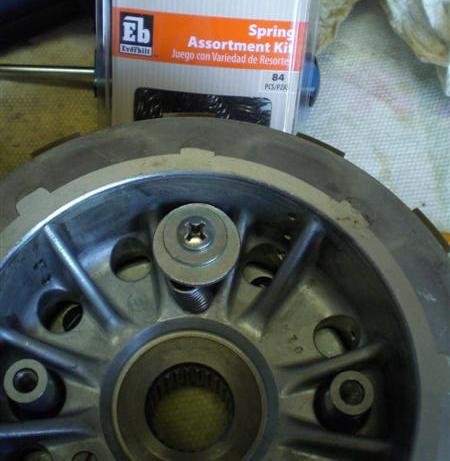 I used a spare screw, some large washers and a spring, (in 2 places) to hold the stack together with some light pressure. This way I could easliy move the disks around and get everything to fit in the basket. When I pulled the stack out, everything stayed in perfect alignment. On the bench I removed the screws/washers/springs and was careful not to move anything while I compressed the stack and replaced the snap ring. The stack slid easily into the basket the first time I tried. |
|
|
|
|
Logged
|
|
|
|
strawbobrob
Member
Posts: 49
It's all in the wrist.
Location: Earth . . . still.
|
|
« Reply #20 on: July 21, 2011, 12:53:59 AM » |
|
I'm impressed--that was brilliant! Much better than what we came up with. . . makes me want to take it out and do it again! I better go lie down...
|
|
|
|
|
Logged
|
|
|
|
|


