Fatboyman05
Member

Posts: 152
.
Palm Coast, Florida
|
 |
« on: April 22, 2012, 07:53:05 PM » |
|
I plan to replace both the front and rear brake pads on my “still new to me” Valk.
I have ordered speed bleeders for the brakes and clutch.
I did check the rotors and they are fine...
I have bought a MityVac.
I am getting ready to order front and rear brake pads. (Planning on using HDL…)
I want to change the fluid and replace the brake pads but my question is…. Should I change the fluid using the MityVac and then install the bleeders and then remove and replace the pads?
I was thinking that swapping the fluid first made more sense and I didn’t want to run older, questionable fluid, through the new speedbleeders.
Thoughts?
|
|
|
|
|
 Logged
|
|
|
|
|
olddog1946
|
 |
« Reply #1 on: April 22, 2012, 08:24:06 PM » |
|
Personally, I'd put the pads in first, then put in the speed bleeders and bleed the brakes, but I doubt it would make much if any difference in the order you did it.
|
|
|
|
|
Logged
|
VRCC # 32473
US AIR FORCE E7, Retired 1965-1988
01 Valk Std.
02 BMW k1200LTE
65 Chevelle coupe, 1986 Mazda RX-7 with 350/5spd, 1983 Mazda RX-7 with FOMOCO 302/AOD project, 95 Mustang GT Convertible 5.0, 5 spd
Moses Lake, Wa. 509-760-6382 if you need help
|
|
|
gordonv
Member
Posts: 5766
VRCC # 31419
Richmond BC
|
|
« Reply #2 on: April 22, 2012, 09:06:24 PM » |
|
I don't know which should be done first, the change of fluid or the brakes. I don't think it really matters.
But isn't having the speed bleeders a waste if you have the mitty vac? If you don't have one or the other yet, then don't buy it. You don't need both.
|
|
|
|
|
Logged
|
1999 Black with custom paint IS   |
|
|
|
John U.
|
|
« Reply #3 on: April 22, 2012, 09:57:23 PM » |
|
I agree that it doesn't matter except that you will need to have the reservoir mostly empty when you compress the caliper pistons to allow thicker pads to fit. If the reservoir is full when you do that it will overflow and make a mess.
|
|
|
|
|
Logged
|
|
|
|
salty1
Member
Posts: 2359
"Flyka"
Spokane, WA or Tucson, AZ
|
|
« Reply #4 on: April 23, 2012, 03:17:28 AM » |
|
IMHO, the speed bleeders are not needed since you already have the Mighty Vac. The flush versus pads first, your choice. +1 on John's comment about watching reservoir volume when you push the pistons back into the calipers.
|
|
|
|
|
Logged
|
My rides: 1998 GL1500C, 2000 GL 1500CF,2006 GL 1800 3A   |
|
|
Fatboyman05
Member
Posts: 152
.
Palm Coast, Florida
|
|
« Reply #5 on: April 23, 2012, 04:41:18 AM » |
|
OK, Thanks everyone.  I will need the mityvac when I swap out my bars and cables for something closer to stock. As I understand it the speedbleeders don't work so well on empty lines, or so I read somewhere. I also plan to get a super sucker as it was recently reffered to, from the farm store, to remove the fluid from the resivor as I push the pistons back in. John |
|
|
|
|
Logged
|
|
|
|
hubcapsc
Member
Posts: 16816
upstate
South Carolina
|
|
« Reply #6 on: April 23, 2012, 04:44:45 AM » |
|
When I got my new-to-me Valkyrie, I changed the brake fluid and changed out
the pads, and then experienced a rear brake caliper failure the next year right
before Britman's Memorial Day Ride (which I missed).
I failed to clean the caliper pistons, and just jambed the dirty pistons back into
the caliper in order to get the new thick pads on. When I went to rebuild the caliper
to get my brakes working again, the inside of the caliper was so fouled, I just bought another
caliper from Pinwall for $25 or $35 and rebuilt that one instead.
I use speed bleeders too. Once the entire system is dry, it is hard to get it primed (probably
true, speed bleeders or not). I prime it so that fluid starts flowing with lever-pumps by
filling the reservoir and using a big syringe down at the caliper to suck some fluid
into the system. Using a speed bleeder to prime the system would probably be a lot
less clumsy than the way I do it....
-Mike
|
|
|
|
|
Logged
|
|
|
|
|
9Ball
|
|
« Reply #7 on: April 23, 2012, 06:19:18 AM » |
|
Save the stock bleeders. If you replace the lines you can install the old bleeder nipples and use your syringe and surgical tubing to force fresh fluid from the bleeder up to the master cylinder. This allows the bubbles to rise instead of having to force them down through the system....saves a lot of brake fluid and gets rid of those stubborn bubbles that tend to stick at the banjo fitting connections. Then just reinstall your speedbleeders and bleed the little bit of air that may be introduced by swapping the bleeders. You won't need your MityVac again for the bike.
good luck...
|
|
|
|
|
Logged
|
VRCC #6897, Joined May, 2000
1999 Standard
2007 Rocket 3
2005 VTX 1300S
|
|
|
custom1
Member
Posts: 333
01 Interstate
SW Pa
|
|
« Reply #8 on: April 23, 2012, 06:58:03 AM » |
|
As they said above, I would do the pads first. Unless the previous owner added fluid as the pads wore, then it doesn't matter cause you will need to remove some fluid before you push the pistons back. I had speed bleeders on a car before and was not impressed with them. You put some tubing on them then open them a little to bleed them. Them have some kind of sealer on the threads to keep air from being sucked back in but I didn't trust them to seal after the first couple of uses. Just my opinion tho. I think the MityVac with a snug fitting piece of tubing works very well. Just make sure to watch the fluid level in the master cylinder so you don't suck air in on that end. When I did mine, before I pushed the pistons back I put the old pads and a shim thinner than the rotor in there and applied the brake a little to push the pistons out enough to clean them. That way you don't push that crud inside the caliper. 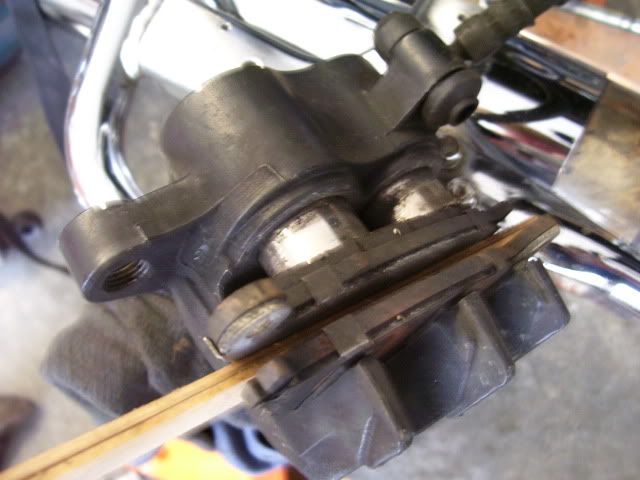 |
|
|
|
|
Logged
|
John
|
|
|
hubcapsc
Member
Posts: 16816
upstate
South Carolina
|
|
« Reply #9 on: April 23, 2012, 07:09:23 AM » |
|
a shim thinner than the rotorThis has always seemed like such a good idea to me, but I figured I'd push the pistons out too far and barf paint-eating brake fluid all over the place. But those six words highlighed above are probably the secret to never messing up. A shim just enough thinner than the rotor to expose the somewhat dirty part of the piston hiding behind the dust seal -Mike
|
|
|
|
|
Logged
|
|
|
|
Fatboyman05
Member
Posts: 152
.
Palm Coast, Florida
|
|
« Reply #10 on: April 23, 2012, 08:17:41 AM » |
|
Great suggestion Custom1. what did you use to clean the pistons and is there something that needs to be applied to them before I push the pistons back in?
|
|
|
|
|
Logged
|
|
|
|
custom1
Member
Posts: 333
01 Interstate
SW Pa
|
|
« Reply #11 on: April 23, 2012, 08:55:40 AM » |
|
If I remember correctly I just sprayed some brake cleaner in an old spray paint can lid and dipped a Q-tip in it and wiped them down with that. If the caliper is not leaking the dirt is really just brake dust. After you get them clean you can look for any pits. Mine were in pretty good shape. No need to put anything on them that I am aware of. I used the pads from HDL also. Happy with them. Don't be surprised if they make some buzzing noise for a few hundred miles till they get worn in to match the rotors. When I did my rear brake the caliper was not floating like it should and one pad was worn more than the other. Brake didn't feel like it was doing much. The pin that the caliper slides on was rusted and stuck in the caliper. I had to order a new pin. Didn't look like it was serviced for a long while. Just something else for you to check. 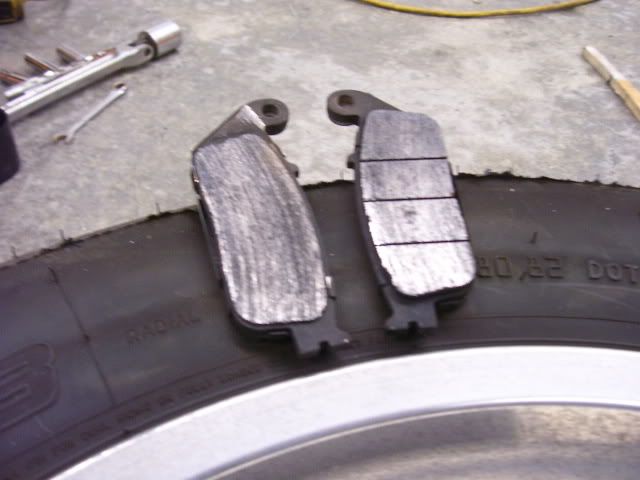 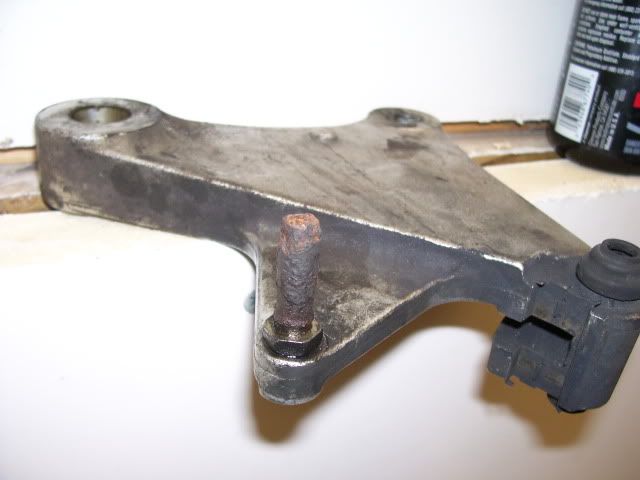 |
|
|
|
|
Logged
|
John
|
|
|
John Schmidt
Member
Posts: 15369
a/k/a Stuffy. '99 I/S Valk Roadsmith Trike
De Pere, WI (Green Bay)
|
|
« Reply #12 on: April 23, 2012, 09:05:22 AM » |
|
Put a hose on the bleeder and have it running into a can, open the bleeder a tad, then compress the pistons so you can put in the new pads. The excess fluid will first run into the catch can instead of backing up into the reservoir. That way all your attention and work is right in front of you, instead of back and forth to make sure you aren't going to overflow the reservoir. You can leave the top on the reservoir if you do it this way.
Plus, I always cover the tank and engine area with a couple layers of plastic...garbage bags work fine. Then an old towel or similar over that...guarantee something will get dropped. If you have any problems, give me a holler on the Fla. board, remember we met and sat together at the Corky Bells lunch ride a few days ago.
John
|
|
|
|
|
Logged
|
|
|
|
|
sandy
|
|
« Reply #13 on: April 23, 2012, 06:18:52 PM » |
|
No one has mentioned flushing out all the contaminates. I use a MityVac to pull all the fluid out. Clean the reservoir then refill with alcohol. Pull all this through the system. This absorbs moisture and flushes it out. When the alcohol dries, refill with DOT 4 and again use the MityVac to bleed the lines. Before the nay sayers chime in, I've done two pickups (F150 & F250) and so many bikes I can't count them all. No problems. I learned this trick from a snowmobile racer as moisture is a killer in sleds.
|
|
|
|
|
Logged
|
|
|
|
|
Davemn
|
|
« Reply #14 on: April 23, 2012, 06:33:29 PM » |
|
What kind of alcohol???
|
|
|
|
|
Logged
|
|
|
|
salty1
Member
Posts: 2359
"Flyka"
Spokane, WA or Tucson, AZ
|
|
« Reply #15 on: April 24, 2012, 04:45:48 AM » |
|
Sounds promising.? ???
|
|
|
|
|
Logged
|
My rides: 1998 GL1500C, 2000 GL 1500CF,2006 GL 1800 3A |
|
|
|
sandy
|
|
« Reply #16 on: April 24, 2012, 08:31:41 PM » |
|
I use High alcohol content (90+ %) from the grocery store. I have also use denatured. Both work well. If your system is dirty, you'll be surprised what flushes out.
|
|
|
|
|
Logged
|
|
|
|
|


