|
97Valk_CT_Euless
|
 |
« on: December 19, 2012, 07:21:18 AM » |
|
I know this has been discussed ad-nausium... After researching the posts here I'm deciding against the ECT mod because the timing goes back to stock right where I want the extra timing, 3000-3500 on the highway. So, I'm looking at the trigger wheel route. I don't like the wheels I've been able to find because they're rounded, and from some of the posts I've read, that can cause cold-start problems. Plus, it seems to me that the trigger-point (leading or trailing edge, by the way, anyone know?) could drift and be less consistent with a rounded-tip wheel.
In one post which I can't find, someone mentioned filing to increase timing. I assume (though it didn't specifically say where to file) that they're filing the key on the trigger wheel to allow it to be rotated forward (timing wise) to increase the timing. Anyone have a comment? Does the trigger wheel "stay put" with the key filed? Or do you need to put in a block/shim in the space left on the trailing portion of the keyway to make it stay put? Actually sounds like a pretty good method, and there should be plenty of key to get 4 deg of advance. Any opinions?
Thanks
|
|
|
|
|
 Logged
|
|
|
|
|
98valk
|
|
« Reply #1 on: December 19, 2012, 07:52:51 AM » |
|
the ECT mod because the timing goes back to stock right where I want the extra timing, 3000-3500 on the highway. actually it doesn't see curves http://timskelton.com/valkyrie/tech/trigger_wheel_plus_dyna3000.htmwww.factorypro.com states no more than a 4 degree TW is needed for the valkyire. using the 4 TW with the ECT mod is a good way to go. the ect advance needs to be shut off after the bike is at operating temps when Accelerating. using it at cruise w/the 4 TW is safe. |
|
|
|
|
Logged
|
1998 Std/Tourer, 2007 DR200SE, 1981 CB900C 10speed
1973 Duster 340 4-speed rare A/C, 2001 F250 4x4 7.3L, 6sp
"Our Constitution was made only for a Moral and Religious people. It is wholly inadequate to the goverment of any other."
John Adams 10/11/1798
|
|
|
John Schmidt
Member

Posts: 15369
a/k/a Stuffy. '99 I/S Valk Roadsmith Trike
De Pere, WI (Green Bay)
|
|
« Reply #2 on: December 19, 2012, 08:04:28 AM » |
|
Why not just use an I/S ECM in conjunction with a 4 deg. TW, that ECM already has some advance built in. It's a combo I've been using for some years now and it gives decent mileage and performance. Depending on the brand of gas, I often have to at least use their mid-grade.
|
|
|
|
|
Logged
|
|
|
|
|
|
|
97Valk_CT_Euless
|
|
« Reply #4 on: December 19, 2012, 08:49:41 AM » |
|
Thanks for the feedback, guys.
Curve seems to be tapering off (if I'm reading it right) from 3000 to 0 additional advance at 3500. What am I missing? Curves are hard to read in B/W to be able to tell which is the CT stock curve)
I like the idea of the I/S ECM, but, it's a cash thang...
Again, the 4 deg wheels I've found have the rounded tips that, just irk me. I can't figure why they'd do that...
|
|
|
|
|
Logged
|
|
|
|
|
97Valk_CT_Euless
|
|
« Reply #5 on: December 19, 2012, 11:27:09 AM » |
|
Sounds like a vacuum switch with the ECT mod combined with a 4 deg wheel might be a way to go... Will auto-shutoff under acceleration but will come on at cruise. Hmm...
|
|
|
|
|
Logged
|
|
|
|
|
Bigwolf
|
|
« Reply #6 on: December 19, 2012, 01:45:52 PM » |
|
I'm deciding against the ECT mod because the timing goes back to stock right where I want the extra timing, 3000-3500 on the highway.
In one post which I can't find, someone mentioned filing to increase timing. I assume (though it didn't specifically say where to file) that they're filing the key on the trigger wheel to allow it to be rotated forward (timing wise) to increase the timing.
I tried the ECT mod and took it back off my standard. I mounted a degree wheel to the front of the engine and mapped out the timing just to reassure myself on what was happening. You are exactly right! The ECT advance begins dropping off at around 2900 rpm and is completely eliminated at 3400 rpm on my Valk. I do a lot of highway riding with the tach between 3000 and 3500 so it did not help my cruise performance nor my fuel mileage. I got a 6* advance wheel but did not like the trigger teeth on it so I filed the key tab on the original trigger wheel and am now able to use this trigger at stock advance or I can rotate it forward as far as 6* This allows me to change timing without taking a belt off. All I have to do is loosen the crankshaft bolt, turn the trigger wheel a bit and then re-torque the crank bolt. I like this setup because the trigger teeth are square and accurate and I can dial in whatever advance suits me between stock and an extra 6* With that said, I was getting some low speed (lugging) detonation even with the trigger wheel about 3.5* ahead of stock. This was on regular gas. I know I could use higher grade gas to eliminate it but that gets costly too. I now have the trigger wheel set at stock but am running a Dyna module set on #8. This is working great. Regular gas gives no detonation at low speed high torque and I still get lots of go power. My fuel mileage runs around 36 at 70 to 80mph and 40 when I try to stay under 2500 rpm. BTW, the trigger wheel has never slipped in the last 8000 miles. Bigwolf |
|
|
|
|
Logged
|
|
|
|
|
97Valk_CT_Euless
|
|
« Reply #7 on: December 19, 2012, 02:17:25 PM » |
|
That sounds perfect. Now I just need to build a copy of your tool and do exactly that, at least with the trigger wheel. Are any dyna units around to pick up? What's a fair price? I know the valk unit is out of production.
Thanks again everyone.
|
|
|
|
|
Logged
|
|
|
|
|
quexpress
|
|
« Reply #8 on: December 19, 2012, 03:52:15 PM » |
|
Why not just use an I/S ECM in conjunction with a 4 deg. TW, that ECM already has some advance built in. It's a combo I've been using for some years now and it gives decent mileage and performance. Depending on the brand of gas, I often have to at least use their mid-grade.
Mine has the exact same set-up as yours since 2004 John ... and am very happy with the results!  |
|
|
|
|
Logged
|
I still have a full deck.
I just shuffle slower ...
|
|
|
|
Bigwolf
|
|
« Reply #9 on: December 19, 2012, 11:14:18 PM » |
|
The the key in the trigger wheel is .175 inch wide originally. Filing .045 inch off the key allows about 6* of rotation. Removing just .030 inch from the key would give about 4* of rotation. I used a dial caliper to check the key for how much metal I had removed. The engine runs counterclockwise when viewed from the front so the key needs to be filed on the left side as seen from the front when the key is at the top. That will allow the trigger wheel to be rotated counterclockwise to advance the timing.
There are a few Dyna modules around that are not being used. I posted a want ad on the classified board and got 3 or 4 responses a year or more ago. Beware. These Dyna units can be cranky. Unless you don't mind spending some time sorting it out, it may very well be a waste of your time and money. They do not like heat so if you do decide to try a Dyna, be sure to not use the rubber mount of the original Valk ICM. Mounting it solid on an aluminum plate with good airflow will help to draw heat away from it.
Bigwolf
|
|
|
|
« Last Edit: December 20, 2012, 08:32:28 AM by Bigwolf »
|
Logged
|
|
|
|
|
97Valk_CT_Euless
|
|
« Reply #10 on: December 20, 2012, 07:14:38 AM » |
|
Thanks again. That's exactly what I was wondering, how to make sure I shaved off the right amount. Im on vacation now so I'll try it today assuming I get the wife's TA fixed today. (her mid-life crisis to balance my mid-life crisis, the Valk). Funny how I spend more time working on HER mid life crisis than MINE!!!
|
|
|
|
|
Logged
|
|
|
|
Patrick
Member
Posts: 15433
VRCC 4474
Largo Florida
|
|
« Reply #11 on: December 20, 2012, 01:52:55 PM » |
|
As you face the front of the engine/trigger, file 1/32" off the left and install twisted to the left. 1/32" is about 4º or maybe a bit more. I'm running one now with about a tad[technical term] more than 1/64" shaved off, starts better in the cold. I believe the original trigger teeth are better than the aftermarkets. That was the cause of a lot of arguments years ago. Maybe all this already said, if so, never mind. When it comes right down to it, Honda got it right.
|
|
|
|
|
Logged
|
|
|
|
|
quexpress
|
|
« Reply #12 on: December 20, 2012, 03:27:10 PM » |
|
As you face the front of the engine/trigger, file 1/32" off the left and install twisted to the left. I've got trouble getting my head around that one Pat! If a portion is filed off (taken out) on the left side of the wheel, would this not permit you to turn the wheel more to the right? I may be out in left field ... or is it right field?  |
|
|
|
|
Logged
|
I still have a full deck.
I just shuffle slower ...
|
|
|
Patrick
Member
Posts: 15433
VRCC 4474
Largo Florida
|
|
« Reply #13 on: December 20, 2012, 04:35:53 PM » |
|
It'll still run either way Normand. One way makes a little change, the other doesn't.  |
|
|
|
|
Logged
|
|
|
|
|
97Valk_CT_Euless
|
|
« Reply #14 on: December 20, 2012, 05:05:09 PM » |
|
Left assuming key is pointing straight up, I think.
|
|
|
|
|
Logged
|
|
|
|
|
97Valk_CT_Euless
|
|
« Reply #15 on: December 20, 2012, 05:49:59 PM » |
|
After pulling the cover off the front I realized.... Where the heck does that tool fit to hold the crank? The only place I see is the cam sprocket. Seems like a lot of stress on the belt. Is that where you hold it???
Thanks
|
|
|
|
|
Logged
|
|
|
|
Patrick
Member
Posts: 15433
VRCC 4474
Largo Florida
|
|
« Reply #16 on: December 21, 2012, 03:52:08 AM » |
|
It is quite a bit of stress on the belt,but, it should be OK. Personally, if you don't have an air gun, put the monster in high gear, hold the brake [rear  ] , and remove the bolt with a stiff jab. Align all the marks correctly, hold the right pulley with something [such as a shingle between it and the case] while you loosen the tensioner and slip the belt off the crank. |
|
|
|
|
Logged
|
|
|
|
|
97Valk_CT_Euless
|
|
« Reply #17 on: December 21, 2012, 05:59:55 AM » |
|
Ah. Right. That sounds better. Thanks!
|
|
|
|
|
Logged
|
|
|
|
|
97Valk_CT_Euless
|
|
« Reply #18 on: December 21, 2012, 09:56:04 AM » |
|
Well... Glad I went in to do this. Tensioner bearings are rough and sloppy. Thought I was hearing a little too much noise down there but thought I was being paranoid. Stinks she'll be laid up on my vacation but better safe than sorry I guess. Thanks for all the help, now I can take my time.
|
|
|
|
|
Logged
|
|
|
|
Patrick
Member
Posts: 15433
VRCC 4474
Largo Florida
|
|
« Reply #19 on: December 21, 2012, 10:33:30 AM » |
|
The tensioners do have tendency to pick up a lot of rubber, that cleans off easily. I few have found the bearings going bad. I set the belts a little looser than recommended [ 5/16"-3/8"], seems to keep them a little quieter.
|
|
|
|
|
Logged
|
|
|
|
|
97Valk_CT_Euless
|
|
« Reply #20 on: December 21, 2012, 10:48:23 AM » |
|
I saw that when I replaced the belts 7500 m ago. Cleaned the rubber off but bearings seemed fine. The old belts were pretty loose and being 15 yrs old I replaced them. (47k miles on the bike, or 147k, who knows...) now the tensioner bearings are showing roughness. I thought I put the belts at spec but maybe I put em up tight and hurt the old bearings. I'll put them up a bit looser when I get the new tensioners.
|
|
|
|
|
Logged
|
|
|
|
|
Ricky-D
|
|
« Reply #21 on: December 21, 2012, 03:18:38 PM » |
|
The spring on the tensioner is there for a specific reason.
What is the reason?
Answer: To set the tension.
I know, that's too simple to believe.
Of course, proper procedure and employment is critical for a good outcome.
Laying on a finger is just like the butcher with the scale. Not proper.
***
|
|
|
|
|
Logged
|
2000_Valkyrie_Interstate
|
|
|
|
97Valk_CT_Euless
|
|
« Reply #22 on: December 22, 2012, 06:39:30 AM » |
|
Lol. Yeah, I'm sure I "outsmarted myself" but I was reading the clymer manual which gave a procedure requiring a specific tension at a specific displacement of the belt and said nothing of letting the springs set it. (the springs though were obviously over stretched and I should have replaced the whole mess back then).
|
|
|
|
|
Logged
|
|
|
|
|
Chrisj CMA
|
|
« Reply #23 on: December 22, 2012, 06:59:24 AM » |
|
Lol. Yeah, I'm sure I "outsmarted myself" but I was reading the clymer manual which gave a procedure requiring a specific tension at a specific displacement of the belt and said nothing of letting the springs set it. (the springs though were obviously over stretched and I should have replaced the whole mess back then).
Id replace the Clymer with a Honda manual. Im sure 99% of the Clymer is good info, but this isint the first glitch I have heard about. When that 1% affects you its a 100% problem |
|
|
|
|
Logged
|
|
|
|
|
97Valk_CT_Euless
|
|
« Reply #24 on: December 22, 2012, 07:16:23 PM » |
|
Did get the Honda manual when I had to rebuild the final drive. Now i know not to bother with the clymer at all Great advice all, thanks. Merry Christmas.
|
|
|
|
|
Logged
|
|
|
|
|
Brian
|
|
« Reply #25 on: December 27, 2012, 03:16:38 AM » |
|
Well... Glad I went in to do this. Tensioner bearings are rough and sloppy. Thought I was hearing a little too much noise down there but thought I was being paranoid. Stinks she'll be laid up on my vacation but better safe than sorry I guess. Thanks for all the help, now I can take my time.
You can rebuild those tensioners. I have done one for under $25 using a Gates T42015 idler pulley. I have it on the bike right now. 1,000 miles and no problems. .jpg) This is the completed repair. Google this part, you will find an article written on this subject with about 6 different methods. This repair is easy if you have the tools and a DYI attitude. |
|
|
|
|
Logged
|
|
|
|
|
97Valk_CT_Euless
|
|
« Reply #26 on: December 27, 2012, 06:45:02 AM » |
|
I Wondered if you could. Figured I'd try on the removed set for next time. Already have a set on order but will follow and try it for next time. Thanks!
|
|
|
|
|
Logged
|
|
|
|
|
Brian
|
|
« Reply #27 on: December 28, 2012, 03:13:41 AM » |
|
I too had a tensioner start making noise. A drill press and a Dremel is all it took to cleanly remove the factory pulley from the mounting plate. JB Weld and $2.50 in hardware along with a little blue locktite if you have it. If not get the nylon lock nut. Amazon.com had the Gates pulleys for $17, I bought two and got free shipping so I have a spare if ever needed. Although this rebuilt unit is my spare as I did like you and ordered a new one from my local dealer, $80!!! At this point I will never have to buy a new one again. Here is a picture of the parts. .jpg) |
|
|
|
|
Logged
|
|
|
|
Patrick
Member
Posts: 15433
VRCC 4474
Largo Florida
|
|
« Reply #28 on: December 28, 2012, 03:52:01 AM » |
|
Nice, I like that.
|
|
|
|
|
Logged
|
|
|
|
|
97Valk_CT_Euless
|
|
« Reply #29 on: January 07, 2013, 05:21:42 AM » |
|
Thanks everyone for the help on this subject. I modified the trigger wheel as you described (did alittle trig to verify, and you're numbers are as close as you can get with a file...) Set it up as close to 4 degrees as I could estimate, and the bike runs great. Fired up literally instantly. Starts better than she ever has and the power increase is very noticeable. Not quite "dramatic", but no doubt she's stronger. I've always run at least mid grade. I'll know tonight when I fill her up again if the mileage improves, but it's so hard to stay out of the throttle now it's probably not a good test  Thanks all! |
|
|
|
|
Logged
|
|
|
|
|
Brian
|
|
« Reply #30 on: January 07, 2013, 07:18:06 PM » |
|
Thanks everyone for the help on this subject. I modified the trigger wheel as you described (did alittle trig to verify, and you're numbers are as close as you can get with a file...) Set it up as close to 4 degrees as I could estimate, and the bike runs great. Fired up literally instantly. Starts better than she ever has and the power increase is very noticeable. Not quite "dramatic", but no doubt she's stronger. I've always run at least mid grade. I'll know tonight when I fill her up again if the mileage improves, but it's so hard to stay out of the throttle now it's probably not a good test Thanks all! Hey guys, I went back to reread all this and apologize for stealing the thread for the tensioner rebuild. I need to rehash this thinking about filing off the left side of the trigger wheel key opening and then turning it to the left or counterclockwise? There would be no change as it would still hit the right side,wouldn't it? I may be thick here tonight, was wondering if you had pictures? Thanks, |
|
|
|
|
Logged
|
|
|
|
|
Bigwolf
|
|
« Reply #31 on: January 07, 2013, 11:38:00 PM » |
|
The engine runs counterclockwise when viewed from the front so the key needs to be filed on the left side as seen from the front when the key is at the top. That will allow the trigger wheel to be rotated counterclockwise to advance the timing.
|
|
|
|
« Last Edit: January 07, 2013, 11:40:20 PM by Bigwolf »
|
Logged
|
|
|
|
|
Brian
|
|
« Reply #32 on: January 08, 2013, 03:12:16 AM » |
|
The engine runs counterclockwise when viewed from the front so the key needs to be filed on the left side as seen from the front when the key is at the top. That will allow the trigger wheel to be rotated counterclockwise to advance the timing.
Bigwolf, I dug out the shop manual after my post last night as I could not remember what the trigger wheel key looked like. Now I understand what you all have been saying as I was hung up on the fact the key way was female and not male. I normally look at the shop manual while reading these posts but for some reason was trusting my memory here. Thanks. |
|
|
|
|
Logged
|
|
|
|
|
97Valk_CT_Euless
|
|
« Reply #33 on: January 08, 2013, 05:30:28 AM » |
|
I was a bit dubious about how well the wheel would stay in place with the key filed, but even tightening the crank bolt finger tight, the wheel won't budge. Very accurate machine work on the timing parts.
It's hard to know precisely where the timing is adjusted to if setting it less than 6 deg, but swinging the wheel back and forth and getting a feel for the arc you've made by filing the key, and setting the wheel at about 2/3 of that arc should give 4 deg. At TDC and the wheel at 0, the trailing edge of the #1 trigger spur (?) is lined up with the clockwise edge of the top pickup. It seems that at 6 deg the center of the spur is pointing directly at the plastic cover of the top pickup (most counter-clockwise edge, if that makes sense). 4 deg seemed to be where the leading edge of the spur was not quite pointing at the plastic edge of the top pickup. I couldn't figure out how to get a degree wheel or protractor in there and see it, my fat head wouldn't fit between the wheel and the crank pulley! Would be curious as to how these references match up to others.
In any case, I'm very happy with the results so far. It's great to be able to benefit from all the experience on this board. Thanks all.
|
|
|
|
|
Logged
|
|
|
|
|
Tx Bohemian
|
|
« Reply #34 on: January 08, 2013, 08:20:11 AM » |
|
It's hard to know precisely where the timing is adjusted to if setting it less than 6 deg, but swinging the wheel back and forth and getting a feel for the arc you've made by filing the key, and setting the wheel at about 2/3 of that arc should give 4 deg... Here's a question: Is there a way to check timing on these bikes with a Timing light? I've been watching this post with interest because recently I changed my 6* TW back to stock because of a "cold start" issue. The performance is still good enough for me with the stock TW however it seems my milage dropped dramatically. Going from 33-34 to 26!! This sucks to say the least!! Even the last fill up 22, but with that tankful I did crank it up and let it run in the shop a couple of times, so that milege is not accurate. (really freaked me out though before i remembered that) I still intend to run a few more tankfuls to get a better accurate average. I do run an Interstae CDI and what I understand is having a 4* advance is the best. I see that filing .030 will give a 4 deg advance. Is there a method of checking it with a timing light just to critique it in case my machining isn't that precise? |
|
|
|
|
Logged
|
Remember, if you are on a bike and wreck with a car no matter how "in the right" you are you are going to lose. RIDE LIKE EVERBODY IS OUT TO GET YOU!!
Al
|
|
|
|
97Valk_CT_Euless
|
|
« Reply #35 on: January 08, 2013, 08:31:04 AM » |
|
Should be a simple matter to hook up a light, but not having a degree reference on the bike anywhere. Maybe someone knows how to attach some timing reference? I would think you could do it through the timing cover (the three-bolt cover on the front).
|
|
|
|
|
Logged
|
|
|
|
|
Tx Bohemian
|
|
« Reply #36 on: January 08, 2013, 09:14:30 AM » |
|
Should be a simple matter to hook up a light, but not having a degree reference on the bike anywhere. Maybe someone knows how to attach some timing reference? I would think you could do it through the timing cover (the three-bolt cover on the front).
Yea, that's what I was thinking. What is that cover for anyway? |
|
|
|
|
Logged
|
Remember, if you are on a bike and wreck with a car no matter how "in the right" you are you are going to lose. RIDE LIKE EVERBODY IS OUT TO GET YOU!!
Al
|
|
|
|
Blackduck
|
|
« Reply #37 on: January 08, 2013, 09:37:42 AM » |
|
2 Methods,
Both involve finding the exact top dead centre and checking the timing mark on the crank plate against the cast mark on the front cover, may have to remark it. Finding TDC requires a piston stop.
Bar the engine over to get the timing mark about 3/8 of an inch off the timing mark, screw the stop in carefully till it just touchs the piston, mark the cover where the timing mark is, turn the motor back the other way and VERY carefully bring it up against the stop, add another mark to the cover.
Halve the distance between the marks and you now have TDC. REMOVE the stop.
Next is the easy part if you have a dial back timing light, just start and warm up the engine. This is to allow the coolant sensor to get to operating temperature then check the timing, dial back the light till the TDC marks line up and read the advance.
Without a dial back light you will need to work out degree marks to to mark onto the edge of the housing, a protractor will allow you to do this.
An old sparkplug with the center removed and tapped to take threaded rod makes a good piston stop.
Much the same as dialling in a camshaft.
Cheers Steve
|
|
|
|
|
Logged
|
2001 Standard, 78 Goldwing, VRCC 21411
|
|
|
|
97Valk_CT_Euless
|
|
« Reply #38 on: January 08, 2013, 10:28:52 AM » |
|
Shows you how out of date I am. We don't have those kind of timing lights under my shade tree...
Thanks Blackduck.
|
|
|
|
|
Logged
|
|
|
|
|
Bigwolf
|
|
« Reply #39 on: January 08, 2013, 07:55:19 PM » |
|
dial back the light till the TDC marks line up and read the advance. Be very careful with this...... be sure that you understand the Valk ignition fires the plug twice during each cycle. In other words, the plug fires at both the compression and the exhaust stroke. Most timing lights with an advance adjustment are calculating the rpm of the engine based on the plug firing only on the compression stroke. Therefore it would miscalculate the advance on this double firing system. I mounted a small degree wheel on the front of the crank and used a fixed timing light. 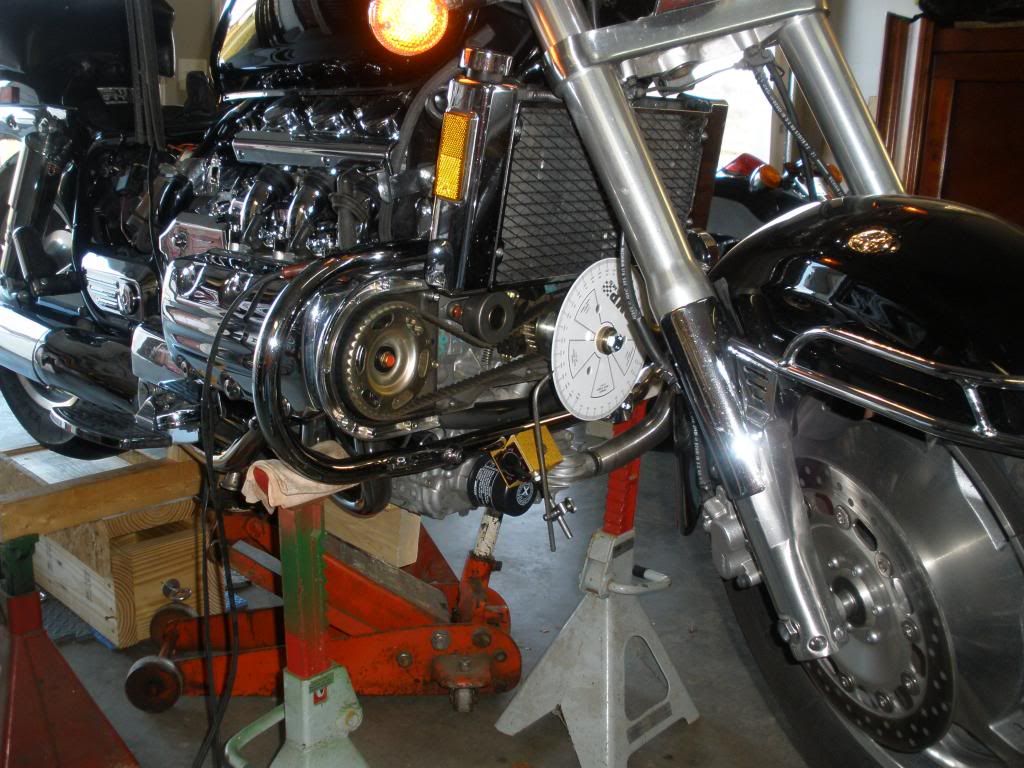 Bigwolf |
|
|
|
« Last Edit: January 08, 2013, 08:02:26 PM by Bigwolf »
|
Logged
|
|
|
|
|


