|
GreenValk
|
 |
« on: February 17, 2013, 08:58:51 AM » |
|
Help. Hanger stud broke off when removing exhaust. Any suggestions on how to fix? I do not have access to a welder so I am looking for other options. Also, one header stud came out with the nut, and another is pretty rusty. Should these be replaced? Thanks, Steve
|
|
|
|
|
 Logged
|
|
|
|
|
Ricky-D
|
|
« Reply #1 on: February 17, 2013, 10:20:44 AM » |
|
There was a post a couple years ago about the broken stud on the muffler and the fix applied.
A search ought to reveal the information you might can employ.
If the stud is in good shape I would clean it up and put it back into the head. Bare also. Antiseize on the nut end of the stud. Nothing more!
***
|
|
|
|
|
Logged
|
2000_Valkyrie_Interstate
|
|
|
|
GreenValk
|
|
« Reply #2 on: February 17, 2013, 10:29:41 AM » |
|
The only fixes I could find involved welding new bracket in place. May be you can help find the post you are thinking about. Thanks.
|
|
|
|
|
Logged
|
|
|
|
|
Ricky-D
|
|
« Reply #3 on: February 17, 2013, 10:32:55 AM » |
|
The only fixes I could find involved welding new bracket in place. May be you can help find the post you are thinking about. Thanks.
Maybe that was it! *** |
|
|
|
|
Logged
|
2000_Valkyrie_Interstate
|
|
|
|
Chrisj CMA
|
|
« Reply #4 on: February 17, 2013, 10:37:30 AM » |
|
Help. Hanger stud broke off when removing exhaust. Any suggestions on how to fix? I do not have access to a welder so I am looking for other options. Also, one header stud came out with the nut, and another is pretty rusty. Should these be replaced? Thanks, Steve
The correct fix is to remove the broken off part and install a new stud. They are designed ot break off with enough sticking out to grab. If not you will have to use an extraction tool like an easy out. I would heat the broken stud with a heat gun and use penetrating oil if its stuck |
|
|
|
« Last Edit: February 17, 2013, 10:39:48 AM by Chrisj CMA »
|
Logged
|
|
|
|
|
GreenValk
|
|
« Reply #5 on: February 17, 2013, 10:47:55 AM » |
|
This is the stud on the muffler not the one on the head. I could pop it out with a punch, but don't know how I would get the next stud in without removing and re-welding the bracket back on the muffler.
|
|
|
|
|
Logged
|
|
|
|
|
Chrisj CMA
|
|
« Reply #6 on: February 17, 2013, 11:00:39 AM » |
|
This is the stud on the muffler not the one on the head. I could pop it out with a punch, but don't know how I would get the next stud in without removing and re-welding the bracket back on the muffler.
I wouldnt worry about that one........pop it out and just use the one thats left |
|
|
|
|
Logged
|
|
|
|
|
BF
|
|
« Reply #7 on: February 17, 2013, 11:07:07 AM » |
|
One of mine broke off last year (left side). Just the one has been holding it on ever since. However, I'll be following your thread to see if you come up with a fix.
|
|
|
|
|
Logged
|
I can't help about the shape I'm in I can't sing, I ain't pretty and my legs are thin But don't ask me what I think of you I might not give the answer that you want me to 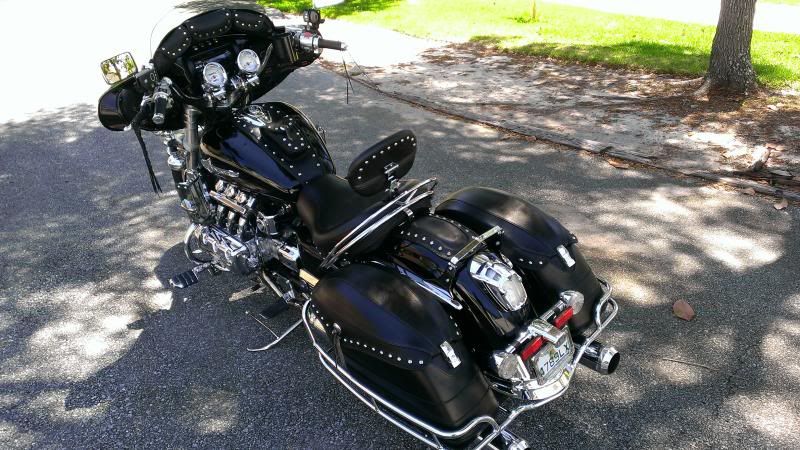 |
|
|
|
GreenValk
|
|
« Reply #8 on: February 17, 2013, 11:22:24 AM » |
|
Here is the before. Will send picture of after once I figure out what after is.  |
|
|
|
|
Logged
|
|
|
|
|
Bone
|
|
« Reply #9 on: February 17, 2013, 11:47:42 AM » |
|
Pop out the broken stud. Drill and tap the hole (thin bracket). Screw in a extra long bolt and cut off the head to the correct length. Clean up the new stud threads with a die.
|
|
|
|
|
Logged
|
|
|
|
R J
Member

Posts: 13380
DS-0009 ...... # 173
Des Moines, IA
|
|
« Reply #10 on: February 17, 2013, 12:23:58 PM » |
|
Pop out the broken stud. Drill and tap the hole (thin bracket). Screw in a extra long bolt and cut off the head to the correct length. Clean up the new stud threads with a die.
Thanks Bone, ya'll beat me to it...... That's the way I fixed one. |
|
|
|
|
Logged
|
44 Harley ServiCar   |
|
|
|
Motorider
|
|
« Reply #11 on: February 17, 2013, 01:39:27 PM » |
|
I started at the end and cut a slot in the channel iron with a dremmel tool. Removed the broken stud, slid a carrage bolt in the slot and tack welded it in place. Worked like factory new.
|
|
|
|
|
Logged
|
|
|
|
|
GreenValk
|
|
« Reply #12 on: February 17, 2013, 03:05:16 PM » |
|
I like the carriage bolt idea except I don't have welder. Maybe if I the cut channel from the bottom then there will be enough support.
If I drill/tap a for a bigger bolt, do you know if I will need to drill out the bolt hole in the frame? I thought about drill & tap a smaller hole and hope the remains of the stud stays in place.
|
|
|
|
|
Logged
|
|
|
|
|
Ricky-D
|
|
« Reply #13 on: February 17, 2013, 03:29:10 PM » |
|
Here's the simplest remedy.
Drill out the stud and slide a nut behind the bracket.
Then simply use the correct length bolt.
Ipso facto
***
|
|
|
|
|
Logged
|
2000_Valkyrie_Interstate
|
|
|
|
GreenValk
|
|
« Reply #14 on: February 17, 2013, 04:00:15 PM » |
|
But how do you keep the nut from turning? both now putting the exhaust back on, and next time when I need to remove.
|
|
|
|
|
Logged
|
|
|
|
|
YoungPUP
|
|
« Reply #15 on: February 17, 2013, 04:42:23 PM » |
|
Find a nut that fits the channel, or go the notch and carrige bolt route, just make sure the notch fits the lug on the carrige bolt.
|
|
|
|
|
Logged
|
Yea though I ride through the valley of the Shadow of Death I shall fear no evil. For I ride the Baddest Mother F$#^er In that valley!
99 STD (Under construction)
|
|
|
|
Motorider
|
|
« Reply #16 on: February 17, 2013, 05:50:07 PM » |
|
I like the carriage bolt idea except I don't have welder.
There in an epoxy called Quik Steel that would hold the carriage bolt in place since you don`t have a welder. I buy Quik Steel at a local Wal-Mart. |
|
|
|
« Last Edit: February 17, 2013, 05:52:40 PM by Motorider »
|
Logged
|
|
|
|
Denny47
Member
Posts: 307
#34898
Grove, Ok.
|
|
« Reply #17 on: February 17, 2013, 06:45:40 PM » |
|
I would go with cutting the slot and using a carriage bolt. Should be ok without welding it. Just use never seize for the next time you might want to remove it so the nut doesn't bind. Just be careful that you don't make the slot too wide that the square edges of the carriage bolt don't hold
|
|
|
|
|
Logged
|
1997 Green/Cream Tourer w/ Cobra 6/6 exhaust, 2012 Pearl White Goldwing
USAF 66-70, F-105 AWCS
|
|
|
MarkT
Member
Posts: 5196
VRCC #437 "Form follows Function"
Colorado Front Range - elevation 2.005 km

|
|
« Reply #18 on: February 17, 2013, 08:23:35 PM » |
|
There's a number of folks who have done the "Easy Glasspack Mod" written up on the shop pages. That mod entails cutting off the can and throwing it away. So there are muffler cans that have been discarded. That is basically what you need. You can cut off half the bracket, line it up with the other one (using the rear hanger bracket), then weld the half-bracket back on. Any welder can do that for you. BTW - in your pic, the other stud looks to be in bad shape.
|
|
|
|
|
Logged
|
|
|
|
|
Ricky-D
|
|
« Reply #19 on: February 18, 2013, 08:23:35 AM » |
|
But how do you keep the nut from turning? both now putting the exhaust back on, and next time when I need to remove.
I probably should have said "threaded rod" instead of "bolt" so there will be a nut at both ends. Sorry for the confusion. And also, I was picturing a square nut behind the flange. *** |
|
|
|
|
Logged
|
2000_Valkyrie_Interstate
|
|
|
|
GreenValk
|
|
« Reply #20 on: February 18, 2013, 09:33:00 AM » |
|
Thanks for all the ideas. I tried to punch the stud out, lightly. It's rusted in pretty good so I think my first attempt will be to drill and see if it holds strong for tapping. If it comes loose then I plan to cut a slot for the carriage bolt (held in place with a little epoxy for easier installation). Mark, The other stud is in pretty good shape. Just out of focus on the picture.
|
|
|
|
|
Logged
|
|
|
|
MarkT
Member
Posts: 5196
VRCC #437 "Form follows Function"
Colorado Front Range - elevation 2.005 km
|
|
« Reply #21 on: February 18, 2013, 10:34:53 PM » |
|
Thanks for all the ideas. I tried to punch the stud out, lightly. It's rusted in pretty good so I think my first attempt will be to drill and see if it holds strong for tapping. If it comes loose then I plan to cut a slot for the carriage bolt (held in place with a little epoxy for easier installation). Mark, The other stud is in pretty good shape. Just out of focus on the picture.
I don't think you will be able to punch it out. It's welded in place on the inside. I have done this repair many times. It's most expedient to just replace half the bracket, with another one, like I said. Takes me 5 minutes but I weld a lot. I could probably send you a half-bracket with the stud intact - I have a lot of muffler cans I use for salvaging parts like this. You basically cut off half the bracket with a cutter wheel in an angle grinder, use the rear mount bracket to hold the new piece in place (with the other stud bolted on, and bolt on the replacement part), tack weld it, remove the bracket and finish weld. 5 minutes. 10 tops. |
|
|
|
|
Logged
|
|
|
|
|


