Tropic traveler
Member

Posts: 3117
Livin' the Valk, er, F6B life in Central Florida.
Silver Springs, Florida
|
 |
« on: April 14, 2013, 08:10:57 PM » |
|
Finally got around to working on the smacked LH saddlebag from our little BikeWeek "incident". This is what it looked like. 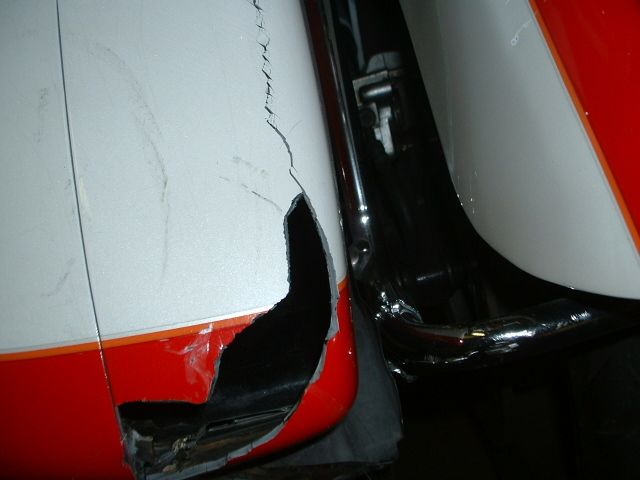 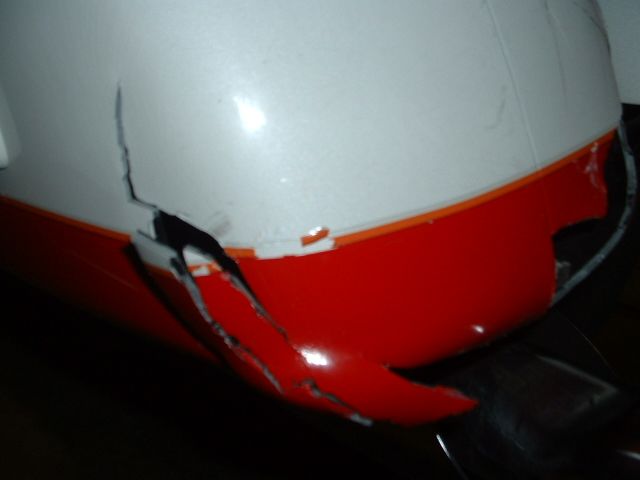  About an hours work using a $4 Harbor Freight soldering iron & it's pieced back together again.   It was a major pain fitting the broken pieces back in, had to cut them up to fit them back in as they were warped pretty bad. The "stitching" of the cracks was fairly straightforward. Tomorrow I will stitch up the inside for strength & maybe later this week get busy with the bodywork part of it. Not my strong suit.  |
|
|
|
« Last Edit: April 14, 2013, 08:12:39 PM by Tropic traveler »
|
 Logged
|
'13 F6B black-the real new Valkyrie Tourer
'13 F6B red for Kim
'97 Valkyrie Tourer r&w, OLDFRT's ride now!
'98 Valkyrie Tourer burgundy & cream traded for Kim's F6B
'05 SS 750 traded for Kim's F6B
'99 Valkyrie black & silver Tourer, traded in on my F6B
'05 Triumph R3 gone but not forgotten!
|
|
|
|
al v
|
|
« Reply #1 on: April 14, 2013, 08:17:56 PM » |
|
Perfect opportunity to mount some tail lights on the bags.
|
|
|
|
|
Logged
|
|
|
|
|
Red Diamond
|
|
« Reply #2 on: April 15, 2013, 06:00:11 AM » |
|
Nothing a little sanding wouldn't take care of. What else is needed to do what you have done besides the soldering gun, rods, cleaner, etc?
|
|
|
|
|
Logged
|
 If you are riding and it is a must that you keep your eyes on the road, you are riding too fast. |
|
|
|
signart
|
|
« Reply #3 on: April 15, 2013, 06:25:13 AM » |
|
Looking good. You might want to reinforce the inside with some plastic radiator repair kits. Comes with the cloth & resin. Super strong & fast.
|
|
|
|
|
Logged
|
|
|
|
|
da prez
|
|
« Reply #4 on: April 15, 2013, 06:39:49 AM » |
|
JB weld is your best friend with the ABS bags. Scuff the surface well and use a small artist type or acic brush to spread the JB as the brush can not be used again. Use the JB on the outside after you start smoothing the surface. For the final touchup , body spot filler will stick to the JB Weld. A primer paint compatible with ABS plastic must be used.
I filled the seams on my bags before painting and tried several products. JB is the best ( not affiliated).
I went to a website ( google ABS repairs) and read it several times .
Good luck , and take your time.
da prez
|
|
|
|
|
Logged
|
|
|
|
Xtracho
Member
Posts: 1303
The Bosses
Florida's Emerald Coast
|
|
« Reply #5 on: April 15, 2013, 06:48:16 AM » |
|
I second the JB Weld. After my deer encounter in January my left saddlebag was busted pretty bad around the hinge where the lid mounts to the bag. JB Weld on the outside underneath the hinge and inside the bag. After drying I sanded it down even to the level of the bag and used a backing plate with ny-lock nuts to secure the hinge/lid back to the saddlebag. It will need touch up painting for sure, but the fit of the lid on the saddle bag is as tight as it ever was.
|
|
|
|
|
Logged
|
Mark
"To live you must be willing to die" - Amir Vahedi
My father gets smarter each day he is gone.
In the stable:
'84 GW Aspencade
'47 Indian Chief
'98 Valkyrie
|
|
|
|
F6BANGER
|
|
« Reply #6 on: April 15, 2013, 07:03:56 AM » |
|
Paint some of this on the inside to melt the abs together.....you can use it on the outside and sand it down smooth too......  |
|
|
|
|
Logged
|
|
|
|
Tropic traveler
Member
Posts: 3117
Livin' the Valk, er, F6B life in Central Florida.
Silver Springs, Florida
|
|
« Reply #7 on: April 15, 2013, 11:59:22 AM » |
|
Nothing a little sanding wouldn't take care of. What else is needed to do what you have done besides the soldering gun, rods, cleaner, etc?
Just a soldering iron & some patience. I have a feeling what I have done so far is the easy part! |
|
|
|
|
Logged
|
'13 F6B black-the real new Valkyrie Tourer
'13 F6B red for Kim
'97 Valkyrie Tourer r&w, OLDFRT's ride now!
'98 Valkyrie Tourer burgundy & cream traded for Kim's F6B
'05 SS 750 traded for Kim's F6B
'99 Valkyrie black & silver Tourer, traded in on my F6B
'05 Triumph R3 gone but not forgotten!
|
|
|
Tropic traveler
Member
Posts: 3117
Livin' the Valk, er, F6B life in Central Florida.
Silver Springs, Florida
|
|
« Reply #8 on: April 15, 2013, 06:26:29 PM » |
|
Paint some of this on the inside to melt the abs together.....you can use it on the outside and sand it down smooth too...... Sounds like a great idea! I went to Lowes but they didn't have that kind of ABS cement & they carried Oatey products. Where do you get that kind? |
|
|
|
|
Logged
|
'13 F6B black-the real new Valkyrie Tourer
'13 F6B red for Kim
'97 Valkyrie Tourer r&w, OLDFRT's ride now!
'98 Valkyrie Tourer burgundy & cream traded for Kim's F6B
'05 SS 750 traded for Kim's F6B
'99 Valkyrie black & silver Tourer, traded in on my F6B
'05 Triumph R3 gone but not forgotten!
|
|
|
Tropic traveler
Member
Posts: 3117
Livin' the Valk, er, F6B life in Central Florida.
Silver Springs, Florida
|
|
« Reply #9 on: April 15, 2013, 06:29:25 PM » |
|
Rough sanded the repaired area today with some nasty 60 grit. Knocked down the nasty areas & the high spots. Looks a lot better.  Looks like a saddlebag again!  |
|
|
|
|
Logged
|
'13 F6B black-the real new Valkyrie Tourer
'13 F6B red for Kim
'97 Valkyrie Tourer r&w, OLDFRT's ride now!
'98 Valkyrie Tourer burgundy & cream traded for Kim's F6B
'05 SS 750 traded for Kim's F6B
'99 Valkyrie black & silver Tourer, traded in on my F6B
'05 Triumph R3 gone but not forgotten!
|
|
|
|
Hook#3287
|
|
« Reply #10 on: April 15, 2013, 07:38:09 PM » |
|
Looking good  |
|
|
|
|
Logged
|
|
|
|
|
da prez
|
|
« Reply #11 on: April 15, 2013, 08:04:40 PM » |
|
If you can't get ABS black , do not use it. The universal solvent glue will not work.
Been there , tried it!
da prez
|
|
|
|
|
Logged
|
|
|
|
gordonv
Member
Posts: 5766
VRCC # 31419
Richmond BC
|
|
« Reply #12 on: April 15, 2013, 11:22:37 PM » |
|
If you can't get ABS black , do not use it. The universal solvent glue will not work.
Been there , tried it!
Thanks for that and the picture, I was wondering the same. Have some fairing pieces from the wrecked IS to practice on. Here is a link that was posted on GWdoc forum, about what you are doing, and mentioning about the Lo VOC abs cement. http://faq.ninja250.org/wiki/Plastics_repair_with_ABS_cement |
|
|
|
« Last Edit: April 15, 2013, 11:25:57 PM by gordonv »
|
Logged
|
1999 Black with custom paint IS   |
|
|
Garland
Member
Posts: 451
#618
Hendersonville NC
|
|
« Reply #13 on: April 16, 2013, 06:03:52 AM » |
|
Perfect opportunity to mount some tail lights on the bags.
While waiting for a new u-joint last week I took the opportunity to get some new lights installed in my bags while I had it all apart.   |
|
|
|
« Last Edit: April 16, 2013, 06:05:56 AM by Garland »
|
Logged
|
|
|
|
|
jmann
|
|
« Reply #14 on: April 16, 2013, 07:30:34 AM » |
|
|
|
|
|
|
Logged
|
|
|
|
Garland
Member
Posts: 451
#618
Hendersonville NC
|
|
« Reply #15 on: April 16, 2013, 08:11:56 AM » |
|
The leds are Custom Dynamics http://www.customdynamics.com/led_billet_circle.htmIt took a little while to make the shims to angle them down but otherwise pretty easy. I originally had the oem turnsignals integrated a bit lower, but had to remove them and fill the holes when I got the chrome saddlebag rails. .jpg) |
|
|
|
« Last Edit: April 16, 2013, 08:23:52 AM by Garland »
|
Logged
|
|
|
|
Tropic traveler
Member
Posts: 3117
Livin' the Valk, er, F6B life in Central Florida.
Silver Springs, Florida
|
|
« Reply #16 on: April 16, 2013, 05:42:43 PM » |
|
If you can't get ABS black , do not use it. The universal solvent glue will not work.
Been there , tried it!
da prez
This is the stuff that I found. Looks like the same stuff except it's not lo-v.o.c. It stunk pretty good!   It went on real smooth & looks like it filled in all the gaps & holes nicely.   And this one is for you Red Diamond.... The $3.99 soldering iron that melted all that ABS.   I'll let it set a couple of days before I try to sand it down a bit. |
|
|
|
|
Logged
|
'13 F6B black-the real new Valkyrie Tourer
'13 F6B red for Kim
'97 Valkyrie Tourer r&w, OLDFRT's ride now!
'98 Valkyrie Tourer burgundy & cream traded for Kim's F6B
'05 SS 750 traded for Kim's F6B
'99 Valkyrie black & silver Tourer, traded in on my F6B
'05 Triumph R3 gone but not forgotten!
|
|
|
|
Red Diamond
|
|
« Reply #17 on: April 16, 2013, 07:43:18 PM » |
|
Thanks Traveler, I've been following your thread closely, I have a crack in the fairing where the bike leaned against a wall before I got it. All the info has been very helpful.
|
|
|
|
|
Logged
|
If you are riding and it is a must that you keep your eyes on the road, you are riding too fast. |
|
|
|
old2soon
|
|
« Reply #18 on: April 17, 2013, 05:50:10 PM » |
|
Search Tue Value Hardware and when you get to their home page enter 127862 in the search bar and i'm hoping this is the correct stuff. Could NOT find the can pictured even with the # off the can. And my True Value handles the Oatey line of cements. RIDE SAFE.
|
|
|
|
|
Logged
|
Today is the tommorow you worried about yesterday. If at first you don't succeed screw it-save it for nite check. 1964 1968 U S Navy. Two cruises off Nam.
VRCCDS0240 2012 GL1800 Gold Wing Motor Trike conversion
|
|
|
Tropic traveler
Member
Posts: 3117
Livin' the Valk, er, F6B life in Central Florida.
Silver Springs, Florida
|
|
« Reply #19 on: April 17, 2013, 06:28:37 PM » |
|
If you can't get ABS black , do not use it. The universal solvent glue will not work.
Been there , tried it!
Thanks for that and the picture, I was wondering the same. Have some fairing pieces from the wrecked IS to practice on. Here is a link that was posted on GWdoc forum, about what you are doing, and mentioning about the Lo VOC abs cement. http://faq.ninja250.org/wiki/Plastics_repair_with_ABS_cementThe ABS cement I bought seems to have worked exactly like the link said it would. I guess the Lo-v.o.c. part was just for lung protection, not affecting the way it works. Anyways I sanded it off to a MUCH smoother surface tonight. It behaves very much like bondo except it seems to have "melted" into the black, exposed raw ABS. Had to apply a 2nd coat to fill in a couple of spots I missed yesterday, I will give it a couple of days curing time before I sand it again. |
|
|
|
|
Logged
|
'13 F6B black-the real new Valkyrie Tourer
'13 F6B red for Kim
'97 Valkyrie Tourer r&w, OLDFRT's ride now!
'98 Valkyrie Tourer burgundy & cream traded for Kim's F6B
'05 SS 750 traded for Kim's F6B
'99 Valkyrie black & silver Tourer, traded in on my F6B
'05 Triumph R3 gone but not forgotten!
|
|
|
|


