Gavin_Sons
Member

Posts: 7109
VRCC# 32796
columbus indiana
|
 |
« on: August 31, 2013, 11:18:16 AM » |
|
I was looking at the pipes on my IS just a few minutes ago and was wondering if any of you guys had to make a new exhaust hanger for truck stacks to clear the back of the saddle bags. Looks to me the stacks will hit the rear of the saddlebags where it drops down. I was thinking about making a hanger to drop the pipes a half of an inch to clear this. Or is it not a problem?
|
|
|
|
|
 Logged
|
|
|
|
|
Chillerman
|
|
« Reply #1 on: August 31, 2013, 03:25:23 PM » |
|
Not an Interstate, but I think I have the same hardware. I don't see how it could be a problem. 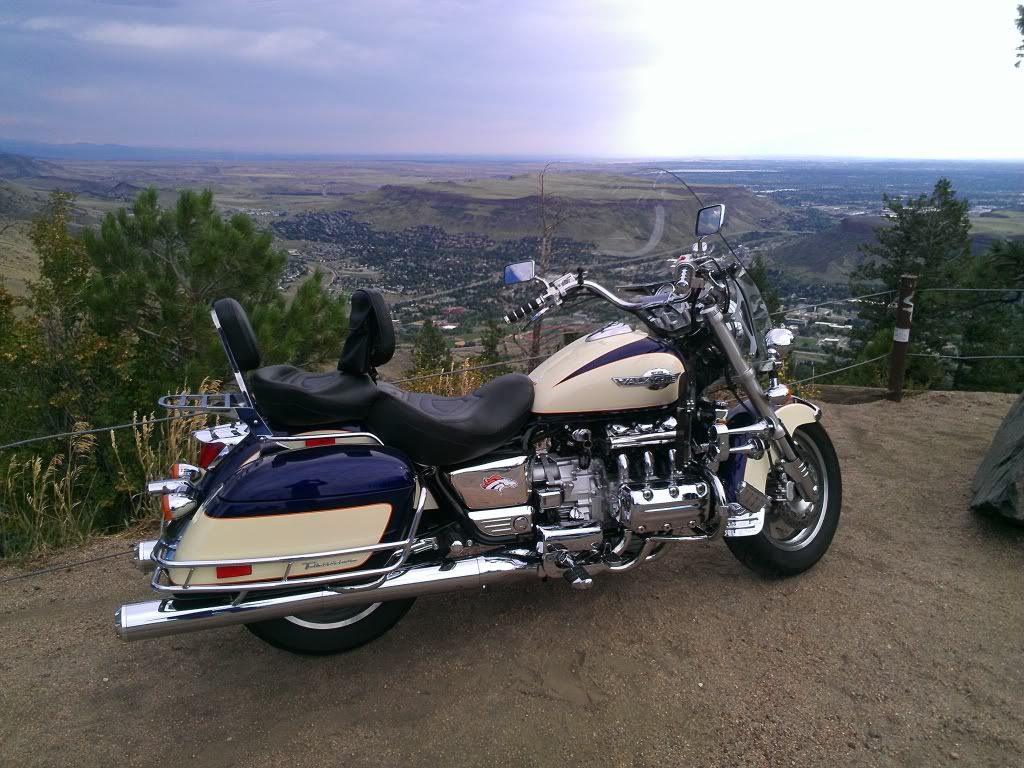 |
|
|
|
|
Logged
|
The problem with Socialists is they eventually run out of other people's money to spend!
Some people are too stupid to realize how ignorant they are.
|
|
|
|
EEEZZRIDER
|
|
« Reply #2 on: August 31, 2013, 03:55:07 PM » |
|
You should be ok with 4" stacks. I was one of the original 5" guys and i'm ok. if you go to 5" stacks they will have to be 5" OD not ID
|
|
|
|
|
Logged
|
|
|
|
|
six2go #152
|
|
« Reply #3 on: August 31, 2013, 04:16:40 PM » |
|
" I was one of the original 5" guys" And you're bragging about it?  |
|
|
|
|
Logged
|
|
|
|
Gavin_Sons
Member
Posts: 7109
VRCC# 32796
columbus indiana
|
|
« Reply #4 on: August 31, 2013, 04:33:11 PM » |
|
I got 4" od
|
|
|
|
|
Logged
|
|
|
|
John Schmidt
Member
Posts: 15369
a/k/a Stuffy. '99 I/S Valk Roadsmith Trike
De Pere, WI (Green Bay)
|
|
« Reply #5 on: August 31, 2013, 05:35:00 PM » |
|
Mine rubbed a bit so I just got out my air driven hack saw and cut off the end of the bag guard that drops down. Been that way for close to ten years with no problems on the bags.
|
|
|
|
|
Logged
|
|
|
|
fudgie
Member
Posts: 10651
Better to be judged by 12, then carried by 6.
Huntington Indiana

|
|
« Reply #6 on: August 31, 2013, 05:37:42 PM » |
|
" I was one of the original 5" guys" And you're bragging about it? |
|
|
|
|
Logged
|
 Now you're in the world of the wolves... And we welcome all you sheep... VRCC-#7196 VRCCDS-#0175 DTR PGR |
|
|
|
jdp
|
|
« Reply #7 on: September 01, 2013, 12:08:36 PM » |
|
This is for chillerman,I like the truck stack look,are those 4 inch od? And what kind of seat is that you have on your bike? Bike looks really nice.thanks,jim
|
|
|
|
|
Logged
|
|
|
|
|
Chillerman
|
|
« Reply #8 on: September 01, 2013, 12:49:14 PM » |
|
This is for chillerman,I like the truck stack look,are those 4 inch od? And what kind of seat is that you have on your bike? Bike looks really nice.thanks,jim
Not to hijack the thread, but my exhaust EXTENSIONS are from Airflo http://store.airflo.com/chrome-exhaust.htmlThe seat is an Utilmate King Big Boy. http://ultimateseats.ca/about.html |
|
|
|
« Last Edit: September 01, 2013, 12:52:16 PM by Chillerman »
|
Logged
|
The problem with Socialists is they eventually run out of other people's money to spend!
Some people are too stupid to realize how ignorant they are.
|
|
|
|
BradValk48237
|
|
« Reply #9 on: September 01, 2013, 02:11:23 PM » |
|
I did also just bend the edge of the shields on my I/S to clear my 18" airflow extensions...
B
|
|
|
|
|
Logged
|
|
|
|
Gavin_Sons
Member
Posts: 7109
VRCC# 32796
columbus indiana
|
|
« Reply #10 on: September 01, 2013, 07:11:35 PM » |
|
Thats what I was thinking, bend the heat shields or cut the ends off. Rather not cut them off, maybe an adjustable wrench and a little bending will get them cleared.
|
|
|
|
|
Logged
|
|
|
|
fudgie
Member
Posts: 10651
Better to be judged by 12, then carried by 6.
Huntington Indiana
|
|
« Reply #11 on: September 02, 2013, 05:59:45 AM » |
|
I had to bend my shields the other way. They were digging into my bags. ???
|
|
|
|
|
Logged
|
Now you're in the world of the wolves... And we welcome all you sheep... VRCC-#7196 VRCCDS-#0175 DTR PGR |
|
|
fudgie
Member
Posts: 10651
Better to be judged by 12, then carried by 6.
Huntington Indiana
|
|
« Reply #12 on: September 02, 2013, 06:02:03 AM » |
|
I had to eventually run a screw thru each pipe from underneth cause the stack kept working its way back. Dont go wild with the vasoline when putting your stacks on, you will smell it for weeks.  |
|
|
|
|
Logged
|
Now you're in the world of the wolves... And we welcome all you sheep... VRCC-#7196 VRCCDS-#0175 DTR PGR |
|
|
Gavin_Sons
Member
Posts: 7109
VRCC# 32796
columbus indiana
|
|
« Reply #13 on: September 02, 2013, 06:39:49 AM » |
|
Ill use bar soap
|
|
|
|
|
Logged
|
|
|
|
|
dan7uk
|
|
« Reply #14 on: September 02, 2013, 04:38:36 PM » |
|
How are the truck stacks installed? Are they driven on or held on with screws? How hard are they to installed?
Interested in 45 degree stacks, if driven on not sure how to keep the miter in the direction I want it to point. Looks like a one shot install.
|
|
|
|
|
Logged
|
|
|
|
Gavin_Sons
Member
Posts: 7109
VRCC# 32796
columbus indiana
|
|
« Reply #15 on: September 02, 2013, 05:21:59 PM » |
|
Most drive them on, a few have put a screw in them to keep in place. It seems pretty easy, we will see when mine get here this week.
|
|
|
|
|
Logged
|
|
|
|
|
dan7uk
|
|
« Reply #16 on: September 02, 2013, 08:01:43 PM » |
|
Sure would like an update on your install when completed. I like the look of the stacks but the install has me puzzled to go ahead with the purchase. Your feedback would be helpful.
|
|
|
|
|
Logged
|
|
|
|
Gavin_Sons
Member
Posts: 7109
VRCC# 32796
columbus indiana
|
|
« Reply #17 on: September 03, 2013, 08:08:13 AM » |
|
i'll post pictures and what i did when i get done
|
|
|
|
|
Logged
|
|
|
|
|
john
|
|
« Reply #18 on: September 03, 2013, 08:13:41 AM » |
|
the long stacks are notched (8" x 2") for the hanger and slide on over the mufflers . its a tight fit . slide the stack on as far as they will go and use a piece if 2x6 over the exhaust end for cover "gently " tap with a hammer into place ... long stacks look sooooo good  my right side stack stays in place ... the left side stack needs a tap now and then no big deal ... just enuff for me to notice bigbf did mine ...  thanks again bill  |
|
|
|
|
Logged
|
vrcc # 19002
|
|
|
Gavin_Sons
Member
Posts: 7109
VRCC# 32796
columbus indiana
|
|
« Reply #19 on: September 03, 2013, 08:58:33 AM » |
|
im going with 38 or 39 inches. i got 48 inch stacks which i'll cut down with the big band saw at work for a nice straight cut. think i will go with 38 because i ordered a set of grumpys tips that will be here thursday. The tips will give me the extra inch i'm looking for. Also got a can of chrome paint to paint the cut edges so they wont rust.
|
|
|
|
|
Logged
|
|
|
|
John Schmidt
Member
Posts: 15369
a/k/a Stuffy. '99 I/S Valk Roadsmith Trike
De Pere, WI (Green Bay)
|
|
« Reply #20 on: September 03, 2013, 01:22:28 PM » |
|
How are the truck stacks installed? Are they driven on or held on with screws? How hard are they to installed?
Interested in 45 degree stacks, if driven on not sure how to keep the miter in the direction I want it to point. Looks like a one shot install.
They stay pretty much in the starting position, partly because you have to cut a slot at the front end to accomodate the exhaust hanger. Years ago I drove mine on but had to smooth off a couple high spots on the mufflers. Used a 2x4 on the end and a small hammer. Took a few minutes for each side and they haven't moved since. |
|
|
|
|
Logged
|
|
|
|
|
dan7uk
|
|
« Reply #21 on: September 03, 2013, 05:14:42 PM » |
|
How are the truck stacks installed? Are they driven on or held on with screws? How hard are they to installed?
Interested in 45 degree stacks, if driven on not sure how to keep the miter in the direction I want it to point. Looks like a one shot install.
They stay pretty much in the starting position, partly because you have to cut a slot at the front end to accomodate the exhaust hanger. Years ago I drove mine on but had to smooth off a couple high spots on the mufflers. Used a 2x4 on the end and a small hammer. Took a few minutes for each side and they haven't moved since. I'm talking about the 18" stacks, I didn't see any hangers for the tips. |
|
|
|
|
Logged
|
|
|
|
Gavin_Sons
Member
Posts: 7109
VRCC# 32796
columbus indiana
|
|
« Reply #22 on: September 03, 2013, 05:20:40 PM » |
|
There are 3 screws that hold on each tip. If you install just the 18 inch tips you will have to drill the holes for the screws. Wrap a piece of paper around old tips and punch the holes out then transfer them to new stacks.
|
|
|
|
|
Logged
|
|
|
|
fudgie
Member
Posts: 10651
Better to be judged by 12, then carried by 6.
Huntington Indiana
|
|
« Reply #23 on: September 03, 2013, 05:34:31 PM » |
|
You could find valk slash cuts that are already drilled. Had them on mine.
|
|
|
|
|
Logged
|
Now you're in the world of the wolves... And we welcome all you sheep... VRCC-#7196 VRCCDS-#0175 DTR PGR |
|
|
|
john
|
|
« Reply #24 on: September 03, 2013, 07:42:54 PM » |
|
" I'm talking about the 18" stacks " ???  never mind .... you will have many seems ... |
|
|
|
|
Logged
|
vrcc # 19002
|
|
|
|
dan7uk
|
|
« Reply #25 on: September 04, 2013, 05:31:04 AM » |
|
There are 3 screws that hold on each tip. If you install just the 18 inch tips you will have to drill the holes for the screws. Wrap a piece of paper around old tips and punch the holes out then transfer them to new stacks.
Great idea, thanks |
|
|
|
|
Logged
|
|
|
|
|
OzarkRider
|
|
« Reply #26 on: September 05, 2013, 08:02:34 AM » |
|
I tried 4x18 turnouts from Air Flow Systems, turned the facing down, they look good. but they drag on turns.  |
|
|
|
|
Logged
|
97 Valkyrie Tourer
83 V65 Magna
VRCC #34495
VRCCDS #00269
"You god-cursed, mean, dirty, son-of-a-bitch!"
"I wouldn't make it a habit of calling me that, son."
"Stole It From A Whore House In Creede"
|
|
|
|
dan7uk
|
|
« Reply #27 on: September 06, 2013, 04:20:08 AM » |
|
I tried 4x18 turnouts from Air Flow Systems, turned the facing down, they look good. but they drag on turns. Nice |
|
|
|
|
Logged
|
|
|
|
|
Hook#3287
|
|
« Reply #28 on: September 07, 2013, 04:29:40 PM » |
|
 The PO put these 24"x4" slash cut truck stacks mounted sideways on this bike. He used the same mounting holes as OEM. With the "Ragnar cut'" and these stacks she sounds nice. Never had a scrapping problem. |
|
|
|
|
Logged
|
|
|
|
gregk
Member
Posts: 794
Retired
Chippewa Falls, wi.
|
|
« Reply #29 on: September 07, 2013, 07:33:08 PM » |
|
I just installed truck stacks on my I/S. Heres my 3 cents. Personally oem pipes are worth BS. They just dont hold up . you can buy 4 36" truck stacks for the cost of replacing your oem pipes and it will look a lot cleaner. I could not get the straight cut pipes where I bought mine so I bought the 45deg slash cut. to save you a little home work here. I only took off the outer shell of the mufflers. clean up the burres on both pipes on the bike( like where the 3 bolts are that hold on the tail pipe.). grind down the seam on the left pipe, For me the install on the left pipe was harder, have someone watch the pipe move on the install. do a search here to find how to cut the pipe so it will slide over the hanger bolts. There is another thread about some one using some wood to help the install-- you can use a 4x4 trimed so it'll fit inside the pipe& cut it at 45deg. add a 3/4" by 6x6" to the angle end and then another 45 deg. piece to the back of that. cut the whole piece off flat. besure to use some long deck or drywall screws so it'll hold togather. use a mall to tap it on after you 50/50 Dawn Soap/water inside stack and outside muffler. Having a chop saw handy is good incase you mess up your wood. I suggest putting the Rt side on 2nd as I'm guessing it will go a lot quicker. I had the longest part at the top and was hoping to match that top up with the end of the bag but the bags wre at the painters so I just put them on. The farest end is about 2'' max from the rear of the bags. no screws needed for the stack to the muffler. Dont forget to cut off the 3 pipes so they cannot be seen out the rear of the bike.. If you want some sound just cut the pipes off at about 3" from the muffler. I did not have my bike back running till after I installed the stacks, so I would leave 6" of the exhaust pipes or piggies stick out of the muffler an fire it up to hear the sound, then if you want it a bit louder then cut off another 3". I would recamend leaving 3"min. stick out. I like to listen to tunes so I may add a little back on .
|
|
|
|
|
Logged
|
|
|
|
Gavin_Sons
Member
Posts: 7109
VRCC# 32796
columbus indiana
|
|
« Reply #30 on: September 08, 2013, 08:57:25 AM » |
|
I cut about 10 inches off the cans, that took the rear baffles completly off and left about 2 inches of can behind the front baffles. I like listening to music too but I have aftermarket speakers and an amp that is plenty loud enough. I ended up getting 48" stacks because I wanted mine cut at 38 and could not find them. Ill just cut them to length at work and use chrome paint on the cut edges. Also got grumpys tips to finish the ends.
|
|
|
|
|
Logged
|
|
|
|
fudgie
Member
Posts: 10651
Better to be judged by 12, then carried by 6.
Huntington Indiana
|
|
« Reply #31 on: September 08, 2013, 05:55:25 PM » |
|
How does it sound Gavin?
|
|
|
|
|
Logged
|
Now you're in the world of the wolves... And we welcome all you sheep... VRCC-#7196 VRCCDS-#0175 DTR PGR |
|
|
Gavin_Sons
Member
Posts: 7109
VRCC# 32796
columbus indiana
|
|
« Reply #32 on: September 08, 2013, 06:35:24 PM » |
|
Dont know yet, still have to cut the stacks down and slide them on the cans. Hopefully they got the big saw at work fixed so I can use it tomorrow and get these puppies installed tomorrow evening. It will be interesting to hear the difference.
|
|
|
|
|
Logged
|
|
|
|
Gavin_Sons
Member
Posts: 7109
VRCC# 32796
columbus indiana
|
|
« Reply #33 on: September 09, 2013, 06:26:12 PM » |
|
Some of you asked for me to post my process when finished. I couldnt find the length of 4" od stacks I wanted so I ordered a set that was 48" and cut them down to 38 with the bandsaw at work. On the stock exhaust I cut 10 1/2" off the end of the can which gave me about 2 inches of can left in front of the front baffle. Cut a slot 2" X 8 1/2" in the stacks with a jig saw to slide past the hangers. This was a loose fit so I took them out to the tig welder and spot welded the stacks in place. I used 4, 1/2" welds on each stack around the hangers. These puppies are solid. I actually took some chrome paint and hit the cut edges with a small paintbrush to keep from rusting. Finally I got to install them tonight when I got home. They were a tight fit and was worried about clearance. They ended up just barley touching the heat shields so im leaving it as is. The sound is awesome, nice deep tone, sounds like a motorcycle should. Ill post pictures tomorrow when it is light out along with a video so you can hear the sound. I know most audio on cameras suck so not sure how good it will turn out. Thanks to everyone for the suggestions.
|
|
|
|
|
Logged
|
|
|
|
|


