|
sawdustar
|
 |
« Reply #40 on: October 16, 2013, 11:09:14 AM » |
|
OK, here's my current update.
Today, I have replaced the rear shock bushings. The old ones had worn completely out. I have the O-ring set to install on the final drive, but I'm waiting on more parts before I take the back wheel off and work on the final drive and shaft splines. I ordered the bumpers for the rear wheel and also went ahead and ordered the front fork seals and dust seals.
I'm seriously hoping that I can have all this stuff done in the next 2 weeks....I'm just waiting on parts to arrive.
|
|
|
|
|
 Logged
|
Thank You,
Dennis
|
|
|
|
sawdustar
|
|
« Reply #41 on: October 21, 2013, 06:31:51 PM » |
|
Got the new front fork seals in today as well as the rear wheel rubber bumpers.
Any advice or pointers for working on the rear?
|
|
|
|
|
Logged
|
Thank You,
Dennis
|
|
|
Gryphon Rider
Member

Posts: 5232
2000 Tourer
Calgary, Alberta
|
|
« Reply #42 on: October 22, 2013, 08:13:47 AM » |
|
There is no need to remove the exhaust or remove the rear fender section to take off the rear wheel. The pipes do need to be pried out, however, so the swingarm will drop down. Remove the nuts behind (or inside, depending on how you think about it) (#14 below) the exhaust hangers, then first use a screwdriver to pry the exhaust away from the hanger, I use a couple of different sizes of open-end inch wrenches to continue prying and then slip a wrench over the stud to keep the exhaust spaced out. 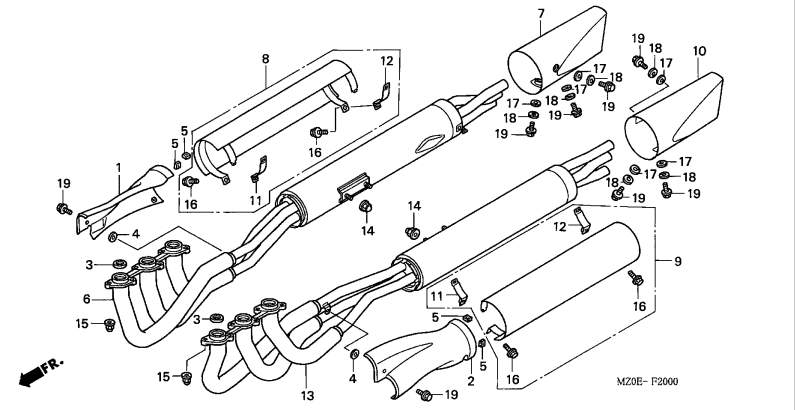 |
|
|
|
|
Logged
|
|
|
|
|
sawdustar
|
|
« Reply #43 on: October 28, 2013, 07:06:39 AM » |
|
The temps outside are nice and cool and that means the shop is perfect to work in. It's supposed to rain most every day this week...so that means I will have some time to work on the bike. I want to get all the work done on the rear end this week. I've already installed the new shock bushings. Now I need to take apart the rear end, final drive, and clean/lube everything, replace the old O-rings with the new poly O-rings, replace the old worn out rubber bumpers in the rear wheel with new ones, check all the other seals and bearings while back there. Anything I need to give a good look at while I have it all apart?
|
|
|
|
|
Logged
|
Thank You,
Dennis
|
|
|
|
sawdustar
|
|
« Reply #44 on: October 28, 2013, 08:47:45 AM » |
|
Oh yea, I forgot.....I will build the lift adapter today before starting.  |
|
|
|
|
Logged
|
Thank You,
Dennis
|
|
|
Gryphon Rider
Member
Posts: 5232
2000 Tourer
Calgary, Alberta
|
|
« Reply #45 on: October 28, 2013, 01:33:39 PM » |
|
Anything I need to give a good look at while I have it all apart?
It looks like you have it covered.  The only thing left to do is replace the Spokey Dokeys with new ones. If they get brittle and fall off, your wheels get out of balance.   |
|
|
|
|
Logged
|
|
|
|
|
sawdustar
|
|
« Reply #46 on: October 31, 2013, 07:04:19 PM » |
|
Well, found out tonight that I can't get to anything unless I take off the saddle bags, mounting frames, and the trailer hitch. Got down to pulling the axle tonight and found that I don't have a socket or wrench to fit the nut on the rear axle. I also found out that I have to pull the right side exhaust from the head back in order to have room to get the axle out. ALSO FOUND that one of the exhaust bolts on the head is broke off, leaving 5 good bolts and nuts at the exhaust / head. There is a stub sticking down from the broken header bolt, but I'm asking now.....how do I go about taking out the broken one? I never dreamed that just trying to remove a rear wheel on a bike would be so compllicated and time consuming.  |
|
|
|
|
Logged
|
Thank You,
Dennis
|
|
|
|
Hook#3287
|
|
« Reply #47 on: October 31, 2013, 07:16:54 PM » |
|
found that I don't have a socket or wrench to fit the nut on the rear axle. Did you get a tool kit? Check # 20 on this page. http://www.hondaparts-direct.com/fiche_section_detail.aspI also found out that I have to pull the right side exhaust from the head back in order to have room to get the axle out. Do a search in the "shoptalk" for the way to remove the rear wheel w/o removing the exhaust. |
|
|
|
|
Logged
|
|
|
|
|
Hook#3287
|
|
« Reply #48 on: October 31, 2013, 07:19:47 PM » |
|
The link for Honda direct didn't work. Go to the site and look up the tool page under any year Valk. #20 is a 27mm wrench that will work on the rear axle nut.
|
|
|
|
|
Logged
|
|
|
|
|
sawdustar
|
|
« Reply #49 on: October 31, 2013, 09:17:14 PM » |
|
Thank you. I will find a local location to purchase a 27mm wrench tomorrow. I had to remove the right side exhaust so that the axle will slip out of the wheel. I found no other way to do it without something being in the way of the axle removal.
|
|
|
|
|
Logged
|
Thank You,
Dennis
|
|
|
|
Jess from VA
|
|
« Reply #50 on: October 31, 2013, 09:45:43 PM » |
|
If you put the bike on a lift, remove the bags/shocks (not the bag supports), lower the bike down on the wheel (raising the swingarm), the axle will come out over the exhaust cans (the axle still gets very close to the bag support brackets, but if you diddle the jack/height just right, it will clear them). Before you lower the bike, loosen the rear exhaust support bolts, spread the rear pipes just a little bit (no need to remove or loosen the header bolts), and the axle nut will not contact/scratch the exhaust cans as you raise it past/over the cans. Pull the axle just enough to remove the rear brake caliper and spacer (hang the caliper on a coat hanger/rope, not the brake line), then push it back in (to hold the weight of the tire/wheel) and separate the final drive apart into two halves. There is a notch in the rubber/plastic dust cover around the center of the drive unit to stick a big screwdriver to wiggle it apart. Then pull the axle out. Then, if you don't want to remove the lower fender half, you raise the bike high enough to drop the tire/wheel out the bottom, crooked. The rear of the bike gets mighty light at this point so a jackstand or two under the front engine guards will keep it from leaning/falling forward off the jack.
|
|
|
|
« Last Edit: October 31, 2013, 09:48:55 PM by Jess from VA »
|
Logged
|
|
|
|
|
Michelin Man
|
|
« Reply #51 on: November 01, 2013, 05:35:10 AM » |
|
There is no need to take anything loose on the exhaust. Go to Dag's video and learn the easy way to remove the rear wheel. http://www.valkyrienorway.com/RWRemoval.html You still have to take the bags and rear shocks off. Hope this helps. Michelin Man |
|
|
|
|
Logged
|
Michelin Man
2000 Tourer
2005 Wing
2003 Tourer (Teresa's Bike)
|
|
|
|
sawdustar
|
|
« Reply #52 on: November 01, 2013, 06:19:06 AM » |
|
Thanks guys, I just KNEW there had to be a better way to do this than the way I was going about it. ???
Now.....what about the broken exhaust header bolt on the rear brake side? There is only one broken off and with the exhaust out of the way, I see about a 1/2" stubb sticking down. How would I go about removing the broken bolt and replacing it? It appears to have been broken off for a long time now.
|
|
|
|
|
Logged
|
Thank You,
Dennis
|
|
|
salty1
Member
Posts: 2359
"Flyka"
Spokane, WA or Tucson, AZ
|
|
« Reply #53 on: November 01, 2013, 06:27:25 AM » |
|
Sawduster I'm no expert but I guess I would hit it with penetrating oil and let it soak for a few days. Then with that 1/2 inch stub exposed, I'd put a vise grip on it and gently try to ease it out. I'm sure others will have some to add.
|
|
|
|
|
Logged
|
My rides: 1998 GL1500C, 2000 GL 1500CF,2006 GL 1800 3A   |
|
|
|
Jess from VA
|
|
« Reply #54 on: November 01, 2013, 07:13:18 AM » |
|
Or an easy out, if that doesn't work.
|
|
|
|
|
Logged
|
|
|
|
Gryphon Rider
Member
Posts: 5232
2000 Tourer
Calgary, Alberta
|
|
« Reply #55 on: November 01, 2013, 11:29:50 AM » |
|
Thanks guys, I just KNEW there had to be a better way to do this than the way I was going about it. ???
Now.....what about the broken exhaust header bolt on the rear brake side? There is only one broken off and with the exhaust out of the way, I see about a 1/2" stubb sticking down. How would I go about removing the broken bolt and replacing it? It appears to have been broken off for a long time now.
Have you tried putting a good pair of pliers/vicegrips on it to turn it? It could be that the stud broke off as the nut was being over-tightened rather than because the stud has seized in the head. If the pliers slip, file or grind flat spots on either side of the stud and try again. Heat and penetrating oil is also your friend. |
|
|
|
|
Logged
|
|
|
|
|
sawdustar
|
|
« Reply #56 on: November 01, 2013, 08:57:09 PM » |
|
Ok...finally got the rear wheel off and the final drive and shaft removed. No real wear that I can tell, but it all sure did need a good cleaning and regreasing. I did replace the "hidden" O-ring and applied new moly grease to that when I installed the new poly ring.
I still have to take the drive assembly apart on the wheel rim, clean it all up, replace the O-rings, replace the rubber bumpers, regrease it all, clean up the rim, and put it all back together.
I still haven't decided what to do about the broken exhaust stud. I spent $100 on tools just tonight so I could get my stuff apart. $30 for a single 27mm wrench..!!!! Add in 2 sockets and 2 socket reducing adapters for using different drive size sockets...and poof.....$100 bill......
Thank you....every one of you for your patience and advice so far. It is much appreciated.
|
|
|
|
|
Logged
|
Thank You,
Dennis
|
|
|
|
Jess from VA
|
|
« Reply #57 on: November 02, 2013, 04:41:50 AM » |
|
Regarding the acorn nut, one of mine was missing, and I just sistered up a pair of common nuts with antiseize. Not as pretty, but cannot be seen. I bought a half inch drive 27mm socket for much less than a whole wench, same thing for the smaller front axle nut.
|
|
|
|
|
Logged
|
|
|
|
Skinhead
Member
Posts: 8743
J. A. B. O. A.
Troy, MI
|
|
« Reply #58 on: November 02, 2013, 06:22:33 AM » |
|
As you probably know, you can't go wrong buying tools. For those rarely used items, harbor freight, while not for the professional, can be your friend.
With regard to that exhaust stud, a couple of good whacks with a hammer before vice grip application will help.
|
|
|
|
|
Logged
|
 Troy, MI |
|
|
|
sawdustar
|
|
« Reply #59 on: November 04, 2013, 05:59:28 AM » |
|
Well Good Morning to my friends and brother bikers here on VRCC.
First off, let me say this........T H A N K ..... Y O U..!!!!!!!
This group has been a true help and teacher to me during my adventure of working on my Valk.
Got the drive shaft lubed, got the new O-rings installed, put in the new rubber bumpers on the rear wheel hub, greased everything that needed it, cleaned up MANY years worth of dust, dirt, and crud that collected in all the various spots on the parts I was removing and repairing, and the new shock bushings have made a difference in the ride of the bike. Got it all put back together yesterday after church and rode is out to the end of the driveway and back to see that it all was seated and working. I will ride her to work today and see how she does.
I learned though....that I'm going to need a new rear brake rotor and new brake pads pretty soon. The rear rotor is worn pretty bad and I had to spread the pads a good bit in order to get the caliper off the rear rotor. So it now looks like I get to have more experiences in getting the rear wheel off and back on some time later this year or early next year.
I did not do anything about the broken exhaust bolt on the right side. I didn't have the replacement parts for it and I'll get the bolt and nut and make plans on replacing it later this winter.
What are the thoughts here about replacing all the exhaust header bolts on the motor? There are fairly rusty and I'd like to have some assurance that these will last me a nice long while. Wouldn't it be easier to remove the old one before they are broken with new bolts? Should I even be concerned about this and just shut up and ride?
|
|
|
|
|
Logged
|
Thank You,
Dennis
|
|
|
Skinhead
Member
Posts: 8743
J. A. B. O. A.
Troy, MI
|
|
« Reply #60 on: November 04, 2013, 06:54:35 AM » |
|
just shut up and ride.
Your words, not mine.  |
|
|
|
|
Logged
|
Troy, MI |
|
|
salty1
Member
Posts: 2359
"Flyka"
Spokane, WA or Tucson, AZ
|
|
« Reply #61 on: November 04, 2013, 06:54:58 AM » |
|
Good morning Sawduster! Glad your work on the Valk is progressing well. You don't have to pull the rear wheel agaiin to change out the rotor and brake pads, just pull the axel. If that isn't comfortable, remove the wheel. I probably would replace the worst looking studs and just clean up all the rest. One concern I would have is breaking more of them off. Remember the torque is only 7 ft lb or 84 in lbs on those little guys. I know you knew this already, just a cautionary note.
|
|
|
|
|
Logged
|
My rides: 1998 GL1500C, 2000 GL 1500CF,2006 GL 1800 3A |
|
|
salty1
Member
Posts: 2359
"Flyka"
Spokane, WA or Tucson, AZ
|
|
« Reply #62 on: November 04, 2013, 06:58:00 AM » |
|
just shut up and ride.
Your words, not mine. +1  Keep up the good work too! |
|
|
|
|
Logged
|
My rides: 1998 GL1500C, 2000 GL 1500CF,2006 GL 1800 3A |
|
|
|
sawdustar
|
|
« Reply #63 on: November 04, 2013, 03:21:20 PM » |
|
No matter the cloudiness and pending rain, I chose to ride her to work today. I took it easy going to work this morning, just in case I forgot to tighten something up.  The rain moved in before it was time to leave work for home....so I rode home in the rain (no rain gear as my son wore mine to college, took it off, laid it over his bike seat and burned a hole in my rain gear on his hot pipes. So....no more rain gear for dad.  Anyway, I rode her home and took the long way home. No more bumping/thumping when starting out or stopping. Smooth power transfer and all. The rear feels more solid and the ride was even more enjoyable (no matter if I was riding in the rain without my rain gear). Made it home and parked her back in the warm shop for her to dry off and stay warm for the night. I'm truly relieved that it all came together very well and I can tell the improvments in the ride and the way she handles. Thank You members of VRCC..!!!!! Thank You.!!!! |
|
|
|
|
Logged
|
Thank You,
Dennis
|
|
|
|
The emperor has no clothes
|
|
« Reply #64 on: November 04, 2013, 05:06:22 PM » |
|
That's what's best about this site! People helping other people. I know I got plenty of info and help from this club! |
|
|
|
|
Logged
|
|
|
|
|
Hook#3287
|
|
« Reply #65 on: November 05, 2013, 05:34:47 AM » |
|
To me, this post is what the VRCC is all about.
A new Valk rider comes here with hat in hand questions and everyone pitches in and gives the knowledge and advice needed to bring a Valk back to glory.
With all the concerns lately about political posts, personal attacks, etc, etc, this post shines through to show what this board is REALLY all about.
Feel good VRCC members, you deserve it.
Now, so I don't get blamed for Hy-jacking, Sawdustar, keep an eye on the bottom of your intakes for some residue that could mean you need to replace the intake o-rings, your mileage calls for it.
Do a search in the Tech board for "intake o-rings" and you'll see what's up there.
|
|
|
|
« Last Edit: November 05, 2013, 05:38:35 AM by Hook#3287 »
|
Logged
|
|
|
|
|
sawdustar
|
|
« Reply #66 on: November 05, 2013, 10:42:54 AM » |
|
Thanks Hook.!!!
I'll go look at that right now.
|
|
|
|
« Last Edit: November 05, 2013, 10:54:17 AM by sawdustar »
|
Logged
|
Thank You,
Dennis
|
|
|
salty1
Member
Posts: 2359
"Flyka"
Spokane, WA or Tucson, AZ
|
|
« Reply #67 on: November 05, 2013, 11:12:49 AM » |
|
Thanks Hook.!!!
I'll go look at that right now.
Sawduster didn't you desmog your bike? If you did, you more likely than not replaced the Orings Hook is talking about. |
|
|
|
|
Logged
|
My rides: 1998 GL1500C, 2000 GL 1500CF,2006 GL 1800 3A |
|
|
salty1
Member
Posts: 2359
"Flyka"
Spokane, WA or Tucson, AZ
|
|
« Reply #68 on: November 05, 2013, 11:21:29 AM » |
|
If haven't desmogged the bike, you can purchase the kit from redeye. https://sites.google.com/site/valkparts/ |
|
|
|
|
Logged
|
My rides: 1998 GL1500C, 2000 GL 1500CF,2006 GL 1800 3A |
|
|
|
sawdustar
|
|
« Reply #69 on: November 05, 2013, 12:36:19 PM » |
|
Desmog...??? ??? ??? I guess I better read up to see what that is and if I need to do it.  |
|
|
|
|
Logged
|
Thank You,
Dennis
|
|
|
Gryphon Rider
Member
Posts: 5232
2000 Tourer
Calgary, Alberta
|
|
« Reply #70 on: November 05, 2013, 01:14:01 PM » |
|
Desmog...??? ??? ??? I guess I better read up to see what that is and if I need to do it. Valkyrie equivalent of circumcision. Some do, some don't. Pay proper attention to your hoses and it's not medi mechanically required. Some think it looks cleaner; others can't be bothered to look too hard. |
|
|
|
|
Logged
|
|
|
|
|
musclehead
|
|
« Reply #71 on: November 08, 2013, 12:55:40 PM » |
|
Timing Belts?
gates 275 from amazon under $17 bucks a piece..... |
|
|
|
|
Logged
|
'in the tunnels uptown, the Rats own dream guns him down. the shots echo down them hallways in the night' - the Boss
|
|
|
|
musclehead
|
|
« Reply #72 on: November 08, 2013, 01:00:29 PM » |
|
Timing Belts?
Not something to get anxious about. I've never heard anyone say, "Holy cow, I'm glad I looked at the belts 'cause they were looking dodgy." What I HAVE heard a lot of is, "My bike is getting up in miles, so I bought replacement belts, then found the old ones to be in excellent shape, but replaced them anyway." mine looked great! and not too many miles, but they were 13 years old so I replaced them... |
|
|
|
|
Logged
|
'in the tunnels uptown, the Rats own dream guns him down. the shots echo down them hallways in the night' - the Boss
|
|
|
|


