|
Farther
|
 |
« Reply #40 on: November 14, 2013, 09:35:06 AM » |
|
|
|
|
|
|
 Logged
|
Thanks,
~Farther
|
|
|
gordonv
Member

Posts: 5766
VRCC # 31419
Richmond BC
|
|
« Reply #41 on: November 14, 2013, 09:56:11 PM » |
|
 There was a post maybe a year or more ago, with someone who took a can, strung it up, added a connector and a hose to the carbs. I couldn't find it, but that allowed him to supply fuel to the bike, while the tank was off. You can do that after the petcock. Get the bike to run. Then work on the petcock after your kit comes in.
|
|
|
|
|
Logged
|
1999 Black with custom paint IS   |
|
|
Patrick
Member
Posts: 15433
VRCC 4474
Largo Florida
|
|
« Reply #42 on: November 15, 2013, 03:39:47 AM » |
|
I am waiting for a new petcock cover set to arrive. In the meantime I thought I would pull, clean and check the gap on all the plugs. I was wondering if could take a small container of fresh gas and connect it to the fuel intake hose and attempt a start. I thought drawing some fresh gas into the carbs and then pulling the drain plugs would be helpful, especially if there was some fuel conditioner in it. Maybe, I would also get lucky and get an actual start. What do you think ??? Also, I lost the small clamp on the vacuum hose. What is the chance a local auto parts store would have them?
Do you read the previous posts ? Like #36 |
|
|
|
|
Logged
|
|
|
|
|
longrider
|
|
« Reply #43 on: November 15, 2013, 06:44:04 AM » |
|
I would run fuel into the hose as you suggested. One thing that was mentioned in a post at the start of this thread and is good advice.... IF the carbs are drained for storage (as I do) the vacuum hose off number six must be removed and vacuum applied for at least a couple of minutes to let fuel down into the bowls. If this is not done it takes a long time to build vacuum on the starter and if the fuel finally gets there the battery may not have enough to fire the plugs.
warren
|
|
|
|
|
Logged
|
|
|
|
|
Cappy
|
|
« Reply #44 on: November 15, 2013, 08:36:51 AM » |
|
Thanks for all the recent posts and tips. It's gonna get hot today here in Minnesota. Might hit 52 degrees F. So I am thinking of working outside and hooking up a alternate fuel supply and trying a start again. I did read reply # 36 earlier, but wasn't sure at that time how the vacuum issue would be resolved to get fuel into the carbs. I think I am clear on that now. So after I get some sunscreen on I will begin that project. I will continue to check on any new posts to see if any more advice comes in. Now, where's my Speedo?
|
|
|
|
|
Logged
|
|
|
|
Gryphon Rider
Member
Posts: 5234
2000 Tourer
Calgary, Alberta
|
|
« Reply #45 on: November 15, 2013, 09:14:36 AM » |
|
Now, where's my Speedo?
It's the white thing on the left. Geez...some people need EVERYTHING explained!  Just don't ask Stanley Steamer where HIS Speedo is!  |
|
|
|
|
Logged
|
|
|
|
|
Cappy
|
|
« Reply #46 on: November 15, 2013, 10:37:53 AM » |
|
Well, that WAS funny! I'm thinking Stanley Steamer in a Speedo may not be such a sight as to match the view of the Canadian Rockies. But, who am I to say?  |
|
|
|
|
Logged
|
|
|
|
|
Cappy
|
|
« Reply #47 on: November 15, 2013, 11:30:58 AM » |
|
Hey. Exactly which one is #6 cylinder?
|
|
|
|
|
Logged
|
|
|
|
Patrick
Member
Posts: 15433
VRCC 4474
Largo Florida
|
|
« Reply #48 on: November 15, 2013, 11:47:17 AM » |
|
Hey. Exactly which one is #6 cylinder?
Brake pedal side is/are #s 1,3,5 front to rear Shift lever side is/are #s 2,4,6 front to rear |
|
|
|
|
Logged
|
|
|
|
|
Cappy
|
|
« Reply #49 on: November 15, 2013, 01:58:27 PM » |
|
Houston: We have ignition!! Ran fresh gas into the the fuel intake tube and with a full choke on got a pretty quick start. Seemed to run fairly stong after I remembered to take the choke off. Seemed to be idleing in well, but i didn't want to push it. Just prior to start I pulled the carb drain plugs, and seemed to get good flow from each carb. I have some carb cleaner in the gas, and will let that sit until my petcock cover set arrives. I will let you all know what's up after, hopefully, a successful rebuild and start-up. Thanks to all who contributed advice up to this point. You guys almost made this fun.  |
|
|
|
|
Logged
|
|
|
|
|
Bone
|
|
« Reply #50 on: November 15, 2013, 02:02:44 PM » |
|
|
|
|
|
|
Logged
|
|
|
|
salty1
Member
Posts: 2359
"Flyka"
Spokane, WA or Tucson, AZ
|
|
« Reply #51 on: November 15, 2013, 04:35:06 PM » |
|
|
|
|
|
|
Logged
|
My rides: 1998 GL1500C, 2000 GL 1500CF,2006 GL 1800 3A   |
|
|
|
Cappy
|
|
« Reply #52 on: November 18, 2013, 01:42:59 PM » |
|
Just received my new petcock cover set. Will begin shortly, but don't remember seeing a small O-Ring when I took the petcock apart before. I will look more closely for it this time, but any advice as to where it goes might be helpful. Thanks.
|
|
|
|
|
Logged
|
|
|
|
|
Bone
|
|
« Reply #53 on: November 18, 2013, 02:16:18 PM » |
|
The cover set I have is part # 16953-MBZ-B51
It doesn't have a O ring in the kit.
|
|
|
|
|
Logged
|
|
|
|
|
Cappy
|
|
« Reply #54 on: November 18, 2013, 02:37:50 PM » |
|
My kit from K&l part#18-5018 is labled FCK-41 Petcock
repair kit. Just to my petcock apart again and see no O-ring. All new parts seem identical in every way to the originals, and seem to fit perfectly. Just came with an O-ring.
Question: the smaller rubber part that covers the small hole leading into the ball chamber is attached to the metal piece on one side of the middle section, and is attached to the diaphram on the other side THROUGH the hole, right??
|
|
|
|
|
Logged
|
|
|
|
|
Ricky-D
|
|
« Reply #55 on: November 18, 2013, 02:40:27 PM » |
|
Could be the 'O'ring that goes with the screen up in the bung.
***
|
|
|
|
|
Logged
|
2000_Valkyrie_Interstate
|
|
|
|
Cappy
|
|
« Reply #56 on: November 18, 2013, 03:33:56 PM » |
|
Yes, it could be for that. My screen is still in the tank, but looks good as far as I can see. I had no signs of rust or debris when I drained my tank. At first I thought I had lost the screen, but it's in position, and resisted a minor attempt to remove it. So I left it alone. It does look like there is an O-ring there. Well, I just finished reassembling the petcock, and I think I have it right. With a long straw on the vacuum tube I can see the diaphram move. The straw also holds good vacuum against the tip of my tongue until I release it. I think that's a good sign. Tomorrow, I hope to put the tank back on, fill with fresh fuel and attempt a start. Is there anything else I should do or look for at his point?
|
|
|
|
|
Logged
|
|
|
|
hubcapsc
Member
Posts: 16816
upstate
South Carolina
|
|
« Reply #57 on: November 18, 2013, 03:50:58 PM » |
|
Yes, it could be for that. My screen is still in the tank, but looks good as far as I can see. I had no signs of rust or debris when I drained my tank. At first I thought I had lost the screen, but it's in position, and resisted a minor attempt to remove it. So I left it alone. It does look like there is an O-ring there. Well, I just finished reassembling the petcock, and I think I have it right. With a long straw on the vacuum tube I can see the diaphram move. The straw also holds good vacuum against the tip of my tongue until I release it. I think that's a good sign. Tomorrow, I hope to put the tank back on, fill with fresh fuel and attempt a start. Is there anything else I should do or look for at his point?
Whenever I manage to get the delicate diaphragms together without damaging them, and the petcock passes the test you described it has always been good to go -Mike |
|
|
|
|
Logged
|
|
|
|
|
Cappy
|
|
« Reply #58 on: November 18, 2013, 04:02:15 PM » |
|
Yipee! Good to know. Hopefully, the Valkyrie will start and I can get a short ride in tomorrow. It's suppose to maybe get up into the 50's, which ain't bad for Minnesota right now.
|
|
|
|
|
Logged
|
|
|
|
|
Cappy
|
|
« Reply #59 on: November 18, 2013, 05:01:41 PM » |
|
I was thinking the same thing about the hose clamps, too. I only got a couple of gallons of 91 octane cuz it is suppose to alcohol free. I figured I would top the tank of with regular after I'm done spilling it all over. Also, hope to burn some up taking a little test ride as it hasn't be ridden in over two years.
|
|
|
|
|
Logged
|
|
|
|
Patrick
Member
Posts: 15433
VRCC 4474
Largo Florida
|
|
« Reply #60 on: November 19, 2013, 03:54:38 AM » |
|
Some stations do have non-ethanol only in the high octane. If this monster hasn't been run in a couple years then I'd recommend mixing in some fuel additive like Sea-foam.
|
|
|
|
|
Logged
|
|
|
|
Gryphon Rider
Member
Posts: 5234
2000 Tourer
Calgary, Alberta
|
|
« Reply #61 on: November 19, 2013, 08:12:57 AM » |
|
I completely disagree with starting the bike up every week throughout the winter. A lot of time and gas and wear and tear for no real benefit. Fill the tank, add stabilizer, run the engine until you know treated gas is through your system. If you want to empty the carbs, turn off the fuel and run it out of gas, or use the carb drains. Change the oil and filter. Pull the battery and fully charge it with a low current every 3-6 weeks or keep a smart maintenance charger on it constantly. Clean, wax, and cover the bike until its spring debut ride.
|
|
|
|
|
Logged
|
|
|
|
|
Ricky-D
|
|
« Reply #62 on: November 19, 2013, 09:25:00 AM » |
|
Yeah, I agree!
That running the bike for a few minutes (or even more) can do no good and possibly harm things.
I like draining the carburetors so there is no possibility of fowling the jets or galleries.
If fuel is going to be left in the carburetors it would be beneficial to stand the bike upright.
***
|
|
|
|
|
Logged
|
2000_Valkyrie_Interstate
|
|
|
|
Cappy
|
|
« Reply #63 on: November 19, 2013, 02:21:28 PM » |
|
Well, it's been a good day & a bad day. The 97' started right off ater installing the fuel tank and puttin in some fresh gas. Got a pretty good idle going once off choke,but had to shut down cuz fuel was running on the ground. A closer look revealed gas leaking from the switch side where the housing rivetts are. It was leaking strongly from the seams. Broke it all down and examined the petcock, and can not see what could be wrong. The new parts look good and in place, unless I have something backwards, etc. I took some pictures, but don't know how to post them.
Any ideas??
|
|
|
|
|
Logged
|
|
|
|
|
HayHauler
|
|
« Reply #64 on: November 19, 2013, 02:51:58 PM » |
|
i threw all them little bitty hoseclamps away about 3 years ago, too hard to work with and most of the lines are vaccum lines so thay aint gonna fall off.
premium fuel might make you feel better but the valk was designed to use 87 octain regular, it runs better with it. going to premium DOES NOT give you hotter gas, quite the contrary, premium runs colder. i live at 4,00 ft. and regularly run 85 octain regular, valk runs great on it, but at all other elevations the bike wants 87 octaine.
+1 on losing the hose clamps. I ran one on my fuel line for a while, but don't even use that one any longer. Hay  Jimmyt |
|
|
|
|
Logged
|
|
|
|
hubcapsc
Member
Posts: 16816
upstate
South Carolina
|
|
« Reply #65 on: November 19, 2013, 02:56:37 PM » |
|
I'm going from memory, but this could be relavant to "leaking from the seams"... When on the left side of the bike, the gas output should be at 9:00. The weep hole should be at 6:00. I've never put it back together any other way, but when I first rebuilt a petcock I remember reading warnings about how easy it was to put the layers together wrong... Here's some pictures from the tech board:   -Mike |
|
|
|
|
Logged
|
|
|
|
Gryphon Rider
Member
Posts: 5234
2000 Tourer
Calgary, Alberta
|
|
« Reply #66 on: November 19, 2013, 06:23:26 PM » |
|
Well, it's been a good day & a bad day. The 97' started right off ater installing the fuel tank and puttin in some fresh gas. Got a pretty good idle going once off choke,but had to shut down cuz fuel was running on the ground. A closer look revealed gas leaking from the switch side where the housing rivetts are. It was leaking strongly from the seams. Broke it all down and examined the petcock, and can not see what could be wrong. The new parts look good and in place, unless I have something backwards, etc. I took some pictures, but don't know how to post them.
Any ideas??
I wonder if the leak only appears to be from that seam, but is actually from the o-ring that seals the valve to the tank; item 6 below. 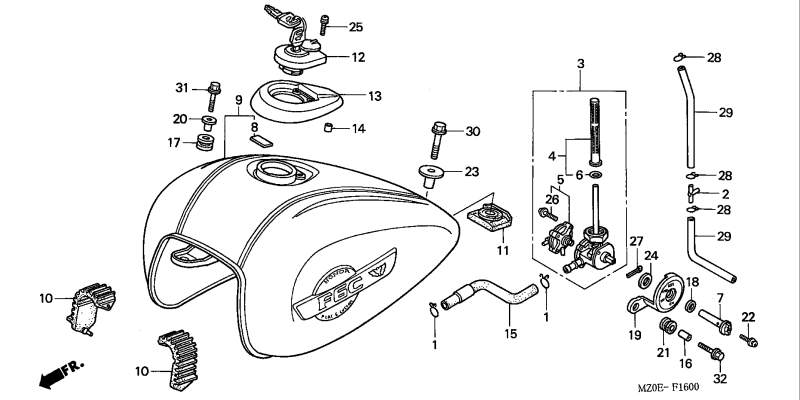 |
|
|
|
|
Logged
|
|
|
|
|
Cappy
|
|
« Reply #67 on: November 20, 2013, 09:33:22 AM » |
|
Thanks. These pictures are helpful, but it sure seems like I put it back together right. However, I will repeat the process with the aid of these pictures, and go from there. The picture with the arrow accurately shows where the fuel was leaking from. One more try, and then the new petcock idea seems logical.
|
|
|
|
|
Logged
|
|
|
|
hubcapsc
Member
Posts: 16816
upstate
South Carolina
|
|
« Reply #68 on: November 20, 2013, 09:46:14 AM » |
|
Thanks. These pictures are helpful, but it sure seems like I put it back together right. However, I will repeat the process with the aid of these pictures, and go from there. The picture with the arrow accurately shows where the fuel was leaking from. One more try, and then the new petcock idea seems logical.
Here's the thread that picture came from: http://www.valkyrieforum.com/bbs/index.php/topic,20617.0.html |
|
|
|
|
Logged
|
|
|
|
Hoser
Member
Posts: 5844
child of the sixties VRCC 17899
Auburn, Kansas
|
|
« Reply #69 on: November 20, 2013, 03:26:21 PM » |
|
Well, it's been a good day & a bad day. The 97' started right off ater installing the fuel tank and puttin in some fresh gas. Got a pretty good idle going once off choke,but had to shut down cuz fuel was running on the ground. A closer look revealed gas leaking from the switch side where the housing rivetts are. It was leaking strongly from the seams. Broke it all down and examined the petcock, and can not see what could be wrong. The new parts look good and in place, unless I have something backwards, etc. I took some pictures, but don't know how to post them.
Any ideas??
Yes, get rid of the junk oem petcock and get a simple manual petcock. I figured it out after three rebuilds of the oem. Just remember to turn off the gas when yer done riding. The bike will let you know if you forget to turn it on to leave. I always turn off the gas about a mile before I get home. Being a rider since the 60's, it's second nature to shut off and turn on the manual, when I ride. Hoser |
|
|
|
|
Logged
|
I don't want a pickle, just wanna ride my motor sickle  [img width=300 height=233]http://i617.photobucket.com/albums/ |
|
|
|
Cappy
|
|
« Reply #70 on: November 20, 2013, 07:40:46 PM » |
|
The thread originally posted by JimL was an excellent presentation of petcock problem. I now believe the cover set repair fixed only half of the problem, and by fixing that, it only help reveal the second half of the problem, and the next weakest link. I like the determination and the cool fix presented here. Kudos for that. Wish I had a tap set. It will probably be a Pingle valve fix I go for, but as I am shopping for a used Utility vehicle to haul this Valk to Florida, a $120 petcock will have to wait. So I might try this fix, and hope for the best.
BTW: By coincidence, I had the opportunity to speak with a former 3M chemist, who also worked 5 years on a SAE petroleum standards project. I learned that Stabil is essentially a solvent with a extremely high anti-oxidant ability. It's main purpose is to arrest/slow the oxidation of the gasoline. However, it's solvent nature will breakdown any lacquers formed in the tank, which will eventually settlte elsewhere and gum things up, like in petcocks. There are no lubricity agents in Stabil. It is effective for it's limited purpose, but can be problematic as well, as it's anti-oxidant power diminishes.
|
|
|
|
|
Logged
|
|
|
|
Gryphon Rider
Member
Posts: 5234
2000 Tourer
Calgary, Alberta
|
|
« Reply #71 on: November 21, 2013, 06:38:53 AM » |
|
Wish I had a tap set.
You don't need a whole set. Just get the tap size you want (M4 x 0.7 according to JimL's post linked to by hubcapsc above) and a small tap wrench. Not expensive; probably under 10 or 15 bucks for both.  |
|
|
|
|
Logged
|
|
|
|
custom1
Member
Posts: 333
01 Interstate
SW Pa
|
|
« Reply #72 on: November 21, 2013, 07:34:45 AM » |
|
Yes, it could be for that. My screen is still in the tank, but looks good as far as I can see. I had no signs of rust or debris when I drained my tank. At first I thought I had lost the screen, but it's in position, and resisted a minor attempt to remove it. So I left it alone. It does look like there is an O-ring there. Well, I just finished reassembling the petcock, and I think I have it right. With a long straw on the vacuum tube I can see the diaphram move. The straw also holds good vacuum against the tip of my tongue until I release it. I think that's a good sign. Tomorrow, I hope to put the tank back on, fill with fresh fuel and attempt a start. Is there anything else I should do or look for at his point?
Based on your comment above, I think the leak could still be from the area of the o-ring. It has to be assembled correctly to seal. The screen has to be seated on the petcock and the o-ring around the edge of the screen. The fuel could be leaking there and running down and just appear to be leaking on the manual side of the petcock. All I'm saying is to check it and be sure before spending the $ on another petcock. |
|
|
|
|
Logged
|
John
|
|
|
|
Cappy
|
|
« Reply #73 on: November 21, 2013, 09:16:38 AM » |
|
Got ya. The original o-ring is seated well with the screen firmly in the tank. I hate to disturb it. Could I just add the new o-ring to the petcock, and therefore have two o-rings, and assemble that. Kinda of a double seal in effect.  |
|
|
|
|
Logged
|
|
|
|
custom1
Member
Posts: 333
01 Interstate
SW Pa
|
|
« Reply #74 on: November 21, 2013, 12:37:56 PM » |
|
No, you can't stack them. The best thing is to have a new screen and o-ring and assemble it on the petcock and then put the whole assembly in the tank.
The reason I think it is leaking up there is, that is the area that was disturbed. The manual side of the petcock wasn't leaking before and shouldn't be now. But anything is possible.
|
|
|
|
|
Logged
|
John
|
|
|
|
Ricky-D
|
|
« Reply #75 on: November 21, 2013, 03:00:29 PM » |
|
With the tank removed it ought to be pretty easy to determine exactly from where the gas is leaking.
***
|
|
|
|
|
Logged
|
2000_Valkyrie_Interstate
|
|
|
|
Cappy
|
|
« Reply #76 on: November 21, 2013, 04:24:16 PM » |
|
Nuts! I just preparred a reply and lost it on the preview. This is a common experience for me on this site.
Anyway, after my last post I examined and removed the screen from the tank. I was then aware of the folly of my comment about dual o-rings. I have since reassembled the new petcock covers, and cleaned and reinstalled the screen with the new o-ring. I believe the o-ring is now well seated, and was likely the problem of the fuel leak. I have not tested this yet, but I think this may be the source of the fuel leak. It does seem logical. I will give you an update ASAP.
|
|
|
|
|
Logged
|
|
|
|
custom1
Member
Posts: 333
01 Interstate
SW Pa
|
|
« Reply #77 on: November 21, 2013, 06:59:02 PM » |
|
I have lost posts before also. I believe it happens if you hit the "back" button before hitting the "post" button.  |
|
|
|
|
Logged
|
John
|
|
|
|
Cappy
|
|
« Reply #78 on: November 23, 2013, 01:59:26 PM » |
|
Ok, checking in after rebuilding fuel petcock and replacing tank screen o-ring. Reinstalled the tank and turned gas on, and attempted a start. The Valkyrie started fairly easily with just full choke on. It coughed & chugged a bit, which I expected, because it about 12-14 degrees F in the garage. I let it idle in slowly, and soon it was sounding pretty good. As I didn't have much fuel in the tank, it ran out of gas after about 10 minutes of idleing and stalled just as I was reaching to switch to reserve. There was no sign of fuel leaks UNTIL I switched to reserve and did a restart. I switched to off and the fuel leak seemed to stop as I shut the bike down. Crapp!! I was sure the leak was from the o-ring petcock connection before, but it is obviously not leaking there now. Also, it does not seem to be leaking from the rivited switch side of the petcock. As soon as I noticed the fuel leak, and shut down, I retreated inside as I was freezing. So I am not sure where the leak is.Well, it least I know it is not electrical, ignition, or carb problems. I suppose it is on to a Pingle, BUT I DON'T UNDERSTAND what is happening. Any ideas??
PLEASE!!!!
|
|
|
|
|
Logged
|
|
|
|
salty1
Member
Posts: 2359
"Flyka"
Spokane, WA or Tucson, AZ
|
|
« Reply #79 on: November 23, 2013, 04:46:06 PM » |
|
Apparently one of the o-rings is out of place or just isn't doing the job.  Sorry! |
|
|
|
|
Logged
|
My rides: 1998 GL1500C, 2000 GL 1500CF,2006 GL 1800 3A |
|
|
|


