|
Fritz The Cat
|
 |
« on: July 11, 2014, 12:59:53 PM » |
|
I'm watching the D-Ray Smith videos on youtube and they're a great.  1. He uses a hacksaw to cut a slot into the jet you're not supposed to mess with (the one that requires a special tool. Using a hacksaw is rather sloppy and I'd rather not. Is this the tool I need? It's cheap and the shipping is free. http://carbjetkits.com/motion-pro-d-shaped-tool.html2. What rebuild kit and other parts do you guys recommend? I'd like to have them on hand before I start disassembling the carbs. Thanks |
|
|
|
|
 Logged
|
|
|
|
Attic Rat
Member

Posts: 446
VRCC # 1962
Tulsa, OK

|
|
« Reply #1 on: July 11, 2014, 02:19:15 PM » |
|
Yes that is the tool and thank God you ask before cutting with at hacksaw. I usually call Rich at Redeye and order a o/h o ring kit. Be sure to vacuum test the air cut off valves and replace the vacuum hoses. If you think you are going to need float valves you can order them from amazon they are K&L is the manufacture and they make them for Honda. If you have anymore questions feel free to call me
918-720- five 4 four4
The Attic Rat
|
|
|
|
|
Logged
|
The Attic Rat Performance Works
|
|
|
|
Fritz The Cat
|
|
« Reply #2 on: July 11, 2014, 02:22:31 PM » |
|
Thank you sir. |
|
|
|
|
Logged
|
|
|
|
rugguy
Member
Posts: 245
2000 Valk I/S
Atlanta, GA
|
|
« Reply #3 on: July 11, 2014, 02:25:29 PM » |
|
I was too far along to wait for the tool. I cut mine...no harm...no foul. And you can't see it.
|
|
|
|
|
Logged
|
I hate sand....sand SUCKS!
I wear a helmet....."I'd rather have brains in my head than wind in my hair"
1999 Valk I/S
2000 Valk I/S
2001 BMW K1200 LTE (sold)
2002 FLHRSEI (for sale)
2006 FLHCTUI (sold)
|
|
|
|
Fritz The Cat
|
|
« Reply #4 on: July 11, 2014, 02:29:37 PM » |
|
Just bought the tool. One of the options was check out with Amazon. Made is super simple, click click done. I lost count of the times I have needed a tool but was to impatient and/or too far along to wait. That's why this time I decided to ask questions first. My never need it again but at $7.95 I can pass it along to someone else in exchange for a warm fuzzy feeling. |
|
|
|
|
Logged
|
|
|
|
|
BigMac (SoCal)
|
|
« Reply #5 on: July 11, 2014, 03:51:11 PM » |
|
Sometimes the pilot screws are corroded and the tool will just not work. I used a dremel and put a slot across it. It makes life a lot easier and it's easy to count the turns.
|
|
|
|
|
Logged
|
|
|
|
|
Fritz The Cat
|
|
« Reply #6 on: July 11, 2014, 04:46:18 PM » |
|
I do have a Dremel if I need it.
Just pulled the carbs off the bike. It was a job in spite of the video. The throttle cable made me cuss. The plastic shield made me cuss. But I did manage to get them off. No doubt I'll cuss when putting them back on. The back throttle cable proved to be a puzzle. Then I got the brilliant idea after 30 minutes of struggle to use a spring hook. It worked like it was made for the job. All the hoses look to be in good shape but I'm going to look them over real good tomorrow.
|
|
|
|
|
Logged
|
|
|
|
salty1
Member
Posts: 2359
"Flyka"
Spokane, WA or Tucson, AZ
|
|
« Reply #7 on: July 11, 2014, 04:52:34 PM » |
|
Fritz is the bike desmogged, if not there is no time like the present.  |
|
|
|
|
Logged
|
My rides: 1998 GL1500C, 2000 GL 1500CF,2006 GL 1800 3A   |
|
|
|
Fritz The Cat
|
|
« Reply #8 on: July 11, 2014, 05:14:04 PM » |
|
It's a Canadian bike. Would it have smog junk ?
|
|
|
|
|
Logged
|
|
|
|
Wewaman
Member
Posts: 423
Dead Lakes Cruiser
Wewa, Fla.
|
|
« Reply #9 on: July 11, 2014, 07:45:35 PM » |
|
Clymer says to put the -pilot screws, intake runners, and slides back on the carb they came off of. D-Rays video's only say that about the slides. I used a muffin/cupcake pan to keep each disassembled carb parts in. Worked well to keep everything for each carb together. +1 on the de-smog Wewa |
|
|
|
|
Logged
|
If you please God it doesn't matter who you displease but if you displease God it doesn't matter who you please  |
|
|
|
The emperor has no clothes
|
|
« Reply #10 on: July 11, 2014, 07:50:09 PM » |
|
It's a Canadian bike. Would it have smog junk ?
I think they all came with smog control junk. Some with more (California bikes) |
|
|
|
|
Logged
|
|
|
|
|
BradValk48237
|
|
« Reply #11 on: July 11, 2014, 08:21:55 PM » |
|
I bought the D tool, but as some said, they were seized .... Even after I soaked them with penetrating oil and let em sit overnight.
I also used a Dremel.... you can't see em once they are back on....... Just make sure to cover anything open up to prevent chunks getting inside the carb parts.....
B
|
|
|
|
|
Logged
|
|
|
|
John Schmidt
Member
Posts: 15379
a/k/a Stuffy. '99 I/S Valk Roadsmith Trike
De Pere, WI (Green Bay)
|
|
« Reply #12 on: July 11, 2014, 08:31:30 PM » |
|
+1 on the Dremel tool, just don't hold them with your fingers unless you have a glove on....they get hot. I don't cut the slot with them installed, too easy to get junk into some passage. And, once they're reinstalled with the slot, they're easier to adjust than using that fool D shaped tool. Also, use a slight dab of anti seize when reinstalling them.
|
|
|
|
|
Logged
|
|
|
|
Attic Rat
Member
Posts: 446
VRCC # 1962
Tulsa, OK
|
|
« Reply #13 on: July 11, 2014, 09:21:18 PM » |
|
I have never had to use a dremel tool and I have had some stuck pretty good. I have done over 600 carbs on Valkyries. If they are stuck just soak them a little and put the tool in a 1/4 socket with a driver and work it back and forth but don't get in a hurry and it will come right out every time.
|
|
|
|
|
Logged
|
The Attic Rat Performance Works
|
|
|
|
|
|
Fritz The Cat
|
|
« Reply #15 on: July 12, 2014, 05:27:38 AM » |
|
Pardon my ignorance but what are the benefits of desmogging?  |
|
|
|
|
Logged
|
|
|
|
salty1
Member
Posts: 2359
"Flyka"
Spokane, WA or Tucson, AZ
|
|
« Reply #16 on: July 12, 2014, 11:31:44 AM » |
|
Pardon my ignorance but what are the benefits of desmogging? Elimination of potential problems with PAIR valves and vacuum leaks. It also opens up the area under the tank for a Dan Marc electronic fuel shutoff valve. |
|
|
|
|
Logged
|
My rides: 1998 GL1500C, 2000 GL 1500CF,2006 GL 1800 3A |
|
|
|
Fritz The Cat
|
|
« Reply #17 on: July 12, 2014, 11:56:33 AM » |
|
How can I tell if it's already been done or not? I'm finding lots of talk but without pics, it makes no sense. ???
|
|
|
|
|
Logged
|
|
|
|
Willow
Administrator
Member

Posts: 16836
Excessive comfort breeds weakness. PttP
Olathe, KS
|
|
« Reply #18 on: July 12, 2014, 01:32:56 PM » |
|
If you've been de-smogged you should have no more than one vacuum tube plugged into the rear of the carb runners.
|
|
|
|
|
Logged
|
|
|
|
salty1
Member
Posts: 2359
"Flyka"
Spokane, WA or Tucson, AZ
|
|
« Reply #19 on: July 12, 2014, 04:31:20 PM » |
|
If you've been de-smogged you should have no more than one vacuum tube plugged into the rear of the carb runners.
The vacuum line is probably from #6 carb to the petcock if it's been desmogged. |
|
|
|
|
Logged
|
My rides: 1998 GL1500C, 2000 GL 1500CF,2006 GL 1800 3A |
|
|
|
Crackerborn
|
|
« Reply #20 on: July 12, 2014, 06:03:28 PM » |
|
If you see lots of vacuum lines going to things that don't serve an obvious function (PAR valves, canisters under the frame, etc.) see Shop Talk. Some here believe in leaving the the emission system intact, some not so much. Redeye for soft parts. Partzilla, HLD, jetsrus, etc. for replaceable hard parts. My experience, replace all soft parts, only replace the hard parts if there is damage to them or you think they won't clean up. The air-cut valve is easy to damage so be careful with it. I respect Attic Rat's opinion, he has more experience than I, but I just had to drill and extract 2 pilot screws on my Lady. I also did not not try penetrating oil and time which may well have worked but time was not on my side. Try John S's suggestion of the slot and Never Seize, well worth it IMHO. Partzilla had pilots to me in four days after I had to drill out the seized and rounded pilot screws on my Big Girl, thank you for soft brass. Also do a search on the tech board and you will find good information. The throttle cables will make you cuss again on re-install if you didn't take a picture of the adjustment settings before you took them off. Just sayin'......
|
|
|
|
|
Logged
|
Life is about the ride, not the destination. 97 Valkyrie Tour 99 Valkyrie Interstate  |
|
|
|
Fritz The Cat
|
|
« Reply #21 on: July 13, 2014, 11:20:34 AM » |
|
|
|
|
|
|
Logged
|
|
|
|
salty1
Member
Posts: 2359
"Flyka"
Spokane, WA or Tucson, AZ
|
|
« Reply #22 on: July 13, 2014, 12:53:18 PM » |
|
Fritz look in the valley below the tank, this is where you will see the PAIR valves and the vacuum lines. Just imagine they are removed and all of the lines connected to the PAIR valves. So now if you had a shiny desmog kit from Redeye installed, your bike would be desmogged. This is the time to do it. |
|
|
|
|
Logged
|
My rides: 1998 GL1500C, 2000 GL 1500CF,2006 GL 1800 3A |
|
|
|
Fritz The Cat
|
|
« Reply #23 on: July 13, 2014, 02:22:54 PM » |
|
How am I supposed to buy this? My options are "X ON HOLD" and "BACK". I don't have no freaking clue what "X ON HOLD" means. |
|
|
|
|
Logged
|
|
|
|
Attic Rat
Member
Posts: 446
VRCC # 1962
Tulsa, OK
|
|
« Reply #24 on: July 13, 2014, 03:12:54 PM » |
|
Fritz are you going to separate the carbs and replace all of the o rings or are you just going to clean them. They really should be completely disassembled and all o rings replaced along with all of the air cut off valves checked and o rings replaced. The fuel rails can only be replaced if the carbs are separated too.
Cleaning carbs without separating them and tearing them all the way down, is like taking a shower and putting back on the same old underwear. LOL
|
|
|
|
« Last Edit: July 13, 2014, 07:58:28 PM by Attic Rat »
|
Logged
|
The Attic Rat Performance Works
|
|
|
|
Fritz The Cat
|
|
« Reply #25 on: July 13, 2014, 03:21:02 PM » |
|
Yea, I'd love to tear them completely down and rebuild them as new but I kinda like to ride too. If I ever have to go into them again I'll separate them. Even thought about buying a new set redo and keep on hand but if I do I'll never need them.
|
|
|
|
|
Logged
|
|
|
|
|
Fritz The Cat
|
|
« Reply #26 on: July 14, 2014, 09:01:19 AM » |
|
I emailed Rich about the desmog kit and he said he didn't have all the parts in stock. I emailed him back and asked when he expected to have them. He replied "I don't know."
So, does anyone else have this kit ?
Thanks
|
|
|
|
|
Logged
|
|
|
|
|
The emperor has no clothes
|
|
« Reply #27 on: July 14, 2014, 05:55:34 PM » |
|
I emailed Rich about the desmog kit and he said he didn't have all the parts in stock. I emailed him back and asked when he expected to have them. He replied "I don't know."
So, does anyone else have this kit ?
Thanks
I think xf6 customs has a desmog kit. A lot of guys just do it on their own using freeze plugs,etc. |
|
|
|
|
Logged
|
|
|
|
|
Fritz The Cat
|
|
« Reply #28 on: July 15, 2014, 09:45:11 AM » |
|
Thank you sir. Just ordered one.
|
|
|
|
|
Logged
|
|
|
|
Otus
Member
Posts: 924
Scott
Taylor Mi.
|
|
« Reply #29 on: July 16, 2014, 05:09:16 PM » |
|
Correct me if I'm wrong, but is that sign of a gasket leak on the vacuum chamber of his #1 carb? |
|
|
|
|
Logged
|
|
|
|
|
Fritz The Cat
|
|
« Reply #30 on: July 26, 2014, 07:34:50 AM » |
|
UPDATE - I cleaned the carbs this morning and I have a bit of advice for idiots like me who have little to no experience with carb cleaner. WEAR GOGGLES !!!!! Carb cleaner is some nasty stuff to get into your peepers.  Fortunately I was only a millisecond away from a sink and a thorough eye wash so hopefully no damage done. I have all the jets and small stuff soaking in mineral spirits. Some of the brass pieces, both removable and pressed into the carb body had a green coating on them. I know copper oxides to green but do brass also? Hopefully I'll get her back together by the end of the week. |
|
|
|
|
Logged
|
|
|
|
|
Ricky-D
|
|
« Reply #31 on: July 26, 2014, 08:30:34 AM » |
|
That is organic crud!
***
|
|
|
|
|
Logged
|
2000_Valkyrie_Interstate
|
|
|
Wewaman
Member
Posts: 423
Dead Lakes Cruiser
Wewa, Fla.
|
|
« Reply #32 on: July 26, 2014, 09:39:59 AM » |
|
Fritz, hopefully Patrick or Salty1 will chime in about the 1 gauge carburetor synchronization procedure. I tried to do like D`Ray said and they all looked good to me, BUT... she did not purr like she was supposed to. I followed Patrick's and Salty1's instructions and Wow, Wow, Wee.. My Mistress was back to AWESOMENESS.... Just saying, Wewa |
|
|
|
|
Logged
|
If you please God it doesn't matter who you displease but if you displease God it doesn't matter who you please |
|
|
|
Fritz The Cat
|
|
« Reply #33 on: July 26, 2014, 10:01:40 AM » |
|
Thank you sir. I am in need of some better instructions. The instructions that came with the desmog kit are clear as mud and this isn't much better - http://www.valkyrieriders.com/shoptalk/desmog.htmI'd love to find a diagram that shows everything that should be removed with said diagram showing all parts properly installed. Those six tubes that go into one that goes down the back side of the engine, are these removed or do they stay? Also, do I really need to pull the headers to block off the holes at the bottom of the engine? Thanks |
|
|
|
|
Logged
|
|
|
|
salty1
Member
Posts: 2359
"Flyka"
Spokane, WA or Tucson, AZ
|
|
« Reply #34 on: July 26, 2014, 01:28:42 PM » |
|
Thank you sir. I am in need of some better instructions. The instructions that came with the desmog kit are clear as mud and this isn't much better - http://www.valkyrieriders.com/shoptalk/desmog.htmI'd love to find a diagram that shows everything that should be removed with said diagram showing all parts properly installed. Those six tubes that go into one that goes down the back side of the engine, are these removed or do they stay? Also, do I really need to pull the headers to block off the holes at the bottom of the engine? Thanks Fritz the six lines into one are float bowl drain tubes. I would leave them just in case you want to drain or flush a float chamber. The two PAIR valves are removed. The two vacuum lines to #3 and 4 carb are taken off. The only vacuum line left would be the one between #6 and the left side of the petcock, assuming you have an OEM valve. All intakes ports should be plugged except for #6. Assuming your bike does not have CA emission, you will need to plug one port on the air box. The four lines removed from PAIR vales to the block and the open port at the block needs to be sealed. And last, they are the two openings on the bottom of the heads that need to covered. I think I have it covered, if not I'm sure others will chime in ??? |
|
|
|
|
Logged
|
My rides: 1998 GL1500C, 2000 GL 1500CF,2006 GL 1800 3A |
|
|
salty1
Member
Posts: 2359
"Flyka"
Spokane, WA or Tucson, AZ
|
|
« Reply #35 on: July 26, 2014, 01:44:55 PM » |
|
Does this help some? 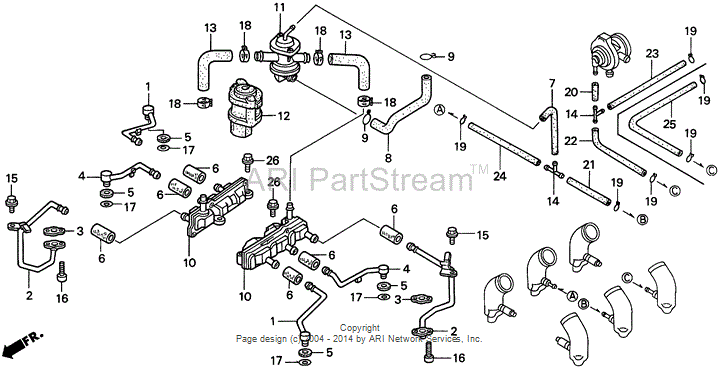 |
|
|
|
|
Logged
|
My rides: 1998 GL1500C, 2000 GL 1500CF,2006 GL 1800 3A |
|
|
salty1
Member
Posts: 2359
"Flyka"
Spokane, WA or Tucson, AZ
|
|
« Reply #36 on: July 26, 2014, 02:10:31 PM » |
|
This is the 4" gauge I used to synchronize my carbs. I bought the guage at O'Reillys. You will need some flow restrictors so that needle movement won't wildly fluctuate. Aquarium pump air flow restrictors work fine. Create a manifold with at least two lines. One will be attached to #3 and the other on the port where the measurement will be made. After you pinch off the vacuum line to #6 using forceps and at operating temp, take a reading at #3 after you pinch off the other line. Then pinch off #3 and open up the other line attached to a vacuum port on the back of an intake and adjust the reading to approximate #3 by turning its synch screw. You will go through all the cylinders making adjustments to the reference reading taken at #3. Go through all of them again until they all approximate or equal #3. You may have to adjust idle during this procedure. Also, put a fan at the front of the bike to help cooling. If the bike's fan comes on, wait for it to quit before taking readings and before making any adjustments 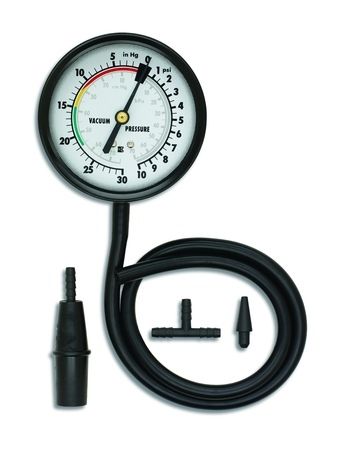 |
|
|
|
« Last Edit: July 26, 2014, 02:20:10 PM by salty1 »
|
Logged
|
My rides: 1998 GL1500C, 2000 GL 1500CF,2006 GL 1800 3A |
|
|
Xtracho
Member
Posts: 1303
The Bosses
Florida's Emerald Coast
|
|
« Reply #37 on: July 26, 2014, 02:13:52 PM » |
|
I'm not much on aftermarket parts for the carbs. Especially the float valves. And this is why...  Aftermarket Float Valve. |
|
|
|
|
Logged
|
Mark
"To live you must be willing to die" - Amir Vahedi
My father gets smarter each day he is gone.
In the stable:
'84 GW Aspencade
'47 Indian Chief
'98 Valkyrie
|
|
|
|
Fritz The Cat
|
|
« Reply #38 on: July 26, 2014, 02:41:56 PM » |
|
Does this help some? This just confused me. I either have part 11 or 12 but I don't have both.  |
|
|
|
|
Logged
|
|
|
|
|
Ricky-D
|
|
« Reply #39 on: July 26, 2014, 03:04:42 PM » |
|
There are some very good and understandable instructions in shop talk that include pictures
and great instructions. And a number of different ideas and suggestions.
All about desmogging the Valkyrie.
You should spend some time finding them all and reading them completely.
***
|
|
|
|
|
Logged
|
2000_Valkyrie_Interstate
|
|
|
|


