|
dpcarson
|
 |
« on: February 19, 2015, 05:43:21 AM » |
|
First, I appreciate all the help and camaraderie here on the board. You have all been very helpful, and not near as condescending or bitchy as the guys on the boating boards get this time of year. Second, Yes, I have read the shop talk articles repeatedly and searched and read every thread on de-smog I can find on here back to about 2009. But, before I screw something up, i would rather ask specific questions so I only have to do it once. And since I like books with lots of pictures, I figured I would post away here. First, from what I have read in the threads, I think I am correct in assuming that these two things are not needed. 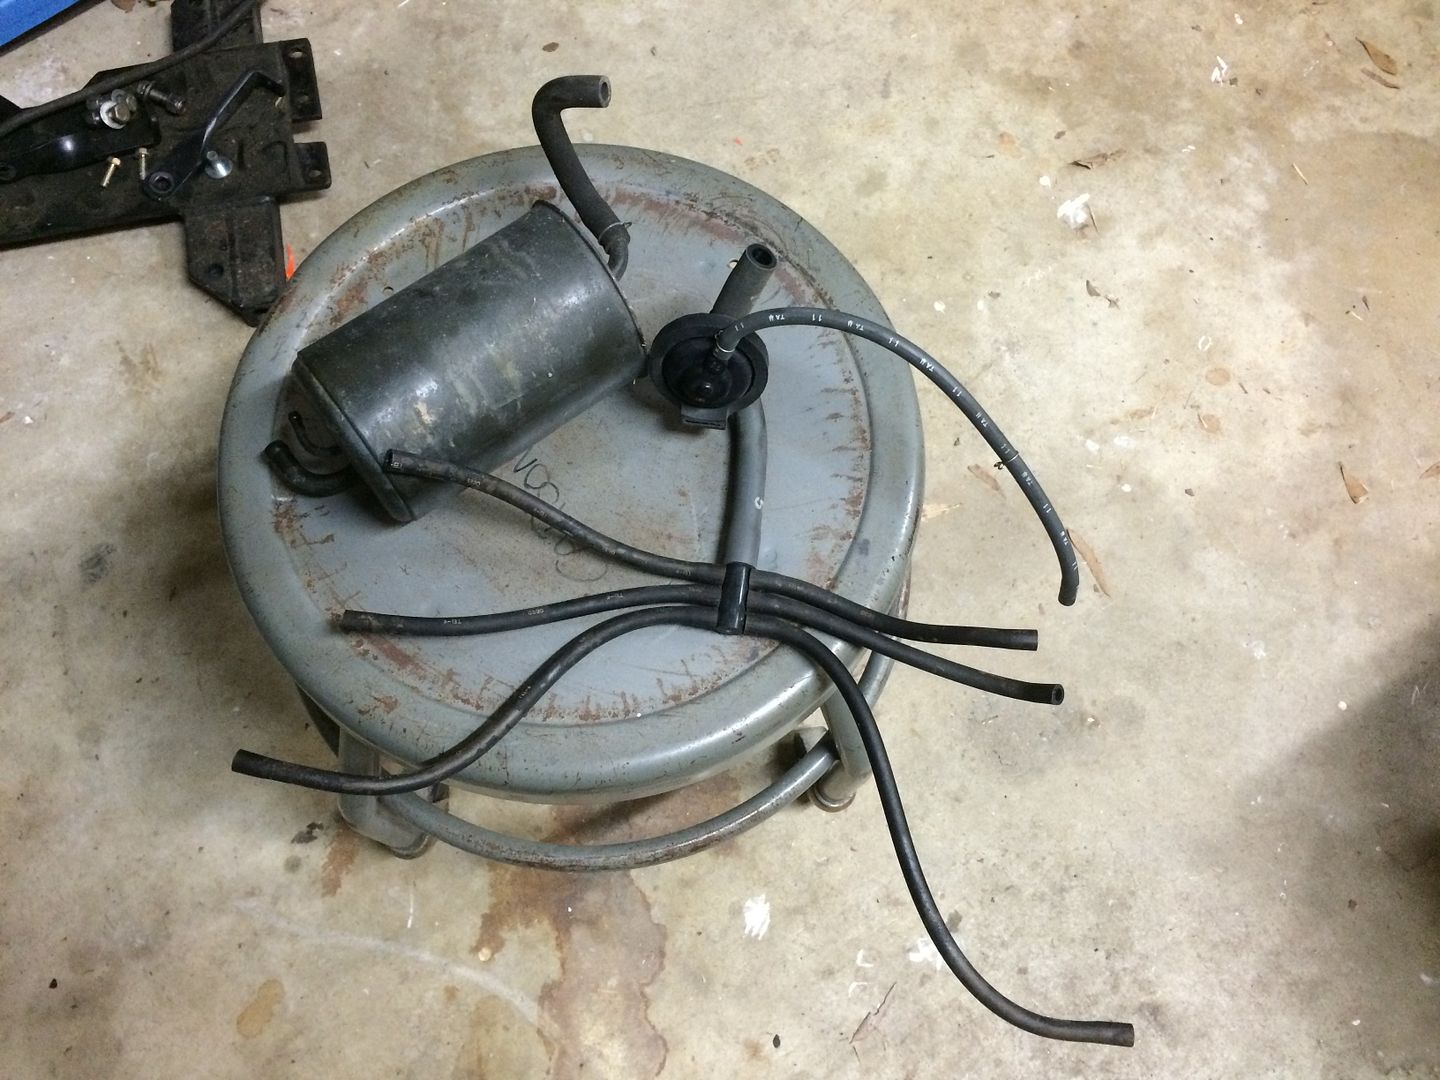 And what is the story with this thing? 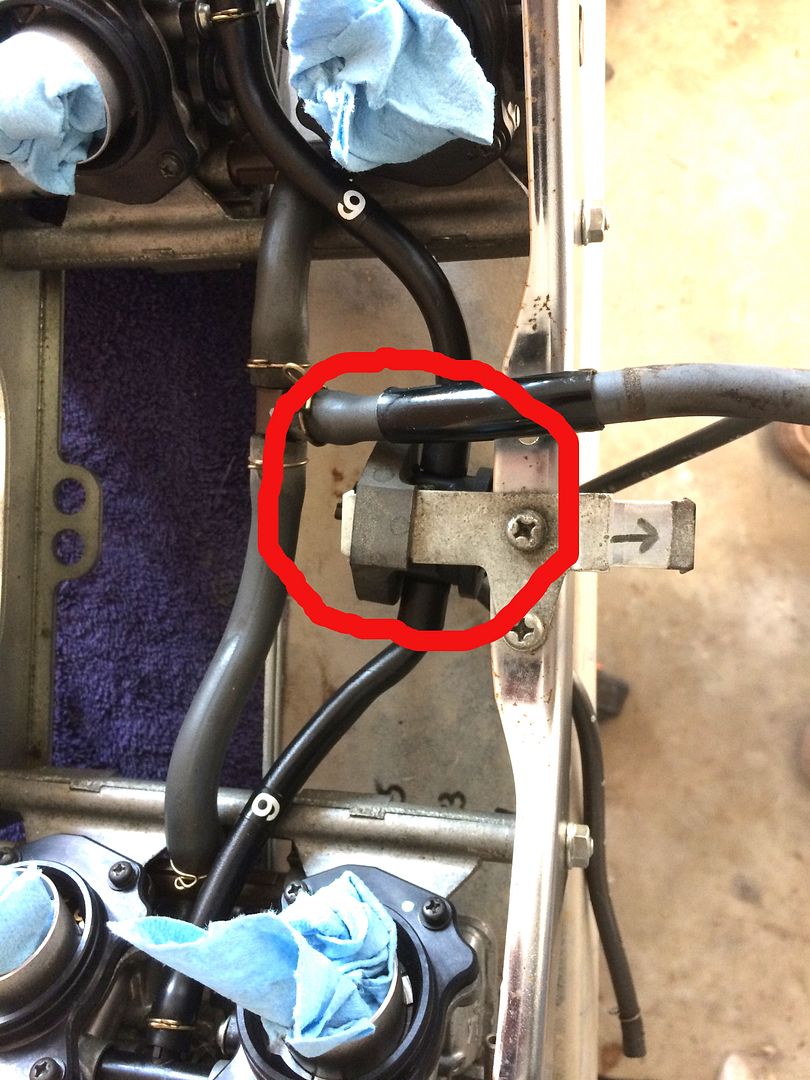 And, I think, on the carbs I need to cap the one in red, and the drain line connects to the nipple in blue. 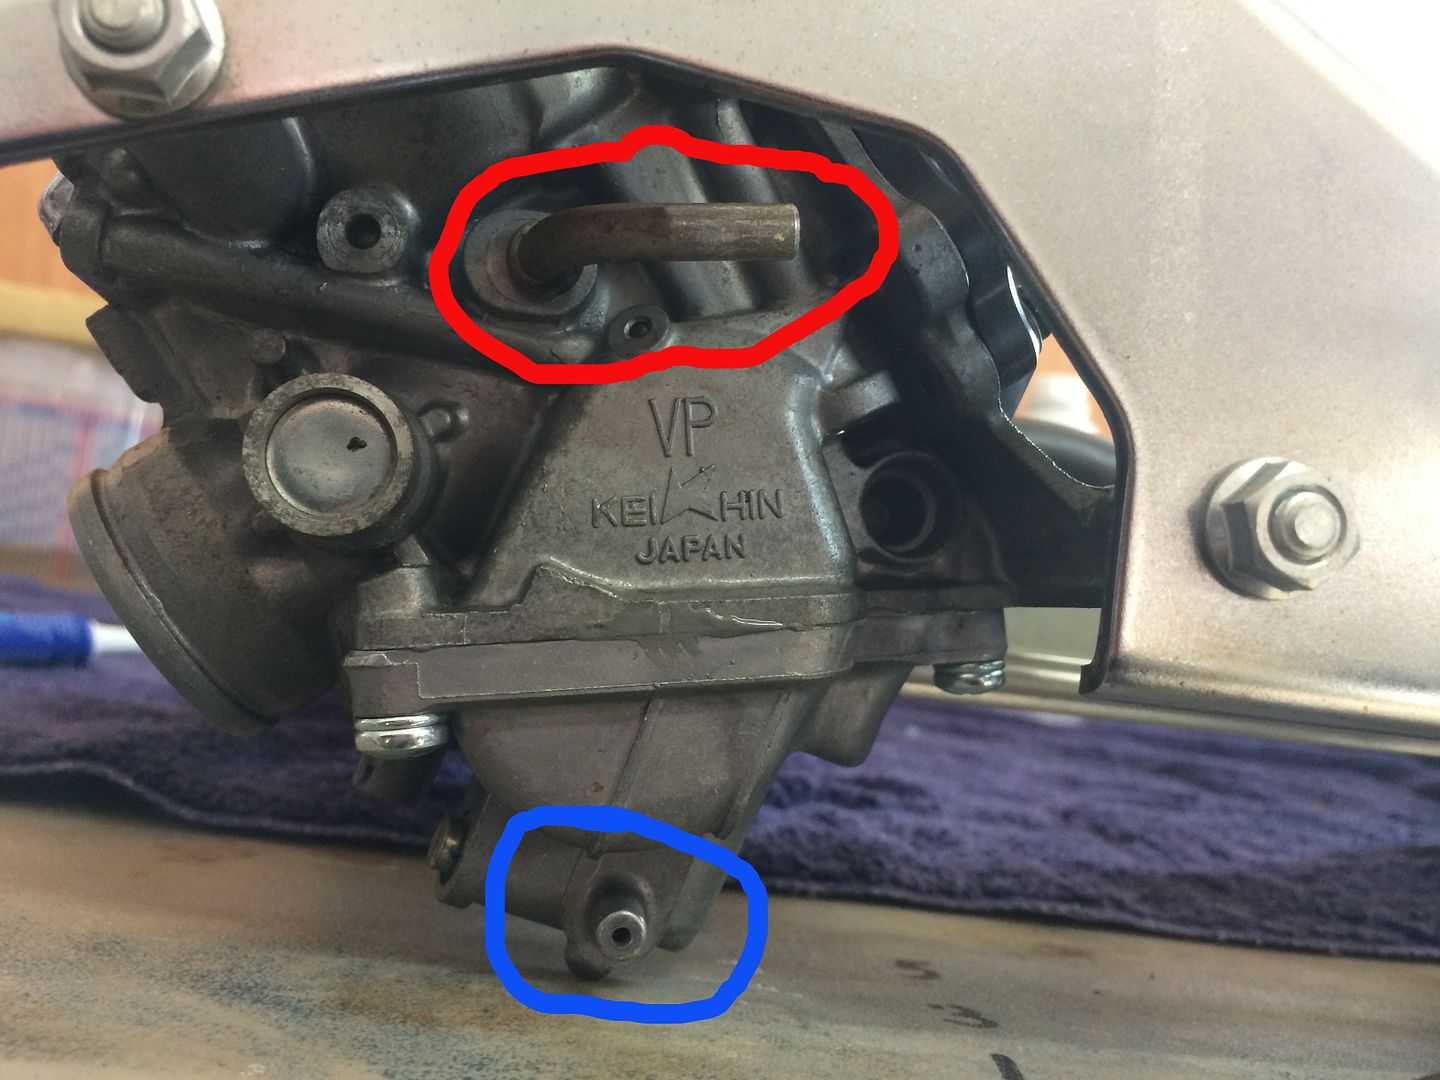 An is this the line that goes back to the petcock to provide vacuum to the tank? 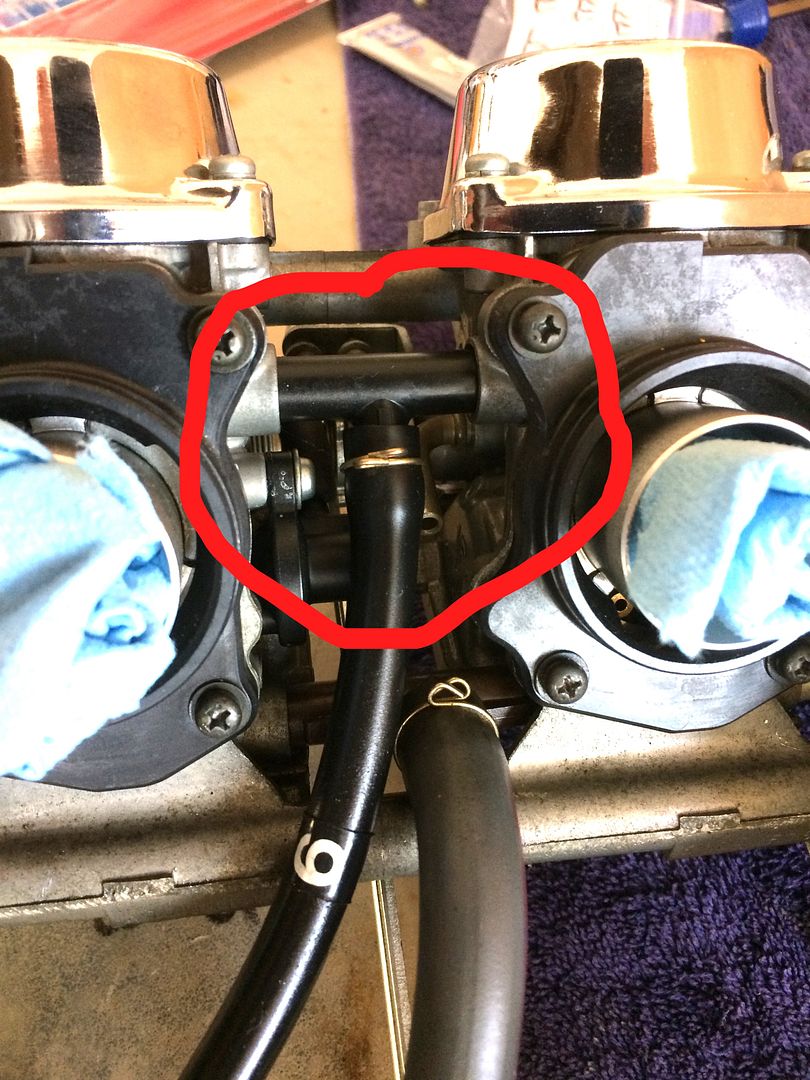 My understanding is that after I have done this properly, the only hoses I will see here will be the fuel lines, the vacuum hose going to the petcock, and the carb drain hoses. Is that correct? Thanks!!! A million!!! I sure hope I can get this thing running again. |
|
|
|
« Last Edit: March 01, 2015, 11:11:31 AM by dpcarson »
|
 Logged
|
"""""""""""""""""""""""""""""" In war, there are no unwounded soldiers.  |
|
|
|
wingrider02
|
|
« Reply #1 on: February 19, 2015, 07:52:56 AM » |
|
It looks like you may have a California emissions bike there. That big canister you have is part of that system. However, I do believe you need to put those lines back on that are sitting next to that canister, as those are your bowl drains...they go where you have circled in blue.
If I am not mistaken, the barbs on the side of the carb is a vent, which you will need to keep venting, unless that was part of the Cali system. Someone that has dealt with that can tell you better than I.
The lines that you need to cap are down on the intake runners, except #6, which has a small line that goes to your petcock.
Did you pull the reed valves off the engine block? There are two of them, held on be two bolts each, and they have three black lines going from them to the silver tubes, which go to the heads.
|
|
|
|
« Last Edit: February 19, 2015, 07:56:56 AM by wingrider02 »
|
Logged
|
|
|
|
|
dpcarson
|
|
« Reply #2 on: February 19, 2015, 08:11:03 AM » |
|
I have them off. Waiting and freeze plugs before removing the chrome lines. 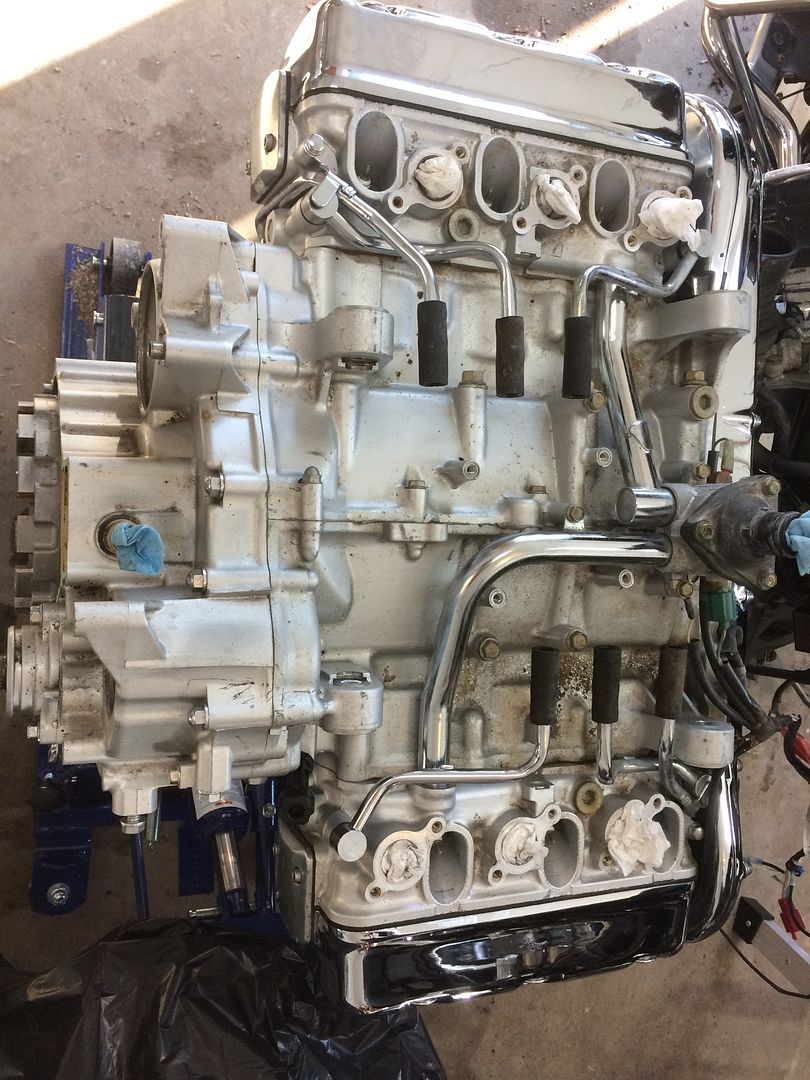 |
|
|
|
|
Logged
|
"""""""""""""""""""""""""""""" In war, there are no unwounded soldiers. |
|
|
|
BobB
|
|
« Reply #3 on: February 19, 2015, 08:23:11 AM » |
|
I don't believe you have it right. Refer to the parts exploded view below. http://www.partzilla.com/parts/search/Honda/Motorcycle/1998/GL1500CT+AC/TUBING/parts.htmlThe primary parts to be removed are 1, 2, 6, 10, 11, 12, & 13. Also remove tubes 21 thru 24. All resulting openings in the cylinder head (6), air box (1) and carb manifolds 1 thru 5 must be caped off. The only remaining vacuum line from cylinder #6 (left rear) goes to the petcock. I hope this helps... |
|
|
|
|
Logged
|
|
|
|
|
Ricky-D
|
|
« Reply #4 on: February 19, 2015, 08:55:14 AM » |
|
I have them off. Waiting and freeze plugs before removing the chrome lines. Yep, you're Ok with what you have removed. It's not necessary to remove those chrome tubes if you don't want to and you needn't plug them either if you don't want to. They simply lead down to the exhaust chamber where there isn't enough pressure to cause any trouble. The only other step is to close off the barbs, there is one each on the back side of each the intake runners. No. 6 is the vacuum barb for your stock petcock which needs to stay connected to the petcock. *** |
|
|
|
|
Logged
|
2000_Valkyrie_Interstate
|
|
|
|
dpcarson
|
|
« Reply #5 on: February 19, 2015, 08:58:31 AM » |
|
OK, thanks. So in this, I need to cap the part circled in red except for #6 carb, and that one goes back to the petcock? |
|
|
|
|
Logged
|
"""""""""""""""""""""""""""""" In war, there are no unwounded soldiers. |
|
|
|
dpcarson
|
|
« Reply #6 on: February 19, 2015, 09:00:52 AM » |
|
Oh, and what is this hose and valve and what is it's purpose? Does it stay or go? I am glad y'all know what you are looking at because it just looks like a big plate of black spaghetti to me. |
|
|
|
|
Logged
|
"""""""""""""""""""""""""""""" In war, there are no unwounded soldiers. |
|
|
|
Ricky-D
|
|
« Reply #7 on: February 19, 2015, 09:15:42 AM » |
|
OK, thanks. So in this, I need to cap the part circled in red except for #6 carb, and that one goes back to the petcock? No, do not cap the red outlined object, it is a vent and needs to be open. The other outlet is a bowl drain and can be left alone or connected to the drain circuit with all the other bowl drains. *** |
|
|
|
|
Logged
|
2000_Valkyrie_Interstate
|
|
|
|
Ricky-D
|
|
« Reply #8 on: February 19, 2015, 09:22:54 AM » |
|
This is the fuel lines and cannot be messed with. Well, I cannot be so sure that's the fuel line. It may be part of the vent system because of the California set-up. It should be pretty easily recognized exactly what it is when looking for where is originates and the type hose it is. I see there are two such looking connections on the carburetor, so it should also be easy to recognize which is the fuel bowl fill and which is the vent. Vents should stay open and the fuel should stay connected. The fuel fill will not be at the bottom of the carburetor. You just have to look very closely and proceed cautiously when you are sure of what each individual part plays. *** *** |
|
|
|
« Last Edit: February 19, 2015, 09:35:02 AM by Ricky-D »
|
Logged
|
2000_Valkyrie_Interstate
|
|
|
|
dpcarson
|
|
« Reply #9 on: February 19, 2015, 04:14:26 PM » |
|
OK. This is the one that has me stumped. This is connected to a tube that is between the 4&6 carbs. There is another one just like it connected between the 3&5 carbs. Then both of these connect to this little valve here. So here is the valve, with the lines going to either side........ 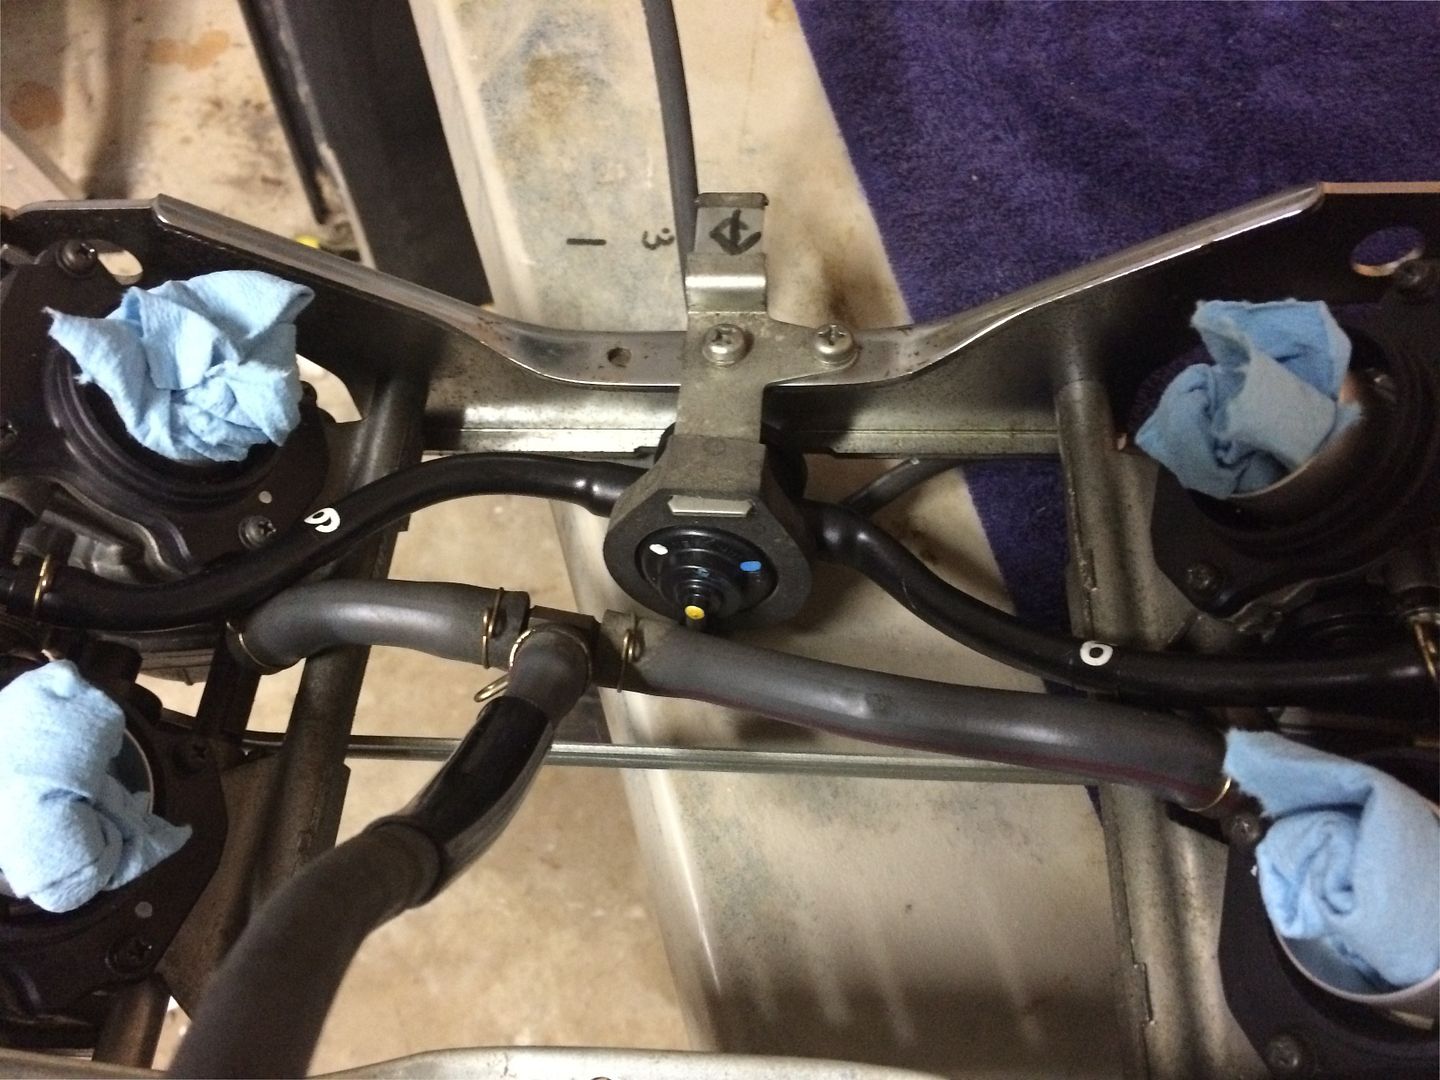 And then on the back of this valve these tubes come out. The is at the back of the carb bracket. 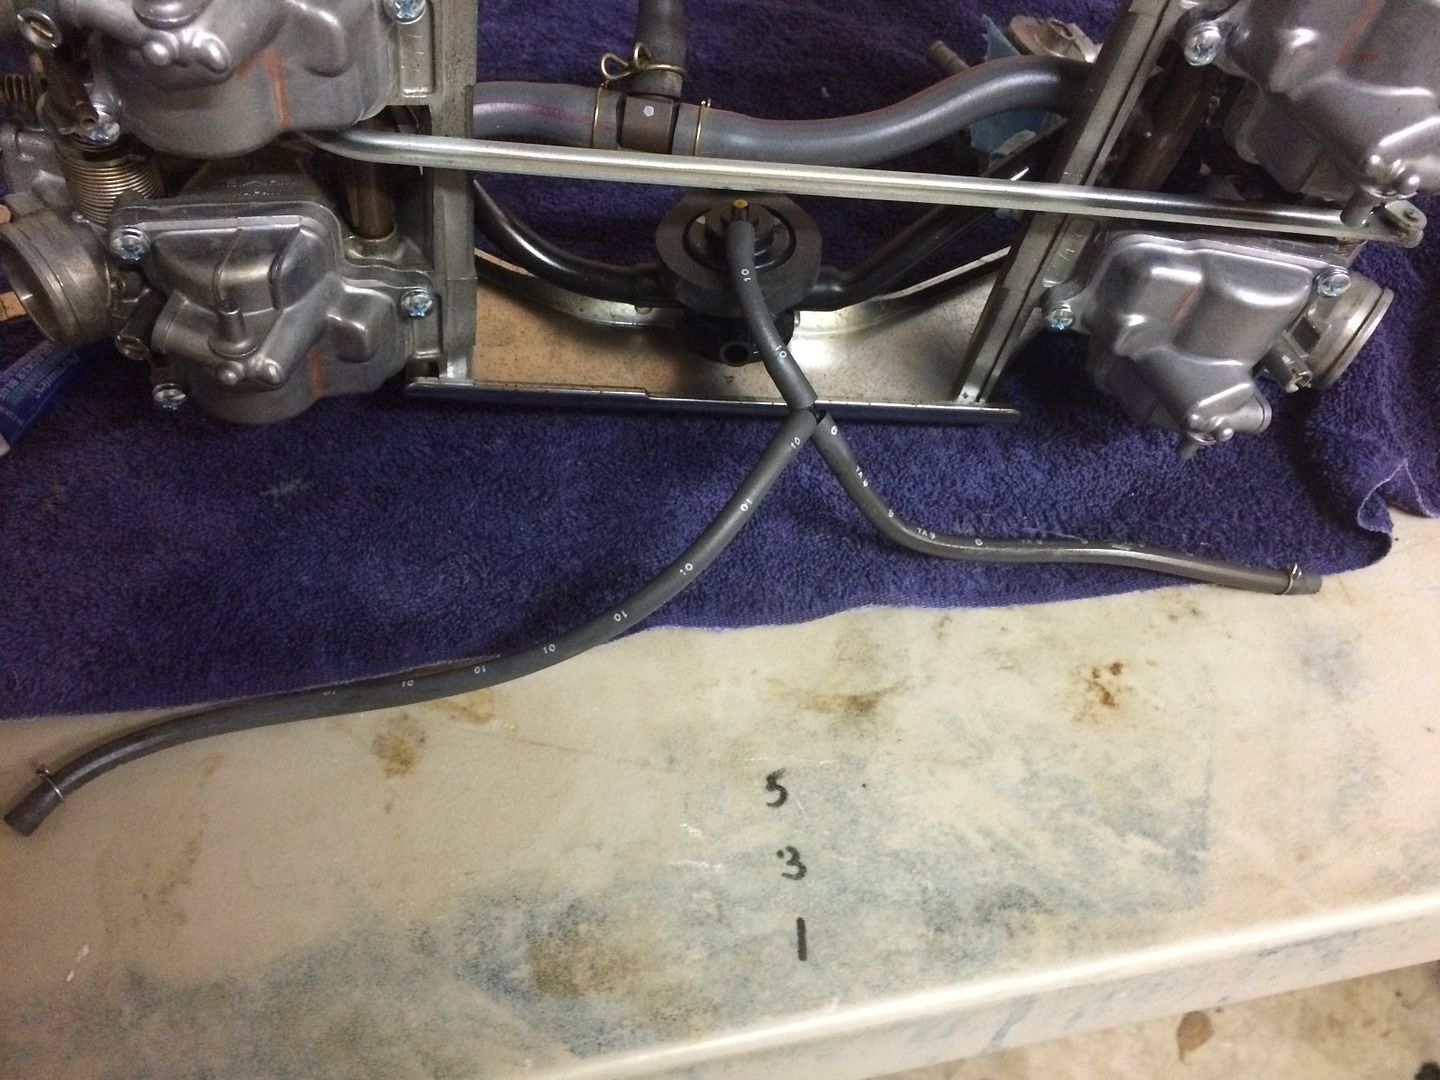 Here is where the hoses tie in above the fuel lines. 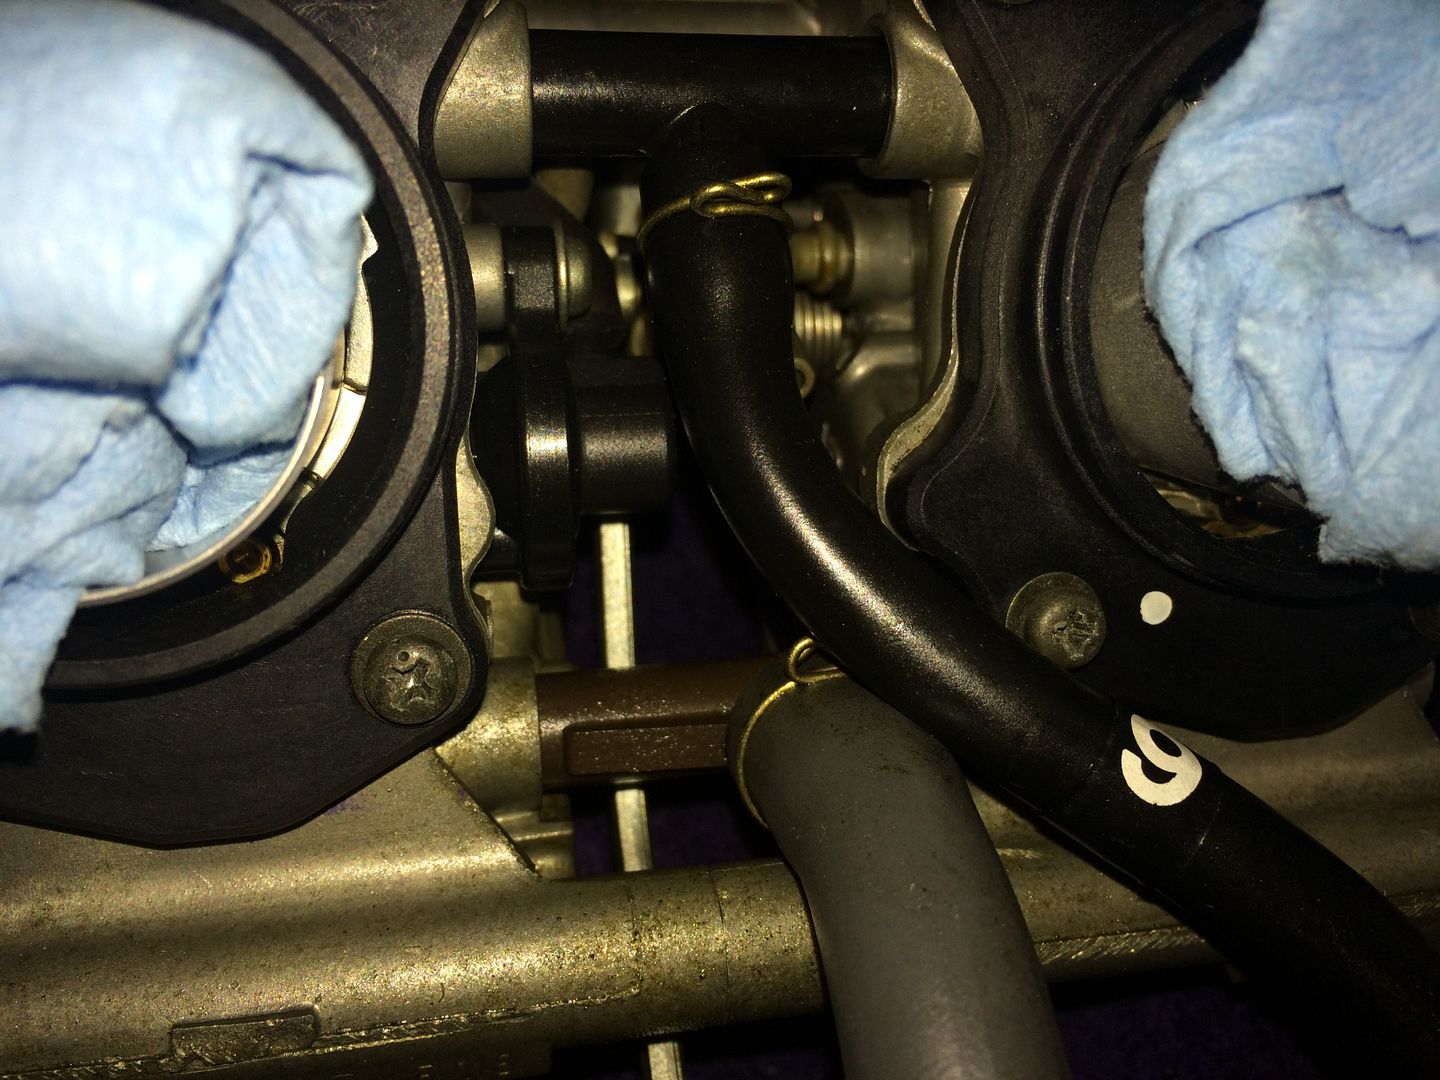 |
|
|
|
|
Logged
|
"""""""""""""""""""""""""""""" In war, there are no unwounded soldiers. |
|
|
|
wingrider02
|
|
« Reply #10 on: February 19, 2015, 05:03:56 PM » |
|
I am taking a guess that those hoses within the rack are part of the emissions stuff, which go back to that Evap cannister you pulled off. On a non Cali bike, there is pair valve, which works with those reed assembly's you pulled off the block. That valve has small hoses which attach to the intake runners, which is what yours appears to do as well.
|
|
|
|
|
Logged
|
|
|
|
|
dpcarson
|
|
« Reply #11 on: February 19, 2015, 05:13:50 PM » |
|
Mine had the pair valve also and all those hoses. They have already been removed.
|
|
|
|
|
Logged
|
"""""""""""""""""""""""""""""" In war, there are no unwounded soldiers. |
|
|
|
The emperor has no clothes
|
|
« Reply #12 on: February 19, 2015, 05:26:49 PM » |
|
http://www.valkyrieforum.com/bbs/index.php/topic,21439.0.htmlFordmano did this post years ago. In it he did a desmog of his CA bike. It shows the stuff you are asking about. In my opinion it was probably the best tech post ever done on here. I think it will help you figure out what's what on your bike. ( as most of us don't have all that stuff on ours) If you still have questions I'm sure you can PM him and he will help. Don't do anything before you are sure of what you are doing.
|
|
|
|
|
Logged
|
|
|
|
|
dpcarson
|
|
« Reply #13 on: February 19, 2015, 05:51:42 PM » |
|
Awesome!! I will go check it out. Thanks
|
|
|
|
|
Logged
|
"""""""""""""""""""""""""""""" In war, there are no unwounded soldiers. |
|
|
|
dpcarson
|
|
« Reply #14 on: February 19, 2015, 06:53:56 PM » |
|
OK, on the manifolds I just noticed that I have several of the little rubber caps that are broken. It is part #6. What is the significance of them. Do I need to exact part or can I just cap them with a vacuum cap. 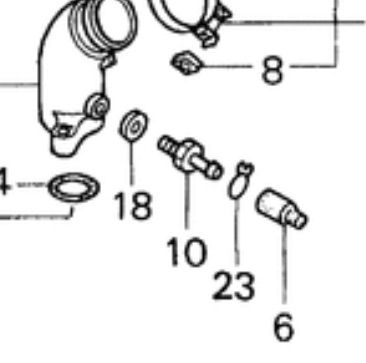 |
|
|
|
|
Logged
|
"""""""""""""""""""""""""""""" In war, there are no unwounded soldiers. |
|
|
|
Hook#3287
|
|
« Reply #15 on: February 19, 2015, 06:59:41 PM » |
|
When your done with de-smog you will only use the one on #6 to hook up to the OEM petcock to provide vacuum. All the other's can be capped with whatever works for you. I used small sections of leftover hose with bolts screwed into them
|
|
|
|
|
Logged
|
|
|
|
|
whitestroke
|
|
« Reply #16 on: February 19, 2015, 07:46:55 PM » |
|
|
|
|
|
|
Logged
|
Minibike
Honda S90
Yamaha YL100
Bultaco 250 Matador
Bultaco 250 Pursang
Yamaha 250 YZ
Triumph 650 Bonni
Honda ATC 200
2 Kids 25 year break.
Suzuki GS 500
2003 VTX 1300S,
1998 Valk standard
2008 Goldwing
|
|
|
gordonv
Member

Posts: 5766
VRCC # 31419
Richmond BC
|
|
« Reply #17 on: February 19, 2015, 08:32:40 PM » |
|
OK, thanks. So in this, I need to cap the part circled in red except for #6 carb, and that one goes back to the petcock? No, do not cap the red outlined object, it is a vent and needs to be open. The other outlet is a bowl drain and can be left alone or connected to the drain circuit with all the other bowl drains. Then this is the place that the fuel drains from, for those who mention about /draining/flushing out the bowls? |
|
|
|
|
Logged
|
1999 Black with custom paint IS   |
|
|
|
Hook#3287
|
|
« Reply #18 on: February 20, 2015, 04:59:52 AM » |
|
Then this is the place that the fuel drains from, for those who mention about /draining/flushing out the bowls? Correct. If you look to the left of the blue circle you can see the drain screw/valve. |
|
|
|
|
Logged
|
|
|
|
|
Farther
|
|
« Reply #19 on: February 20, 2015, 08:20:10 AM » |
|
OK, on the manifolds I just noticed that I have several of the little rubber caps that are broken. It is part #6. What is the significance of them. Do I need to exact part or can I just cap them with a vacuum cap.
They are vacuum caps and you need them in good shape. These work very well: http://redeye.ecrater.com/p/3301919/three-vacuum-caps-honda-valkyrie |
|
|
|
|
Logged
|
Thanks,
~Farther
|
|
|
|
Crackerborn
|
|
« Reply #20 on: February 20, 2015, 07:32:28 PM » |
|
The #6 hoses going to the mounted valve stay, the mounted valve goes. Add a tee, short piece of hose and a breather filter. Tuck it away so it won't get wet and dispose of all the other CA emisission bull-puckey, includimg that charcoal cannister you found under the swingarm.
|
|
|
|
|
Logged
|
Life is about the ride, not the destination. 97 Valkyrie Tour 99 Valkyrie Interstate  |
|
|
Wewaman
Member
Posts: 423
Dead Lakes Cruiser
Wewa, Fla.
|
|
« Reply #21 on: February 20, 2015, 09:51:38 PM » |
|
Ok here is what I did on my California Valk. Go to shop talk , click on "Removing the Smog" Then click on "CA De-Smog notes by Tim Skelton"  most don't open that but it will answer your questions.  I removed all the hoses except from# 6 intake runner to stock petcock. IMPORTANT Take the advice about the vac caps, get good ones (viton) or just unscrew the nipples and screw a plug in. also the T in the tank vent hose. Good luck, Wewaman Tony |
|
|
|
|
Logged
|
If you please God it doesn't matter who you displease but if you displease God it doesn't matter who you please  |
|
|
|
PhredValk
|
|
« Reply #22 on: February 20, 2015, 11:35:52 PM » |
|
If you're going to keep the chrome tubes, like I did (who wants to remove chrome?!?), vacuum cap them and glue the caps on. Mine worked off one at a time and I got a loud 'chuff' sound each RPM and the bike ran like crap until I got the cap back on. The hoses labelled 6 I left alone, just pointed the centre hose down. I used all of the freed vacuum hoses for my cruise control.
Fred.
|
|
|
|
|
Logged
|
Growing old is mandatory, growing up is optional.
VRCCDS0237
|
|
|
|
dpcarson
|
|
« Reply #23 on: February 21, 2015, 05:03:12 AM » |
|
The #6 hoses going to the mounted valve stay, the mounted valve goes. Add a tee, short piece of hose and a breather filter. Tuck it away so it won't get wet and dispose of all the other CA emisission bull-puckey, includimg that charcoal cannister you found under the swingarm.
The #6 hoses going to the mounted valve stay, the mounted valve goes. Add a tee, short piece of hose and a breather filter. Tuck it away so it won't get wet and dispose of all the other CA emisission bull-puckey, includimg that charcoal cannister you found under the swingarm.
Alright!! Thanks. That extra link in the shoptalk page helped a lot! And thanks for the advice on capping or plugging those manifold nipples. I may look at plugging them so I never have to worry about the caps deteriorating again. New sockets and parts showed up yesterday so I can finish changing out the idler and starter drive gears today and hopefully start putting the old girl back together again. I just have to go find that breather filter and tee now, but hopefully the local parts store will have it. Thanks. I ordered many of my other carb parts and gaskets from him and placed my order for these yesterday also. May just cap them if I can find something that works, but if not, thanks for the link. Way better than 2.20 each for them from the parts sites. Thanks again to everybody for all the help. I see light at the end of the tunnel. Of course, then once she breathes fire again....... well then things get real expensive. Previous owner did not chrome anything on the handle bars.  |
|
|
|
|
Logged
|
"""""""""""""""""""""""""""""" In war, there are no unwounded soldiers. |
|
|
|
Crackerborn
|
|
« Reply #24 on: February 21, 2015, 05:50:56 AM » |
|
The Purolator #B13153 recomended in the CA desmog article is available but I had to call around to find it. You will have plenty of hose and tee in that black spaghetti you are pulling off unless you want new.
|
|
|
|
|
Logged
|
Life is about the ride, not the destination. 97 Valkyrie Tour 99 Valkyrie Interstate |
|
|
Wewaman
Member
Posts: 423
Dead Lakes Cruiser
Wewa, Fla.
|
|
« Reply #25 on: February 21, 2015, 12:21:24 PM » |
|
Glad that link helped you, I had a tuff time when I did mine but when I found that link, waaa'lah it all became Crystal clear.
If you know where you can find a scrapped Goldwing you could get the intake runner plugs from there. You will need 5
Good luck ,not many GW get scrapped.
Wewa
|
|
|
|
« Last Edit: February 21, 2015, 12:25:26 PM by Wewaman »
|
Logged
|
If you please God it doesn't matter who you displease but if you displease God it doesn't matter who you please |
|
|
|
dpcarson
|
|
« Reply #26 on: February 21, 2015, 12:28:06 PM » |
|
Glad that link helped you, I had a tuff time when I did mine but when I found that link, waaa'lah it all became Crystal clear.
If you know where you can find a scrapped Goldwing you could get the intake runner plugs from there. You will need 5
Good luck ,not many GW get scrapped.
Wewa
Only 5? |
|
|
|
|
Logged
|
"""""""""""""""""""""""""""""" In war, there are no unwounded soldiers. |
|
|
|
Ricky-D
|
|
« Reply #27 on: February 21, 2015, 01:17:01 PM » |
|
I myself use short pieces of vacuum hose with an old bearing shoved in the end. No need for fancy, just reliable is the goal.
|
|
|
|
|
Logged
|
2000_Valkyrie_Interstate
|
|
|
|
Challenger
|
|
« Reply #28 on: February 21, 2015, 01:33:23 PM » |
|
I thought about plugging my intake runner ports until I remembered I was going to synch my carbs when I was done. It's a lot easier to remove the rubber caps than a hex plug on the backside of the runner.
|
|
|
|
|
Logged
|
|
|
|
Wewaman
Member
Posts: 423
Dead Lakes Cruiser
Wewa, Fla.
|
|
« Reply #29 on: February 21, 2015, 05:15:01 PM » |
|
Challenger makes a great point,
Only 5 because#6 has a hose going to stock petcock
Ricky-d also has a good point
Wewa
|
|
|
|
|
Logged
|
If you please God it doesn't matter who you displease but if you displease God it doesn't matter who you please |
|
|
|
dpcarson
|
|
« Reply #30 on: February 21, 2015, 08:10:35 PM » |
|
1/8" vacuum caps came in a pack of 5 at the auto parts store and fit perfect. and 5 to a pack was even better.
|
|
|
|
|
Logged
|
"""""""""""""""""""""""""""""" In war, there are no unwounded soldiers. |
|
|
Wewaman
Member
Posts: 423
Dead Lakes Cruiser
Wewa, Fla.
|
|
« Reply #31 on: February 21, 2015, 08:23:00 PM » |
|
You'll be changing those out shortly  they won't last long at all. Been there , done that  Wewa |
|
|
|
|
Logged
|
If you please God it doesn't matter who you displease but if you displease God it doesn't matter who you please |
|
|
|
dpcarson
|
|
« Reply #32 on: March 01, 2015, 08:02:11 AM » |
|
OK. I have followed the Skelton's shop talk info to finish de smog on the CA model I have. However, I have come up with a question. Instead of using the purolator filter he suggests using and then plugging the extra breather hose port on the airbag, can I just connect the breather lines where the purolator should go directly to the airbag port instead of plugging it?
|
|
|
|
|
Logged
|
"""""""""""""""""""""""""""""" In war, there are no unwounded soldiers. |
|
|
|
Crackerborn
|
|
« Reply #33 on: March 01, 2015, 05:29:43 PM » |
|
I just did what the write-up suggested and everything worked just fine. Your idea has merit and is worth pursuing IMHO. If there seems to be performance issues using the air-box as a filter, pulling the tank and air-box are small compared what you have going on at this point. I believe that some earlier write-ups plugged those hoses and only some bikes suffered from performance problems. I like not having the hoses attached since that is one less thing I have to remember to attach when I pull the air-box.
|
|
|
|
|
Logged
|
Life is about the ride, not the destination. 97 Valkyrie Tour 99 Valkyrie Interstate |
|
|
|
Ricky-D
|
|
« Reply #34 on: March 02, 2015, 10:30:55 AM » |
|
OK. I have followed the Skelton's shop talk info to finish de smog on the CA model I have. However, I have come up with a question. Instead of using the purolator filter he suggests using and then plugging the extra breather hose port on the airbag, can I just connect the breather lines where the purolator should go directly to the airbag port instead of plugging it?
Well, I'm confused here. I don't see where any additional filters or hosing is needed. The crankcase breather is or should be still connected to the air filter in the bottom of the filter case. I know one hole in the bottom needs to be plugged. If there are more because of the California edition, plug them also. And the breather vents on the carburetors need nothing, leave them open and alone. You know you can go overboard, and start making problems where none previously existed. Some refer to that as the "law of unintended consequences". *** |
|
|
|
|
Logged
|
2000_Valkyrie_Interstate
|
|
|
|


