Sandy, I think this will help.
Here is how I check the operation of the Temperature Indicator Unit and the Coolant Light on a 1997 to 1999 Valkyrie Standard or Tourer
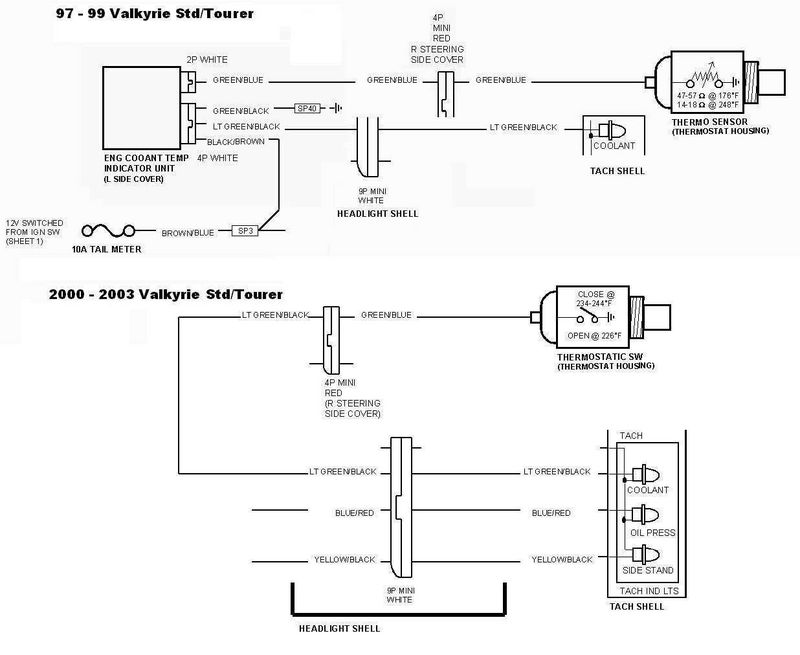
How the light works. The 97-99 Valkyrie Standards and Tourers have a Thermo Sensor on the thermostat housing. The Thermo Sensor has a wire that connects it to the 2P connector on the Temperature Indicator Unit behind the left side cover and overflow tank.
The Thermo Sensor offers a variable resistance to the Temperature Indicator Unit depending on the temperature of the coolant. When the coolant is 176 degrees the resistance measures 47 to 57 ohms.
When the coolant is 248 degrees the resistance measures 14 to 18 ohms. At ~248 degrees the coolant light should be on.
How to check for proper operation:
1. Remove the left side cover
2. Remove the bolt for the coolant overflow tank and moved it aside.
3. Remove the Temperature Indicator Unit from the holding band so that you can get to the connectors.
4. Disconnect the 2P connector from the Temperature Indicator Unit. It has only wire.
5. Connect a 18 ohm resistor from the only pin on the 2P side of the Temperature Indicator Unit to ground .
6. Turn on the ignition key and the Coolant Light should be on.
7. Turn off the ignition key.
8. Exchange the 18 ohm resistor with a 53 ohm resistor.
9. Turn on the ignition key and verify that the Coolant Light is not on.
This verifies that the Temperature Indicator Unit is functioning properly and that the Coolant Light is not burned out.
Later Valkyries and all Interstates use a Thermostatic Switch to turn the Coolant Light on. The switch is either off or on to control the light.
To eliminate the 97-99 the Temperature Indicator Unit and change to the later Thermostatic Switch do the following.
1, Replace the Thermo Sensor in the Thermostat Housing with the later Thermostatic Switch. You will probably have to change the connector on the end of the wire to attached to it.
2. Remove the Left Side Cover , the Coolant Tank, and disconnect the Temperature Indicator Unit.
3. Jumper the Green/Blue wire on the 2p connector to the Lt Green/Black wire in the 4p connector.
4. The old Temperature Indicator Unit can be removed.