|
ValkISDan
|
 |
« on: March 14, 2016, 06:45:31 PM » |
|
OK so I think I'm about ready to throw up. I recently changed my oil and have a crush washer on my oil drain plug that is getting old. It dripped a little after my oil change so I tightened it a bit more and it still leaked. Got a new crush washer and when I was installing it noticed what appeared to be a small crack in the block coming up from my drain plug. Sure enough I installed the new washer and it still leaks from what appears to be from this hairline crack. What the hell do I do now? Help!
|
|
|
|
|
 Logged
|
|
|
|
gordonv
Member

Posts: 5766
VRCC # 31419
Richmond BC
|
|
« Reply #1 on: March 14, 2016, 07:44:08 PM » |
|
There was a "plug" that can be added that has a drain through it. You could JB Weld this in (or get someone to actual weld it in), and this might hold and seal the crack.
There is also just doing it right, and having it welded. Cost? No clue.
|
|
|
|
|
Logged
|
1999 Black with custom paint IS   |
|
|
|
pancho
|
|
« Reply #2 on: March 15, 2016, 03:21:57 PM » |
|
First thing to do is completely clean and sand the area while the oil is out and see what you have. I have seen repairs done on the outside of aluminum cases that held for many years done with JB weld and two part epoxys.
|
|
|
|
|
Logged
|
The most expensive things you will purchase, are those things you would not have needed if you had listened and obeyed.
|
|
|
|
ValkISDan
|
|
« Reply #3 on: March 15, 2016, 03:51:15 PM » |
|
Thanks for the input. My motorcycle guy thinks it needs a new block. I would have certainly tried JB weld or an epoxy before anything that radical. I then spoke with an aluminum welding specialist and he thinks we can weld the area if we get it clean enough. I'm scheduled for the procedure next Tuesday, I'll keep everyone posted.
|
|
|
|
|
Logged
|
|
|
|
|
Hook#3287
|
|
« Reply #4 on: March 15, 2016, 04:10:42 PM » |
|
Back in the early 70's I raced a Honda Elsinore, great bike, not so great of a racer.
I trashed on a start once and collided with the bike next to me causing his footpeg to jam my front sprocket. It damaged the inside case.
Everyone told me I needed a new case, but I didn't have the money.
A local welder liked me for some reason and said he would weld it.
I split the cases, he welded it, I sold the bike and the next owner ran it for years.
Hopefully, your welder has the same, or better, skills and he can do it w/o a tear down.
Good luck.
|
|
|
|
|
Logged
|
|
|
|
|
DK
|
|
« Reply #5 on: March 15, 2016, 07:26:31 PM » |
|
Be sure to disconnect the battery before welding on the engine case.
Also be sure to ground the engine to earth before welding.
Presumably, your welder will do the repair with a TIG welder.
Ask If your welder can accomplish the repair without using the High Frequency feature of most TIG welders. Disabling HF causes it to be harder to strike the arc and minimizes the ability of the arc to clean or float impurities from the weld. Thorough prep of the weld area will minimize the need for HF.
Welding on a machine with sensitive electronics is always problematical. Using a welder with the high frequency feature greatly increases the problem.
Personally, I would grind the crack out a bit and rough up the immediate area with a Dremel tool and apply JB Weld. Also, rather than the original Two part epoxy, JB Weld now has a "paste" product made expressly for this type of repair. It comes in stick form that you knead to activate.
Also, there exists one or more products formulated for the express purpose of sealing engine block cracks. - Ask a good counterman at a NAPA type store for more information on this.
If the epoxy sealers fail, then consider welding.
I'm just an experienced hobby welder, so I acknowledge that a professional may be able to do the repair in a manner without any risk from the problems I've mentioned.
Good luck.
Dan
|
|
|
|
|
Logged
|
Machinery has a mysterious soul and a mind of its own.
|
|
|
|
KG
|
|
« Reply #6 on: March 15, 2016, 07:49:57 PM » |
|
Check with a prop shop first. They are used to building up aluminum props. Had one do a Toyota timing cover and when he got done you could hardly see the repair
|
|
|
|
|
Logged
|
What we do all have is a limited number of days to devote to whatever we love in this life. Not all the same number of days but all have limited days....Willow
|
|
|
|
da prez
|
|
« Reply #7 on: March 15, 2016, 08:31:24 PM » |
|
If trying the JB weld , clean with brake clean or electric motor cleaner and an air gun. Clean,clean,clean. The weld would be better , but Jr is worth a try.
da.prez
|
|
|
|
|
Logged
|
|
|
|
Tfrank59
Member
Posts: 1364
'98 Tourer
Western Washington

|
|
« Reply #8 on: March 15, 2016, 10:36:04 PM » |
|
OK so I think I'm about ready to throw up. I recently changed my oil and have a crush washer on my oil drain plug that is getting old. It dripped a little after my oil change so I tightened it a bit more and it still leaked. Got a new crush washer and when I was installing it noticed what appeared to be a small crack in the block coming up from my drain plug. Sure enough I installed the new washer and it still leaks from what appears to be from this hairline crack. What the hell do I do now? Help!
OK so that really sucks. Sorry for your misfortune. Hope you can find the right fix for it without ripping the whole motor apart or whatever. Are you saying that you think the block got cracked by over tightening the oil drain plug? Or was it just cracked anyways and you noticed it when you drained your oil? Just curious. |
|
|
|
|
Logged
|
-Tom
Keep the rubber side down. USMC '78-'84
'98 Valkyrie, ‘02 VTX 1800, '96 Royal Star, '06 Drifter, '09 Bonneville, '10 KTM 530, '04 XR 650, '76 Bultaco, '81 CR 450, '78 GS 750...
|
|
|
|
ValkISDan
|
|
« Reply #9 on: March 16, 2016, 04:35:27 PM » |
|
Check with a prop shop first. They are used to building up aluminum props. Had one do a Toyota timing cover and when he got done you could hardly see the repair
Funny you should mention that, a local prop shop came highly recommended so that's where I'm starting. As for the earlier comment on the High frequency welder comment I will bring that to his attention and get his opinion. I truely believe it wasn't there prior and it was my over tightening that created the problem. I think the welding is the best fix and wouldn't have considered if the welder didn't think he could do it. |
|
|
|
|
Logged
|
|
|
|
Tfrank59
Member
Posts: 1364
'98 Tourer
Western Washington
|
|
« Reply #10 on: March 17, 2016, 12:56:40 PM » |
|
I guess it doesn't matter much now, but it is hard to believe that just over tightening could've cracked the case. I've always only heard of drain plugs getting stripped, so there may have been a flaw in the casting and overtorquing just helped it along. Is it possible that you hit a curb or something underneath, and it hit the drain plug directly to produce a crack? I guess you'd see evidence of that impact on the drain plug. Just thinking out loud.
|
|
|
|
|
Logged
|
-Tom
Keep the rubber side down. USMC '78-'84
'98 Valkyrie, ‘02 VTX 1800, '96 Royal Star, '06 Drifter, '09 Bonneville, '10 KTM 530, '04 XR 650, '76 Bultaco, '81 CR 450, '78 GS 750...
|
|
|
hubcapsc
Member
Posts: 16817
upstate
South Carolina
|
|
« Reply #11 on: March 17, 2016, 01:36:19 PM » |
|
I split the cases, he welded it, I sold the bike and the next owner ran it for years. Similar thing happened to my yz490... I removed the motor, still assembled, and took it to the aluminum welder guy... I don't know how long the next guy ran it, but there was nothing wrong with the fix (other than ugly  )... Good luck to the OP...  -Mike
|
|
|
|
|
Logged
|
|
|
|
|
98valk
|
|
« Reply #12 on: March 17, 2016, 03:32:07 PM » |
|
OK so I think I'm about ready to throw up. I recently changed my oil and have a crush washer on my oil drain plug that is getting old. It dripped a little after my oil change so I tightened it a bit more and it still leaked. Got a new crush washer and when I was installing it noticed what appeared to be a small crack in the block coming up from my drain plug. Sure enough I installed the new washer and it still leaks from what appears to be from this hairline crack. What the hell do I do now? Help!
I would install a new drain plug first. Standard practice, the threaded hole should be a harden steel insert and the plug will be a softer metal so it wears and not the insert. The plug might just be worn and not sealing and oil is just seeping to the normal aluminum casting surface lines, which can look like cracks due to their siphoning effect. Drain bolt torque is 25 lbft per pg 3-9 of tech manual. Good Luck. |
|
|
|
|
Logged
|
1998 Std/Tourer, 2007 DR200SE, 1981 CB900C 10speed
1973 Duster 340 4-speed rare A/C, 2001 F250 4x4 7.3L, 6sp
"Our Constitution was made only for a Moral and Religious people. It is wholly inadequate to the goverment of any other."
John Adams 10/11/1798
|
|
|
|
ValkISDan
|
|
« Reply #13 on: March 17, 2016, 05:07:31 PM » |
|
I thought I would include a photo. It's hard to believe that over tightening coulddo this. 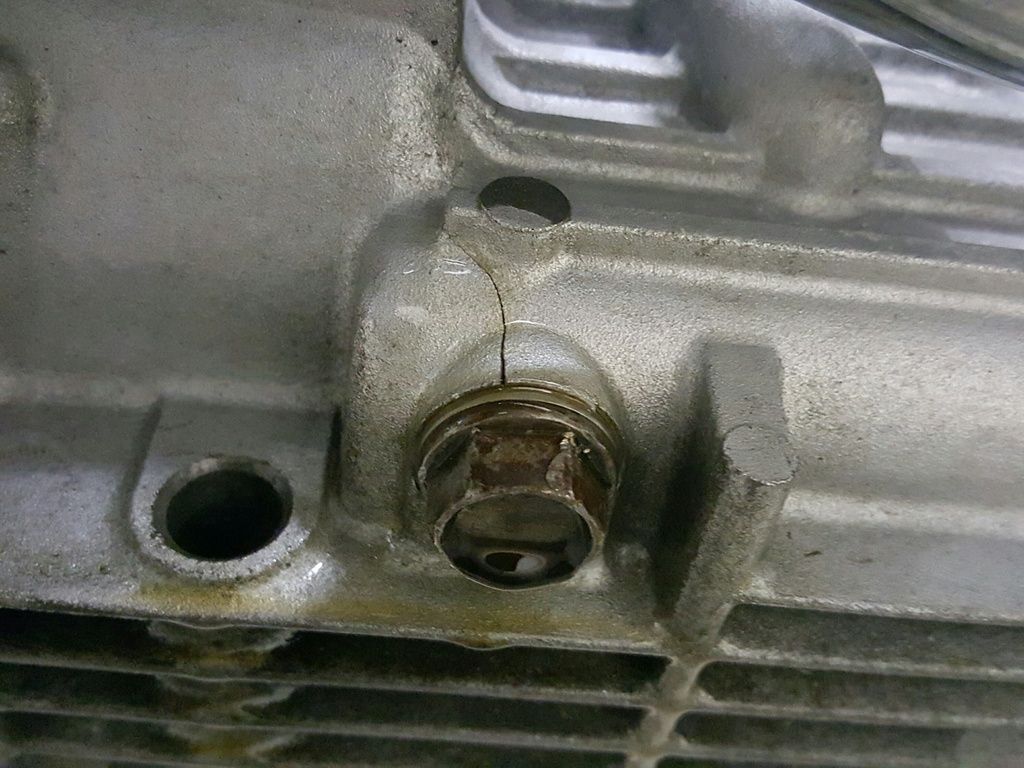 |
|
|
|
|
Logged
|
|
|
|
|
98valk
|
|
« Reply #14 on: March 17, 2016, 05:43:03 PM » |
|
Wow. so sorry,  forget what I wrote. JB weld, aluminum epoxies, or TIG weld, will be the fix as others have said. |
|
|
|
|
Logged
|
1998 Std/Tourer, 2007 DR200SE, 1981 CB900C 10speed
1973 Duster 340 4-speed rare A/C, 2001 F250 4x4 7.3L, 6sp
"Our Constitution was made only for a Moral and Religious people. It is wholly inadequate to the goverment of any other."
John Adams 10/11/1798
|
|
|
|
The emperor has no clothes
|
|
« Reply #15 on: March 17, 2016, 05:44:04 PM » |
|
I thought I would include a photo. It's hard to believe that over tightening coulddo this.  man that sucks. I feel for you. I don't see how over tightening would do that either. It seems like it would strip the threads way before it would crack that. I am not understanding how it could be welded and still have a good seal. |
|
|
|
|
Logged
|
|
|
|
Tfrank59
Member
Posts: 1364
'98 Tourer
Western Washington
|
|
« Reply #16 on: March 17, 2016, 05:57:06 PM » |
|
Yes, it does suck, but it also looks fixable, with the right tig welder dude (and the right prep).
|
|
|
|
|
Logged
|
-Tom
Keep the rubber side down. USMC '78-'84
'98 Valkyrie, ‘02 VTX 1800, '96 Royal Star, '06 Drifter, '09 Bonneville, '10 KTM 530, '04 XR 650, '76 Bultaco, '81 CR 450, '78 GS 750...
|
|
|
|
pancho
|
|
« Reply #17 on: March 17, 2016, 07:48:29 PM » |
|
Looks like the plug was forced in with a large hunk of debris stuck in the threads at one time. At least it is readily accessible and appears to be a good candidate for a repair.
|
|
|
|
|
Logged
|
The most expensive things you will purchase, are those things you would not have needed if you had listened and obeyed.
|
|
|
art
Member
Posts: 2737
Grants Pass,Or
Grants Pass,Or
|
|
« Reply #18 on: March 17, 2016, 07:53:36 PM » |
|
That crack may get longer if you don't drill a small hole at the end of it to stop it from traveling. Then clean it before either Tig welding or JB weld.
|
|
|
|
|
Logged
|
|
|
|
|
DK
|
|
« Reply #19 on: March 17, 2016, 08:36:40 PM » |
|
After seeing the pic of your problem, I reiterate that you may want to investigate the casting crack "block crack sealer" I mentioned in my previous post. We used it on a bulldozer casting crack several years ago with good results. Drilling a small hole at the end of a crack is a stress relieving technique for cast iron, a very brittle metal. Alumninum is malleable and I doubt that drilling would serve any purpose with this crack. Research the problem yourself. This is the sort of thing everybody with a shade tree has an opinion on how to fix. (Applies only to repairmen, not VRCC Forum members) Here is a good discussion of crack repair by the Engine Rebuilder's Association: http://www.enginebuildermag.com/2015/04/engine-block-and-head-repair/Good luck, Dan |
|
|
|
|
Logged
|
Machinery has a mysterious soul and a mind of its own.
|
|
|
Tfrank59
Member
Posts: 1364
'98 Tourer
Western Washington
|
|
« Reply #20 on: March 17, 2016, 08:40:34 PM » |
|
Yeah I'm no welder but I work with them all the time and do weld preps. I mean to really do it right you have to get in there with a rotary file and chase that crack and probably do a dye penetrant test to make sure you got to the end of the crack, and then you tig weld. And then there's the issue of the threads --somebody said something about a thread insert --that might be the right fix for those. Not a heli coil but what they call a "keensert" – you just drill and tap and then screw it in and it has locking tabs. Course if you wanted it to have the same original ID threads, you'd have to buy the correct metric keensert.
|
|
|
|
|
Logged
|
-Tom
Keep the rubber side down. USMC '78-'84
'98 Valkyrie, ‘02 VTX 1800, '96 Royal Star, '06 Drifter, '09 Bonneville, '10 KTM 530, '04 XR 650, '76 Bultaco, '81 CR 450, '78 GS 750...
|
|
|
|
The emperor has no clothes
|
|
« Reply #21 on: March 17, 2016, 08:50:30 PM » |
|
Yeah I'm no welder but I work with them all the time and do weld preps. I mean to really do it right you have to get in there with a rotary file and chase that crack and probably do a dye penetrant test to make sure you got to the end of the crack, and then you tig weld. And then there's the issue of the threads --somebody said something about a thread insert --that might be the right fix for those. Not a heli coil but what they call a "keensert" – you just drill and tap and then screw it in and it has locking tabs. Course if you wanted it to have the same original ID threads, you'd have to buy the correct metric keensert.
Can all that be done with the engine on the bike ? |
|
|
|
|
Logged
|
|
|
|
Tfrank59
Member
Posts: 1364
'98 Tourer
Western Washington
|
|
« Reply #22 on: March 17, 2016, 08:55:03 PM » |
|
I'm thinking yes, but again I'm not a welder (just a machinist). if any oil seeps into the crack from inside while he's welding...oops! As far as threading in a keensert after the welding, it's just a matter of making sure metal chips don't go uphill  Afterthought: and you know he might be able to get away with doing nothing to the threads – depending on whether metal flows into those during the welding process, a guy might be able to just run a tap through it and call it good. Of course the final judge would be whether oil leaks from there. |
|
|
|
« Last Edit: March 17, 2016, 08:59:43 PM by Tfrank59 »
|
Logged
|
-Tom
Keep the rubber side down. USMC '78-'84
'98 Valkyrie, ‘02 VTX 1800, '96 Royal Star, '06 Drifter, '09 Bonneville, '10 KTM 530, '04 XR 650, '76 Bultaco, '81 CR 450, '78 GS 750...
|
|
|
Tfrank59
Member
Posts: 1364
'98 Tourer
Western Washington
|
|
« Reply #23 on: March 17, 2016, 09:36:39 PM » |
|
If trying the JB weld , clean with brake clean or electric motor cleaner and an air gun. Clean,clean,clean. The weld would be better , but Jr is worth a try.
da.prez
I'd be afraid to trust JB Weld on this application, just because of the oil saturation factor--JB Weld is good stuff but in this case I doubt it would hold up over the long haul. I think if he wants to keep the bike and doesn't want this problem to keep coming back around it's most likely going to require welding. |
|
|
|
|
Logged
|
-Tom
Keep the rubber side down. USMC '78-'84
'98 Valkyrie, ‘02 VTX 1800, '96 Royal Star, '06 Drifter, '09 Bonneville, '10 KTM 530, '04 XR 650, '76 Bultaco, '81 CR 450, '78 GS 750...
|
|
|
|
Blackduck
|
|
« Reply #24 on: March 18, 2016, 02:26:19 AM » |
|
After it is welded, run some Loctite 290 over the weld. This is designed to wick into threads and works well on porous castings. Have not used or seen the other mention cast repair material.
Pull the fuel tank, battery and lay the bike over to get clear access to the weld site. Carb cleaner or the likes to clean out the crack. Spray it with cleaner and hit it with a air hose and repeat several times to get the oil out.
By laying it over it reduces the chance of oil running down and back into the crack when it heats up.
As said there is a good chance you can just re-tap the hole.
Good luck with the repair.
|
|
|
|
« Last Edit: March 18, 2016, 02:30:39 AM by Blackduck »
|
Logged
|
2001 Standard, 78 Goldwing, VRCC 21411
|
|
|
Tfrank59
Member
Posts: 1364
'98 Tourer
Western Washington
|
|
« Reply #25 on: March 18, 2016, 06:03:31 AM » |
|
I thought I would include a photo. It's hard to believe that over tightening coulddo this. That's an excellent pic, which is what prompted several of us to chime in that it is fixable and how to go about it. Blackduck sounds like he really knows how to prep this job for welding. but now it brings up the issue how many other Valks have this kind of crack going on? When they say 25 foot-pounds on the drain plug they really mean it. Now I got to get under there and look at mine! |
|
|
|
|
Logged
|
-Tom
Keep the rubber side down. USMC '78-'84
'98 Valkyrie, ‘02 VTX 1800, '96 Royal Star, '06 Drifter, '09 Bonneville, '10 KTM 530, '04 XR 650, '76 Bultaco, '81 CR 450, '78 GS 750...
|
|
|
|
The emperor has no clothes
|
|
« Reply #26 on: March 18, 2016, 08:09:52 AM » |
|
I've got to admit I've never used a torque wrench on any oil drain on ANY vehicle. I just snug them up. I've never felt they need to be tight, just snug enough not to leak. I have always threaded it in with fingers till the end. I learned the hard way when I was 14 about using a spark plug wrench without threading by hand first.
|
|
|
|
|
Logged
|
|
|
|
|
Ricky-D
|
|
« Reply #27 on: March 18, 2016, 08:21:10 AM » |
|
Applying 25 ft.lb of torque to that bolt is stupid. The bolt holds nothing but itself. There is virtually no vibration to rattle the bolt loose.
Tight enough is all that is needed, somewhere in the 60 in.lb range I would think. That 25 ft.lb figure is a maximum limit and not a required number.
And yes, the first action of stripping a bolt hole is a spreading force trying to make the hole larger. When the hole wont enlarge, the threads then start to strip out.
In this case, the hole enlarged by cracking the boss.
***
|
|
|
|
|
Logged
|
2000_Valkyrie_Interstate
|
|
|
|
flash2002
|
|
« Reply #28 on: March 18, 2016, 09:00:47 AM » |
|
You can see by the marks on the bolt , that sucker was real tight. They must of had trouble getting it off.
|
|
|
|
|
Logged
|
|
|
|
Tfrank59
Member
Posts: 1364
'98 Tourer
Western Washington
|
|
« Reply #29 on: March 18, 2016, 09:58:19 AM » |
|
I've got to admit I've never used a torque wrench on any oil drain on ANY vehicle. I just snug them up. I've never felt they need to be tight, just snug enough not to leak. I have always threaded it in with fingers till the end. I learned the hard way when I was 14 about using a spark plug wrench without threading by hand first.
In 40+ years working on bikes (not to mention cars), I've never used a torque wrench on a drain plug either, and never had one strip out, crack the housing or vibrate loose. 25 lbs of torque on that plug would never cause a problem; that spec is just provided in the manual for those who feel the need to do everything by the book. |
|
|
|
|
Logged
|
-Tom
Keep the rubber side down. USMC '78-'84
'98 Valkyrie, ‘02 VTX 1800, '96 Royal Star, '06 Drifter, '09 Bonneville, '10 KTM 530, '04 XR 650, '76 Bultaco, '81 CR 450, '78 GS 750...
|
|
|
hubcapsc
Member
Posts: 16817
upstate
South Carolina
|
|
« Reply #30 on: March 18, 2016, 10:29:02 AM » |
|
I've used a torque wrench on my Valkyrie very few times...
A few times on the axle, maybe I should do that more, but...
I used it to tighten the nut on the pinion cups I've replaced when
working on final drives. That seemed very right, especially since
I had one final drive whose pinion-cup-nut had been br-r-r-r-rrped
on real tight with an impact wrench. That thing was impossible
to get off, I broke my home-made pinion-cup holder tool trying to get it
off.
All things can be too tight...
-Mike
|
|
|
|
|
Logged
|
|
|
|
Skinhead
Member
Posts: 8753
J. A. B. O. A.
Troy, MI
|
|
« Reply #31 on: March 18, 2016, 03:27:21 PM » |
|
I got too tight on St. Patty's day...
|
|
|
|
|
Logged
|
 Troy, MI |
|
|
|
The emperor has no clothes
|
|
« Reply #32 on: March 18, 2016, 03:41:01 PM » |
|
I got too tight on St. Patty's day...
No cracking I hope |
|
|
|
|
Logged
|
|
|
|
|
ValkISDan
|
|
« Reply #33 on: March 18, 2016, 06:17:45 PM » |
|
After it is welded, run some Loctite 290 over the weld. This is designed to wick into threads and works well on porous castings. Have not used or seen the other mention cast repair material.
Pull the fuel tank, battery and lay the bike over to get clear access to the weld site. Carb cleaner or the likes to clean out the crack. Spray it with cleaner and hit it with a air hose and repeat several times to get the oil out.
By laying it over it reduces the chance of oil running down and back into the crack when it heats up.
As said there is a good chance you can just re-tap the hole.
Good luck with the repair.
This is pretty much what we are going to do the repair shop said the exact same thing except for the Loctite 290. Tuesday is the big day, I'll keep everyone in the loop |
|
|
|
|
Logged
|
|
|
|
Tfrank59
Member
Posts: 1364
'98 Tourer
Western Washington
|
|
« Reply #34 on: March 18, 2016, 06:35:15 PM » |
|
After it is welded, run some Loctite 290 over the weld. This is designed to wick into threads and works well on porous castings. Have not used or seen the other mention cast repair material.
Pull the fuel tank, battery and lay the bike over to get clear access to the weld site. Carb cleaner or the likes to clean out the crack. Spray it with cleaner and hit it with a air hose and repeat several times to get the oil out.
By laying it over it reduces the chance of oil running down and back into the crack when it heats up.
As said there is a good chance you can just re-tap the hole.
Good luck with the repair.
This is pretty much what we are going to do the repair shop said the exact same thing except for the Loctite 290. Tuesday is the big day, I'll keep everyone in the loop Good plan – good luck to you |
|
|
|
|
Logged
|
-Tom
Keep the rubber side down. USMC '78-'84
'98 Valkyrie, ‘02 VTX 1800, '96 Royal Star, '06 Drifter, '09 Bonneville, '10 KTM 530, '04 XR 650, '76 Bultaco, '81 CR 450, '78 GS 750...
|
|
|
crow
Member
Posts: 556
Toujours Pret
Citrus Co Fla
|
|
« Reply #35 on: March 19, 2016, 05:21:34 PM » |
|
Before you weld or epoxy, take a centre punch and dot both sides of the crack about 3/16 ths apart. Also, if weld reparied, make shure the end of the crack is stop drilled. That weld should take no more than a couple of hours to complete.
|
|
|
|
|
Logged
|
dont write a check with your mouth,
that your ass cant cash
|
|
|
art
Member
Posts: 2737
Grants Pass,Or
Grants Pass,Or
|
|
« Reply #36 on: March 19, 2016, 07:38:05 PM » |
|
I still say stop drill the end of the crack. It will not hurt and is added Ins. against the crack traveling. The case is a casting and a crack will travel.
|
|
|
|
|
Logged
|
|
|
|
|
Bighead
|
|
« Reply #37 on: March 19, 2016, 10:20:51 PM » |
|
And make sure whoever is changing the oil is using the correct size wrench. just sayin.
|
|
|
|
|
Logged
|
1997 Bumble Bee
1999 Interstate (sold)
2016 Wing
|
|
|
gordonv
Member
Posts: 5766
VRCC # 31419
Richmond BC
|
|
« Reply #38 on: March 20, 2016, 06:21:19 PM » |
|
This was what I was referring to about an oil drain valve. http://www.ezoildrainvalve.com/I also found the name Fumoto. I was thinking permanently mount it in the block (locktit/JB Weld), to stop the crack from leaking. Then you can the oil via the valve. |
|
|
|
|
Logged
|
1999 Black with custom paint IS |
|
|
|
ValkISDan
|
|
« Reply #39 on: March 22, 2016, 06:39:27 PM » |
|
|
|
|
|
|
Logged
|
|
|
|
|


