|
peter
|
 |
« on: March 20, 2016, 07:03:16 AM » |
|
My first thread is getting too long so I'm starting another. Replaced both tires and lubed the splines, now on to the carbs. The plan is to follow this youtube series: https://www.youtube.com/watch?v=eDLTpQCTBscAnybody have any experience with this series? Looks great to me. Peter |
|
|
|
|
 Logged
|
'98 Valk
'56 BSA
'04 Ducati
|
|
|
|
Bighead
|
|
« Reply #1 on: March 20, 2016, 07:35:13 AM » |
|
I have watched it before and all his other vids. He explains everything pretty clearly.
|
|
|
|
|
Logged
|
1997 Bumble Bee
1999 Interstate (sold)
2016 Wing
|
|
|
|
98valk
|
|
« Reply #2 on: March 20, 2016, 08:42:07 AM » |
|
much, much easier to remove the carb bank if the rear upper motor mounts are moved out of the way which is per the tech manual. much easier than dealing with the plastic radiator shield removal. And then the air box does not have to be completely pulled out from btwn the frame rails, saving a headache removing and re-installing, since there is no need to pull the rad shield.
|
|
|
|
|
Logged
|
1998 Std/Tourer, 2007 DR200SE, 1981 CB900C 10speed
1973 Duster 340 4-speed rare A/C, 2001 F250 4x4 7.3L, 6sp
"Our Constitution was made only for a Moral and Religious people. It is wholly inadequate to the goverment of any other."
John Adams 10/11/1798
|
|
|
|
98valk
|
|
« Reply #3 on: March 20, 2016, 08:43:32 AM » |
|
much, much easier to remove the carb bank if the rear upper motor mounts are moved out of the way which is per the tech manual. much easier than dealing with the plastic radiator shield removal. And then the air box does not have to be completely pulled out from btwn the frame rails, saving a headache removing and re-installing, since there is no need to pull the rad shield.
with everything out of the way consider doing a de-smog.
|
|
|
|
« Last Edit: March 21, 2016, 03:51:50 AM by 98valk (aka CA) »
|
Logged
|
1998 Std/Tourer, 2007 DR200SE, 1981 CB900C 10speed
1973 Duster 340 4-speed rare A/C, 2001 F250 4x4 7.3L, 6sp
"Our Constitution was made only for a Moral and Religious people. It is wholly inadequate to the goverment of any other."
John Adams 10/11/1798
|
|
|
|
peter
|
|
« Reply #4 on: March 20, 2016, 07:40:38 PM » |
|
Thanks for the tip - I'll go that route.
She's already been desmogged by my man Big BF, Valk Mechanic Extraordinaire...
|
|
|
|
|
Logged
|
'98 Valk
'56 BSA
'04 Ducati
|
|
|
|
peter
|
|
« Reply #5 on: March 21, 2016, 04:21:56 PM » |
|
Almost have the air box out but want to move the wiring harness out of the way first to gain more room. I see it is attached to the underside of the frame rail by two fasteners. How does one remove these without buggering them up? Simply pry them down or do they need to shift forward or backward first?
Thanks again,
Peter
Does Big BF still post here occasionally?
|
|
|
|
|
Logged
|
'98 Valk
'56 BSA
'04 Ducati
|
|
|
|
Hook#3287
|
|
« Reply #6 on: March 21, 2016, 04:34:26 PM » |
|
Never had to remove or move the wiring harness to get the air box out, but if their like the handlebar wire clips, you move one end to the side, or, one side left and the other right.
|
|
|
|
|
Logged
|
|
|
|
gordonv
Member

Posts: 5766
VRCC # 31419
Richmond BC
|
|
« Reply #7 on: March 21, 2016, 06:12:31 PM » |
|
I believe they are just metal tabs folded over. but if they are plastic ones, they "snap" into place. Be careful, they do break. I removed mine when wrecking the bike and saved them (somewhere).
|
|
|
|
|
Logged
|
1999 Black with custom paint IS   |
|
|
|
peter
|
|
« Reply #8 on: March 23, 2016, 06:57:35 PM » |
|
Managed to get the air box and carb set out. Took the carbs apart and cursed if every one of them was sparkly clean even after 10 years of moderate use since the last time they were serviced. Soaking the jets in lacquer thinner all the same. Thinking about changing out the vacuum lines while all this stuff is out of the way. Anything special needed in this regard??
..and the clips referred to above come off by pushing them forward, not down.
Now the hard part, putting it back together...
Peter
|
|
|
|
|
Logged
|
'98 Valk
'56 BSA
'04 Ducati
|
|
|
gordonv
Member
Posts: 5766
VRCC # 31419
Richmond BC
|
|
« Reply #9 on: March 23, 2016, 07:25:21 PM » |
|
..and the clips referred to above come off by pushing them forward, not down.
So these where the little plastic clamps, that slid onto those nail like protrusions. |
|
|
|
|
Logged
|
1999 Black with custom paint IS |
|
|
|
pancho
|
|
« Reply #10 on: March 24, 2016, 07:33:18 AM » |
|
" Thinking about changing out the vacuum lines while all this stuff is out of the way. Anything special needed in this regard??"
No,, just use good quality vacuum line from any auto parts store, and use the old lines as a template to cut the new ones. The carb drain lines must be pretty close in length to have them fit correctly and look nice. I forget the size that works,, just take a piece with you and match it up.
|
|
|
|
|
Logged
|
The most expensive things you will purchase, are those things you would not have needed if you had listened and obeyed.
|
|
|
|
peter
|
|
« Reply #11 on: March 24, 2016, 11:28:30 AM » |
|
[/img]
|
|
|
|
|
Logged
|
'98 Valk
'56 BSA
'04 Ducati
|
|
|
|
peter
|
|
« Reply #12 on: March 24, 2016, 08:10:46 PM » |
|
Carbs are back together and back on the bike and everything is looking good. I am perversly disappointed that everything was so damn clean inside after all that trouble. But I did think something was strange. She's been desmogged and there are no longer ANY vacuum lines - just the 6 drain tubes and the lines associated with the petcock and tank. All the, what I assume are vacuum nipples on the carbs have been capped except the left rear ?? I'm thinking it may have fallen off but then again, I don't see those caps vibrating off. Any thoughts?
|
|
|
|
|
Logged
|
'98 Valk
'56 BSA
'04 Ducati
|
|
|
|
big poppa pump
|
|
« Reply #13 on: March 24, 2016, 08:43:16 PM » |
|
The #6 is the vacuum line to your petcock.
|
|
|
|
|
Logged
|
VRCC#35870 VRCCDS#0266 1998 Valkyrie Hot Rod  |
|
|
|
peter
|
|
« Reply #14 on: March 25, 2016, 06:07:37 AM » |
|
Thank you Big Poppa! That makes sense and I now know how to hook it back up.
Err. one more slight concern, I have 2 lines coming out of the upper carb "rails" (above the rail where the gas lines are hooked up), one on each side that now go nowhere. One end is hooked up to the upper rails, the other ends just sits in the 2 holes on the back side of the rear carb frame rail but are not hooked up to anything nor are they plugged. I think this is ok but thought I'd check here to make sure.
Sure am grateful for everyone's help.
|
|
|
|
|
Logged
|
'98 Valk
'56 BSA
'04 Ducati
|
|
|
|
pancho
|
|
« Reply #15 on: March 25, 2016, 07:46:22 AM » |
|
I think you are referring to the vent tubes peter,, if they both look the same, they should be the perfect length to fit into two holes in the "stay plate", they just hang.
|
|
|
|
|
Logged
|
The most expensive things you will purchase, are those things you would not have needed if you had listened and obeyed.
|
|
|
|
big poppa pump
|
|
« Reply #16 on: March 25, 2016, 07:54:00 AM » |
|
Yep, carb vent tubes. 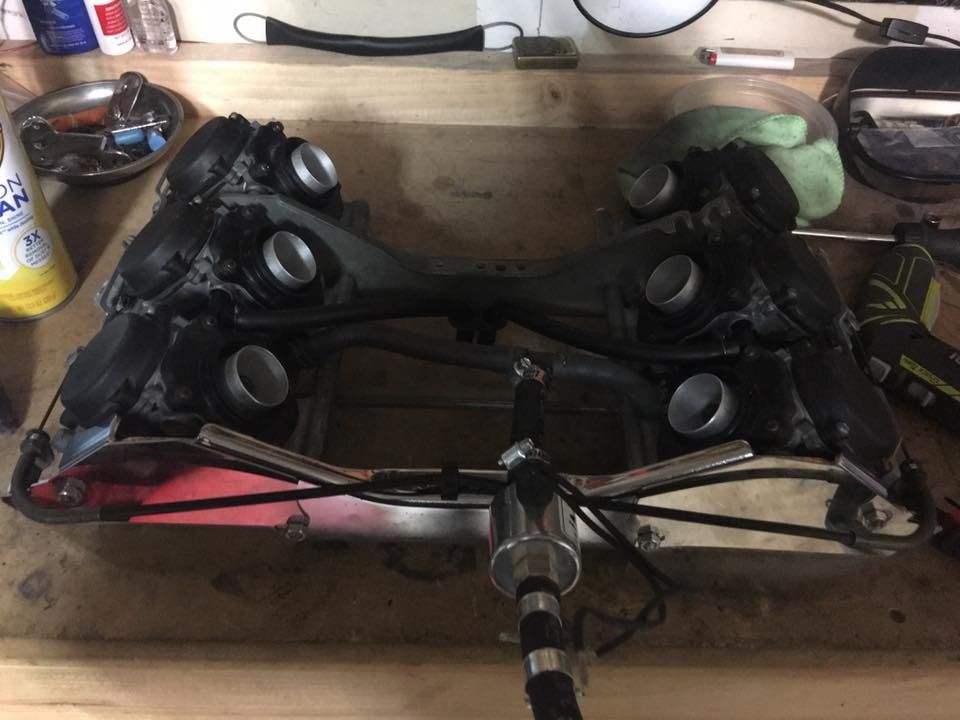 |
|
|
|
|
Logged
|
VRCC#35870 VRCCDS#0266 1998 Valkyrie Hot Rod |
|
|
|
peter
|
|
« Reply #17 on: March 25, 2016, 10:26:39 AM » |
|
Thanks you Pancho (and Pappa). Man, that's great. I'll have this wrapped up pretty quickly - just have to install the air box.
You guys and this site have been a Godsend....
|
|
|
|
|
Logged
|
'98 Valk
'56 BSA
'04 Ducati
|
|
|
|
pancho
|
|
« Reply #18 on: March 25, 2016, 04:52:01 PM » |
|
The easiest way I have found to install the airbox, is to fold in and wrap up the tubes with some cord (like a long shoe lace), no knots, and done so it will come completely undone when releasing the end of the cord. Set it in, remove the cord,,,,, saves a bunch of messing around.
|
|
|
|
|
Logged
|
The most expensive things you will purchase, are those things you would not have needed if you had listened and obeyed.
|
|
|
|
big poppa pump
|
|
« Reply #19 on: March 25, 2016, 06:27:07 PM » |
|
The easiest way I have found to install the airbox, is to fold in and wrap up the tubes with some cord (like a long shoe lace), no knots, and done so it will come completely undone when releasing the end of the cord. Set it in, remove the cord,,,,, saves a bunch of messing around.
Zipties work better. 3 snips and everything pops out! |
|
|
|
|
Logged
|
VRCC#35870 VRCCDS#0266 1998 Valkyrie Hot Rod |
|
|
|
peter
|
|
« Reply #20 on: March 25, 2016, 07:27:27 PM » |
|
I wrestled the air box in and hooked up all the lines without too much trouble. A lot of this must be a bit easier on a desmogged bike. Happy about that. My current problemo is that the tank barely sits low enough for the cheap ass petcock to go back on. This can't be right - I'll experiment with the rubber cushion at the rear. It fell off and I may have it upside down or something...I'm almost ready to try and fire it up (gulp).
|
|
|
|
|
Logged
|
'98 Valk
'56 BSA
'04 Ducati
|
|
|
|
peter
|
|
« Reply #21 on: March 25, 2016, 07:40:59 PM » |
|
sorry, forgot to ask about the need to syn the carbs. I don't think I messed with anything that would throw them off so is it necessary assuming they were cool before the tear down?
|
|
|
|
|
Logged
|
'98 Valk
'56 BSA
'04 Ducati
|
|
|
|


