gordonv
Member

Posts: 5766
VRCC # 31419
Richmond BC
|
 |
« on: June 18, 2016, 05:26:51 PM » |
|
I was prepping my bike today, spraying some Liquid Wrench on the exhaust studs/bolts, since I picked up my new exhaust today, and noticed 2 things wrong. One bolt is bent, 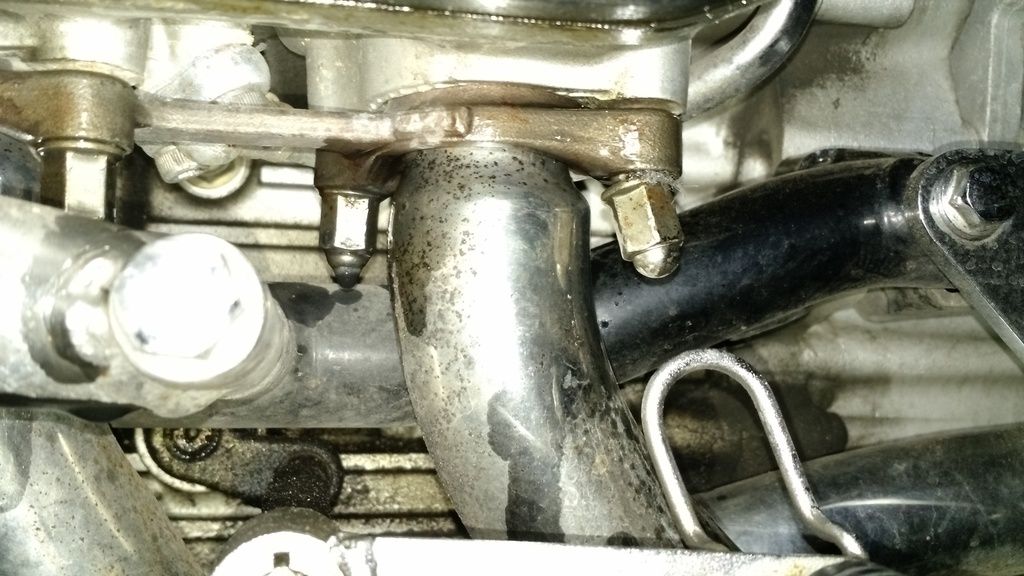 and there was another bolt that was loose, about a 1/16" gape, but the picture didn't turn out. Just a reminder to have a look at your own, and maybe give each bolt a little twist with a wrench to see if they are loose. Now I need to find a stub before trying to remove the exhaust, I'm sure it will break when I try to remove or straighten it out. Was always wanting to remove all the stubs and apply a little anti-seize on them, now might be a good time. |
|
|
|
« Last Edit: June 18, 2016, 05:30:44 PM by gordonv »
|
 Logged
|
1999 Black with custom paint IS   |
|
|
|
58Woody
|
|
« Reply #1 on: June 18, 2016, 07:31:52 PM » |
|
A good lesson learned here. Often just taking a look at your bike is a good idea. You might not see anything out of place...............................but......................
Good catch Gordonv !
Any one else got any finds like this to share ?
|
|
|
|
|
Logged
|
Be not afraid. Only believe.
|
|
|
|
Chrisj CMA
|
|
« Reply #2 on: June 19, 2016, 10:31:42 AM » |
|
A good lesson learned here. Often just taking a look at your bike is a good idea. You might not see anything out of place...............................but......................
Good catch Gordonv !
Any one else got any finds like this to share ?
And people laugh at me for cleaning places the normal person never sees. The best way to find these little problems while they're little is to clean that area, which area? Glad you asked.....ALL areas.....lol  I have another simple gem to share that will actually increase safety, and save you money. Every once in awhile, and way before you wear out a set of brake pads, I recommend removing the pads, clean off the exposed surfaces of the pistons of the calipers. I do this with a piece of thin rope or a shoelace dipped in brake fluid....wrap it around one complete turn and then pull back and forth until that piston is all clean and shiny. Then clean and gently rub (long ways) the holding pin with very fine emory cloth if its not really smooth. This will make for a stronger smoother braking feel with less dragging of the brakes when the brakes are not applied so the pads will last longer. |
|
|
|
« Last Edit: June 19, 2016, 11:02:46 AM by Chrisj CMA »
|
Logged
|
|
|
|
|
Chrisj CMA
|
|
« Reply #3 on: June 19, 2016, 11:16:00 AM » |
|
I was prepping my bike today, spraying some Liquid Wrench on the exhaust studs/bolts, since I picked up my new exhaust today, and noticed 2 things wrong. One bolt is bent, and there was another bolt that was loose, about a 1/16" gape, but the picture didn't turn out. Just a reminder to have a look at your own, and maybe give each bolt a little twist with a wrench to see if they are loose. Now I need to find a stub before trying to remove the exhaust, I'm sure it will break when I try to remove or straighten it out. Was always wanting to remove all the stubs and apply a little anti-seize on them, now might be a good time. Have you looked into replacing the shifter shaft oil seal yet. Very easy to do |
|
|
|
|
Logged
|
|
|
|
gordonv
Member
Posts: 5766
VRCC # 31419
Richmond BC
|
|
« Reply #4 on: June 19, 2016, 11:32:54 AM » |
|
I was prepping my bike today, spraying some Liquid Wrench on the exhaust studs/bolts, since I picked up my new exhaust today, and noticed 2 things wrong. One bolt is bent, and there was another bolt that was loose, about a 1/16" gape, but the picture didn't turn out. Just a reminder to have a look at your own, and maybe give each bolt a little twist with a wrench to see if they are loose. Now I need to find a stub before trying to remove the exhaust, I'm sure it will break when I try to remove or straighten it out. Was always wanting to remove all the stubs and apply a little anti-seize on them, now might be a good time. Have you looked into replacing the shifter shaft oil seal yet. Very easy to do Thanks Chris for the catch, I see from my picture that there is an excess amount of oil around that thing. I know I need to get working on the bike in cleaning the engine to rid it of all the oil/dirt on it. |
|
|
|
|
Logged
|
1999 Black with custom paint IS |
|
|
|
longrider
|
|
« Reply #5 on: June 19, 2016, 06:47:03 PM » |
|
Gordon. I see it's the rear stud. You should be able to get a box end wrench on It easily so you might try warming the engine up. Take it for a spin. Then get on it and it should come out. You may need a couple of regular nuts you can jamb together if the oem doesn't spin the stud out
|
|
|
|
|
Logged
|
|
|
|
gordonv
Member
Posts: 5766
VRCC # 31419
Richmond BC
|
|
« Reply #6 on: June 19, 2016, 08:07:16 PM » |
|
Pulled the new exhaust out of the box today. I thought they where brand new at first. Remove the shields, so I could put a little anti-seize on it, and saw what looked like to me, as some soot/exhaust. So I think these are removed from a brand new zero mile bike. 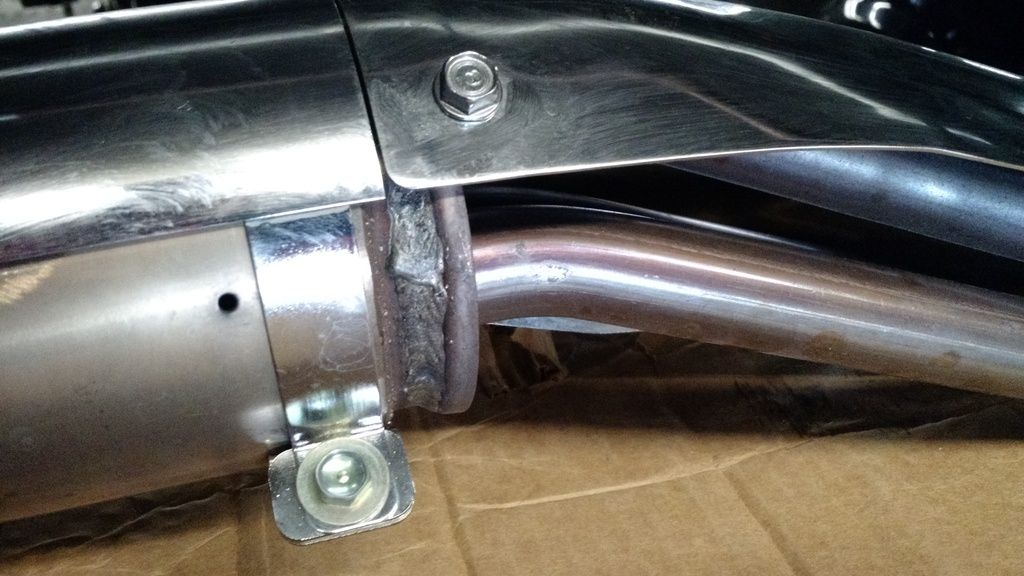 Cleaned them up, some surface rust. Removed the pipes from my bike, broke 2 stubs, 6 total along with the bent one, all came out of the heads. Going to have fun to remove the broken studs. Always wanted to add anti-seize to these studs before they seize in the heads and brake when removed. Now is my chance. |
|
|
|
« Last Edit: June 19, 2016, 08:32:22 PM by gordonv »
|
Logged
|
1999 Black with custom paint IS |
|
|
Tfrank59
Member
Posts: 1364
'98 Tourer
Western Washington

|
|
« Reply #7 on: June 19, 2016, 08:19:22 PM » |
|
Gordon, do you have any idea how that stud got bent like that? I've been keeping an eye on mine for what that's worth, and all 12 of them down there look great
|
|
|
|
|
Logged
|
-Tom
Keep the rubber side down. USMC '78-'84
'98 Valkyrie, ‘02 VTX 1800, '96 Royal Star, '06 Drifter, '09 Bonneville, '10 KTM 530, '04 XR 650, '76 Bultaco, '81 CR 450, '78 GS 750...
|
|
|
gordonv
Member
Posts: 5766
VRCC # 31419
Richmond BC
|
|
« Reply #8 on: June 19, 2016, 08:30:05 PM » |
|
No clue. But it is a new to me bike, April 2nd. It has 67K miles on it. To me, it looks rough. Ridden hard, and put away wet.  |
|
|
|
|
Logged
|
1999 Black with custom paint IS |
|
|
|


