|
Robert
|
 |
« Reply #200 on: July 09, 2017, 05:50:59 PM » |
|
Thanks Bill for the information on the spray gun and settings. I have done some spray work but want to get a bit more into it. HVLP is what everyone is going to these days.  |
|
|
|
|
 Logged
|
“Some people see things that are and ask, Why? Some people dream of things that never were and ask, Why not? Some people have to go to work and don’t have time for all that.”
|
|
|
Bill Havins
Member

Posts: 413
A roadster!
Abilene, Texas
|
|
« Reply #201 on: July 09, 2017, 06:20:49 PM » |
|
Robert, this little (little?) gun is LVLP. I'm sure you know what that means, but for others, it means you can easily run it off of a smaller compressor. So, for example, I use my old, old, old Craftsman Professional 2HP "oil-free" compressor. It has a 4 gallon air capacity (two "hot dog" tanks). And, for this specific job, I plumbed in my 5 gallon portable air tank. With an LVLP gun that gives me more than enough air to do the "stop-and-start" kinds of spraying that you do on motorcycle accoutrements. I can also use it to spray latex or oil-based paint around the house (think doors, door trim, a catalyzed finish on the kitchen cabinets - one door at a time, etc.).
You do have to get a touch closer to your work with an LVLP gun. And you may need to overlap your strokes more. You do spray at a slightly slower pace, too. So it's kinda' like HVLP but at a "laid back" pace. And you don't have to buy, feed, and store a great big honking compressor. For the do-it-yourselfer it is a very good option.
Bill
|
|
|
|
|
Logged
|
"So many windmills, so little time." - Don Quixote
"Dawg I hate windmills!" - Sancho Panza
|
|
|
|
Robert
|
|
« Reply #202 on: July 09, 2017, 07:10:50 PM » |
|
Thank you again for clarifying something I should have seen like the model of the gun and all the information you already put down in the last post.  I have the motor unit for the HVLP setup and was concentrating on that. The LVLP guns I really have no experience with, many use them with great results. How does it do on a flat level wide surface since you cannot move to far from upright? I already have the compressor, both at home and at work so air is not a problem and am used to using a standard spray gun. Sounds like you have done many projects with it and I would need one for vehicle painting and that would be about it. For house stuff or any project that requires a thicker paint, I have an airless sprayer that does a great job on anything from the house itself to a door but cleanup is a bit of a pain. |
|
|
|
|
Logged
|
“Some people see things that are and ask, Why? Some people dream of things that never were and ask, Why not? Some people have to go to work and don’t have time for all that.”
|
|
|
Bill Havins
Member
Posts: 413
A roadster!
Abilene, Texas
|
|
« Reply #203 on: July 09, 2017, 07:27:55 PM » |
|
Robert, if you already have the compressor you may want to go the HVLP route, like you said, above. You'll get things done faster with HVLP just because of the wider fan of the spray. Speed is the main difference between the HVLP and LVLP guns (speed completing the job, that is).
I had a Binks siphon feed gun years ago. Overspray, overspray, overspray! When you set the fluid flow and air pressure correctly the "lack" of overspray with an LVLP or HVLP gun is truly amazing (and gratifying). More of the paint you pay for ends up on the surface you are painting. And, in the above project, I was painting about 15 feet away from Judy's washer and dryer. I did have to dust the top of them when I was done but nothing stuck. This is West Texas - the dust may have been from something else.
Since you already have the compressor go for HVLP. You'll get things done quicker, but you can always "turn it down" when you want to go slow.
Lots of great videos about painting on YouTube. And then there's some junk, too.
Bill
|
|
|
|
|
Logged
|
"So many windmills, so little time." - Don Quixote
"Dawg I hate windmills!" - Sancho Panza
|
|
|
|
|
|
lazos valk
|
|
« Reply #205 on: July 10, 2017, 07:28:52 PM » |
|
|
|
|
|
« Last Edit: July 10, 2017, 07:31:14 PM by lazos valk »
|
Logged
|
|
|
|
|
Verismo
|
|
« Reply #206 on: July 10, 2017, 08:50:17 PM » |
|
Absolutely beautiful job, Bill!! This thread has been a joy to follow. Congratulations and looking forward to hearing about the many wind-protected miles you're sure to enjoy in the near future.
|
|
|
|
|
Logged
|
|
|
|
|
|
Bill Havins
Member
Posts: 413
A roadster!
Abilene, Texas
|
|
« Reply #208 on: July 11, 2017, 04:58:39 AM » |
|
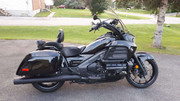
As this thread “winds down” I thought I would share my thoughts about this process, including the several things I would do differently if I ever chose to do this again. But first, here’s something for our man in France, Ledany. Yes, the headlight turns my bike into a “BatBike.” Low Beam –  High Beam –  The “bat” effect is a lot clearer in person but, I guess, if you switched the headlight back and forth quickly enough the “flapping” of the headlight’s “wings” might cause the bike to leave the ground – Oh! BatBike! (I’m not gonna’ try it – Honda switches don’t last that long.) So, about the process. Remember I started all this to see if a fairing could be made for the 1800 F6C that would provide good wind protection for touring. And I wanted the styling to be reminiscent of one of my favorite roadster designs, the 1956 Jaguar XK140. Attempting to keep costs down I chose to do my prototyping using expanded polystyrene (EPS) insulation board that you can find at any home center. And I laminated pieces of the foam together using water-based and other glues. If I was to do this again I’d use polyurethane foam. The polyurethane shapes easier/better and can be glued using solvents that melt EPS. When it comes to laying up the fiberglass I would use a vacuum-bagging system. Such a system allows easier control of the thickness of the layup and eliminates air bubbles. There are many other advantages, too. West System (an epoxy resin manufacturer) has published an excellent tutorial on the topic of vacuum-bagging – http://www.westsystem.com/wp-content/uploads/VacuumBag-7th-Ed.pdf. I will continue to use epoxy fiberglass resin and biaxial fiberglass cloth. But I will use a faster-setting hardener for the resin. The strength of epoxy resin is worth the additional cost. Biaxial fiberglass cloth is stronger than traditional weaves and is more conformable when laying-up a complex shape. I purchased my fiberglass goods from U.S. Composites in Florida – http://www.uscomposites.com. I will continue to use my LVLP paint spray gun. I don’t want to buy a larger compressor than my little 2HP unit and, with the addition of my 5 gallon portable air tank, I think I will be able to paint most anything I want to take on (see detail of this in an earlier post on this thread). Axalta paint products are good stuff (Axalta used to be DuPont’s paint group). I used products from both their Cromax and Nason brands. I found them to be rather forgiving so long as I followed the instructions listed in the technical data sheets. I will continue to use both the Cromax and Nason products in the future. Thanks to all of you for your interest in this project. I have appreciated your thoughts and encouragement. Most of all I want to thank my wife, Judy. She finally admitted to me that she had been “holding her breath” on this project. She watched me spend day-after-day in the garage, all the while hoping the fairing would work. It’s nice to have a buddy! Cheers! Bill |
|
|
|
« Last Edit: July 11, 2017, 05:03:19 AM by Bill Havins »
|
Logged
|
"So many windmills, so little time." - Don Quixote
"Dawg I hate windmills!" - Sancho Panza
|
|
|
bscrive
Member
Posts: 2539
Out with the old...in with the wooohoooo!!!!
Ottawa, Ontario
|
|
« Reply #209 on: July 11, 2017, 07:12:28 AM » |
|
|
|
|
|
|
Logged
|
 If global warming is happening...why is it so cold up here? |
|
|
|
|
|
Kidd
|
|
« Reply #211 on: July 11, 2017, 12:51:17 PM » |
|
The cost to make one for someone would be $8K , considering the time you have in it
Good job , Bill
|
|
|
|
|
Logged
|
 If I like to go fast , does that make me a racist ??? |
|
|
|
rudymsmith
|
|
« Reply #212 on: July 13, 2017, 05:50:59 AM » |
|
Roadster!  Darn - you got some skills !!! |
|
|
|
|
Logged
|
Be careful what you wish for.
|
|
|
Bill Havins
Member
Posts: 413
A roadster!
Abilene, Texas
|
|
« Reply #213 on: July 15, 2017, 11:05:18 AM » |
|
This morning was the time for the "Final Exam." And the Final Exam question - how does the fairing perform when we're riding two-up? I'll give you the score first, then the detail. It scored an A+!Now for the detail. I wear an Arai Signet-Q helmet. Judy wears a Nolan N-43. We use Sena SMH-10R headsets to communicate. Our microphones are attached to the chin bars of our helmets. In the past (with the Honda Touring Windshield) we have often had to turn our headsets off at highway speeds (and above) because of wind noise. (Remember I worked in broadcast radio for many years - I tried everything to kill the wind noise at speed and nothing worked.) We put on our armored jackets and off we went for a spirited ride through the country, and then to run some errands in town. The route we took is one I used for several years testing changes to engine MAPS on my Moto Guzzi. It includes posted 70MPH speed limits on straight sections, and a number of rather sharp curves with recommended speeds of 50MPH or less. It has ups-and-downs to it, and one section that is known for strong wind currents. When I put the Honda Touring Windshield on my Valkyrie I was rather disappointed with how the bike handled. I was used to my Guzzi and, with it, I never had to change my line when going through the slower-speed curves on the route described above. With the Honda Touring Windshield the curves were a little work when I took them at speeds of 70MPH+. It was my impression that the turbulence from the windshield made it necessary to correct my line several times when going through a curve. And that same turbulence made me feel like I was getting "close to the edge" of what was safe. On today's ride we did not experience any wind noise in our headsets. We left our face shields up when riding at speeds of 45MPH or less and, even then, did not get wind noise in our headsets. Score! As we rode on the highway I asked Judy how the wind protection was for her. She indicated she was getting a little wind on her shoulders and she was glad for it - it had already gotten hot (+90°). Otherwise she was not catching any wind to speak of. Score! I threw the bike into the marked 50MPH curves at speeds above 70MPH. I was amazed - it was as if the Valkyrie was on a rail. I chose my line and the bike stuck to it, each and every time. Score! But the problem with the above was I soon found us about to climb up the tail pipe of a Jeep that was slowing through the last curve. So I backed off. As the road straightened out we caught a little turbulence from the Jeep. Nothing to do about that - some things about physics can't be changed. We rode to a local home improvement center to get some string trimmer line - life with "Farmer Judy." We walked back out to the bike, put on our duds, and began to ride through the parking lot to the exit. One of the store employees was operating a fork lift in the parking lot. He smiled at us as we rode by and gave us two big thumbs up. Judy waved back. We decided to ride to my Honda dealer to tell them the results of the test. I exclaimed, "That is the neatest scooter I have ever ridden!" Judy said, "Oh, it's really nice!" After talking to Judy for a while the owner of the shop went outside to take photos of the Valkyrie. He was grinning from ear-to-ear. Well, all of the guys at the shop were too. ( https://www.facebook.com/maxscycle/photos/pb.108771602491598.-2207520000.1500223587./1426963364005742/?type=3&theater). Sometimes you get lucky! I guess it was my turn. I believe this Valkyrie is now the neatest motorcycle I have ever ridden. It's ready for touring. It's an "A+." I'll continue to do a few tweaks to things on the scooter. By and large I think I've resolved my major concerns. I finally have the Motorcycle I've always wanted - a 50's roadster! Cheers! Bill |
|
|
|
« Last Edit: July 16, 2017, 09:43:18 AM by Bill Havins »
|
Logged
|
"So many windmills, so little time." - Don Quixote
"Dawg I hate windmills!" - Sancho Panza
|
|
|
|
Wayne Basso
|
|
« Reply #214 on: July 15, 2017, 12:50:08 PM » |
|
Way to go Bill. I've enjoyed following this thread. Glad everything works like you hoped it would. |
|
|
|
|
Logged
|
|
|
|
|
larue
|
|
« Reply #215 on: July 15, 2017, 02:22:37 PM » |
|
I don't have an 1800 but been following this amazing thread and I have to say you sir are very talented. Beautiful finished product. Bike looks awesome most of all functional. Thanks for taking us with you on this journey. Great work
|
|
|
|
|
Logged
|
|
|
|
|
Farther
|
|
« Reply #216 on: July 23, 2017, 07:43:51 AM » |
|
It scored an A+!
Very nice job. The first Gen II Valkyrie Tourer!! |
|
|
|
|
Logged
|
Thanks,
~Farther
|
|
|
|
specialdose
|
|
« Reply #217 on: July 23, 2017, 08:34:56 AM » |
|
Another non 1800 rider here. I have so much enjoyed following you build. You sir definitely qualify as a artisan. Your Valkyrie Gen. II is beautiful (it's fast black) and unique. Hoping you and your wife enjoy many safe miles of travel on your awesome looking machine...... |
|
|
|
|
Logged
|
|
|
|
Bill Havins
Member
Posts: 413
A roadster!
Abilene, Texas
|
|
« Reply #218 on: July 23, 2017, 12:11:38 PM » |
|
Thanks to everyone for their kind words. It has been pleasing to see all of this come together; a touring roadster! Here's a bit of a "real" ride report on the fairing. The route we followed is detailed in this Google Maps link: https://goo.gl/maps/vFRJEhn5wk22By the way, the start and end points are not our actual physical address (people don't really put their actual physical address out on the internet, do they?  ). Anyway, the area between Weinert and Rochester, Texas, is a wintering ground for many waterfowl. Texas Parks & Wildlife Magazine has done an article on the significance of this area for these web-footed critters: https://www.tpwmagazine.com/archive/2016/dec/ed_3_geese/index.phtml. Being "almost-tree-huggers" we thought we'd go see what the area is like. The article describes it very well so I won't even try to add more to what they've published. Regarding our ride - we headed out just after 8:00 a.m. The day was already warm and was predicted to make it to 102° in the afternoon. We agreed that, if we were going, we'd better boogie! I had re-installed the cruise control switch module last night. I wanted to be able to set the speed at 75 MPH and hold it there while we were on major roads. I figured we'd just "putt" on some of the farm-to-market roads. There is so much to see on the little roads! As we rode along we were sometimes pelted by insects - "first goo on the new windshield." For the most part the bugs missed me. I did catch one on my right pinkie, and there was one "acrobat" that hit the top of my helmet, then the top of Judy's helmet, and went off to the side of the road. Another bug caught Judy's left knee - I heard this loud, "Dang! That one hurt!" in my headset. I write this to indicate the windshield and fairing were doing their job providing us protection. As we rode along I tracked the airflow around the fairing. I was able to determine that air still hits the front of the engine and shoots up about the steering head. It forms a "dome of turbulence" that hovers just above the ignition key but doesn't really climb much higher. It seemed to be shaped like half of a soccer ball (dome-side up). It was an interesting phenomenon. At times it would cause my plastic key fob to fly just a bit. But most of the time my key fob was still. Some of the turbulence would rustle the front of my jacket, but it wasn't a source of concern. I didn't catch any air on my thighs except for a bit on the outside of my knees. On most motorcycles I end up catching bugs with my shins and boots - not on this trip. Judy said she caught air on her shoulders. It wasn't bad at all. She said it helped to keep her cool. I had the same air I've reported before (up the sleeves of my riding coat and a bit on the top of my helmet). No head buffeting. But I knew I was on a motorcycle. Turbulence from vehicles in front of us was sometimes bothersome. That was easy to resolve. We stopped in Rotan at our favorite Dairy Queen. It was just before 11:00. Judy asked, "Lunch?" And so we did. The iced tea hit the spot. We ate lunch at a rather leisurely pace and then remembered the forecast -> 102°. Ugh! So we jumped on the bike and headed south. The ride was just over 200 miles according to Google Maps. And it took a tank of gas (highway speeds). I believe the fairing continues to perform well. It took a lot of work to get it done but I believe it has proven it was worth it. Bill |
|
|
|
« Last Edit: July 24, 2017, 12:29:36 PM by Bill Havins »
|
Logged
|
"So many windmills, so little time." - Don Quixote
"Dawg I hate windmills!" - Sancho Panza
|
|
|
|
Crabballs
|
|
« Reply #219 on: July 23, 2017, 06:50:13 PM » |
|
I really enjoyed your build thread. Fairing looks awesome! Do you have and pics of the backside of it as you would see while riding? Might be a great place to mount accessories?
|
|
|
|
|
Logged
|
|
|
|
Bill Havins
Member
Posts: 413
A roadster!
Abilene, Texas
|
|
« Reply #220 on: July 24, 2017, 07:59:38 AM » |
|
CB, Here is a photo of part of the back with some detail (right-click on the photo and choose to "open image in new tab" if you want to zoom in a bit):  First, I didn't design this for accessories - I like to listen to the "music" from my engine/exhaust as I go down the road, or to Judy's comments when she sees something interesting. That's about it. This fairing is built pretty thin. It is less than a quarter-inch thick (less than 6 mm) in most places. The edges (see red arrow in upper right corner) are reinforced with "flox" and provide tremendous rigidity. The fairing doesn't flex much at all. There is not a lot of room between the fairing and other "stuff" on the bike. The distance at "1" (between the forward-most corner of the brake master cylinder and the closest part of the fairing) is just at 5.25 inches (about 135 mm). At "2" (between the instrument display and the closest part of the fairing) the distance is less than 2 inches (about 50 mm). I guess a person could drill holes in the fairing to use screws to mount "stuff." Or "slim" items might be epoxied to the back of the fairing. There is more room out on the ends of the fairing. But the ends actually angle down a bit; that might complicate things. Cheers! Bill |
|
|
|
« Last Edit: July 24, 2017, 08:05:48 AM by Bill Havins »
|
Logged
|
"So many windmills, so little time." - Don Quixote
"Dawg I hate windmills!" - Sancho Panza
|
|
|
|
Crabballs
|
|
« Reply #221 on: July 24, 2017, 04:25:05 PM » |
|
It does look really nice on the backside! I agree about not wanting to put too many accessories on the bike as they can be a distraction from listening to the nice roar of the motor. I do want to mount my cell phone as I can use it for navigation. I did put a VHF/UHF ham radio on mine and it isn't that obtrusive. Other than those two items I want nothing more on my bike. I am seriously thinking about tackling a fairing project this winter, yours is great inspiration. Thanks.
|
|
|
|
|
Logged
|
|
|
|
|
Ken Tarver
|
|
« Reply #222 on: August 18, 2017, 03:41:22 PM » |
|
Another non-1800 valk owner here. I've been reading this thread off and on for several days. I'm saying this has been interesting. Bill, you absolutely did an amazing job with your fairing project. You definitely have something to be proud of. Congratulations sir!!
Ken
|
|
|
|
|
Logged
|
|
|
|
|


