Valkorado
Member

Posts: 10517
VRCC DS 0242
Gunnison, Colorado (7,703') Here there be twisties.
|
 |
« on: June 23, 2017, 07:29:03 AM » |
|
Now that I have a small garage, I'm trying to gather all the needful things for rear end service. Looking at Jeff's PDF, http://www.valkyrieriders.com/shoptalk/rear_end_service.pptxthe thing I'm most iffy about is the bracket for the left shock bolts. Are the holes drilled 13" apart center to center? Any other suggestions are welcome. Thanks. |
|
|
|
« Last Edit: June 23, 2017, 08:01:31 AM by Valkorado »
|
 Logged
|
Have you ever noticed when you're feeling really good, there's always a pigeon that'll come sh!t on your hood? - John Prine 97 Tourer "Silver Bullet" 01 Interstate "Ruby"  |
|
|
|
indybobm
|
|
« Reply #1 on: June 23, 2017, 08:06:52 AM » |
|
I use a bracket on the left side to hold the wheel up. Mine has a hole at the bottom and one at the top 13" apart. There are also other holes spaced so that it holds the axle above the exhaust. Not sure what spacing the other hole is, I'll have to check. When I am ready to remove the axle, I remove the bolt from the top shock mount, pull the bracket up so the second hole is lined up with the shock mount and put the bolt back in. Holds the swingarm in place when I remove the axle. I think i got the idea from Chrisj CMA. 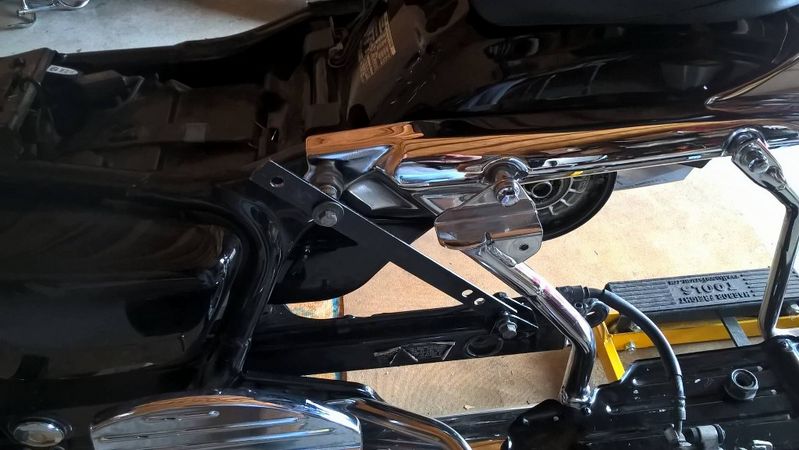 |
|
|
|
« Last Edit: June 23, 2017, 08:36:51 AM by indybobm »
|
Logged
|
So many roads, so little time
VRCC # 5258
|
|
|
|
The emperor has no clothes
|
|
« Reply #2 on: June 23, 2017, 09:04:49 AM » |
|
A ratchet strap works well. The simple cam buckle strap is even better.
|
|
|
|
|
Logged
|
|
|
|
|
Fazer
|
|
« Reply #3 on: June 23, 2017, 10:11:05 AM » |
|
+1 on the ratchet strap. It also allows you to raise the swing arm above level to make re-inserting the drive shaft simple. If you do that, all you need to do is jiggle the shaft forcefully and it will slip right in--saw Daniel Meyer demonstrate in his tech session at Morgantown Inzane, and it WORKS.
Greg
|
|
|
|
|
Logged
|
Nothing in moderation...
|
|
|
hubcapsc
Member
Posts: 16821
upstate
South Carolina
|
|
« Reply #4 on: June 23, 2017, 10:32:39 AM » |
|
|
|
|
|
|
Logged
|
|
|
|
|
Jess from VA
|
|
« Reply #5 on: June 23, 2017, 11:20:14 AM » |
|
|
|
|
|
|
Logged
|
|
|
|
Valkorado
Member
Posts: 10517
VRCC DS 0242
Gunnison, Colorado (7,703') Here there be twisties.
|
|
« Reply #6 on: June 23, 2017, 06:07:23 PM » |
|
Thanks for the replies. A ratchet strap sounds easy enough, but I like the gadget Mike came up with too. Looks sturdy. Can you adjust that up and down by twisting? If so, I may go that route. What would I ask the folks at the friendly hardware place for? Guess I could print your pic and bring it in.
Already have the Bel-Ray and moly grease. Anything else?
I'd about guarantee an hour and a half job for you guys will be an afternoon for me the first time. At least. If I'm lucky.
|
|
|
|
|
Logged
|
Have you ever noticed when you're feeling really good, there's always a pigeon that'll come sh!t on your hood? - John Prine 97 Tourer "Silver Bullet" 01 Interstate "Ruby" |
|
|
|
Cracker Jack
|
|
« Reply #7 on: June 23, 2017, 06:49:58 PM » |
|
Another method, and the one I use, is to use a short piece of small cable (I/8-3/16") with 2 cable clamps to make a loop at each end to hold the swingarm at about normal height. Place the cable around the top and bottom shock bolts. This method limits the down travel of the swingarm but does not restrict the upward movement which is what I'm looking for. With the shocks removed, the jack can be lowered to raise the axel above the muffler so it can come out. Of course the reinstall is just to reverse the procedure. Been doing it this way for about 15 years with no problems and will continue doing it this way as long as I need to remove the rear wheel. The cable assembly goes into the tool box for the next time. The cable and clamps are available at Lowe's or similar and will cost you less than $5.00.  FYI, the item in Mike's picture is called a turnbuckle. |
|
|
|
|
Logged
|
|
|
|
|
Chrisj CMA
|
|
« Reply #8 on: June 23, 2017, 06:55:08 PM » |
|
Thanks for the replies. A ratchet strap sounds easy enough, but I like the gadget Mike came up with too. Looks sturdy. Can you adjust that up and down by twisting? If so, I may go that route. What would I ask the folks at the friendly hardware place for? Guess I could print your pic and bring it in.
Already have the Bel-Ray and moly grease. Anything else?
I'd about guarantee an hour and a half job for you guys will be an afternoon for me the first time. At least. If I'm lucky.
Just make sure you torque the axle with the right shock removed and the four final drive to swing arm bolts loose. Immediately after the torquing the axle to 81ftlbs you go straight to the four bolts torque to 47ft lbs. The sequence of everything else doesn't really matter if you get the axle and four bolts right. |
|
|
|
|
Logged
|
|
|
|
Valkorado
Member
Posts: 10517
VRCC DS 0242
Gunnison, Colorado (7,703') Here there be twisties.
|
|
« Reply #9 on: June 23, 2017, 06:57:38 PM » |
|
Great info guys. Thanks very much. |
|
|
|
|
Logged
|
Have you ever noticed when you're feeling really good, there's always a pigeon that'll come sh!t on your hood? - John Prine 97 Tourer "Silver Bullet" 01 Interstate "Ruby" |
|
|
|
Jess from VA
|
|
« Reply #10 on: June 23, 2017, 07:51:33 PM » |
|
While moving the swingarm up and down taking things apart and back together, you do not want to be spinning the wheel with the swingarm all or most of the way down. The Ujoint is already pinched with the swingarm down, and turning the wheel may stress or damage it. Putting the bike in gear will stop the wheel from turning.
After the pumpkin and shaft is removed, use a light up the swingarm shaft hole. If it is cruddy or full of metal dust, swab it out like a rifle bore. I look for water damage (rust), which could indicate a torn joint boot. When clean, I shoot some liquid wrench (or other lasting solvent) up there (unlike WD40). Nothing lasts till next year, but I feel better about it.
I use a big tupperware dish pan as a parts cleaner. Brake cleaner did not work well for cutting the old goopy crud at all (and is guaranteed to shoot back in your eyes), so I dump gas in my pan and that makes quick work of it, with various stiff bristle brushes and rags. Nitrile gloves are really a good idea for the whole process. All my nuts, bolts spacers get scrubbed too, and I put a dab of copper antisieze on everything threaded before reinstall. One of my axles was pretty corroded, and steel wool did a good job on it.
Don't hang the brake caliper on it's hydraulic line while working; bend up an old wire coat-hanger as a hanger.
If working with no help, getting the axle back through the wheel (don't forget the internal wheel spacer and the big thrust washer) pumpkin, brake caliper spacer and caliper all at the same time is a PITA. So feed the (freshly greased) axle through everything else, but leave the caliper spacer out, get the pumpkin mated, then pull the axle back out just enough to feed the caliper spacer in last. This can really save your low back some grief.
If it's hot and/or buggy, setting up a box fan to blow on you during your afternoon of fun is a good idea.
Make sure you stick a jack stand under one engine guard before you pull the wheel/tire/pumpkin. The bike suddenly gets light in the rear and starts to tip forward on the jack, causing excitement.
I have two long 2-foot wide strips of carpet remnant, I run down each side of the bike. Good for the knees. I also have a little low stool (no wheels), but moving aorund all the time the carpet helps a lot.
I forget the big axle nut mm size, but you need one that is not in most tool kits (in half inch drive). Twenty something.
|
|
|
|
« Last Edit: June 23, 2017, 08:11:31 PM by Jess from VA »
|
Logged
|
|
|
|
Valkorado
Member
Posts: 10517
VRCC DS 0242
Gunnison, Colorado (7,703') Here there be twisties.
|
|
« Reply #11 on: June 23, 2017, 08:28:39 PM » |
|
Some info I haven't seen elsewhere. This thread is getting printed and saved.
|
|
|
|
|
Logged
|
Have you ever noticed when you're feeling really good, there's always a pigeon that'll come sh!t on your hood? - John Prine 97 Tourer "Silver Bullet" 01 Interstate "Ruby" |
|
|
|
The emperor has no clothes
|
|
« Reply #12 on: June 23, 2017, 09:39:20 PM » |
|
Everything Jess said except ditch the carpet remnants for those foam pads that aerobics women use. Or the foam sleeping pads. The carpet remnants aren't that soft, and they catch all the grease chunks. Take your time, you'll get faster each time.
|
|
|
|
|
Logged
|
|
|
|
hubcapsc
Member
Posts: 16821
upstate
South Carolina
|
|
« Reply #13 on: June 24, 2017, 04:46:40 AM » |
|
With the shocks removed, the jack can be lowered to raise the axel above the muffler so it can come out. There's several methods to get the axle out from behind the pipes that I know of... the manual says to remove the pipes... bleghhh... some people remove the rear pipe mounts and use a wedge to push the pipes out and make enough room. My favorite is to remove the shocks and lower the bike up and down as needed to do the different parts of the job. I also remove the bags (but I have a Rattlebars quick disconnect kit) and the rear fender half (Daniel Myer does it this way in his tech sessions at InZane I think). Stanley Steamer uses the wedges, my way seems like more trouble than it is worth with all that extra Interstate trunk/cb stuff back there... -Mike
|
|
|
|
|
Logged
|
|
|
|
|
Hook#3287
|
|
« Reply #14 on: June 24, 2017, 05:35:25 AM » |
|
I like using the 2 jack method. Bike jack for the bike and a trolley jack for the wheel. It makes lifting the wheel in and out of place easier and you don't have to move the bike, once you've got it at height with jack stands under the guards and tied down. That rear wheel seems to get a little heavier every time.  I also use the wedges for holding the pipes out a little and always remove the bags. Taking the rear fender off is a good way also, but I haven't done it yet for rear wheel removal. |
|
|
|
|
Logged
|
|
|
|
|
Jess from VA
|
|
« Reply #15 on: June 24, 2017, 08:18:40 AM » |
|
I do it like Mike, moving my jack up and down with the shocks off through the various stages of the job. With an interstate, even with the bags removed, I still have to finagle clearing all the bag hardware and rails (no quick releases on my bikes) and often need only a couple MMs up or down. It is always best to set your jack safety bar (or jam a piece of wood through it like Mike) and not work with the jack just sitting on the hydraulics alone, but while I'm moving the bike up and down tearing down, I don't set the safety bar each time. But once it's apart with everything out on the floor, I do set the safety bar. I tried using a 2d small jack under the rear wheel, but that did not turn out to be as precise as moving the whole bike up and down on the main lift (for me). And it's funny, on my bikes, all I do is loosen up the exhaust hanger bolts, but I have not needed wedges to hold the pipes out while moving the pumpkin/swingarm back and forth past the pipes. Once loose, my pumpkin goes back and forth across the pipe with no contact without shimming them out. They might get nudged a bit on the right side, but no scratches or dings. Here's another general purpose bit of advice. While working along, you have various bike parts and tools laying on the ground. You want to keep a clear zone down the sides of the bike, so tools and parts are either 1) under the bike, or 2) behind where you are working. Otherwise, as you get up to get another tool or retrieve some part, you run the risk of stepping on a screwdriver or socket, slipping and falling into the bike while on the jack (maybe hard enough to knock it off the jack, or over). When the wheel/tire is out, look up under the fender to see your wiring is solidly tacked down and not rubbed. I found bare wire under one of mine from tire rubs. I had not had any loss of light function, but I would have eventually. I fixed the wire and shrinkwrapped it, and tacked it up better. I also found some rusty spots under there and wire wheeled them and hit them with some rattle can. I also found my license plate/signal bracket was loose and tightened it up. Indeed the first time I did this, I found a half dozen small other projects to work on and fix up before continuing with the rear end service and new tire. Like polishing up the rear wheel when off the bike is way easier than doing it on the bike. Like scrubbing up the filthy brake caliper and pistons, even though my pads were still good. And when you are stabbing the drive shaft (and pumpkin) back up the swingarm on reassembly, you want the swingarm up and level to mate the shaft up successfully to the Ujoint. Sometimes it goes right in, and sometimes it doesn't. And Rob, I haven't caught any women doing aerobics on foam pads in my back yard for a long time.  |
|
|
|
« Last Edit: June 24, 2017, 08:29:27 AM by Jess from VA »
|
Logged
|
|
|
|
Valkorado
Member
Posts: 10517
VRCC DS 0242
Gunnison, Colorado (7,703') Here there be twisties.
|
|
« Reply #16 on: June 24, 2017, 08:40:28 AM » |
|
Great! This should help with the intimidation factor. Need to get a few more things. Planning the job for mid July after a friend comes up for visit and ride through colorful Western Colorado. Per Jess' advice, I'm gonna take my time look everything over. I'll probably be seeking advise along the way... Glad Bertha is ready to roll.
|
|
|
|
|
Logged
|
Have you ever noticed when you're feeling really good, there's always a pigeon that'll come sh!t on your hood? - John Prine 97 Tourer "Silver Bullet" 01 Interstate "Ruby" |
|
|
|
The emperor has no clothes
|
|
« Reply #17 on: June 24, 2017, 08:57:23 AM » |
|
I do it like Mike, moving my jack up and down with the shocks off through the various stages of the job. With an interstate, even with the bags removed, I still have to finagle clearing all the bag hardware and rails (no quick releases on my bikes) and often need only a couple MMs up or down. It is always best to set your jack safety bar (or jam a piece of wood through it like Mike) and not work with the jack just sitting on the hydraulics alone, but while I'm moving the bike up and down tearing down, I don't set the safety bar each time. But once it's apart with everything out on the floor, I do set the safety bar. I tried using a 2d small jack under the rear wheel, but that did not turn out to be as precise as moving the whole bike up and down on the main lift (for me). And it's funny, on my bikes, all I do is loosen up the exhaust hanger bolts, but I have not needed wedges to hold the pipes out while moving the pumpkin/swingarm back and forth past the pipes. Once loose, my pumpkin goes back and forth across the pipe with no contact without shimming them out. They might get nudged a bit on the right side, but no scratches or dings. Here's another general purpose bit of advice. While working along, you have various bike parts and tools laying on the ground. You want to keep a clear zone down the sides of the bike, so tools and parts are either 1) under the bike, or 2) behind where you are working. Otherwise, as you get up to get another tool or retrieve some part, you run the risk of stepping on a screwdriver or socket, slipping and falling into the bike while on the jack (maybe hard enough to knock it off the jack, or over). When the wheel/tire is out, look up under the fender to see your wiring is solidly tacked down and not rubbed. I found bare wire under one of mine from tire rubs. I had not had any loss of light function, but I would have eventually. I fixed the wire and shrinkwrapped it, and tacked it up better. I also found some rusty spots under there and wire wheeled them and hit them with some rattle can. I also found my license plate/signal bracket was loose and tightened it up. Indeed the first time I did this, I found a half dozen small other projects to work on and fix up before continuing with the rear end service and new tire. Like polishing up the rear wheel when off the bike is way easier than doing it on the bike. Like scrubbing up the filthy brake caliper and pistons, even though my pads were still good. And when you are stabbing the drive shaft (and pumpkin) back up the swingarm on reassembly, you want the swingarm up and level to mate the shaft up successfully to the Ujoint. Sometimes it goes right in, and sometimes it doesn't. And Rob, I haven't caught any women doing aerobics on foam pads in my back yard for a long time. I have to use the wedges on my exhaust hangers. I forgot once, and scratched up the swing arm a little. I've found on my Standard removing the rear fender is fine, but not really necessary . On my I/S with hitch, bag rails it is too much of a pain. Just get her up high enough to remove the wheel. After watching Grumpy use a second Jack under the tire I've tried it a couple times with limited success. It's hard to keep it balanced on there. I think I need to make up some kind of cradle for it. Jess, maybe time to move ?  |
|
|
|
|
Logged
|
|
|
|
|


