|
RonW
|
 |
« on: December 08, 2017, 09:48:54 AM » |
|
I've been getting 12.7 volts ..... voltmeter back probed on the red IN wire at the key switch's p-connector. The p-connector is located under the gas tank (X in the pic below). The problem is that the OUT wires on the ignition p-connector register 11.7 volts. That's a full one volt loss upon exiting the key switch!? The OUT wires go to the fusebox and supply every circuit. The p-connector appears to be in good condition without discoloring throughout its translucent plastic material. The male prongs are like brand new. The logical thing is to inspect the condition of the electrical contacts in the ignition switch itself. Has anybody actually taken the ignition switch apart? 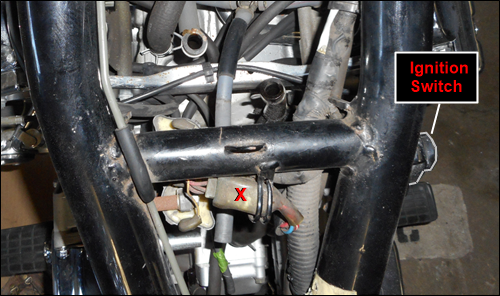 |
|
|
|
|
 Logged
|
2000 Valkyrie Tourer
|
|
|
|
indybobm
|
|
« Reply #1 on: December 08, 2017, 10:10:31 AM » |
|
When you measure 12.7 at the inlet of the switch, is that with the key on?
The switch does come apart and can be inspected and cleaned.
|
|
|
|
|
Logged
|
So many roads, so little time
VRCC # 5258
|
|
|
|
Bagger John - #3785
|
|
« Reply #2 on: December 08, 2017, 10:11:17 AM » |
|
You'll need a security spline bit to get the lock mechanism off the electrical component. I did this x2 when I swapped the locks between my Tourer and I/S, all because I wanted the relocated I/S trunk to be keyed the same as the rest of the bike.  Does your multimeter have an ohmmeter function? Look at the switch truth table (in the schematic and service manual) then determine which connectors on the plug should read zero ohms when the key is turned to various positions. That should tell you whether or not you have a bad switch assembly. Another thing I'd check is the crimped-on terminals in the connector housing. |
|
|
|
|
Logged
|
|
|
|
|
RonW
|
|
« Reply #3 on: December 08, 2017, 11:44:15 AM » |
|
You'll need a security spline bit to get the lock mechanism off the electrical component. I did this x2 when I swapped the locks between my Tourer and I/S, all because I wanted the relocated I/S trunk to be keyed the same as the rest of the bike. This is good and valued info, and when I ever need a new key switch I'll re-read, thank you. Right now, the focus is on taking the ignition switch apart without crossing into pandora territory. The rotary contact must have tiny coil springs under them either that or the stationary contacts are sprung. I doubt the contacts are captured to keep them from flying off when the back plate is removed where then the contacts aren't pressing on the switch's substrate. So how in tarnation, would the backplate be re-riveted back on without knowing the contacts are or aren't the way they should be? Does your multimeter have an ohmmeter function? Look at the switch truth table (in the schematic and service manual) then determine which connectors on the plug should read zero ohms when the key is turned to various positions.
That should tell you whether or not you have a bad switch assembly. Another thing I'd check is the crimped-on terminals in the connector housing.
I didn't measure across the p-connector for any abnormal voltage drop indicative of resistance on the blade connectors or frays at the crimp. The plastic on the p-connector passed the eyeball test and the male prongs were like new. I should have but when I thought of it, I already had the fuel tank back on. That influenced the decision as well as previously not switching the vacuum tubing on runner 6 to runner 5, self-explanatory. The ignition switch is a OFF and ON switch. Key off, then OUT wires won't have current since the OUT wires power the fusebox, otherwise every thing served by the fusebox would stay on like the headlights for example. Conversely rotating the key to the ON position, turns on the lights, horn. etc, er, the OUT wires will have power. This p-connector is normally used to hot wire a bike by using a paper clip to jump the IN wire to the OUT wires after separating the halves of the p-connector, or cut the wires and wire nut them together. Same idea pertaining to the OUT wires being on or off with a turn of the key. Be glad the p-connector is tucked away under the gas tank. The issue is that a full one volt is disappearing in the ignition switch's cul-de-sac. I would like to inspect the switch's innards for a gremlin whether real or imagined. |
|
|
|
|
Logged
|
2000 Valkyrie Tourer
|
|
|
|
RonW
|
|
« Reply #4 on: December 08, 2017, 11:48:43 AM » |
|
When you measure 12.7 at the inlet of the switch, is that with the key on?
affirmative, 12.7 with the key on.
The switch does come apart and can be inspected and cleaned.
Would you elaborate on the details. |
|
|
|
|
Logged
|
2000 Valkyrie Tourer
|
|
|
|
Ricky-D
|
|
« Reply #5 on: December 09, 2017, 10:40:35 AM » |
|
|
|
|
|
|
Logged
|
2000_Valkyrie_Interstate
|
|
|
|
WintrSol
|
|
« Reply #6 on: December 09, 2017, 03:04:55 PM » |
|
If you do try to take it apart, I would suggest you do it inside a clear plastic bag; that way the parts that take off can't get away.
|
|
|
|
|
Logged
|
98 Honda Valkyrie GL1500CT Tourer
Photo of my FIL Jack, in honor of his WWII service
|
|
|
|
RonW
|
|
« Reply #7 on: December 09, 2017, 03:09:28 PM » |
|
thanks for the info/suggestions.
|
|
|
|
|
Logged
|
2000 Valkyrie Tourer
|
|
|
|
Blackduck
|
|
« Reply #8 on: December 09, 2017, 08:37:29 PM » |
|
With the 11.7 volts do you have the lights, ignition isolated or are they running while checking the voltage?
|
|
|
|
|
Logged
|
2001 Standard, 78 Goldwing, VRCC 21411
|
|
|
|
RonW
|
|
« Reply #9 on: December 09, 2017, 10:33:49 PM » |
|
It's like the diagram below. The bike isn't running. The p-connector is not disconnected. *Key, ON.* Bike has full power. 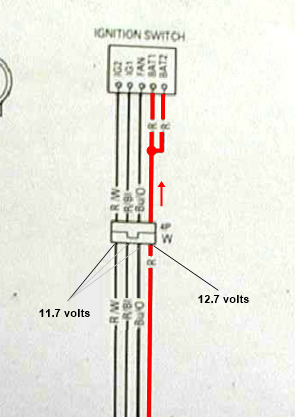 |
|
|
|
« Last Edit: December 09, 2017, 11:33:01 PM by RonW »
|
Logged
|
2000 Valkyrie Tourer
|
|
|
|
WintrSol
|
|
« Reply #10 on: December 10, 2017, 07:17:04 AM » |
|
That's a classic high contact resistance measurement; since all three outputs show the same, both sliders for BAT1 and BAT2 inputs are suspected to be burned, or the springs weak (could be both). Or, it could be the contact in the connector, which is shared by both, or the splice point. Before trying to dismantle the switch, check again, as close to the switch as possible. If you pierce the insulation just behind the connector (you only need to test one wire), you can protect it by painting the hole with some of that liquid insulation goo.
|
|
|
|
|
Logged
|
98 Honda Valkyrie GL1500CT Tourer
Photo of my FIL Jack, in honor of his WWII service
|
|
|
|
RonW
|
|
« Reply #11 on: December 11, 2017, 05:01:55 AM » |
|
Or, it could be the contact in the connector, which is shared by both .....
True, and I didn't test the voltage on the opposite side of the p-connector for the Red wire (question mark, pic below). That's just an inch away, but that was becuz, unplugged, the male prong was pristine. Whether that's also true of its crimp, dunno. Fixing that would be way easier. 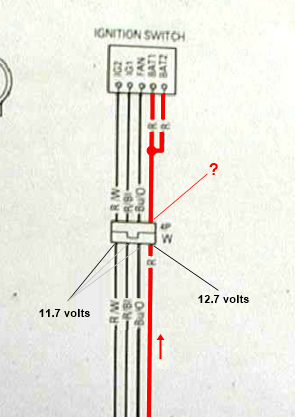 |
|
|
|
|
Logged
|
2000 Valkyrie Tourer
|
|
|
|
WintrSol
|
|
« Reply #12 on: December 11, 2017, 07:40:10 AM » |
|
The contact may be clean, but the wire broken inside the insulation. Oxidation can creep up inside the insulation and cause the wires to start breaking, so I would measure first at the switch side of the splice; if the Voltage is low there, then test the connector side of the splice, or just replace the wire from the connector to the switch. This would be easier if you have the contact for the connector, and a splicing ferrule, with the crimper to match.
|
|
|
|
|
Logged
|
98 Honda Valkyrie GL1500CT Tourer
Photo of my FIL Jack, in honor of his WWII service
|
|
|
|
Brian
|
|
« Reply #13 on: December 13, 2017, 03:00:31 AM » |
|
You'll need a security spline bit to get the lock mechanism off the electrical component. I did this x2 when I swapped the locks between my Tourer and I/S, all because I wanted the relocated I/S trunk to be keyed the same as the rest of the bike.
Ron, HF sells a security bit set if you don't have one. I have taken mine a part and cleaned the contacts, not hard at all. For peace of mind I replaced the switch. FYI, and I had posted this before, your Honda dealer can easily cut you new keys. Our keys are cut double sided, the locks on our bikes only index on one side. I had them cut me new keys with one side being the new cut for the replacement switch the other side the old cut. One key fits all the locks, if the key does not work, turn it around. Does your multimeter have an ohmmeter function? Look at the switch truth table (in the schematic and service manual) then determine which connectors on the plug should read zero ohms when the key is turned to various positions.
That should tell you whether or not you have a bad switch assembly. Another thing I'd check is the crimped-on terminals in the connector housing.
I didn't measure across the p-connector for any abnormal voltage drop indicative of resistance on the blade connectors or frays at the crimp. The plastic on the p-connector passed the eyeball test and the male prongs were like new. I should have but when I thought of it, I already had the fuel tank back on. That influenced the decision as well as previously not switching the vacuum tubing on runner 6 to runner 5, self-explanatory. The ignition switch is a OFF and ON switch. Key off, then OUT wires won't have current since the OUT wires power the fusebox, otherwise every thing served by the fusebox would stay on like the headlights for example. Conversely rotating the key to the ON position, turns on the lights, horn. etc, er, the OUT wires will have power. This p-connector is normally used to hot wire a bike by using a paper clip to jump the IN wire to the OUT wires after separating the halves of the p-connector, or cut the wires and wire nut them together. Same idea pertaining to the OUT wires being on or off with a turn of the key. Be glad the p-connector is tucked away under the gas tank. The issue is that a full one volt is disappearing in the ignition switch's cul-de-sac. I would like to inspect the switch's innards for a gremlin whether real or imagined. |
|
|
|
« Last Edit: December 13, 2017, 03:03:00 AM by Brian »
|
Logged
|
|
|
|
|
RonW
|
|
« Reply #14 on: December 14, 2017, 06:32:37 PM » |
|
I tested more points shown in red below. The red wire at the ignition switch side of the p-connector registers 12.7 volts, so the terminals in the p-connector are good, since the red wire going into the p-connector was also 12.7 volts. Meanwhile, the OUT wires are still 11.7 volts tested at the ignition side of the p-connector. Thusly, the contacts inside the ignition switch are suspect. 12.7 volts goes into the ignition switch and only 11.7 leaves the ignition switch. I bought a used ignition switch online and when I get it in the mail I'll be performing some surgery on my ignition switch. Actually, I'll plug in the used ignition switch and if it doesn't have a voltage loss, and if the surgery doesn't work out on the switch I have now, I'll use the used switch. 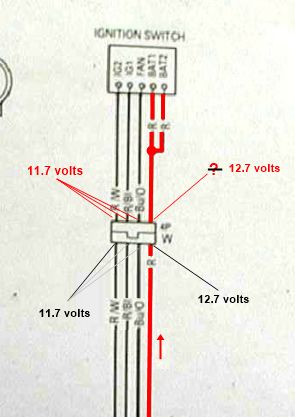 The torx bolt on my ignition switch is a plain torx (size T-35 T-30). Security torx shown below with a security hex on the bottom row. I've used security hex bolts in my line of work. Torx are sometimes referred to as star drives. We sent an apprentice to pick up some phillip head screws and he came back with 5 boxes of star drives. Didn't know the difference. Nobody in our crew had torx bits, either. 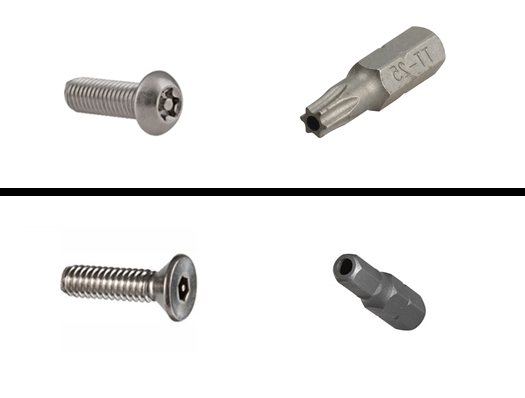 |
|
|
|
« Last Edit: December 15, 2017, 08:23:59 AM by RonW »
|
Logged
|
2000 Valkyrie Tourer
|
|
|
|
RonW
|
|
« Reply #15 on: December 18, 2017, 05:47:36 PM » |
|
My used ignition switch arrived in the mail. I swapped it with the old ignition switch only to get 12.7 volts on the IN wire and 11.7 volts on the OUT wires. Identical with the ignition switch I already have. I started to take the used switch apart, but apparently the movable contact assembly (rotary contact) has an axle that's flared onto the stationary contact plate to keep them together. The idea was to polish up the internal contacts. In order to do that the movable contact plate has to be separated from the stationary contact plate for access. Which is easily done, but a huge question mark reassembling the two halves back together again. Anyways, it turns out that there is a large enough gap between the movable & stationary plates to stick a strip of sandpaper in between and sand away. After doing just that, the OUT wires registered 12.7 volts, the same as the IN wires. The gap is shown in the bottom-most pic below. Used switch ..... 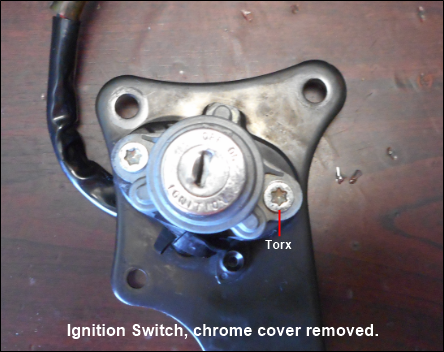 I guess these are the *security torx* that some members were referring to (pic below). I was only aware of the torx bolt that secures the chrome cover ignition switch to the engine hanger. That's a plain torx. That said, if you have a security torx bit, you can use it, or if not, the little post can be broken off using a micro screwdriver which allows you to use a regular torx bit. I ended up drilling off the rivets on the plastic backplate after trying for nothing to bend back the flares on the rivet. If needed the backplate can be glued back on as the rivets are not through rivets. 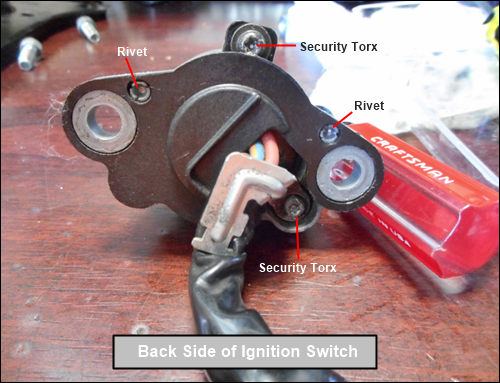 Backplate removed ...... 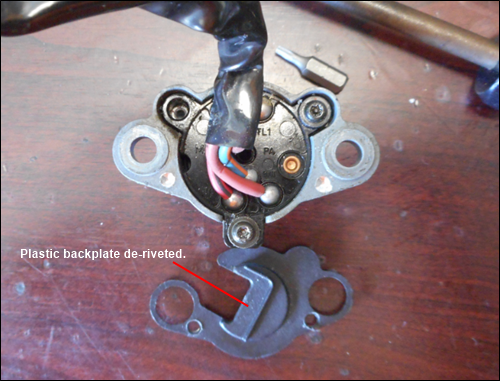 Ignition switch removed from housing ..... 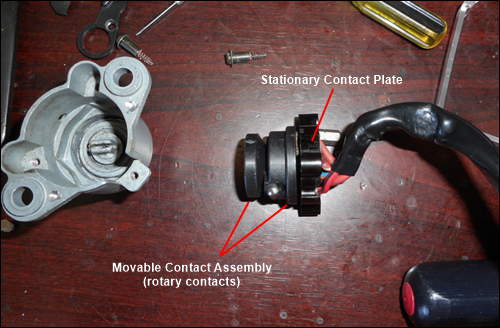 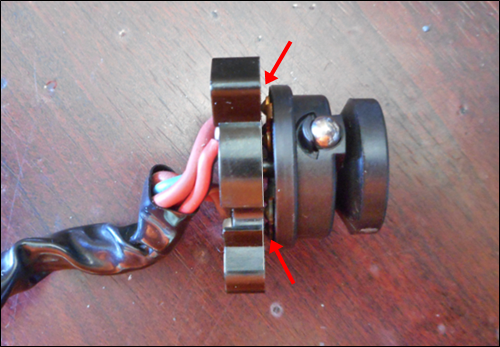 |
|
|
|
« Last Edit: December 19, 2017, 08:03:25 AM by RonW »
|
Logged
|
2000 Valkyrie Tourer
|
|
|
|
JimC
|
|
« Reply #16 on: December 18, 2017, 09:25:13 PM » |
|
Ron,
Great info, and thanks for sharing and the pictures.
Jim
|
|
|
|
|
Logged
|
Jim Callaghan SE Wisconsin
|
|
|
|
Avanti
|
|
« Reply #17 on: December 19, 2017, 06:37:19 AM » |
|
Replace the rivets by drilling and taping. This makes the switch more serviceable.
|
|
|
|
|
Logged
|
|
|
|
|
mrtlc
|
|
« Reply #18 on: December 19, 2017, 03:46:33 PM » |
|
This may be part of the hard starting some bikes seam to have. Good project for any 20 year old bike.  |
|
|
|
|
Logged
|
99 Interstate 1500
89 Goldwing sidecar 1500
88 Goldwing 1500
85 Goldwing 1200
84 Gold wing 1200
80 Goldwing 1100
79 Yamaha XT500
78 Honda 750K
+++
|
|
|
|
WintrSol
|
|
« Reply #19 on: December 19, 2017, 04:21:45 PM » |
|
I wonder if, instead of removing the plastic cover, you can just drill through it to access the Torx screw? Then, all you would need is a good quality tape to cover the hole.
|
|
|
|
|
Logged
|
98 Honda Valkyrie GL1500CT Tourer
Photo of my FIL Jack, in honor of his WWII service
|
|
|
|
RonW
|
|
« Reply #20 on: December 19, 2017, 08:19:32 PM » |
|
I wonder if, instead of removing the plastic cover, you can just drill through it to access the Torx screw?
There is only one torx screw underneath the plastic backplate, and the other two torx screws are unobstructed. However, the backplate has to be removed in order to pull out the switch from the housing the way things are stacked in the deck. The re-riveting issue, reversing the process, though, turns out to be a moot issue, since the plastic backplate is riveted to the housing only to facilitate assembly at the factory, so it don't keep falling off and inconvenience a factory worker from having to reach down and pick it up from the floor if so inclined. The spot welds in the back of the housing would be exposed and maybe damaged. But on the bike, the backplate is sandwiched between the housing and the rubber cushion, and as a unit bolted to the frame. The ridges on the backplate also interlock with the contours of the housing and rubber cushion which sandwich it. Once the ignition switch is bolted to the frame, the backplate ain't going anywhere even without the rivets. Originally the rivets concerned me becuz I thought it held the stationary plate & spring contacts in place. 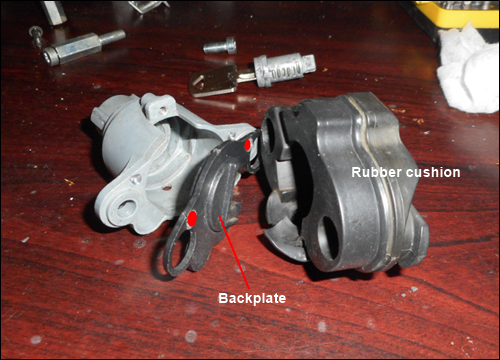 |
|
|
|
« Last Edit: December 27, 2017, 03:02:58 PM by RonW »
|
Logged
|
2000 Valkyrie Tourer
|
|
|
|
RonW
|
|
« Reply #21 on: December 19, 2017, 08:46:28 PM » |
|
|
|
|
|
|
Logged
|
2000 Valkyrie Tourer
|
|
|
|
OzValk
|
|
« Reply #22 on: December 29, 2017, 10:50:25 PM » |
|
How do you get the chrome housing around the switch off?
|
|
|
|
|
Logged
|
|
|
|
|
RonW
|
|
« Reply #23 on: December 30, 2017, 12:47:30 AM » |
|
There's a screw on the bottom side of the ignition switch where the arrow points to in the pic below. 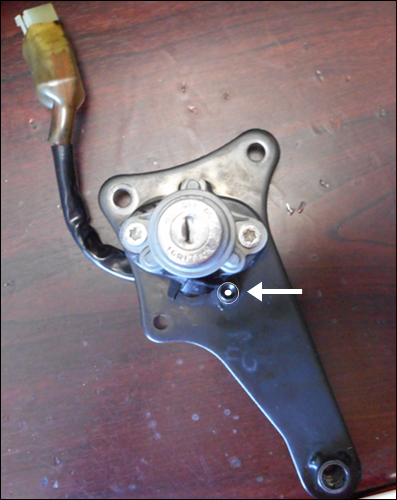 If by chance, you meant this chrome thingie ..... 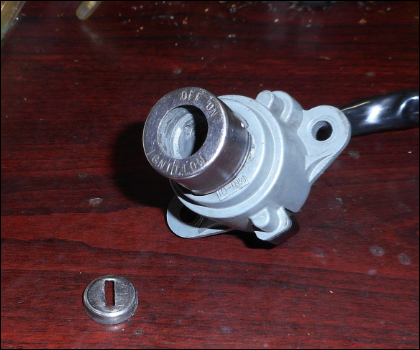 ..... just pry it off the switch. 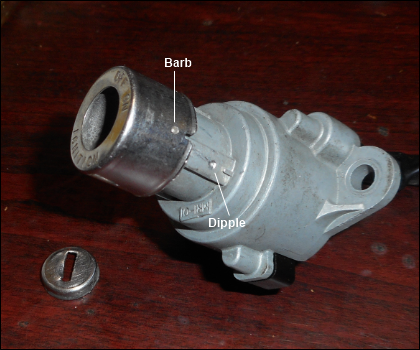 |
|
|
|
|
Logged
|
2000 Valkyrie Tourer
|
|
|
|
Glenn-B
|
|
« Reply #24 on: January 03, 2018, 03:25:26 PM » |
|
I had a similar scenario with the ignition switch on a PT Cruiser. The radio wasn't working in the run position. Like yours the voltage was down. Fitted a new switch and still the same. Turned out to be a bad earth to the radio. When looking for a fault you can always find plenty of potential faults |
|
|
|
|
Logged
|
|
|
|
|
OzValk
|
|
« Reply #25 on: January 05, 2018, 02:24:23 PM » |
|
Thanks a lot RonW for that pic ref getting the housing around the switch off.
Sadly I broke it getting it off before I saw your pic and comments but it's repairable.
Now for more troubleshooting.
|
|
|
|
|
Logged
|
|
|
|
|
RonW
|
|
« Reply #26 on: January 06, 2018, 12:45:53 AM » |
|
OzValk, actually gave me something to do. Two fridays ago, I tail ended a pickup truck. Bend both front forks. This was while on my Shadow 600. Ruptured my achilles tendon & tore the mesh that I had from an earlier hernia surgery. A week after the accident, I did go back and ride Iron Horse back home. Had to pry the front fender free from the front wheel. Otherwise, it started right up. My guess is it didn't want to be left on the side of the road. Grateful indeed for everything.
|
|
|
|
|
Logged
|
2000 Valkyrie Tourer
|
|
|
|
OzValk
|
|
« Reply #27 on: January 06, 2018, 01:13:12 AM » |
|
Crikey. Very glad it was no worse than all that. Riding while disabled I know a bit about. Broke an ankle parachuting some years ago, and had to ride the Valk home after hosp. strapped it up. I recall it was a long, slow trip.
I don't know if this is the correct forum, but I still have the problem- non start. Cleaned and checked as best I know from battery to ignition, opened up ignition. cleaned up, reassembled and turned ignition on and lights, indicators, horn etc all worked. But pressed starter and got a loud click from around battery area, and lost ignition power. Should I start from the battery again?
|
|
|
|
|
Logged
|
|
|
|
|
The emperor has no clothes
|
|
« Reply #28 on: January 06, 2018, 04:18:38 AM » |
|
Crikey. Very glad it was no worse than all that. Riding while disabled I know a bit about. Broke an ankle parachuting some years ago, and had to ride the Valk home after hosp. strapped it up. I recall it was a long, slow trip.
I don't know if this is the correct forum, but I still have the problem- non start. Cleaned and checked as best I know from battery to ignition, opened up ignition. cleaned up, reassembled and turned ignition on and lights, indicators, horn etc all worked. But pressed starter and got a loud click from around battery area, and lost ignition power. Should I start from the battery again?
Sounds like your starter relay connection. Pull that apart and clean it. |
|
|
|
|
Logged
|
|
|
|
|
OzValk
|
|
« Reply #29 on: January 06, 2018, 04:46:56 PM » |
|
On to it- many thanks.
|
|
|
|
|
Logged
|
|
|
|
|
RonW
|
|
« Reply #30 on: January 06, 2018, 10:27:43 PM » |
|
There's a red cap on the starter relay (pics below). The *Red Wire* in the red cap supplies the key switch with +12. It don't do nothing else. The red wire runs from the starter relay to the key switch, here and here. The red cap should be fully pressed into the green plastic thingie. Sometimes even when the red cap is fully seated, the female blades are pushed up in its slot instead of mated with the male blades. Other than that, a fault on the red wire is usually a degraded wire connection within the red cap. 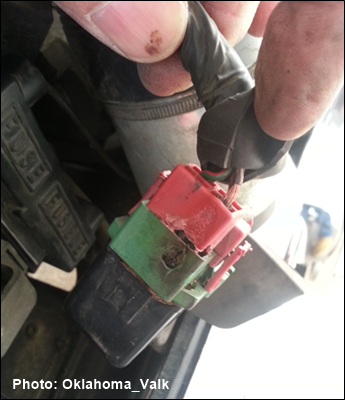 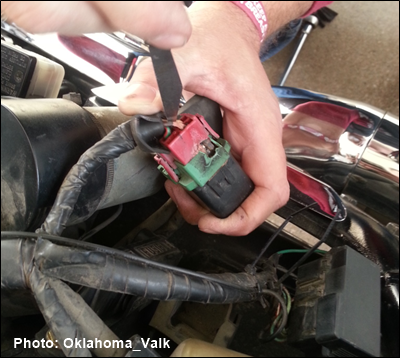 It's best to extract the female blades out of the red cap to examine the crimp. The female blades have a retention barb (X, below) that needs to be depressed in order to release it from its slot using a flat blade micro screwdriver, etc. The arrow points to where to insert the flat blade micro screwdriver. The channel. Keep prying at the retention barb to flatten it while gently tugging on the wire to pull it out. Be sure to re-set the barb when you plug back the female blade terminal.  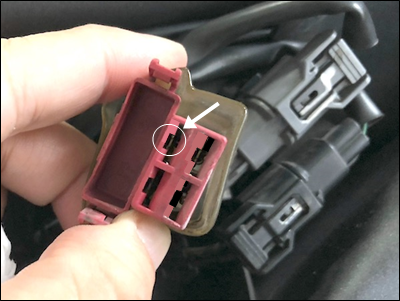  |
|
|
|
|
Logged
|
2000 Valkyrie Tourer
|
|
|
|
OzValk
|
|
« Reply #31 on: January 08, 2018, 12:24:09 AM » |
|
RonW- thanks again.
As she's not starting, I might as well tackle this maintenance.
I was heading for the starter motor but find it is almost impossible to access the cable connection from solenoid.
It's all giving me some understanding of the electrics as I stumble along. Living in the country means I need to do this stuff myself as far as I can.
Glad I got those first 17 years of trouble free riding all over Australia on this great bike before I heard the 'click'.
Again, thanks.
|
|
|
|
|
Logged
|
|
|
|
|
RonW
|
|
« Reply #32 on: January 09, 2018, 11:57:24 PM » |
|
Note: the reason for taking apart the key switch was to track down the gremlin causing the non-start problem otherwise known as, " one loud click ..... then no power at all." Just to differentiate this from other non-start scenarios, there is no rapid-fire clicking sound or a steady humming sound. The starter motor does not crank even for a nano second. Instead, here, the one and only sound immediately after pressing the start button is a single loud click. Background info: when I turn the key ON, there is full power to everything. The bike would have continued to have full power for the next 24 hours had I not pressed the start button or until the battery was drained. To differentiate again, this is different from situations where there is no power to begin with when the key is turned ON. There is full power initially. After pressing the start button, the electrical system then flat-lines and all things electrical go dark heralded in by the loud click. It seems that enough juice was escaping from the battery for a single try. After the pulse, the battery acts like a discharged capacitator and ceases to send any more electricity into the wires. The loud click itself is misleading. The loud click has always been there. You just happen to hear the loud click on this occasion becuz the starter motor is silent. The click would not be audible if the starter motor had cranked up and the engine started, that is, over the sound of the starter motor cranking up at the same moment, if that makes any sense. However, the fact that the click sounds identical to a fuse blowing does make you inspect the main fuse, and the dogbone fuse, and all the mini-fuses in the fusebox alas only to find that all the fuses are okay & now what? It is among the most unnerving electrical experience you can go through. My battery had been on the battery tender charging for two days. When the battery was attached to the tender 2 days earlier, the green light came on in 20 minutes. In my situation, I had slathered the battery terminals using an old tube of dielectric grease. The grease was on the dry side and ended up being a non-conductive layer that didn't allow electricity to flow out of the battery. Sanding the battery terminals removed the dried lube, and I had full power to all circuits after that, shruggin my shoulders slapping my forehead. I had gone over the key switch with a fine tooth comb to no avail but the experience was worthwhile like taking the scenic route, sorta. In my esteemed opinion and so on, the culprit behind "one loud click ..... then no power at all," would be found at the connecting points that are substandard though not obvious for whatever reasons on the heavy gauge wires (arrows, below). This assumes all components on the heavy duty wire circuit are healthy. The battery is healthy, the strands in the heavy gauge wires and their crimps are healthy, and the internal heavy duty contacts in the starter relay are not carbon fouled. I wouldn't put much focus on the starter motor since it doesn't crank in this scenario while it had been doing so on a daily basis. The underlying problem is a lack of current due to an unknown restriction in the supply side, instead of an abnormal high amp draw by the starter motor, the load on the demand side. Hydrolock for instance would put a huge strain on the starter motor but the strain wouldn't leave the electrical system with a total lost of power a split second later. 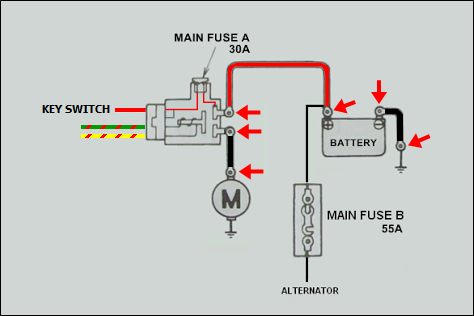 |
|
|
|
|
Logged
|
2000 Valkyrie Tourer
|
|
|
|
OzValk
|
|
« Reply #33 on: January 15, 2018, 07:37:00 PM » |
|
RonB and others.
So much generous advice and info.
I reconnected everything after the big clean etc and starter motor kicked over.
Will buy new air filter then reinstall the tank and fire her up.
Then front brake kit to fix new leak before a spin around the block.
Cheers from DownUnder.
|
|
|
|
|
Logged
|
|
|
|
|


