Wewaman
Member

Posts: 423
Dead Lakes Cruiser
Wewa, Fla.
|
 |
« Reply #40 on: January 29, 2016, 03:43:28 AM » |
|
Thanks Dan (DK) that's what I needed to know  Tony |
|
|
|
|
 Logged
|
If you please God it doesn't matter who you displease but if you displease God it doesn't matter who you please  |
|
|
|
|
Wewaman
Member
Posts: 423
Dead Lakes Cruiser
Wewa, Fla.
|
|
« Reply #42 on: January 31, 2016, 05:49:21 PM » |
|
Ken, well i'm not quite sure why but I had to buy 3/4" long spacers to keep from hitting the exhaust tins. I also removed the peg lowering plate from that side because the heel/toe shifter was way to high. It fit's me better that way. Maybe I can adjust the stock shifter up a tooth or 2 and bring the heel down some. I tried to get a 7/8" spacer for the rear shift knob but they didn't have one so I just used the 3/8". I went for about an hour long test ride and it works like a charm, although alot of that was just cruising so not much shifting was going on. I guess i need to go again and head to Spring Hill where there are lots of stop lights. Oh yes a plan has formed,  Thanks again Ken you made it easy to follow. Tony |
|
|
|
|
Logged
|
If you please God it doesn't matter who you displease but if you displease God it doesn't matter who you please |
|
|
|
Ken Tarver
|
|
« Reply #43 on: January 31, 2016, 06:52:15 PM » |
|
Ken, I ordered mine from Chrome World. Was about 63 bucks. Found the chrome spacer, washers and bolts at my local (non-national chain) hardware store. Fit perfect. Didn't really need the spacers. I have cobra 6x6, but I used them anyway to bring it out a little. No slop at all. Thanks for the input. Easy install, and way cheaper.   A major need of the spacers between the rider peg bracket and the frame is so the heel/toe shift will be aligned in a straight line with the stock shift arm. Otherwise, if it is not spaced away from the frame, the slot on the front end of the Add On shifter is going to be at angle that won't allow for a smooth shift. Ken |
|
|
|
« Last Edit: February 01, 2016, 08:21:10 AM by Ken Tarver »
|
Logged
|
|
|
|
|
Ken Tarver
|
|
« Reply #44 on: January 31, 2016, 07:00:38 PM » |
|
Ken, well i'm not quite sure why but I had to buy 3/4" long spacers to keep from hitting the exhaust tins. I also removed the peg lowering plate from that side because the heel/toe shifter was way to high. It fit's me better that way. Maybe I can adjust the stock shifter up a tooth or 2 and bring the heel down some. I tried to get a 7/8" spacer for the rear shift knob but they didn't have one so I just used the 3/8". I went for about an hour long test ride and it works like a charm, although alot of that was just cruising so not much shifting was going on. I guess i need to go again and head to Spring Hill where there are lots of stop lights. Oh yes a plan has formed, Thanks again Ken you made it easy to follow. Tony Tony, without seeing your setup, don't know why you would have to use 3/4" spacers between the rider peg bracket and the frame. Does your completed set-up look like my picture? Ken |
|
|
|
« Last Edit: February 01, 2016, 08:22:34 AM by Ken Tarver »
|
Logged
|
|
|
|
|
Roidfingers
|
|
« Reply #45 on: February 01, 2016, 07:11:58 AM » |
|
Ken, Yes you are correct. I at first tried a nut on the back side that was only about 1/4 to 3/8. Was rather close to stock shifter. I went back to hardware store to get a different length bolt and that's when I saw the chrome spacers. Grabbed two of those and everything fit much better. I have also ordered a 31/2 inch long shifter peg that is narrow. I will drill and tap it where stock peg is. Should give me much better spacing . Thanks for all your help.
|
|
|
|
|
Logged
|
|
|
|
|
Ken Tarver
|
|
« Reply #46 on: February 01, 2016, 08:32:15 AM » |
|
Ken, Yes you are correct. I at first tried a nut on the back side that was only about 1/4 to 3/8. Was rather close to stock shifter. I went back to hardware store to get a different length bolt and that's when I saw the chrome spacers. Grabbed two of those and everything fit much better. I have also ordered a 31/2 inch long shifter peg that is narrow. I will drill and tap it where stock peg is. Should give me much better spacing . Thanks for all your help. Last few days, thinking I will also cut off the stock shift peg and drill the shift arm and mount the extra peg that came with the heel/toe shifter. That is too good looking peg to not use it. Ken |
|
|
|
|
Logged
|
|
|
|
|
Hook#3287
|
|
« Reply #47 on: February 01, 2016, 03:24:45 PM » |
|
I put mine together yesterday. Used an OEM spacer and bolt that goes to the rear fender on a Tourer. Just misses the exhaust cover by fractions of an inch. I put both shift pegs on, cause like Ken said, "That is too good looking peg to not use it." Won't get a chance to test it out on the road for a while. The salt on the roads here is crazy. It's like the highway guys are being paid commission on how much they put down. (Sorry Craig ) Although...., we're suppose to get some heavy rain Wednesday. Who knows, it was close to 60 degrees today. Man, I'm loving that el nino thing. Compared to last year, this year is cake So far   |
|
|
|
|
Logged
|
|
|
|
|
Roidfingers
|
|
« Reply #48 on: February 01, 2016, 03:46:12 PM » |
|
Was 75 here today. Good thing about our weather here in Bama ( Roll Tide ) Sorry SC folks. Its always changing. And I never have to winterize the Valk. Give it a week. then U ride again. Learning my shifter this past 5 days. That rear peg takes getting used to , but not complicated. Also your footwear makes a difference too. Id almost would like to raise it up more. Hummmm.
|
|
|
|
|
Logged
|
|
|
|
|
N0tac0p
|
|
« Reply #49 on: February 02, 2016, 02:45:37 AM » |
|
@hook. yours doesn't appear to be the same install as Kens. I don't see and spacers behind the foot peg plate to the frame. I thought he said you need that (the 9/16 bolt spacers) so the H/T shifter would be straight to the oem one? your pic looks like you just put a larger one at the H/T spot moving it out, if so was that a 3/4" spacer for that app?
|
|
|
|
|
Logged
|
|
|
|
|
Hook#3287
|
|
« Reply #50 on: February 02, 2016, 04:19:06 AM » |
|
@hook. yours doesn't appear to be the same install as Kens. I don't see and spacers behind the foot peg plate to the frame. I thought he said you need that (the 9/16 bolt spacers) so the H/T shifter would be straight to the oem one? your pic looks like you just put a larger one at the H/T spot moving it out, if so was that a 3/4" spacer for that app?
I didn't use any spacers between the OEM peg plate and the frame and that may not work as well as Kens set up, because it moves the heal&toe shifter that much closer to your ankle. I don't know if that's an issue or not, yet. I used what I had on hand. One of these. 90115-MZ0-700 BOLT (8X68) --- BOLT, SPECIAL FLANGE (8X68) And either this 90206-MZ0-700 COLLAR (8X15) --- COLLAR (8X15) Or this 90207-MZ0-700 COLLAR (10X17) --- COLLAR (10X15) |
|
|
|
|
Logged
|
|
|
|
|
|
|
Ken Tarver
|
|
« Reply #52 on: February 04, 2016, 05:23:58 PM » |
|
Did the oem shifter mod today. I used the shifter peg that came with the kit, so it would match. Since I am a size 12 and wear boots, I drilled a 5/16 hole 1 inch forward then location of stock peg and slightly down. Couldn't locate the correct length allen head bolt so had to temp with washer and hex head. Also the diameter of the peg was too large and would not fit through the space in the front arm so I got a black nylon spacer 3/4 OD and installed in between peg and stock shifter. Didn't want to use chrome because then it would be metal to metal. Looks good. Gives me plenty of room with my boot. And it works too.   I did the front peg on mine yesterday. And did use a chrome spacer, got clear tubing to go over the spacer. |
|
|
|
|
Logged
|
|
|
|
|
Roidfingers
|
|
« Reply #53 on: February 04, 2016, 05:45:50 PM » |
|
I thought about that Ken, but I thought the hard nylon bushing would wear better. Seems we doing the same mods at the same time. HaHA
|
|
|
|
|
Logged
|
|
|
|
|
N0tac0p
|
|
« Reply #54 on: February 05, 2016, 03:10:38 AM » |
|
@ everyone..... great discussion here. HOOK, I agree, I looked closer at yours and Kens differences, and I think you need to split the difference for clearing the rear peg at the exhaust. just your way pushes the shifter closer to the ankle and block access to a little of the peg. So, a shopping I will, a shopping I will go......
why would you necessarily need to do that front mod, as you're not putting you foot "UNDER" the peg.?
|
|
|
|
|
Logged
|
|
|
|
|
Hook#3287
|
|
« Reply #55 on: February 05, 2016, 03:42:45 AM » |
|
@ everyone..... great discussion here. HOOK, I agree, I looked closer at yours and Kens differences, and I think you need to split the difference for clearing the rear peg at the exhaust. just your way pushes the shifter closer to the ankle and block access to a little of the peg. So, a shopping I will, a shopping I will go......
why would you necessarily need to do that front mod, as you're not putting you foot "UNDER" the peg.?
Yeah, as I said, haven't had the opportunity to test it yet. Thought I might yesterday, but didn't get done with work till 3 and it was getting cold. Plus, lots of tree branches and debre on the roads from Wednesday's blow. If I find it bothers my ankle, that will give me the reason to put floorboards on her |
|
|
|
|
Logged
|
|
|
|
|
Roidfingers
|
|
« Reply #56 on: February 05, 2016, 06:33:06 AM » |
|
NotAcop, I did mine due to the size of my feet being larger, which makes my boots bigger. I moved it forward about 3/4 - 1 inch and then down a little. Just gives me a little more room under the motor and less a chance of inadvertent shift if my boot was resting on it. Plus with it being closer to the rotation point of the gear I would think it would put a little less stress on the bearing. Main thing is. It works for me.
|
|
|
|
|
Logged
|
|
|
|
|
N0tac0p
|
|
« Reply #57 on: February 05, 2016, 07:17:11 AM » |
|
absolutely
|
|
|
|
|
Logged
|
|
|
|
|
N0tac0p
|
|
« Reply #58 on: February 07, 2016, 10:32:24 AM » |
|
well as I was taking it apart and putting it on, things kind of came apart. so I am looking at all these parts. spent 2o mins trying to get the orings back into the shifter.....that doesn't seem to work. but I seem to have these larger ID washers that would hold them inside as there is a gap where the bronze bushing is......with smaller washers going between them and the bolt.......
did some of the hardware get mixed up when it fell apart, ie gl1800 mtg hardware vs the shifter part?
|
|
|
|
|
Logged
|
|
|
|
|
Ken Tarver
|
|
« Reply #59 on: February 07, 2016, 11:46:55 AM » |
|
well as I was taking it apart and putting it on, things kind of came apart. so I am looking at all these parts. spent 2o mins trying to get the orings back into the shifter.....that doesn't seem to work. but I seem to have these larger ID washers that would hold them inside as there is a gap where the bronze bushing is......with smaller washers going between them and the bolt.......
did some of the hardware get mixed up when it fell apart, ie gl1800 mtg hardware vs the shifter part?
Only thing applicable to the 1800 GW I removed was the mounting bracket. All other assembly stayed within the pivot point. Ken |
|
|
|
|
Logged
|
|
|
|
|
N0tac0p
|
|
« Reply #60 on: February 07, 2016, 11:59:41 AM » |
|
yeh and that was my intent as well, but while I had it "unbolted" rady to bolt onto my valk locaton, I figured what the hell I'll lube it, went to regrab it and all the parts started falling, went to grab those and well.it mixed in with the other gl parts.....whatever they were...
so now that it is absolutely all part, I am looking at a bunch of hardware, and again it seemed that the orings go inside the hsg, but I see your pics show at lease one side exposed. guess i'll call chrome world tomorrow
|
|
|
|
|
Logged
|
|
|
|
|
Hook#3287
|
|
« Reply #61 on: July 09, 2016, 04:49:08 AM » |
|
Just wanted to give my experience with this set up.  Paid something under $75.00 dollars for this and had the parts hanging around to install it. It works really well, as good as the other two I have, that I paid much more for. Used. I used spacers to move the OEM peg mount out just enough to clear the OEM pipes. The original set up I did, didn't work so good. Great deal. Thanks to Ken Tarver for the original find and post |
|
|
|
|
Logged
|
|
|
|
baldo
Member
Posts: 6961
Youbetcha
Cape Cod, MA
|
|
« Reply #62 on: July 09, 2016, 11:18:22 AM » |
|
Ken; Great write up Wish you had done that last year before I bought a used Rattlebars and had it re-chromed  Hook, Do you have a chroming shop locally? I've got a few pieces I'd like to do.... Thanks, Bob |
|
|
|
|
Logged
|
|
|
|
|
Hook#3287
|
|
« Reply #63 on: July 09, 2016, 11:29:23 AM » |
|
Ken; Great write up Wish you had done that last year before I bought a used Rattlebars and had it re-chromed Hook, Do you have a chroming shop locally? I've got a few pieces I'd like to do.... Thanks, Bob I use this company. newenglandchrome.com Their in East Hartford, CT. Great work, but $$$$$ I send them a picture with measurements, they shoot me a quote and I mail the item to them. Couple weeks later, it comes back all shiny. Nice |
|
|
|
|
Logged
|
|
|
|
baldo
Member
Posts: 6961
Youbetcha
Cape Cod, MA
|
|
« Reply #64 on: July 09, 2016, 11:41:26 AM » |
|
Ken; Great write up Wish you had done that last year before I bought a used Rattlebars and had it re-chromed Hook, Do you have a chroming shop locally? I've got a few pieces I'd like to do.... Thanks, Bob I use this company. newenglandchrome.com Their in East Hartford, CT. Great work, but $$$$$ I send them a picture with measurements, they shoot me a quote and I mail the item to them. Couple weeks later, it comes back all shiny. Nice Cool...I'll call on Monday. I have a center stand I'd like to do. Got a guess what that might run? Thanks |
|
|
|
|
Logged
|
|
|
|
|
Hook#3287
|
|
« Reply #65 on: July 10, 2016, 05:50:16 AM » |
|
Cool...I'll call on Monday.
I have a center stand I'd like to do. Got a guess what that might run?
Thanks
Yeah, a lot. |
|
|
|
|
Logged
|
|
|
|
|
|
Valk_Ridin_Soldier
Member
Posts: 71
'15 F6B; '99 Blown Supervalk
Yorktown, VA
|
|
« Reply #67 on: July 19, 2016, 09:49:45 AM » |
|
|
|
|
|
|
Logged
|
If Bullet proof glass is stronger than bullets, why don't we use bullet proof glass as bullets?  |
|
|
|
BigM
|
|
« Reply #68 on: July 20, 2016, 09:40:59 AM » |
|
I see you have the peg lower kit with yours. that probably helped in getting the space you need. Along with allowing more room for the shifter. There is some on classifieds now.
|
|
|
|
|
Logged
|
|
|
|
|
Fazer
|
|
« Reply #69 on: July 21, 2016, 11:13:00 AM » |
|
Just ordered from Chrome World--thanks to Ken and all the others that put this mod together. I already have a spacer on my peg attachment piece for the Mark T lowering kit. I am going to wait to see if I need to buy any additional spacers, longer bolts, etc.
|
|
|
|
|
Logged
|
Nothing in moderation...
|
|
|
|
falconbrother
|
|
« Reply #70 on: July 21, 2016, 11:39:28 AM » |
|
I have the heel toe and floor boards. Can't imagine life without it.
|
|
|
|
|
Logged
|
|
|
|
|
556ALPHA
|
|
« Reply #71 on: August 01, 2016, 09:41:48 AM » |
|
I would like to say thanks for the information and tips. I decided to cut the Valkyrie shift peg off and drill/tap a new hole to attach the Add On shifter peg. BigBF has a good how to on his site for this. http://www.bigbf.com/bigbf_shop/shift_peg/ I also had to use a spacer between the Add On peg and the shift lever as the peg is too large to fit between the cut out. Between the Taylor Do It Center (like an Ace Hardware) and Home Depot I was able to find the required hardware and tools. My Home Depot has a dedicated space for Chrome Hardware and had good spacers. 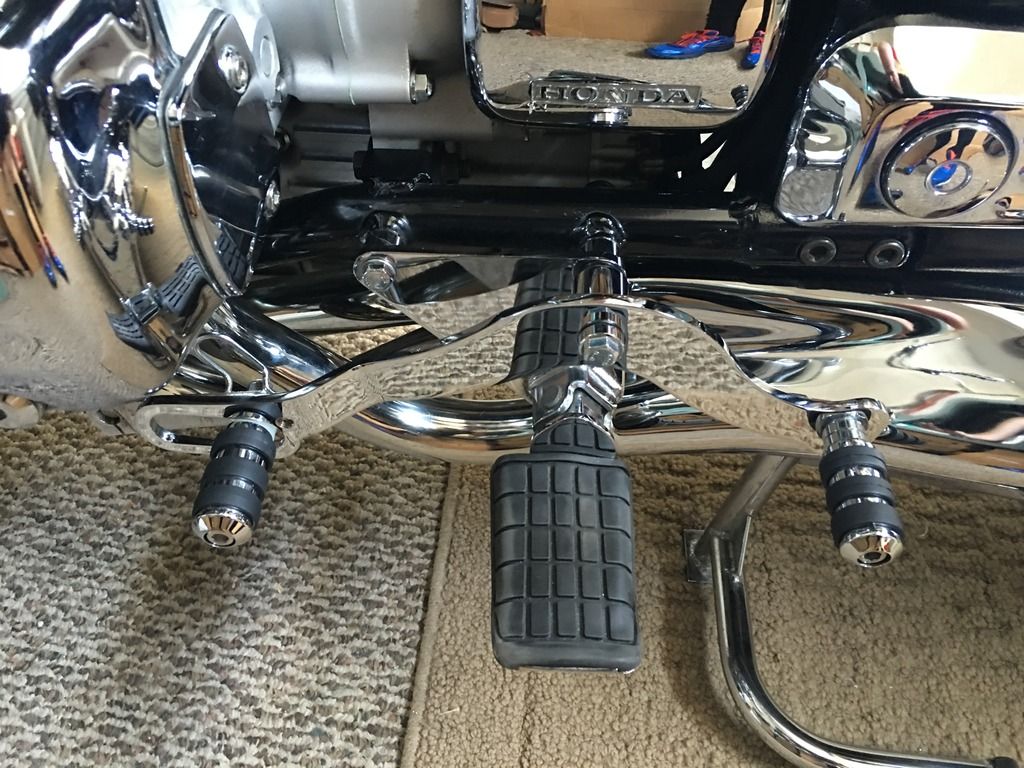 |
|
|
|
« Last Edit: August 01, 2016, 09:46:17 AM by 556ALPHA »
|
Logged
|
|
|
|
|
Fazer
|
|
« Reply #72 on: August 01, 2016, 09:58:07 AM » |
|
I have mine on now--jury still out if I will keep it so as of now am still using the stock rubber shift peg. I find it takes more effort to use the heel shifter, but it's kind of cool looking. I'm much smoother, and faster, using the toe shifter to upshift. I can use either, so maybe I'll leave if on even if I don't use it.
|
|
|
|
|
Logged
|
Nothing in moderation...
|
|
|
|
556ALPHA
|
|
« Reply #73 on: August 01, 2016, 10:05:17 AM » |
|
Understand that, another reason I wanted the larger Add On shifter peg up front. The longer Add On peg is easier to locate than the stock rubber peg.
|
|
|
|
« Last Edit: August 01, 2016, 10:11:34 AM by 556ALPHA »
|
Logged
|
|
|
|
|
|
|
Gental Gaint
|
|
« Reply #75 on: March 26, 2017, 09:22:21 PM » |
|
|
|
|
|
|
Logged
|
Raymond Johnson
Houston/Richmond, Texas
"Live Life"
Cell: 281-460-3794
I will ride with anyone... let's go....
|
|
|
|
Fazer
|
|
« Reply #76 on: March 27, 2017, 05:27:42 AM » |
|
Since this thread has been revived, I will chime in again. Still using mine with the OEM shifter peg, but since buying some new Sidi boots, I am having more difficulty shifting. The toe is bigger on these new boots, so I am considering modifying the toe shifter peg as others above have done.
|
|
|
|
|
Logged
|
Nothing in moderation...
|
|
|
|
falconbrother
|
|
« Reply #77 on: March 27, 2017, 10:56:02 AM » |
|
Heel toe shifter is a mandatory thing for me. Since coming off of Harleys I became addicted to them. Even if I had to custom make one I'd have to have it. Makes the ride nicer to me. When I bought my first Heritage Softail with the heel toe I didn't like it. But, quickly decided it was the balls..
|
|
|
|
|
Logged
|
|
|
|
|
Ken Tarver
|
|
« Reply #78 on: March 27, 2017, 05:55:12 PM » |
|
I hope everyone that has purchased the Add On shifter is pleased the quality. With the aquired parts to adapt to our valks, hopefully it is working as well for you as it is for me. I can't tell a difference in it compared the the Rattlebars model on the other Valk. I have no affiliation with Add On, Chrome World, or Cycle Max; other than being a customer. Ken |
|
|
|
« Last Edit: March 27, 2017, 08:39:27 PM by Ken Tarver »
|
Logged
|
|
|
|
|
Hook#3287
|
|
« Reply #79 on: March 27, 2017, 06:46:36 PM » |
|
I hope everyone that has purchased the Add On shifter is pleased the quality of the shifter. With the aquired parts to adapt to our walks, I hope it is working as well for you as it is for me. I can't tell a difference in it compared the the Rattlebars model on the other Valk. I have no affiliation with Add On, Chrome World, or Cycle Max; other than being a customer. Ken Ken, I'm very happy you decided to share your discovery. I also can't tell the difference between my Rattlebars and the Add On, but my wallet likes it. |
|
|
|
|
Logged
|
|
|
|
|


