John Schmidt
Member

Posts: 15325
a/k/a Stuffy. '99 I/S Valk Roadsmith Trike
De Pere, WI (Green Bay)
|
 |
« on: October 15, 2016, 05:17:51 PM » |
|
First thing I noticed going down the street out front.....I twisted the throttle in 1st gear and the rear tire broke loose. Pucker factor....wasn't expecting it. Runs fine, very, very quick...fast. Went up/down our street 3 times, a bit faster each time, got as high as 3rd gear. The speedo needs calibrating, just rolling about 15-20mph it shows 124kph which is about 77mph. Judging by that I'll never get into 5th.  It's an aftermarket gauge and I'm using an I/S pickup which apparently is giving way too many pulses. The unit was built in China so when I went on their website.....no speaka English. So now I'm trying to figure out the instructions that came with the gauge, being written over there you know they aren't very clear. If I can't figure it out I'll just invest in a SpeedoHealer and be done with it. I'm loving the performance so far and everything works fine with one exception; the front master cylinders....clutch and brake. I have Valk bars on it so will first try to enlarge the mounting holes on the OEM master cyls. and then rebuild them. The Valk units on there now work OK but there's too much lever action before engaging. The OEM m/c's are slightly longer strokes and piston diameter so should make a big difference. |
|
|
|
|
 Logged
|
|
|
|
f6john
Member
Posts: 9735
Christ first and always
Richmond, Kentucky
|
|
« Reply #1 on: October 15, 2016, 07:19:09 PM » |
|
No pics!!!???
|
|
|
|
|
Logged
|
|
|
|
|
Jersey mike
|
|
« Reply #2 on: October 15, 2016, 08:04:46 PM » |
|
Good for you John, glad to hear the bike is running, those 1200's were pretty quick.
Good brakes are a bit more important than the speedo issue, hope you get it worked out.
|
|
|
|
|
Logged
|
|
|
|
|
solo1
|
|
« Reply #3 on: October 16, 2016, 03:23:15 AM » |
|
I ha an '86 Interstate. It was my favorite bike until I got the Valk. I liked it better than the '91 Aspencade.
|
|
|
|
|
Logged
|
|
|
|
Rams
Member
Posts: 16684
So many colors to choose from yet so few stand out
Covington, TN
|
|
« Reply #4 on: October 16, 2016, 03:34:53 AM » |
|
Glad to learn things are moving along. I agree that brakes are more important than the speedo so, I think I'd focus on that first. Pics are a must. Ya know what they say, if you don't have pics, it didn't happen.  |
|
|
|
|
Logged
|
VRCC# 29981
Learning the majority of life's lessons the hard way.
Every trip is an adventure, enjoy it while it lasts.
|
|
|
|
BonS
|
|
« Reply #5 on: October 16, 2016, 07:14:36 AM » |
|
That's exciting! Remind me, did you go with a single carburetor on your build? Oh, and we do need pictures.  |
|
|
|
« Last Edit: October 16, 2016, 10:08:35 AM by BonS »
|
Logged
|
|
|
|
John Schmidt
Member
Posts: 15325
a/k/a Stuffy. '99 I/S Valk Roadsmith Trike
De Pere, WI (Green Bay)
|
|
« Reply #6 on: October 16, 2016, 08:31:41 AM » |
|
That's exciting! Remind me, did you go with a single carburetor on your build? Oh, and we don need pictures. Bon, I did at first but didn't like the performance. The OEM carbs had parts missing so after collecting all that was needed I rebuilt them, they work fine. Actually easier to set up than the Valks carbs, and I also desmogged it while I was at it. I did have a single carb on an old '75 I had years ago, it would scream but the kit was engineered for the bike. With the use of Valk bars and controls, I had to shorten one throttle cable and the choke cable, created a homemade doodad(technical term) to make the new lead slugs on the ends of both cables. This works great. Drill only part way through the long piece, use plenty of flux in the procedure. I lay the cable in the narrow trough with the end slightly frayed for better adhesion and it lays in the hole. I bolt it together and mount the long part in a vise slightly tipped up. Use solid core all lead and a small torch(Bernz-o-matic), heat it and start feeding in the lead. When it's full it will start to run out of the small trough along the cable, stop the heat and with a knife blade scrape it off smooth on the large hole you fed the lead into. Let it cool for a bit then remove it from the "doodad", you will need to dress the slug a little to make it fit and knock off edges. 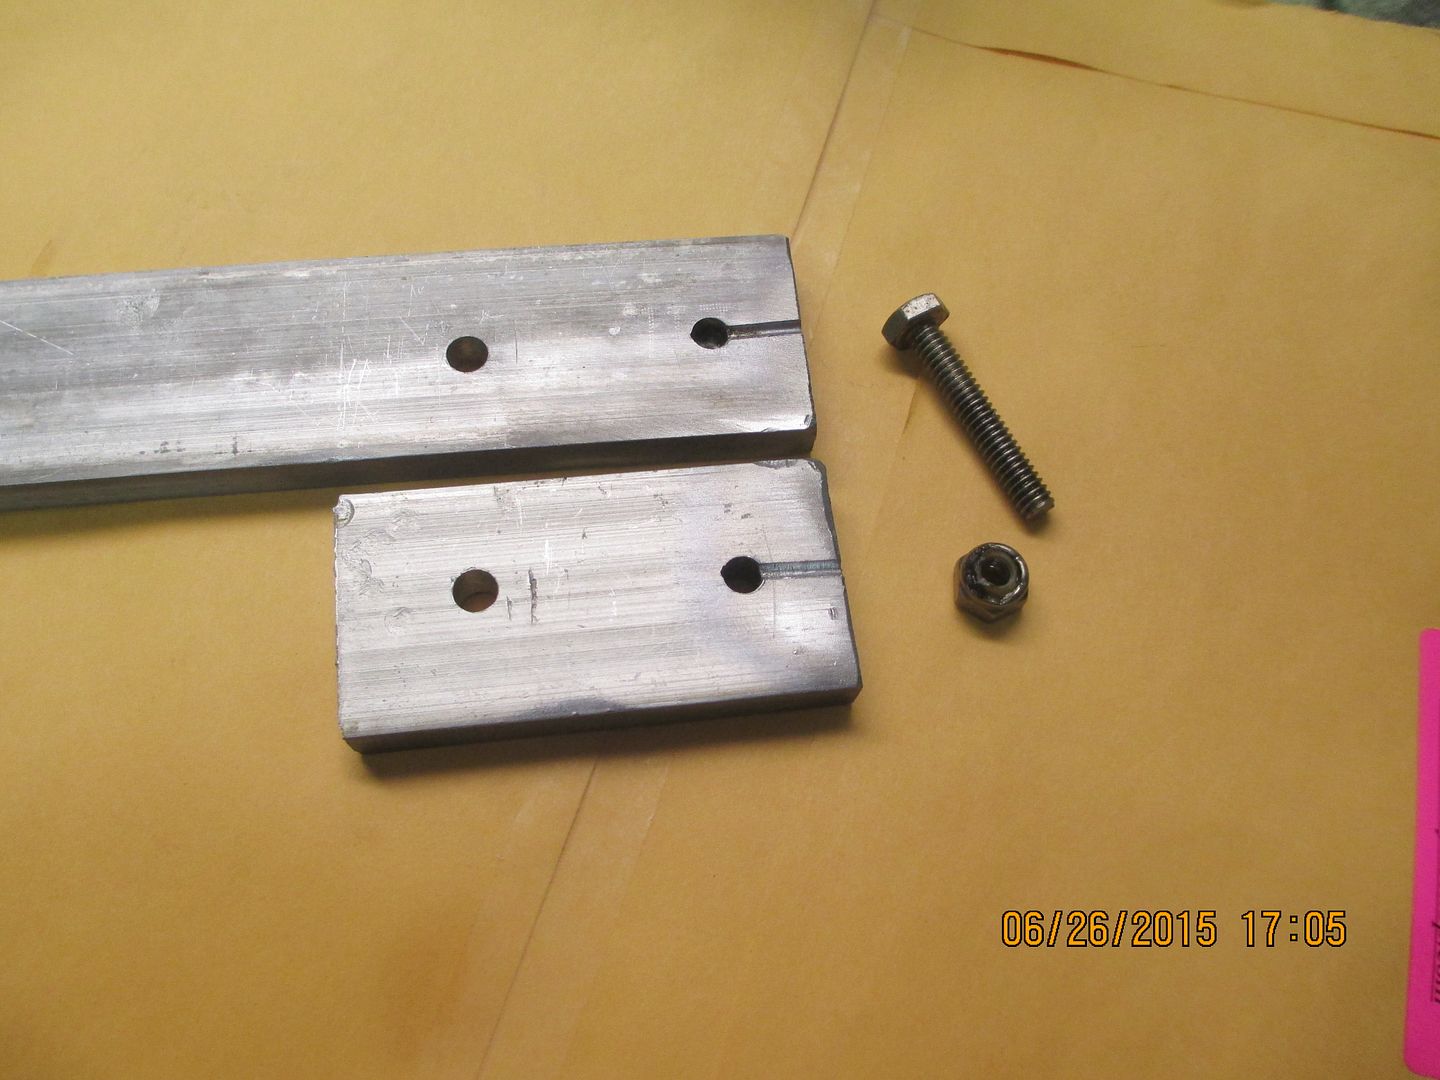 Here's the end result.....Honda factory on the left, the Schmidt factory on the right. 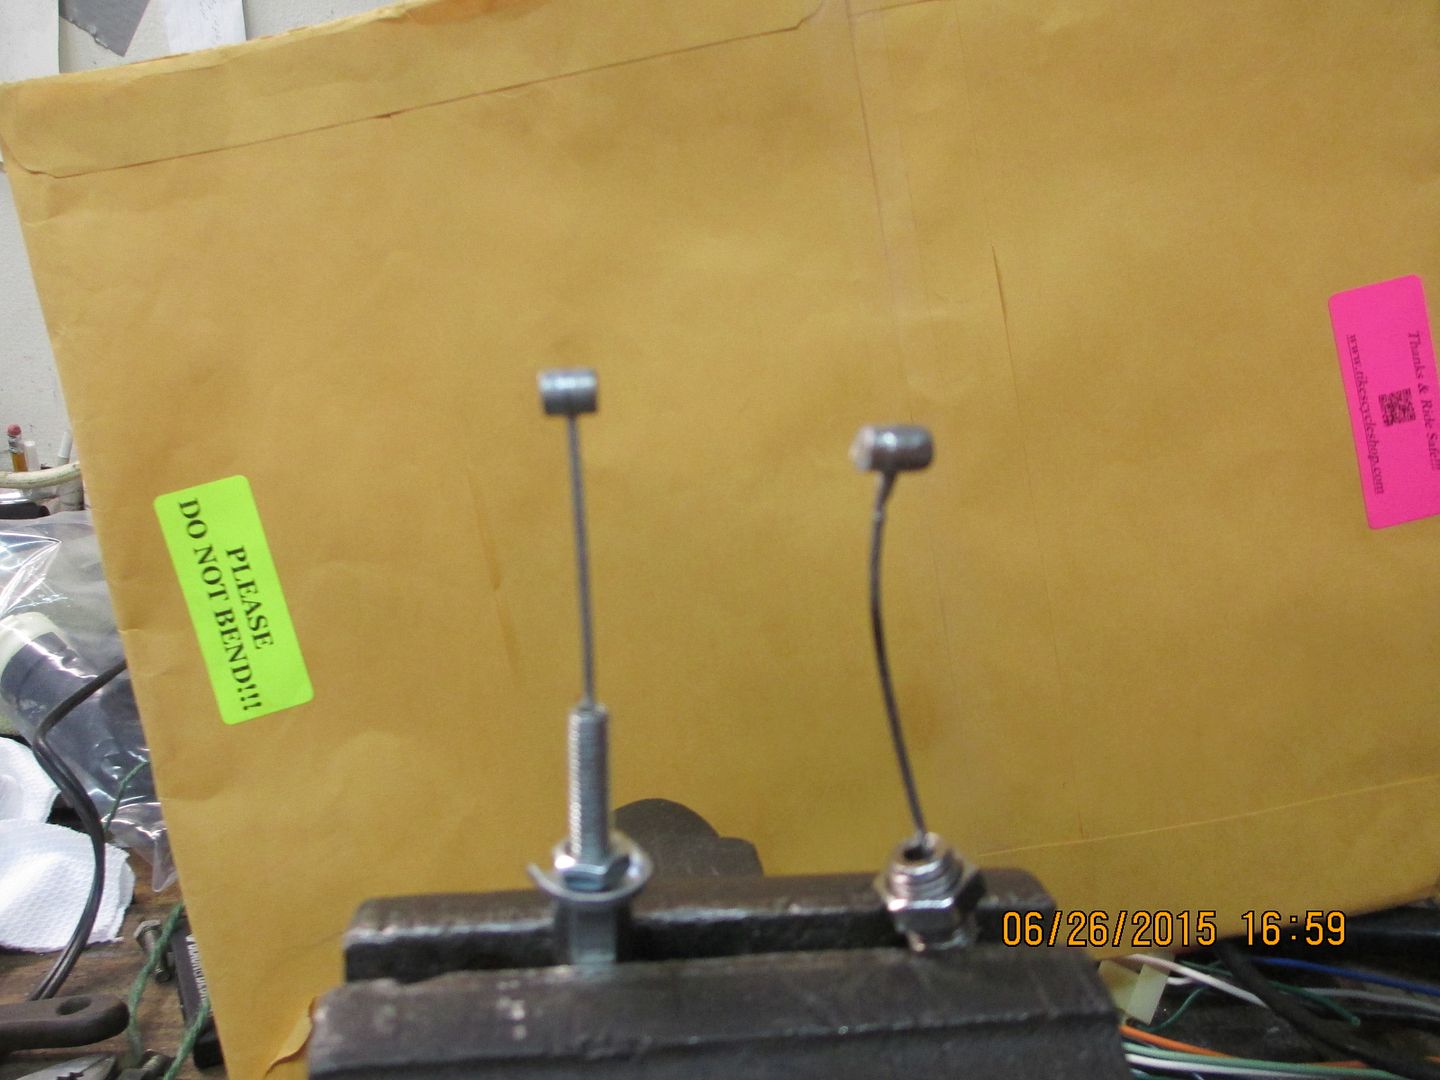 How the tool looks assembled, I laid a scrap bit of cable in there for demo purposes. To make that small trough you just bolt it together, stick it in a vise and use a small bit to drill between the halves. 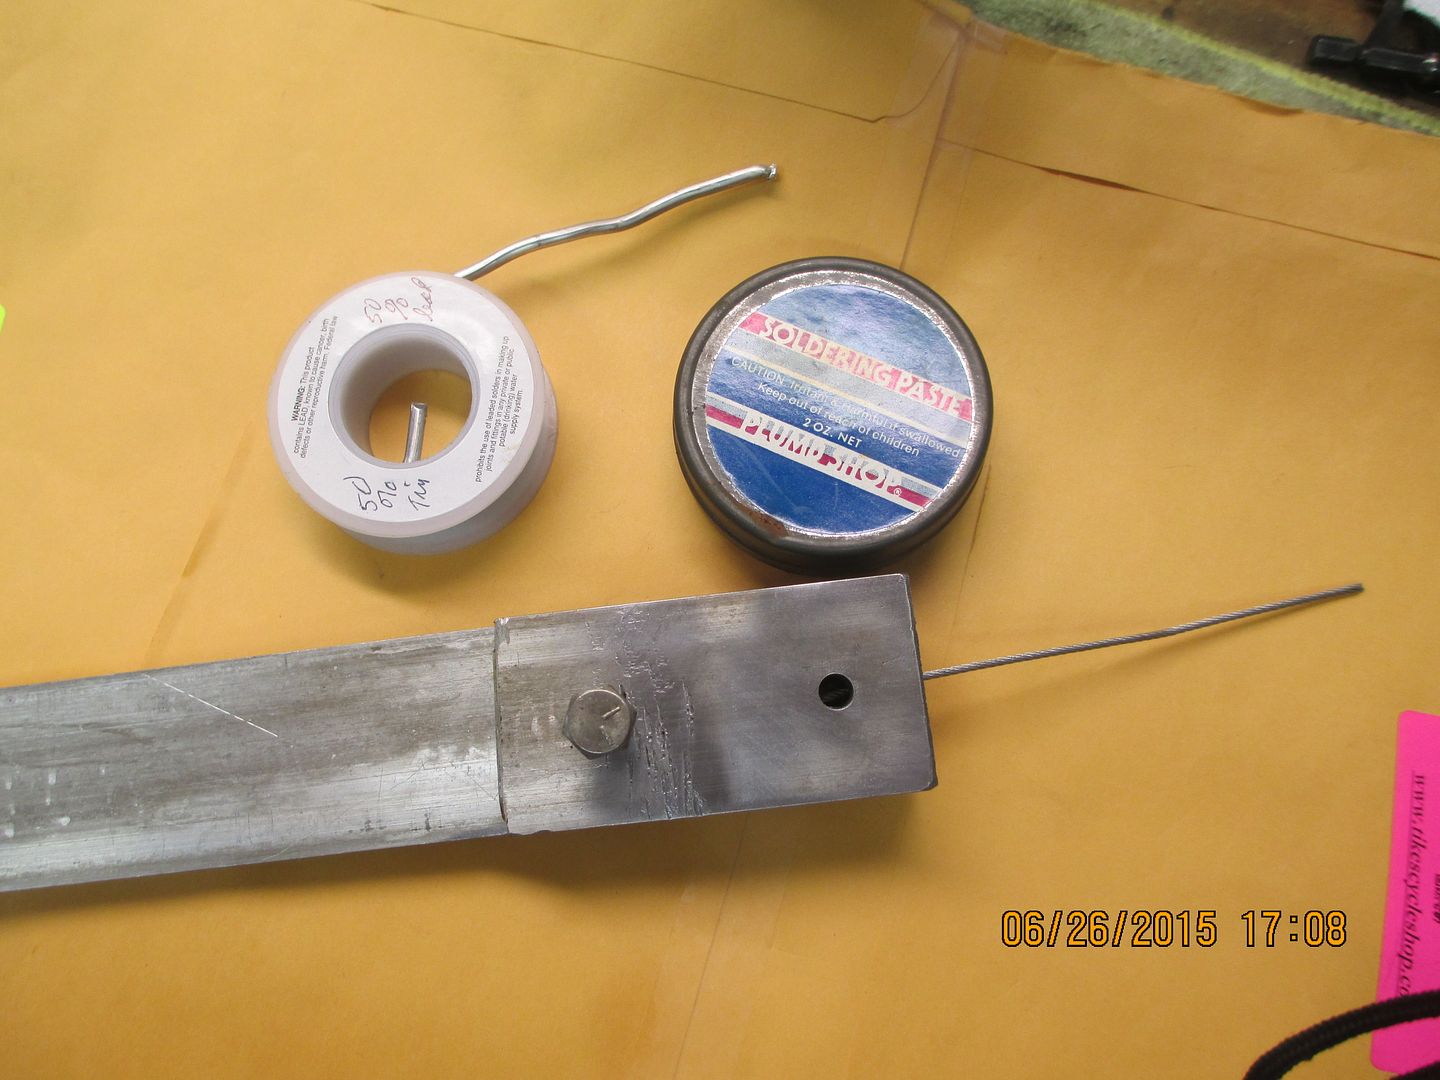 |
|
|
|
|
Logged
|
|
|
|
|
JimC
|
|
« Reply #7 on: October 16, 2016, 10:00:50 AM » |
|
I have had a 1000, 1200, and a 1500 prior to my Valk. I have to admit that I also liked the 1200 the best until I got the Valk.
Jim
|
|
|
|
|
Logged
|
Jim Callaghan SE Wisconsin
|
|
|
|
The emperor has no clothes
|
|
« Reply #8 on: October 16, 2016, 10:05:55 AM » |
|
I have had a 1000, 1200, and a 1500 prior to my Valk. I have to admit that I also liked the 1200 the best until I got the Valk.
Jim
You need to go out and get the 1100 & the 1800 to complete the Royal Flush. |
|
|
|
|
Logged
|
|
|
|
baldo
Member
Posts: 6961
Youbetcha
Cape Cod, MA
|
|
« Reply #9 on: October 16, 2016, 11:20:02 AM » |
|
That's exciting! Remind me, did you go with a single carburetor on your build? Oh, and we don need pictures. Bon, I did at first but didn't like the performance. The OEM carbs had parts missing so after collecting all that was needed I rebuilt them, they work fine. Actually easier to set up than the Valks carbs, and I also desmogged it while I was at it. I did have a single carb on an old '75 I had years ago, it would scream but the kit was engineered for the bike. With the use of Valk bars and controls, I had to shorten one throttle cable and the choke cable, created a homemade doodad(technical term) to make the new lead slugs on the ends of both cables. This works great. Drill only part way through the long piece, use plenty of flux in the procedure. I lay the cable in the narrow trough with the end slightly frayed for better adhesion and it lays in the hole. I bolt it together and mount the long part in a vise slightly tipped up. Use solid core all lead and a small torch(Bernz-o-matic), heat it and start feeding in the lead. When it's full it will start to run out of the small trough along the cable, stop the heat and with a knife blade scrape it off smooth on the large hole you fed the lead into. Let it cool for a bit then remove it from the "doodad", you will need to dress the slug a little to make it fit and knock off edges. Here's the end result.....Honda factory on the left, the Schmidt factory on the right. How the tool looks assembled, I laid a scrap bit of cable in there for demo purposes. To make that small trough you just bolt it together, stick it in a vise and use a small bit to drill between the halves. John, that's pretty clever. Ever have any separate on you? |
|
|
|
|
Logged
|
|
|
|
John Schmidt
Member
Posts: 15325
a/k/a Stuffy. '99 I/S Valk Roadsmith Trike
De Pere, WI (Green Bay)
|
|
« Reply #10 on: October 16, 2016, 12:39:00 PM » |
|
Baldo....nope. When I lay the cable in the small trough I sorta fray the individual wires out a bit where the end lays in the larger hole...where the solder goes. It makes the end result very strong. I experimented on a scrap piece of cable first and when done put the new lead slug in a vise and pulled really hard on the cable with some channel locks. It never moved so I figured I had a winner. Now for those that are wanting pictures, I give you the following. Keep in mind the fenders and side covers still need painting, and the seat needs fabricating. 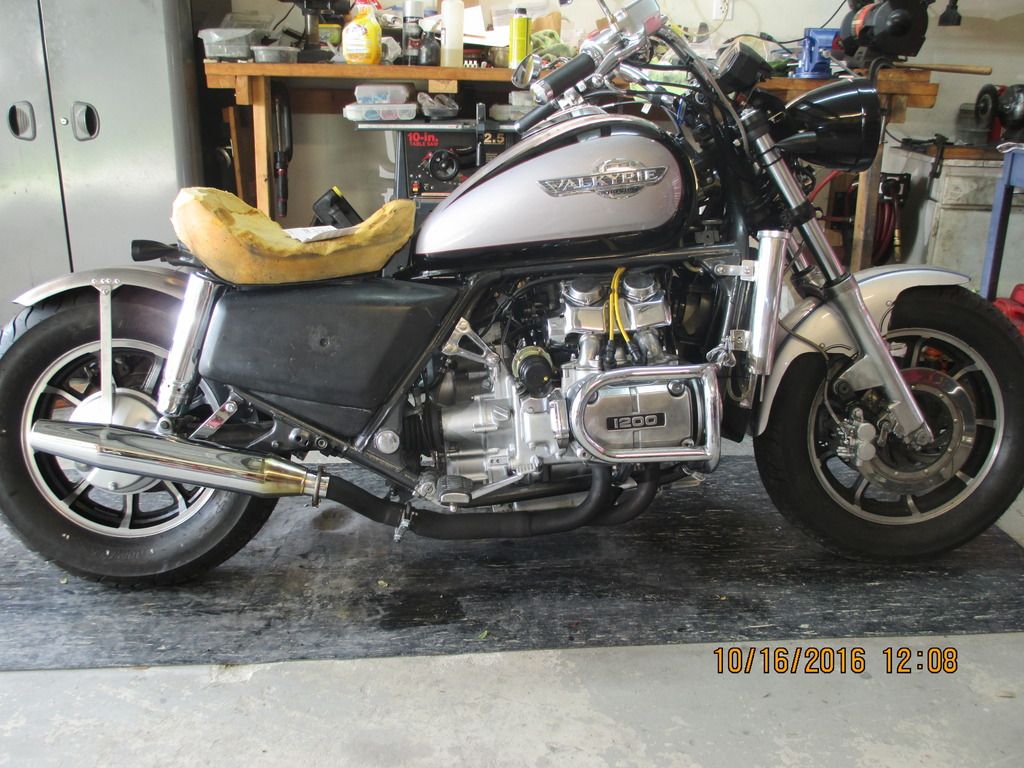 How many Valkyries in this picture? 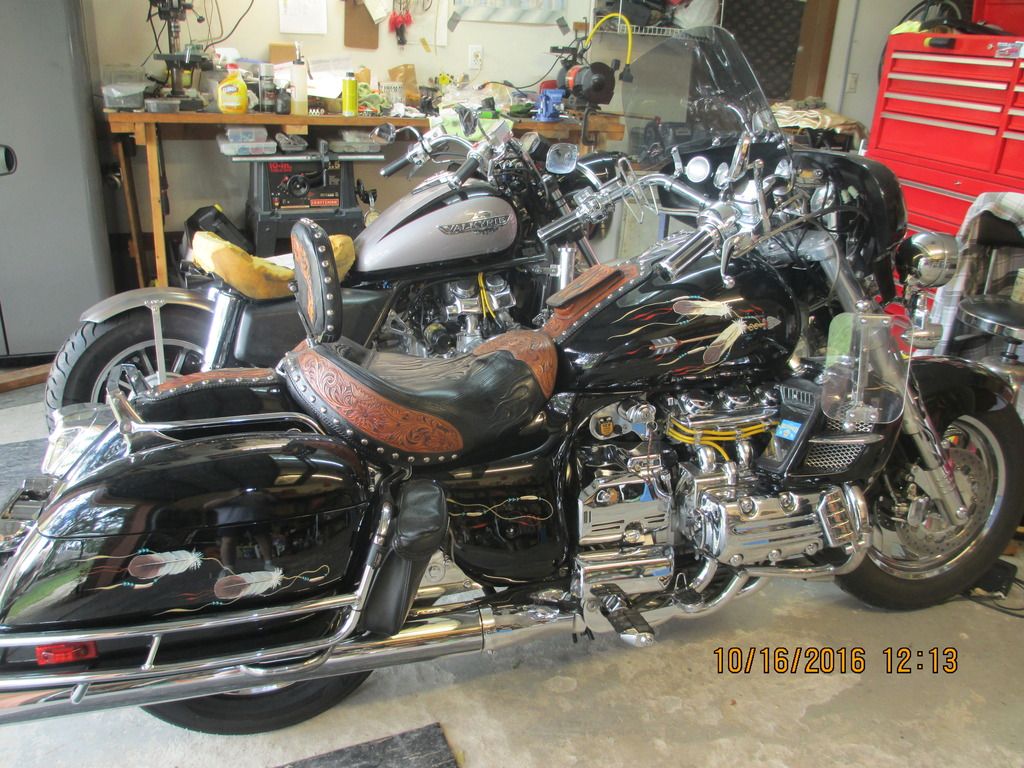 Wanna race, you're liable to only see this! Valkyrie shocks, gas tank, handlebars and controls, Harley mufflers, Adjure headlight, trailer fender from Northern Tool, aircraft fuel shut-off valve. Everything but the engine is new or rebuilt. Fabricated headlight mounting bracket and side mount for the license/taillight. 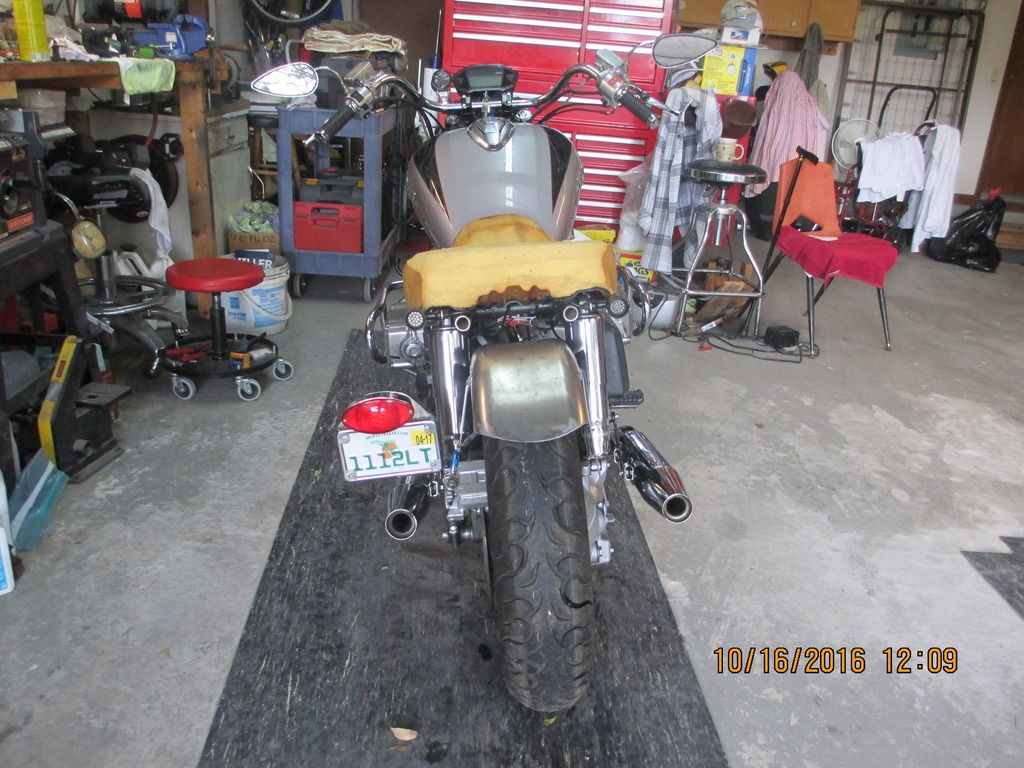 |
|
|
|
|
Logged
|
|
|
|
|
old2soon
|
|
« Reply #11 on: October 16, 2016, 01:48:23 PM » |
|
Are any garages in your area missing Their stash of spare parts?  That cable end trick IS slicker than snot on a door knob!  Glad the build be wurkin out fer ya! RIDE SAFE. |
|
|
|
|
Logged
|
Today is the tommorow you worried about yesterday. If at first you don't succeed screw it-save it for nite check. 1964 1968 U S Navy. Two cruises off Nam.
VRCCDS0240 2012 GL1800 Gold Wing Motor Trike conversion
|
|
|
|
|
John Schmidt
Member
Posts: 15325
a/k/a Stuffy. '99 I/S Valk Roadsmith Trike
De Pere, WI (Green Bay)
|
|
« Reply #13 on: October 16, 2016, 02:45:31 PM » |
|
I worked for an airline in the 80's that flew DC-3's. We usually had to make our own flight control and engine control cables. We'd swedge the ends on but didn't have a proper test rig to check pull strength. So we hung a radial engine about 6" off the floor and if it didn't break, it was good to go....  I have a large pliers like tool for doing that, has come in handy a few times over the years. Never needed to hang a radial with it though. |
|
|
|
|
Logged
|
|
|
|
|
The emperor has no clothes
|
|
« Reply #14 on: October 16, 2016, 02:46:06 PM » |
|
I worked for an airline in the 80's that flew DC-3's. We usually had to make our own flight control and engine control cables. We'd swedge the ends on but didn't have a proper test rig to check pull strength. So we hung a radial engine about 6" off the floor and if it didn't break, it was good to go.... Forgive my ignorance. What is swedging ? |
|
|
|
|
Logged
|
|
|
|
|
|
baldo
Member
Posts: 6961
Youbetcha
Cape Cod, MA
|
|
« Reply #16 on: October 16, 2016, 03:05:14 PM » |
|
I worked for an airline in the 80's that flew DC-3's. We usually had to make our own flight control and engine control cables. We'd swedge the ends on but didn't have a proper test rig to check pull strength. So we hung a radial engine about 6" off the floor and if it didn't break, it was good to go.... Forgive my ignorance. What is swedging ? Swedging is the act of attaching various fittings to the end of stainless aircraft cable. This allows cables to be connected to other cables, bellcranks, actuators, etc. You put a clean-cut cable end into the hollow barrel of whatever fitting you're using. You place that fitting into some type apparatus that will compress the barrel with sufficient force to crush that fitting onto the wire. Similar to putting a ring tongue on a wire, think electrical work on your bike. You then have a tool, called a go/no-go gauge that will measure the diameter of that crushed area. It will have two slots, one the minimum and the other the maximum diameter of that finished fitting. Slide it into the slot and it will fit one and not the other. Here's a link to a cable company that might make it easier to see what I'm trying to say.... http://www.mcfarlaneaviation.com/Products/?CategoryID=47&PS: And there is no ignorance here. I don't figure you run into cable very often cutting steaks.... |
|
|
|
« Last Edit: October 16, 2016, 03:09:19 PM by baldo »
|
Logged
|
|
|
|
|
The emperor has no clothes
|
|
« Reply #17 on: October 16, 2016, 03:15:54 PM » |
|
I worked for an airline in the 80's that flew DC-3's. We usually had to make our own flight control and engine control cables. We'd swedge the ends on but didn't have a proper test rig to check pull strength. So we hung a radial engine about 6" off the floor and if it didn't break, it was good to go.... Forgive my ignorance. What is swedging ? Swedging is the act of attaching various fittings to the end of stainless aircraft cable. This allows cables to be connected to other cables, bellcranks, actuators, etc. You put a clean-cut cable end into the hollow barrel of whatever fitting you're using. You place that fitting into some type apparatus that will compress the barrel with sufficient force to crush that fitting onto the wire. Similar to putting a ring tongue on a wire, think electrical work on your bike. You then have a tool, called a go/no-go gauge that will measure the diameter of that crushed area. It will have two slots, one the minimum and the other the maximum diameter of that finished fitting. Slide it into the slot and it will fit one and not the other. Here's a link to a cable company that might make it easier to see what I'm trying to say.... http://www.mcfarlaneaviation.com/Products/?CategoryID=47&PS: And there is no ignorance here. I don't figure you run into cable very often cutting steaks.... Thanks, Bob. Always interesting to learn new things. And yes it's true. The industry trend has been toward organic, swedge free beef.  |
|
|
|
|
Logged
|
|
|
|
|
Cracker Jack
|
|
« Reply #18 on: October 16, 2016, 04:09:50 PM » |
|
That's exciting! Remind me, did you go with a single carburetor on your build? Oh, and we don need pictures. Bon, I did at first but didn't like the performance. The OEM carbs had parts missing so after collecting all that was needed I rebuilt them, they work fine. Actually easier to set up than the Valks carbs, and I also desmogged it while I was at it. I did have a single carb on an old '75 I had years ago, it would scream but the kit was engineered for the bike. With the use of Valk bars and controls, I had to shorten one throttle cable and the choke cable, created a homemade doodad(technical term) to make the new lead slugs on the ends of both cables. This works great. Drill only part way through the long piece, use plenty of flux in the procedure. I lay the cable in the narrow trough with the end slightly frayed for better adhesion and it lays in the hole. I bolt it together and mount the long part in a vise slightly tipped up. Use solid core all lead and a small torch(Bernz-o-matic), heat it and start feeding in the lead. When it's full it will start to run out of the small trough along the cable, stop the heat and with a knife blade scrape it off smooth on the large hole you fed the lead into. Let it cool for a bit then remove it from the "doodad", you will need to dress the slug a little to make it fit and knock off edges. Here's the end result.....Honda factory on the left, the Schmidt factory on the right. How the tool looks assembled, I laid a scrap bit of cable in there for demo purposes. To make that small trough you just bolt it together, stick it in a vise and use a small bit to drill between the halves. John, that's pretty clever. Ever have any separate on you? John, clever idea and nice job on the execution. My question would be, how durable will it be? My experience is that the "barrels" are made of a much harder material than the lead solder. I got a cable repaired on an old BSA years ago and the tech removed the old barrel from the cable, cleaned it up then silver soldered the barrel back onto the cable, said lead solder was not strong or durable enough to hold. You might check to see what the barrel is made out of if you still have it. |
|
|
|
« Last Edit: October 16, 2016, 04:11:48 PM by Cracker Jack »
|
Logged
|
|
|
|
John Schmidt
Member
Posts: 15325
a/k/a Stuffy. '99 I/S Valk Roadsmith Trike
De Pere, WI (Green Bay)
|
|
« Reply #19 on: October 16, 2016, 04:25:16 PM » |
|
Cracker Jack, I put the barrel in a vise but not to crush it. I spun the vise around so I could pull on the cable with the barrel poking out the other end of the jaws. The vise is mounted to a bench made of 2x6's and mounted solid to the wall....it hasn't moved in 20 years. With the new barrel sticking out one end of the jaws, which were only closed enough to keep the barrel from slipping through, I grabbed the other end of the cable and pulled with channel lock pliers. I applied enough force to equal my own weight. It's still in one piece, and I used all lead....no mixture and no hollow core. You apply the paste/flux while melting. Believe me, it's not going anywhere. |
|
|
|
|
Logged
|
|
|
|
gordonv
Member
Posts: 5766
VRCC # 31419
Richmond BC
|
|
« Reply #20 on: October 16, 2016, 04:46:10 PM » |
|
Great job, and great report on how the project is going. After the trouble you where having and wanting to give it up, it's nice to see you have taken it out for a ride.
So you made a casting mold, just like for bullets.
If you ever have that piece pull loose, I would get a small piece of heavy gauge copper wire to run through the middle of the barrel. Take your cable strands, and loop it around the wire first. I don't think it would ever pull out then.
(I found my new to me IS chock cable broken at the lever)
|
|
|
|
|
Logged
|
1999 Black with custom paint IS   |
|
|
|
Cracker Jack
|
|
« Reply #21 on: October 16, 2016, 05:33:44 PM » |
|
Cracker Jack, I put the barrel in a vise but not to crush it. I spun the vise around so I could pull on the cable with the barrel poking out the other end of the jaws. The vise is mounted to a bench made of 2x6's and mounted solid to the wall....it hasn't moved in 20 years. With the new barrel sticking out one end of the jaws, which were only closed enough to keep the barrel from slipping through, I grabbed the other end of the cable and pulled with channel lock pliers. I applied enough force to equal my own weight. It's still in one piece, and I used all lead....no mixture and no hollow core. You apply the paste/flux while melting. Believe me, it's not going anywhere. Hope you're right. |
|
|
|
|
Logged
|
|
|
|
John Schmidt
Member
Posts: 15325
a/k/a Stuffy. '99 I/S Valk Roadsmith Trike
De Pere, WI (Green Bay)
|
|
« Reply #22 on: October 16, 2016, 05:54:26 PM » |
|
Great job, and great report on how the project is going. After the trouble you where having and wanting to give it up, it's nice to see you have taken it out for a ride.
So you made a casting mold, just like for bullets.
If you ever have that piece pull loose, I would get a small piece of heavy gauge copper wire to run through the middle of the barrel. Take your cable strands, and loop it around the wire first. I don't think it would ever pull out then.
(I found my new to me IS chock cable broken at the lever)
Gordon, re. your choke cable, you need to do what I did. See the pics below. First one is under construction, the second pic it's operational. No cable from the handlebar down, just the cross over cable for the right side. Been on there at least 10 yrs. with nary a hitch.   |
|
|
|
|
Logged
|
|
|
|
DDT (12)
Member
Posts: 4120
Sometimes ya just gotta go...
Winter Springs, FL - Occasionally...
|
|
« Reply #23 on: October 17, 2016, 03:35:02 AM » |
|
Why are you changing the seat, John? It makes such a nice accent piece as is... Of course, that's just me... your taste may vary... Interesting project, my friend... I'm happy for you that you have it, even more glad your skills are occasionally showcased here... As they say on that TV program... "You've got talent!"
DDT
|
|
|
|
|
Logged
|
Don't just dream it... LIVE IT!
See ya down the road...
|
|
|
John Schmidt
Member
Posts: 15325
a/k/a Stuffy. '99 I/S Valk Roadsmith Trike
De Pere, WI (Green Bay)
|
|
« Reply #24 on: October 17, 2016, 07:57:51 PM » |
|
Bruce, the seat pan is only zip tied to the frame for now and the foam just sits on it. Got a little dicey going around a corner and doing a U turn....the foam started to go sideways. I think it was only the pucker factor that kept it in place. |
|
|
|
|
Logged
|
|
|
|
baldo
Member
Posts: 6961
Youbetcha
Cape Cod, MA
|
|
« Reply #25 on: October 17, 2016, 08:19:56 PM » |
|
Bruce, the seat pan is only zip tied to the frame for now and the foam just sits on it. Got a little dicey going around a corner and doing a U turn....the foam started to go sideways. I think it was only the pucker factor that kept it in place. John, if you have any questions upholstery wise, give me a shout...... |
|
|
|
|
Logged
|
|
|
|
John Schmidt
Member
Posts: 15325
a/k/a Stuffy. '99 I/S Valk Roadsmith Trike
De Pere, WI (Green Bay)
|
|
« Reply #26 on: October 18, 2016, 01:26:56 PM » |
|
Bruce, the seat pan is only zip tied to the frame for now and the foam just sits on it. Got a little dicey going around a corner and doing a U turn....the foam started to go sideways. I think it was only the pucker factor that kept it in place. John, if you have any questions upholstery wise, give me a shout...... Thanks, my friend that did the tooling on my Valk seat was going to build this one but other problems have cropped up so it's apparently not going to happen. I'm thinking of picking up a simple tractor style with spring support in back and a swivel mount in front. At least it would suffice for the time being. |
|
|
|
|
Logged
|
|
|
|
|


