|
Trapez
|
 |
« on: June 01, 2018, 06:40:17 AM » |
|
Snapped timing belt Laid my bike down, smashed pulley gear into engine snapping the timing belt!! No compression in cly 1 & 3 all others ok also fracture rear case clutch housing (leaking oil) Have 2nd valk motor with 22k miles mine has 88k. Was going to swap engines but now may swap parts (heads and rear case). Before the swap will pull head and check if I have any bent rods or damage pistons from the snapped timing belt. NOTE: 2nd engine has three hidden broken teeth somewhere that i simply cannot find (found two of the five) otherwise I would use 2nd engine. Need help on any pointers, tips or am i missing anything??? - 1. Clean the carb jets! (been 5 months :'() - 2. - 3.    Fracture rear case Fracture rear case  |
|
|
|
|
 Logged
|
|
|
|
|
Chrisj CMA
|
|
« Reply #1 on: June 01, 2018, 07:09:37 AM » |
|
Sounds like you are ok. Sorry about the bike that’s terrible. Good thing you have the spare parts
|
|
|
|
|
Logged
|
|
|
|
|
Paladin528
|
|
« Reply #2 on: June 01, 2018, 08:57:59 AM » |
|
That engine guard did NOT work like it is supposed to.
|
|
|
|
|
Logged
|
|
|
|
|
..
|
|
« Reply #3 on: June 01, 2018, 11:00:31 AM » |
|
That took a hell of a whack!
How fast?
|
|
|
|
|
Logged
|
|
|
|
Grandpot
Member

Posts: 630
Rolling Thunder South Carolina Chapter 1
Fort Mill, South Carolina
|
|
« Reply #4 on: June 01, 2018, 11:17:47 AM » |
|
By now you know the 1500 is an interference engine. I agree with your decision not to use the other engine if you can't find all the teeth. They will show up some day at a bad time.
To be safe, pull both heads. You really need to inspect all the valves. With the heads off, you can turn the crank and get the cams timed up and the belts installed without doing any damage. Then, put the heads back on.
Good luck.
|
|
|
|
|
Logged
|
 Experience is recognizing the same mistake every time you make it. |
|
|
|
Cracker Jack
|
|
« Reply #5 on: June 01, 2018, 12:19:21 PM » |
|
By now you know the 1500 is an interference engine. I agree with your decision not to use the other engine if you can't find all the teeth. They will show up some day at a bad time.
To be safe, pull both heads. You really need to inspect all the valves. With the heads off, you can turn the crank and get the cams timed up and the belts installed without doing any damage. Then, put the heads back on.
Good luck.
Hey Grandpot, help me and him out. I'm sure he wants to be safe and not do any damage. How are you going to "get the cams timed up and the belts installed" with the heads off? |
|
|
|
|
Logged
|
|
|
|
Grandpot
Member
Posts: 630
Rolling Thunder South Carolina Chapter 1
Fort Mill, South Carolina
|
|
« Reply #6 on: June 01, 2018, 05:00:37 PM » |
|
By now you know the 1500 is an interference engine. I agree with your decision not to use the other engine if you can't find all the teeth. They will show up some day at a bad time.
To be safe, pull both heads. You really need to inspect all the valves. With the heads off, you can turn the crank and get the cams timed up and the belts installed without doing any damage. Then, put the heads back on.
Good luck.
Hey Grandpot, help me and him out. I'm sure he wants to be safe and not do any damage. How are you going to "get the cams timed up and the belts installed" with the heads off? My typing got ahead of my thinking. Get #1 cylinder to TDC, put the cams at the timing marks, put the heads on, put the belts on. |
|
|
|
|
Logged
|
Experience is recognizing the same mistake every time you make it. |
|
|
John Schmidt
Member
Posts: 15349
a/k/a Stuffy. '99 I/S Valk Roadsmith Trike
De Pere, WI (Green Bay)
|
|
« Reply #7 on: June 01, 2018, 05:35:39 PM » |
|
I'd get a borescope or similar and keep looking for the rest of the teeth on the low mileage motor. Maybe even pull the front and rear covers off to try finding them. I'd hate to have a low mileage motor and not feel safe using it. Those covers represent a lot less work & money than pulling the heads. And with the front cover off you could install the switch on the front from a Wing that lets you install a gear indicator. PS: Just think....if you bought the tool you linked to on the other post, you could do your own colonoscopy as well. That would save a bunch of $$, win...win all the way around.  |
|
|
|
« Last Edit: June 01, 2018, 05:39:28 PM by John Schmidt »
|
Logged
|
|
|
|
|
Trapez
|
|
« Reply #8 on: June 01, 2018, 07:12:49 PM » |
|
That took a hell of a whack!
How fast?
Not fast really, coming out of left turn, around 30-35mph. The hit on the right side had to been the curb. Almost as if the bike a hard right flip and some kind of dive angle into the curb ??? |
|
|
|
|
Logged
|
|
|
|
|
Trapez
|
|
« Reply #9 on: June 01, 2018, 07:19:32 PM » |
|
I'd get a borescope or similar and keep looking for the rest of the teeth on the low mileage motor. Maybe even pull the front and rear covers off to try finding them. I'd hate to have a low mileage motor and not feel safe using it. Those covers represent a lot less work & money than pulling the heads. And with the front cover off you could install the switch on the front from a Wing that lets you install a gear indicator. PS: Just think....if you bought the tool you linked to on the other post, you could do your own colonoscopy as well. That would save a bunch of $$, win...win all the way around. got one of those snake camera on order but not sure where its going, theres not much room anywhere and the drain plug does not look like much of an option. |
|
|
|
|
Logged
|
|
|
|
|
..
|
|
« Reply #10 on: June 02, 2018, 05:00:46 AM » |
|
That took a hell of a whack!
How fast?
Not fast really, coming out of left turn, around 30-35mph. The hit on the right side had to been the curb. Almost as if the bike a hard right flip and some kind of dive angle into the curb ???  Thanks |
|
|
|
|
Logged
|
|
|
|
|
indybobm
|
|
« Reply #11 on: June 02, 2018, 06:05:34 AM » |
|
I would think that it would be easier to replace the rear housing by pulling the motor and the clutch basket. Clutch basket has to come out anyway. Have you pulled the clutch basket on the 2nd motor? If not, i would do that and look for the missing teeth. Chances are, however, the teeth came out when the oil drained when the clutch cover was removed.
Either way, it is a lot of work. I would try to go with the 2nd motor.
|
|
|
|
|
Logged
|
So many roads, so little time
VRCC # 5258
|
|
|
Tfrank59
Member
Posts: 1364
'98 Tourer
Western Washington

|
|
« Reply #12 on: June 02, 2018, 07:54:31 AM » |
|
wow, glad you're okay. I think this is the first report of a broken timing belt on a Valk! that's what it takes--a slam on the cover and into the pulley. Hope you'll be able to get her going again. Looks like a lot to do and if some valves are bent what else happened internally? Let us know what you learn.
|
|
|
|
|
Logged
|
-Tom
Keep the rubber side down. USMC '78-'84
'98 Valkyrie, ‘02 VTX 1800, '96 Royal Star, '06 Drifter, '09 Bonneville, '10 KTM 530, '04 XR 650, '76 Bultaco, '81 CR 450, '78 GS 750...
|
|
|
|
Trapez
|
|
« Reply #13 on: June 02, 2018, 08:22:02 PM » |
|
I would think that it would be easier to replace the rear housing by pulling the motor and the clutch basket. Clutch basket has to come out anyway. Have you pulled the clutch basket on the 2nd motor? If not, i would do that and look for the missing teeth. Chances are, however, the teeth came out when the oil drained when the clutch cover was removed.
Either way, it is a lot of work. I would try to go with the 2nd motor.
Didnt think about that the teeth might have came out on the oil drain! Not sure if they thought to check. I found only two with the rear case off. I looked for hours could not find the other three. I would have to split the engine case to continue the search. Got a snake camera on order, but dont think I can snake it through any openings, not expecting much from that. I decided to swap heads |
|
|
|
|
Logged
|
|
|
|
|
Trapez
|
|
« Reply #14 on: June 02, 2018, 08:23:53 PM » |
|
That engine guard did NOT work like it is supposed to.
Engine guard didnt have a chance! |
|
|
|
|
Logged
|
|
|
|
|
Kokomo Kevin
|
|
« Reply #15 on: June 02, 2018, 08:35:22 PM » |
|
Just my opinion FWIW, Part this horse out and buy another one. I know we all love these things to death but with all the great deals on used ones on this site, you probably would be back in the saddle faster and with little out of pocket coin.
|
|
|
|
|
Logged
|
|
|
|
|
|
|
Trapez
|
|
« Reply #17 on: June 02, 2018, 10:12:31 PM » |
|
Motor back in with following parts from 2nd motor: - Rear case clutch housing - Rear clutch cover case - Clutch basket (starter and alternator can both go in after motor installed, I was able to struggle free the starter and install the starter with motor in but when removing the motor i left the alternator in place. Its really not an issue, both are do doable with motor in.) New parts - Slave clutch cylinder & squash washers (clutch bleed and ready) - Two Rubber seals (oil seals), clutch cover & drive shaft holder - One big o-ring on drive shaft holder - Two case gaskets, rear case & clutch cover case The hard part: When head gasket comes in next week will use both heads from 2nd motor. Then I get to test my memory and iPhone pics to get all the wires and hose in place ??? my worst nightmare will be the air box, already did this once you have to bend air horns so much you think its about to snap off. Motor back in, will stay like this till the head gaskets come in  2nd hand motor on floor 2nd hand motor on floor
Following sockets are now the biggest sockets i own. The silver is the 32mm converted to inches 1 1/4. All three sockets work just fine:
1 1/4 6 point
36mm 12 point
46mm 12 point
Aircat Impact works just fine to break the stake and nut off single handed and back on to be restaked. But since I had two nuts to chose from to put back on I picked the better one that didnt get torn up.
    And yes everything is a big mess, but so far no regrets ??? |
|
|
|
|
Logged
|
|
|
|
|
Kokomo Kevin
|
|
« Reply #18 on: June 03, 2018, 06:04:45 AM » |
|
I understand, man what a project, but I know lots of us like to wrench more than others! For me I am saving my coin to get in line someday with the Attic Rat. Now that is a Project that will be well worth a tear down.
|
|
|
|
|
Logged
|
|
|
|
|
Chrisj CMA
|
|
« Reply #19 on: June 03, 2018, 06:04:58 AM » |
|
Looks like some good work, keep it up  |
|
|
|
|
Logged
|
|
|
|
|
Trapez
|
|
« Reply #20 on: June 03, 2018, 06:49:43 AM » |
|
wow, glad you're okay. I think this is the first report of a broken timing belt on a Valk! that's what it takes--a slam on the cover and into the pulley. Hope you'll be able to get her going again. Looks like a lot to do and if some valves are bent what else happened internally? Let us know what you learn.
...and it had to be me  I was hoping for that exact moment that the engine had stopped completely (not moving after pulley smashed into case) and the belt just snapped (when engine stopped) and all would be good but apparently not. |
|
|
|
|
Logged
|
|
|
|
gordonv
Member
Posts: 5766
VRCC # 31419
Richmond BC
|
|
« Reply #21 on: June 03, 2018, 08:45:56 AM » |
|
I love the pictures, Thank you. Since older posts of the sockets, and most photobucket pictures are now gone, it' really nice having new ones. Not only the socket sizes, but the parts they are for too.
|
|
|
|
|
Logged
|
1999 Black with custom paint IS   |
|
|
|
RonW
|
|
« Reply #22 on: June 03, 2018, 11:45:27 PM » |
|
the manual doesn't state the torque for the 6mm bolt for the oil port (red circle). Just states to install it after torquing down the 9mm cylinder head bolts. I guess you could try torquing it down before removing it at 7 ft-lbs, etc. and if you hear the click, it's 7 ft-lbs or higher. I went with 9 ft-lbs, I think. 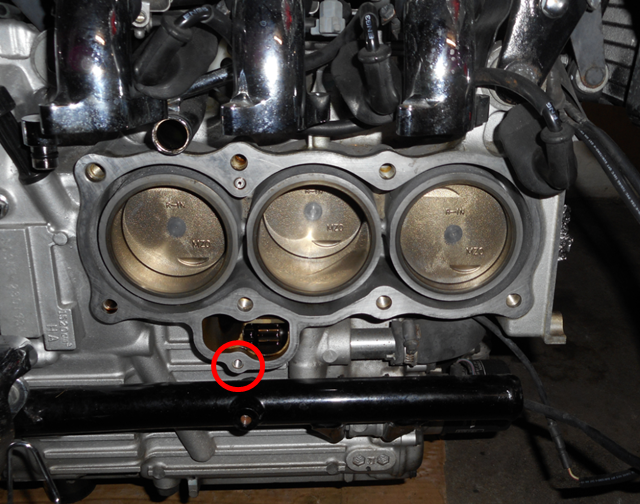 |
|
|
|
|
Logged
|
2000 Valkyrie Tourer
|
|
|
|
RonW
|
|
« Reply #23 on: June 04, 2018, 12:51:38 AM » |
|
I found Gasket 5 protruding into the chamber enough to rub against the right timing belt. I used the tip of a flat blade screwdriver to work the gasket back into it's gap. Otherwise I would have to remove the shield to reset the gasket. In order to do that, the cam pulley would have to be removed. Problem is the gasket fits tightly into the gap so I ended up pushing it entirely out by pushing too hard. Then I had to pull the gasket back into the gap with a dental pic. The gasket ended up broken in several pieces the more I tried to pull on it. Lying upside down on your back had a role in it. Some pieces couldn't be found. The gasket isn't flexible as when it was new. I now have to seal up the open spaces in the gap with gasket maker to prevent water from leaking into the timing belt chamber. Moral is that it's better to slice slivers off the gasket where it protrudes. Or, when the shield is re-installed, double-check gaskets 5 & 7.   |
|
|
|
« Last Edit: June 04, 2018, 12:53:17 AM by RonW »
|
Logged
|
2000 Valkyrie Tourer
|
|
|
|
Led
|
|
« Reply #24 on: June 06, 2018, 09:57:48 AM » |
|
I don't mind doing some wrenching........but a LOT of these photo's will give me nightmares tonight!!  |
|
|
|
|
Logged
|
|
|
|
|
Six7390GT
|
|
« Reply #25 on: June 06, 2018, 11:17:48 AM » |
|
I would also de-smog while you're in there.
|
|
|
|
|
Logged
|
|
|
|
|
Trapez
|
|
« Reply #26 on: June 06, 2018, 08:59:02 PM » |
|
the manual doesn't state the torque for the 6mm bolt for the oil port (red circle). Just states to install it after torquing down the 9mm cylinder head bolts. I guess you could try torquing it down before removing it at 7 ft-lbs, etc. and if you hear the click, it's 7 ft-lbs or higher. I went with 9 ft-lbs, I think. Thanks Ron good idea! ill try to find where its torque at before I loosen it |
|
|
|
|
Logged
|
|
|
|
|
RonW
|
|
« Reply #27 on: June 06, 2018, 10:44:30 PM » |
|
Think I went with 9 ft-lbs (?), maybe it was 7-ft lbs ..... around the same torque value for other 6mm bolts. It's just that other 6mm bolts don't have a gasket they torque down upon, if that makes any sense. I own a inch-lbs torque wrench. Also it might be a torque-to-yield bolt, not suppose to reuse. Felt it spin freely on me tightening it down, but managed to screw it back out hanging on by a hair.
|
|
|
|
|
Logged
|
2000 Valkyrie Tourer
|
|
|
|
Trapez
|
|
« Reply #28 on: June 24, 2018, 03:44:03 PM » |
|
Finished the bike last week, with a got'ch.  - Thought the petcock tube was just a vent! then figured out later it was more than just a vent, but a vacuum from manifold to act as an on/off!! - Radiator cap wasnt on tight tight had about 1/10 turn more, well test ride again later see if it undoes itself. May try and tighten that little screw more. Still waiting for a rear right turn signal, and right crash guard. Also, still have dent in gas tank. May just keep it as is for my Road Battle Scars ???  Other than that ebay sent wrong cobra spotlight, but I like it better looks more up to date, matchs my headlight...  now need to replace this to match the others  Heres a few pic as promised of the 'snake camera.' Works better than i thought but still somewhat useless, can only see about 10% or less of the main engine case., You cant really snake it everywhere, only certain places.      |
|
|
|
« Last Edit: June 25, 2018, 05:44:48 PM by Trapez »
|
Logged
|
|
|
|
|
RonW
|
|
« Reply #29 on: June 24, 2018, 06:31:51 PM » |
|
Amazed! Would have take the average person 5 years. If the cap on the radiator is screwed on as much as it will go, the head of the little screw will bottom out on the circumference of the radiator cap. Just did that a few days ago. Filled coolant in the night and wasn't able to see the head of the little screw sticking out a tad. Apparently the screw should go *behind* the tab on the radiator throat and this keeps the radiator cap from rotating counter-clockwise or loose. If the screw is behind the tab, the little screw will go deep enough to bottom out on the radiator cap. Gas tank is expensive. So, is the Right engine guard. Just why couldn't it be the Left engine guard, lol. That where mines is dented.
|
|
|
|
« Last Edit: June 24, 2018, 06:33:36 PM by RonW »
|
Logged
|
2000 Valkyrie Tourer
|
|
|
|
Trapez
|
|
« Reply #30 on: June 25, 2018, 05:48:48 PM » |
|
Amazed! Would have take the average person 5 years.
yea, just glad to have my garage back! it was about a good two weeks+. Thanks, im going to double check that radiator screw... |
|
|
|
|
Logged
|
|
|
|
|
Savago
|
|
« Reply #31 on: June 26, 2018, 01:26:39 PM » |
|
Awesome job and amazing report! |
|
|
|
|
Logged
|
|
|
|
|
9Ball
|
|
« Reply #32 on: June 27, 2018, 12:14:48 PM » |
|
At least it’s the right color...keep that one on the road! Just my opinion FWIW, Part this horse out and buy another one. I know we all love these things to death but with all the great deals on used ones on this site, you probably would be back in the saddle faster and with little out of pocket coin.
I know I came real close to it, but have to hang on to her just a little bit more. Shes been with me for the ride on a few of my contract jobs from Hawaii, Dallas and Houston. My next may be a V-Max   |
|
|
|
|
Logged
|
VRCC #6897, Joined May, 2000
1999 Standard
2007 Rocket 3
2005 VTX 1300S
|
|
|
|
desertrefugee
|
|
« Reply #33 on: July 04, 2018, 10:13:46 AM » |
|
Really good work. I've had heads off quite a few 4 cylinder Goldwings, but haven't had the need to do so on a Valk yet. Pretty much exactly the same - including the 10mm bolt on the bottom. However, I'm replying here because I laughed out loud at one of your comments: ...my worst nightmare will be the air box. Sheesh. After all you went through, that airbox should've been the absolute least of your worries! |
|
|
|
|
Logged
|
'97 Bumble Bee, '78 GL1000, '79 CBX, '78 CB750F, '74 CB750
|
|
|
baldo
Member
Posts: 6961
Youbetcha
Cape Cod, MA
|
|
« Reply #34 on: July 04, 2018, 05:28:21 PM » |
|
the manual doesn't state the torque for the 6mm bolt for the oil port (red circle). Just states to install it after torquing down the 9mm cylinder head bolts. I guess you could try torquing it down before removing it at 7 ft-lbs, etc. and if you hear the click, it's 7 ft-lbs or higher. I went with 9 ft-lbs, I think. Man, that is CLEAN! Excellent job, both wrenching and documenting..... |
|
|
|
|
Logged
|
|
|
|
|
RonW
|
|
« Reply #35 on: July 05, 2018, 01:25:34 AM » |
|
baldo, you might be meaning Trapez's work (?). Anyways, here's a before pic of my pistons. The walls were actually almost mirror smooth except for the cross-hatching making the pic give the wrong impression. It's just the reflection on the cylinder walls (x in the second pic). Only some crud (circle) around the top lip of the cylinder walls, whew. I used a Scotch-Brite scouring pad and a plastic putty knife. Kept vacuuming things up with a mini nozzle hooked up to a Oreck vacuum. Took hours. But since you can sit on a stool wasn't that bad. My guess is that the top of the pistons will be back to the same condition after a year, so it's largely a wasted effort. But then the Valk's such a wonderful bike. 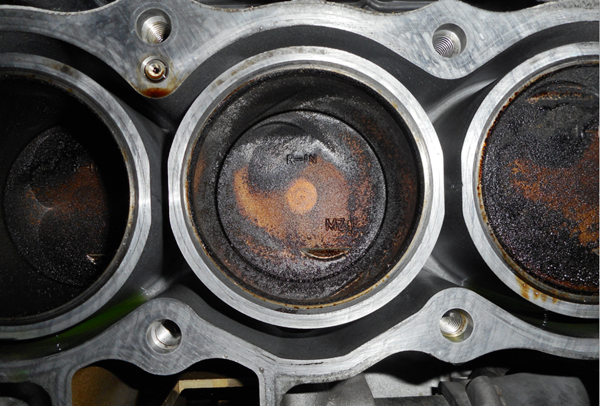 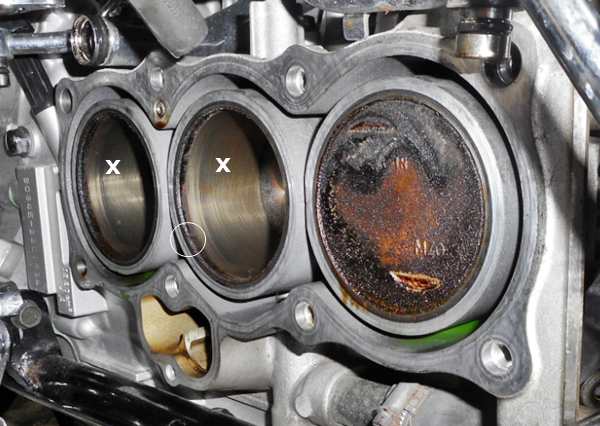 |
|
|
|
« Last Edit: July 05, 2018, 03:46:45 AM by RonW »
|
Logged
|
2000 Valkyrie Tourer
|
|
|
|


