|
jrflyboyVP2
|
 |
« on: May 26, 2020, 06:38:57 AM » |
|
Help, just replaced my rear tire on my 99 Tourer. Found spacer between drive flange and rear wheel was missing. Both sets of splines (final drive female and drive flange male) are completely shot. Searched forum and found several options: Used final drive ($500 to $700) ebay; new Gear set $300, used goldwing 1500 and press out spline and press into my final drive gear. Has anyone rebuilt there final drive with new gear set. How difficult is it. How is proper gear lash achieved (spacer shims on small gear shaft). Does anyone know a shop or owner who rebuilds final drives? Totally bummed my Dragon is down right before summer.
John Reinschmidt
Austin Texas
|
|
|
|
|
 Logged
|
|
|
|
|
Chrisj CMA
|
|
« Reply #1 on: May 26, 2020, 06:58:29 AM » |
|
Help, just replaced my rear tire on my 99 Tourer. Found spacer between drive flange and rear wheel was missing. Both sets of splines (final drive female and drive flange male) are completely shot. Searched forum and found several options: Used final drive ($500 to $700) ebay; new Gear set $300, used goldwing 1500 and press out spline and press into my final drive gear. Has anyone rebuilt there final drive with new gear set. How difficult is it. How is proper gear lash achieved (spacer shims on small gear shaft). Does anyone know a shop or owner who rebuilds final drives? Totally bummed my Dragon is down right before summer.
John Reinschmidt
Austin Texas
spacer between drive splines and rear wheel Are you talking about the thrust washer. The little nylon washer looking thing? The reason I ask is that it’s common when the thrust washer is forgotten that the corner of the wheel hub gets worn. Thus usually requires a whole new wheel as well |
|
|
|
« Last Edit: May 26, 2020, 07:04:13 AM by Chrisj CMA »
|
Logged
|
|
|
|
|
jrflyboyVP2
|
|
« Reply #2 on: May 26, 2020, 08:06:54 AM » |
|
Yes the nylon thrust washer was missing, The wheel surface is roughed up, but now step worn in it, should be able to be turned for refaced. The bike has 78,000 miles and has been down so is only worth about 2k to 2.5k but I don't want to just junk it for bad final drive splines. The used final drives for sale on Ebay, either don't show the splines in the photos, or show them but can't tell there condition.
|
|
|
|
|
Logged
|
|
|
|
|
jrflyboyVP2
|
|
« Reply #3 on: May 26, 2020, 08:08:40 AM » |
|
meant to say no step worn into the face of the wheel. Should have taken pictures while wheel was off. I had to put it all back together to get it home.
|
|
|
|
|
Logged
|
|
|
|
|
old2soon
|
|
« Reply #4 on: May 26, 2020, 09:22:45 AM » |
|
Hey Chris is Grumpy still pressing in splines from the G/Ws? RIDE SAFE.
|
|
|
|
|
Logged
|
Today is the tommorow you worried about yesterday. If at first you don't succeed screw it-save it for nite check. 1964 1968 U S Navy. Two cruises off Nam.
VRCCDS0240 2012 GL1800 Gold Wing Motor Trike conversion
|
|
|
|
jrflyboyVP2
|
|
« Reply #5 on: May 26, 2020, 10:45:15 AM » |
|
So I read about pressing in the splined portion of the rear drive gear from a goldwing 1500 gear, but I am not sure how that works. ie finding a goldwing 1500 gear with good splines, dissemble and remove my rear drive gear; finding a good machine shop which can do the pressing, than reassembling my final drive. In the end does that really save much money, and you still have used splines in your final drive. I found the new oem drive flange set available for $155 and new oem final gear set for $287. I guess I could have the splines pressed off an new gear and pressed onto my gear. Any way I look at it It's going to run $500 to $700. Just trying to figure the best way to go.
John R
Austin Texas
|
|
|
|
|
Logged
|
|
|
|
|
98valk
|
|
« Reply #6 on: May 26, 2020, 01:38:51 PM » |
|
So I read about pressing in the splined portion of the rear drive gear from a goldwing 1500 gear, but I am not sure how that works. ie finding a goldwing 1500 gear with good splines, dissemble and remove my rear drive gear; finding a good machine shop which can do the pressing, than reassembling my final drive. In the end does that really save much money, and you still have used splines in your final drive. I found the new oem drive flange set available for $155 and new oem final gear set for $287. I guess I could have the splines pressed off an new gear and pressed onto my gear. Any way I look at it It's going to run $500 to $700. Just trying to figure the best way to go.
John R
Austin Texas
all u need is a 10 ton press. sometimes on sale or 20% off coupon. looks like they only have 12 ton now. https://www.harborfreight.com/12-ton-shop-press-33497.htmleasy to do to. you'll need the right size sockets or other pressing tools such as a Ball Joint Adapter Set I had both avail. put everything in freezer overnight, then before press spray some penetrating oil. make sure u use the same ring gear shim that was in your final drive, that way no problem with the gears being set up properly. |
|
|
|
|
Logged
|
1998 Std/Tourer, 2007 DR200SE, 1981 CB900C 10speed
1973 Duster 340 4-speed rare A/C, 2001 F250 4x4 7.3L, 6sp
"Our Constitution was made only for a Moral and Religious people. It is wholly inadequate to the goverment of any other."
John Adams 10/11/1798
|
|
|
|
The emperor has no clothes
|
|
« Reply #7 on: May 26, 2020, 03:40:52 PM » |
|
Yes the nylon thrust washer was missing, The wheel surface is roughed up, but now step worn in it, should be able to be turned for refaced. The bike has 78,000 miles and has been down so is only worth about 2k to 2.5k but I don't want to just junk it for bad final drive splines. The used final drives for sale on Ebay, either don't show the splines in the photos, or show them but can't tell there condition.
If I'm understanding you correctly, you plan on turning the wheel down on a milling machine ? If so, I think that will result in more damage. That will throw off the correct thickness, and result in wobbling of the wheel or pinching down of the spacer in the rear end. The only way I see this could work would building the shoulder up with TIG welding, then machining it to the correct dimensions. |
|
|
|
|
Logged
|
|
|
|
gordonv
Member

Posts: 5766
VRCC # 31419
Richmond BC
|
|
« Reply #8 on: May 26, 2020, 04:49:10 PM » |
|
Any way I look at it It's going to run $500 to $700.
Austin Texas
i see you add your location in each of your posts, you can add it to your profile, and others will be able to find where you are easier, might get offers of help too. I bought my spare GW rear drive for $25, free shipping, but it was years ago. Now they are less than $100, but not always. From what I read, you can do it yourself, but I hope to never have to learn how. At least there is someone close by, within 3 hr drive, who I figure might help out, who's done it before. |
|
|
|
|
Logged
|
1999 Black with custom paint IS   |
|
|
|
Avanti
|
|
« Reply #9 on: May 26, 2020, 05:52:46 PM » |
|
Yes the nylon thrust washer was missing, The wheel surface is roughed up, but now step worn in it, should be able to be turned for refaced. The bike has 78,000 miles and has been down so is only worth about 2k to 2.5k but I don't want to just junk it for bad final drive splines. The used final drives for sale on Ebay, either don't show the splines in the photos, or show them but can't tell there condition.
If I'm understanding you correctly, you plan on turning the wheel down on a milling machine ? If so, I think that will result in more damage. That will throw off the correct thickness, and result in wobbling of the wheel or pinching down of the spacer in the rear end. The only way I see this could work would building the shoulder up with TIG welding, then machining it to the correct dimensions. It can be built up and than machined to original condition or machined and than set up using additional thrust washer. |
|
|
|
|
Logged
|
|
|
|
|
Calboy
|
|
« Reply #10 on: May 26, 2020, 06:13:08 PM » |
|
Help, just replaced my rear tire on my 99 Tourer. Found spacer between drive flange and rear wheel was missing. Both sets of splines (final drive female and drive flange male) are completely shot. Searched forum and found several options: Used final drive ($500 to $700) ebay; new Gear set $300, used goldwing 1500 and press out spline and press into my final drive gear. Has anyone rebuilt there final drive with new gear set. How difficult is it. How is proper gear lash achieved (spacer shims on small gear shaft). Does anyone know a shop or owner who rebuilds final drives? Totally bummed my Dragon is down right before summer.
John Reinschmidt
Austin Texas
What part number on the diagram of the final driven gear is the spacer you're talking about? |
|
|
|
|
Logged
|
|
|
|
|
CoreyP
|
|
« Reply #11 on: May 26, 2020, 09:36:12 PM » |
|
So I read about pressing in the splined portion of the rear drive gear from a goldwing 1500 gear, but I am not sure how that works. ie finding a goldwing 1500 gear with good splines, dissemble and remove my rear drive gear; finding a good machine shop which can do the pressing, than reassembling my final drive. In the end does that really save much money, and you still have used splines in your final drive. I found the new oem drive flange set available for $155 and new oem final gear set for $287. I guess I could have the splines pressed off an new gear and pressed onto my gear. Any way I look at it It's going to run $500 to $700. Just trying to figure the best way to go.
John R
Austin Texas
all u need is a 10 ton press. sometimes on sale or 20% off coupon. looks like they only have 12 ton now. https://www.harborfreight.com/12-ton-shop-press-33497.htmleasy to do to. you'll need the right size sockets or other pressing tools such as a Ball Joint Adapter Set I had both avail. put everything in freezer overnight, then before press spray some penetrating oil. make sure u use the same ring gear shim that was in your final drive, that way no problem with the gears being set up properly. You didn't say which parts to freeze which is important. You want the gears you are pressing to be warm, what you are pressing on to needs to be cold. |
|
|
|
|
Logged
|
|
|
|
|
jrflyboyVP2
|
|
« Reply #12 on: May 27, 2020, 05:24:58 AM » |
|
Thanks for all the replies. I have a neighbor with a 12 ton press, so I could probably do it. Looking for a GW 1500 rear drive with good splines. Most Ebay sellers don't show good pictures of the splines so it's hard to know if your getting a servicable part.
JR
|
|
|
|
|
Logged
|
|
|
|
|
jrflyboyVP2
|
|
« Reply #13 on: May 27, 2020, 05:36:49 AM » |
|
found this online:
1998 98 HONDA GOLDWING 1500 GL1500 GL 1500 FINAL DRIVE GEAR DIFFERENTIAL REAR
Regular price
$58.06
not sure how to post picture
|
|
|
|
|
Logged
|
|
|
|
hubcapsc
Member
Posts: 16804
upstate
South Carolina
|
|
« Reply #14 on: May 27, 2020, 06:11:22 AM » |
|
That's probably this one:  Can't tell with excruciating accuracy with this fuzzy picture of goopy splines, but it looks like it might be good... The five finger flanges on 1500 wings are the same as ours, it is worthwhile to try and get the flange that was mated to the final if it is available. -Mike |
|
|
|
|
Logged
|
|
|
|
|
98valk
|
|
« Reply #15 on: May 27, 2020, 06:42:10 AM » |
|
So I read about pressing in the splined portion of the rear drive gear from a goldwing 1500 gear, but I am not sure how that works. ie finding a goldwing 1500 gear with good splines, dissemble and remove my rear drive gear; finding a good machine shop which can do the pressing, than reassembling my final drive. In the end does that really save much money, and you still have used splines in your final drive. I found the new oem drive flange set available for $155 and new oem final gear set for $287. I guess I could have the splines pressed off an new gear and pressed onto my gear. Any way I look at it It's going to run $500 to $700. Just trying to figure the best way to go.
John R
Austin Texas
all u need is a 10 ton press. sometimes on sale or 20% off coupon. looks like they only have 12 ton now. https://www.harborfreight.com/12-ton-shop-press-33497.htmleasy to do to. you'll need the right size sockets or other pressing tools such as a Ball Joint Adapter Set I had both avail. put everything in freezer overnight, then before press spray some penetrating oil. make sure u use the same ring gear shim that was in your final drive, that way no problem with the gears being set up properly. You didn't say which parts to freeze which is important. You want the gears you are pressing to be warm, what you are pressing on to needs to be cold. yep, left that out, I did use a heat gun low setting on the ring gear before I pressed then apart. thanks |
|
|
|
|
Logged
|
1998 Std/Tourer, 2007 DR200SE, 1981 CB900C 10speed
1973 Duster 340 4-speed rare A/C, 2001 F250 4x4 7.3L, 6sp
"Our Constitution was made only for a Moral and Religious people. It is wholly inadequate to the goverment of any other."
John Adams 10/11/1798
|
|
|
hubcapsc
Member
Posts: 16804
upstate
South Carolina
|
|
« Reply #16 on: May 27, 2020, 07:07:55 AM » |
|
I never used heat or cold on any of the ones I did. The feller
down at the machine shop pressed them in and pressed
them out with no thought to cold and hot.
I once put some rear wheel bearings in the freezer before
installing them. As I was rushing to install them while they
were still cold, I forgot to put in the distance spacer.
-Mike "ymmv"
|
|
|
|
|
Logged
|
|
|
|
|
jrflyboyVP2
|
|
« Reply #17 on: May 27, 2020, 08:38:23 AM » |
|
I found a used Valkyrie final drive in Luling Tx on Ebay for $499 the seller didn't show the splines but I contacted him and am going to meet him in Luling to check it out. If they are good I'll probably just buy it. It includes the Flange set so if good all I would need is the orings, nylon thrust washer, and dampers, bolts, plus some good waterproof grease (belray?). Total cost about $580. Unfortunately I do not have attachments enabled under additional options, so I can't post pictures of my progress. Do I have to contact the moderator to get permission? If I go the GW1500 used, dissemble press out method it would be about $150 to $200 pretty good savings.
JR
|
|
|
|
|
Logged
|
|
|
|
|
..
|
|
« Reply #18 on: May 27, 2020, 09:45:21 AM » |
|
Unfortunately I do not have attachments enabled under additional options, so I can't post pictures of my progress.
https://postimages.org/Create an account using the SIGN UP box top right. Create a new gallery by clicking on the box towards the top left Upload photos. Do a max of 4 at a time or it can take too long. Once uploaded put your cursor on the image you want to put on the VRCC forum Now move your cursor to the symbol to left of the trash bin symbol Click on it Now copy the "Hotlink" for forums. Now go to the VRCC post you want the photo to appear in and right click and paste. Once you then post your comment the photo should appear for all to see. |
|
|
|
|
Logged
|
|
|
|
|
jrflyboyVP2
|
|
« Reply #19 on: May 27, 2020, 11:56:33 AM » |
|
I am confused about the photo posting. I click on Photostash and it asks for member number and password. I don't know what my member number is. It's not listed in my profile. I followed the link on the above instructions and created a login but don't know how to get back to it. Is that app different from photostash
|
|
|
|
|
Logged
|
|
|
|
hubcapsc
Member
Posts: 16804
upstate
South Carolina
|
|
« Reply #20 on: May 27, 2020, 01:45:51 PM » |
|
I am confused about the photo posting. I click on Photostash and it asks for member number and password. I don't know what my member number is. It's not listed in my profile. I followed the link on the above instructions and created a login but don't know how to get back to it. Is that app different from photostash
Probably skip photostash... what almost all of us (99.9% of us) do is post our pictures on some free image hosting site and then just reference them in our posts... For example... I have an image (jpeg) stored here: https://sites.google.com/site/hubcapsite1/fcr2016/randy.jpgIf I type it into my post like this:  It shows up in my post like this:  -Mike |
|
|
|
|
Logged
|
|
|
|
|
indybobm
|
|
« Reply #21 on: May 28, 2020, 07:57:22 AM » |
|
I found a used Valkyrie final drive in Luling Tx on Ebay for $499 the seller didn't show the splines but I contacted him and am going to meet him in Luling to check it out. If they are good I'll probably just buy it. It includes the Flange set so if good all I would need is the orings, nylon thrust washer, and dampers, bolts, plus some good waterproof grease (belray?). Total cost about $580. Unfortunately I do not have attachments enabled under additional options, so I can't post pictures of my progress. Do I have to contact the moderator to get permission? If I go the GW1500 used, dissemble press out method it would be about $150 to $200 pretty good savings.
JR
If the Valkyrie Final Drive looks good, I would do both. Swap out the splines on your old FD and repair as a spare using the GW splines. Remember the GW Pinion cup is the same as yours. |
|
|
|
|
Logged
|
So many roads, so little time
VRCC # 5258
|
|
|
|
jrflyboyVP2
|
|
« Reply #22 on: May 28, 2020, 08:17:40 AM » |
|
The splines on the used final drive I bought yesterday look good. So I ordered O rings, Thrust Washer, Damper set, bolts, and some Belray water proof grease. Will be swapping it all out when new parts arrive. Will plan on rebuilding my old final drive with swap out GW1500 splines at some point for a spare. One question I have is during my research on this board, I read somewhere that someone doubled up the thrust washer to keep the Flange set firmly seated in the final drive. Anyone tried this. I know I caused my spline failure because I removed the 4 nuts and lubed the drive shaft pinion cup, than tightened the 4 nuts, than installed the wheel ( with moly paste) leaving out the thrust washer by accident. So I made both major assembly errors causing rapid destruction of my splines (approximately 10,000 miles like that).
|
|
|
|
|
Logged
|
|
|
|
|
Chrisj CMA
|
|
« Reply #23 on: May 28, 2020, 08:25:05 AM » |
|
Did the new to you final drive come with the flange? Your old one certainly won’t be acceptable in the new set up.
|
|
|
|
|
Logged
|
|
|
|
|
|
hubcapsc
Member
Posts: 16804
upstate
South Carolina
|
|
« Reply #25 on: May 28, 2020, 08:28:30 AM » |
|
I read somewhere that someone doubled up the thrust washer ... I know I caused my spline failure ... leaving out the thrust washer by accident. I'd say: don't leave nuthin' out, don't add nuthin' extra  -Mike
|
|
|
|
|
Logged
|
|
|
|
|
jrflyboyVP2
|
|
« Reply #26 on: May 28, 2020, 08:28:50 AM » |
|
yes got the flange. I included the link to the pictures I uploaded to post image.org, but they don't show in my post. Not sure what I did wrong.
JR
|
|
|
|
|
Logged
|
|
|
|
hubcapsc
Member
Posts: 16804
upstate
South Carolina
|
|
« Reply #27 on: May 28, 2020, 08:29:52 AM » |
|
not sure if it's going to work.
Close enough... your stuff looks GOOD.
add the image tags around your URLs and your pictures will show up.
-Mike
|
|
|
|
|
Logged
|
|
|
|
|
jrflyboyVP2
|
|
« Reply #28 on: May 28, 2020, 08:30:17 AM » |
|
gonna try the hotlink for forums 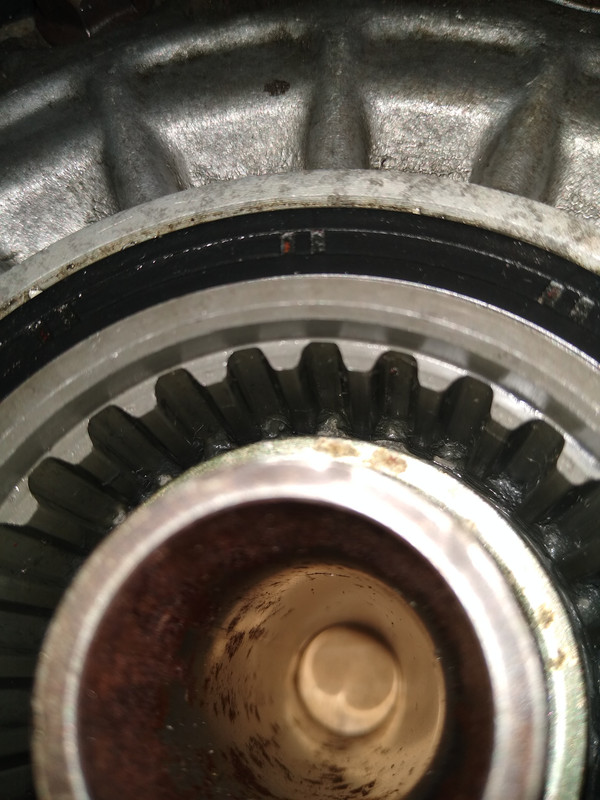 |
|
|
|
|
Logged
|
|
|
|
|
jrflyboyVP2
|
|
« Reply #29 on: May 28, 2020, 08:31:53 AM » |
|
Worked, the one above is obviously the FD female splines, Here is the Flange set male splines. 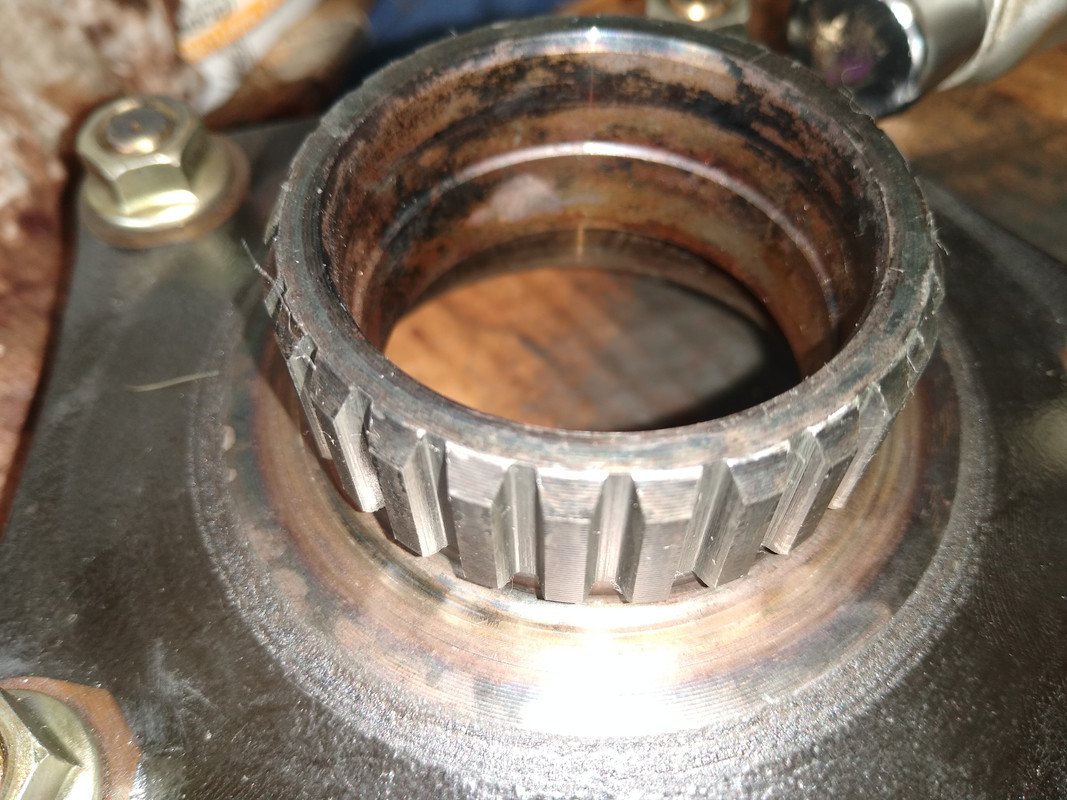 |
|
|
|
|
Logged
|
|
|
|
|
jrflyboyVP2
|
|
« Reply #30 on: May 28, 2020, 08:37:27 AM » |
|
Yes, I'm a happy camper! Looks like good splines but $450 plus another $80 for dampers, o rings, thrust washer, bolts, expensive mistake. I should have searched this forum and it all could have been avoided. Learned a valuable lesson. Now the only other issue is the condition of my rear wheel. May have to reface, or replace we'll see. When I get my old one all apart, will post picture of the damage.
JR
|
|
|
|
|
Logged
|
|
|
|
|
jrflyboyVP2
|
|
« Reply #31 on: May 28, 2020, 08:45:42 AM » |
|
For anyone interested here is a picture of my Valk in Glacier park Montana last summer. Right after I lubed the splines (pinion cup and Final Drive) and reassembled it all wrong, I rode from Austin Texas up to New Hampshire for nieces wedding and back, than to Colorado and up to Glacier park via Cody Wy, Chief Joseph pass, Beartooth pass to Red Lodge, than back roads up to Glacier, than down to New Mexico, than back to Austin. All the while unbeknownst to me destroying my final drive splines. The Ducati in my younger brothers.  |
|
|
|
|
Logged
|
|
|
|
|
old2soon
|
|
« Reply #32 on: May 28, 2020, 09:34:13 AM » |
|
Most if Not All maint stuff on Our Phatt Ghurls have Definite sequences of reinstall. And I'm afraid you learned your personal lesson post Expensive tragedy and by yer own words avoidable. I'm NOT attempting to rub salt into an open wound. My own little Expensive screw up you ask?  Not realizing there Is one long and Only One Long bolt that hold the pods on an Interstate. Cost me a radiator plus labor plus lost ridin days!  3 O-rings and a thrust washer on the rear drive setup and a dab of grease on the thrust washer Should hold it in place on reinstall. And Again I can NOT stress SEQUENCE of reinstall strongly enough.  And good luck on future maint projects and I Trust you Will read up a bit!  RIDE SAFE. |
|
|
|
|
Logged
|
Today is the tommorow you worried about yesterday. If at first you don't succeed screw it-save it for nite check. 1964 1968 U S Navy. Two cruises off Nam.
VRCCDS0240 2012 GL1800 Gold Wing Motor Trike conversion
|
|
|
|
RonW
|
|
« Reply #33 on: May 28, 2020, 09:42:25 AM » |
|
..... the only other issue is the condition of my rear wheel. - May have to reface, or replace we'll see.
Don't know if what you mean is the damper plate is gouged up. That's replaceable (6).   |
|
|
|
|
Logged
|
2000 Valkyrie Tourer
|
|
|
|
Fazer
|
|
« Reply #34 on: May 28, 2020, 09:53:13 AM » |
|
For anyone interested here is a picture of my Valk in Glacier park Montana last summer. Right after I lubed the splines (pinion cup and Final Drive) and reassembled it all wrong, I rode from Austin Texas up to New Hampshire for nieces wedding and back, than to Colorado and up to Glacier park via Cody Wy, Chief Joseph pass, Beartooth pass to Red Lodge, than back roads up to Glacier, than down to New Mexico, than back to Austin. All the while unbeknownst to me destroying my final drive splines. The Ducati in my younger brothers.
No one would accuse you of letting her sit--that's a lot of riding! I have the same color combo. Must have been a lot of them made those years. At Inzane each year, Daniel Meyer, one of the several Valkyrie sensi does a technical session on some maintenance program. Last couple of years he has gone thru the process of removing the rear wheel and servicing the final drive. very informative and appreciated by everyone that attends. He uses his own bike after riding in from Texas. |
|
|
|
|
Logged
|
Nothing in moderation...
|
|
|
hubcapsc
Member
Posts: 16804
upstate
South Carolina
|
|
« Reply #35 on: May 28, 2020, 10:12:13 AM » |
|
Don't know if what you mean is the damper plate is gouged up.
I think he's worried that the wheel is worn where the thrust washer
should have been...
-Mike
|
|
|
|
|
Logged
|
|
|
|
John Schmidt
Member
Posts: 15348
a/k/a Stuffy. '99 I/S Valk Roadsmith Trike
De Pere, WI (Green Bay)
|
|
« Reply #36 on: May 28, 2020, 10:17:02 AM » |
|
You're doing something wrong while using Postimage, it shouldn't show the link but the actual picture. Once uploaded to Postimage, put your cursor on the pic you want to show. At the top are two icons, a trash barrel and a sideways V that looks kinda like this: <. Click on that "<" and the next screen shows a number of choices, you want the 2nd from the bottom choice. Click on that at the far right and it will say "copied." Then go to your post and place your cursor where you want the picture to show and click. Next go to "preview" and the pic will show just as it will show when posted. Now click post and there's the picture, not the link. You never have to "copy/paste", the program does it for you as shown below.
Basically it's 3 clicks to post a picture from Postimage.
1) cursor on the pic and click the "lazy <"
2) click the 2nd from bottom choice on next screen
3) click on your post where you want the pic to show....always check your post in Preview before posting.
|
|
|
|
|
Logged
|
|
|
|
|
RonW
|
|
« Reply #37 on: May 28, 2020, 12:27:42 PM » |
|
I think he's worried that the wheel is worn where the thrust washer
should have been...
-Mike
Logically. And the bearing's probably rounded off as well (another forum member's pic, below). It's just that jrflyboyVP2 stated he had bought a new 5-star flange thus the seat for the thrust washer wouldn't have been an issue. However, he added, "Now the only other issue is the condition of my rear wheel. May have to reface, or replace we'll see." Come in, jrflyboyVP2It's.  |
|
|
|
|
Logged
|
2000 Valkyrie Tourer
|
|
|
|
Pluggy
|
|
« Reply #38 on: May 29, 2020, 05:22:13 AM » |
|
Is there any advantage to purchasing the gear set and drivien flange as new parts? Yes it is expensive, but used parts on eBay are often disappointing. You would not need a press. It doesn't look complicated, but I have not tried it, either.
|
|
|
|
|
Logged
|
|
|
|
|
jrflyboyVP2
|
|
« Reply #39 on: May 29, 2020, 05:24:56 AM » |
|
Ron, my flange and wheel don't look near as bad as yours did. I don't have the step on the wheel surface outside the bearing, just some marring and pitting type marks, and my bearing looks fine. When I get it off i will post pictures. I read your post and saw you had the wheel machined. Did you have to add an additional shim, or did they weld on material and than machine it back to original surface level. When torqued up, the pressure is on the bearing race. My understanding is the aluminum surface of the wheel outside the bearing is only pushing on the nylon thrust washer keeping the flange assembly pressed into the final drive. I note if you pull the flange assembly just a 1/16 inch out from fully seated it can wobble and move around quite a bit, so I think assembly procedure (torque axle bolt 81ft-lb before tighten 4 nuts on drive shaft tube) is very important because slight alignment error will cause a wobble of the spline assemblies with each rotation of the wheel. Of course old dampers and wrong assembly sequence with no thrust washer is a recipe for spline disaster. I hope others can learn from my mistake. Waiting on parts now
regards, JR
|
|
|
|
|
Logged
|
|
|
|
|


