|
Morse
|
 |
« on: October 16, 2020, 08:46:51 AM » |
|
98 STD 40,000 miles
So I think I've been driving around with sheared rivets. I've had the bike running for around a year, it's my daily driver, no real issues. My dad was in town this weekend and took the Valk for a spin. He thought it was shifting funny. It's shifting the same way it always has for me but that doesn't mean it hasn't had an issue this whole time.
I did some research on here and found that I have some symptoms of sheared rivets but not all of them. The one big symptom (besides my dad's reported rough shifting) is that occasionally my clutch lever will only pull about 3/4 of the way to the grip. This will happen once or twice, then the lever will pull to the grip again and be fine. The 3/4 pull appears to have no affect on the function of the clutch.
There is no noticeable clutch drag at stop lights and the bike drives fine, no clutch slipping, clutch always engages/disengages at the same point.
Some other oddities that might be relevant:
-When the engine is cold, if I engine brake in second it will sometimes slip into neutral. This only happened three times (then again I don't engine brake in second anymore...or much at all after reading that engine braking is thought to possibly cause the shearing)
-I cannot shift down to first when going over ten or fifteen mph. There is a grinding noise when I try and the bike only goes to neutral. Under ten it shifts right into first.
-Shifting up from first to second requires a good deal of force applied to the shifter to get it over neutral. Neutral to second is easy though.
So my question is: Is there anything else I should check before ordering a new damper plate and gasket?
|
|
|
|
|
 Logged
|
|
|
|
|
F6Dave
|
|
« Reply #1 on: October 16, 2020, 06:13:40 PM » |
|
Sounds like sheared rivets. When the lever hits a hard stop part of the way, a rivet has sheared and is stuck between the plates. Centrifugal force will spit the rivet out, and it feels normal for a while, until the next one shears. Unfortunately with fewer rivets the process accelerates and more and more shear.
The fix isn't as difficult as you might think. The rear clutch location makes it more work than a typical clutch located on the side, but once on a lift the job can be done in a few hours without exotic tools. I have some pictures of a few shortcuts if you do it yourself.
|
|
|
|
« Last Edit: October 17, 2020, 07:29:50 AM by F6Dave »
|
Logged
|
|
|
|
|
Morse
|
|
« Reply #2 on: October 17, 2020, 07:26:24 AM » |
|
Ah thanks F6Dave, that's the confirmation I was looking for. Just wanted to make sure the symptoms were consistent with what other people experienced from shearing rivets. I will order my dampener plate. I am doing it myself. It really doesn't seem too bad. I would appreciate the pictures though, I'm a big fan of shortcuts. My email is johnc8821@gmail.com or I can check back on here if it's easier for you to post them on this site. Big thanks Dave. |
|
|
|
|
Logged
|
|
|
|
|
F6Dave
|
|
« Reply #3 on: October 17, 2020, 07:33:11 AM » |
|
Here's my old post on the clutch project. I only cover the tricky parts since most of the job is very easy. After many months I finally got around to replacing the clutch on my ’98 Tourer. As some others have experienced, the rivets in the damper plate failed. This is not uncommon on some high mileage Valks. The job took several hours, but was not difficult at all. Getting the center plastic cover off was more of a PITA than any of the other work. Clearance isn’t as good as in a bike with a more typical transversely mounted engine, but once you have it on a lift with a few pieces removed (I didn’t even remove the tank) there is plenty of clearance to remove the rear cover and clutch center pack without any special tools (not even a wobble joint for your ratchet). Here are of a couple of things I learned: I’d read that the disk alignment must nearly perfect or the compressed clutch center pack will not fit back into the basket. I used a couple of large washers and a spring in 2 places to hold the pack together with some light pressure. This allowed me to align the disks in the basket, and keep them aligned when I compressed the diaphragm spring and replaced the circlip. 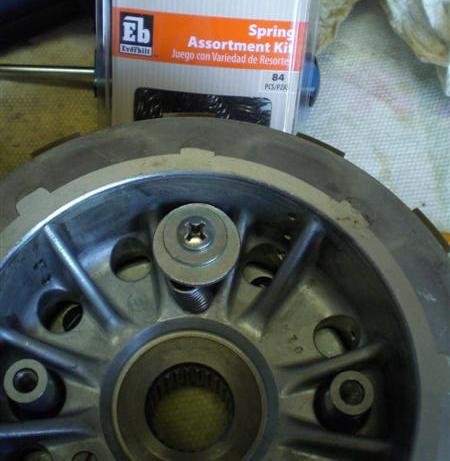 Speaking of compressing the spring, I made a simple tool out of a 2x4, long bolt, a plastic pipe fitting, and an old lawnmower blade. I knew that blade would come in handy one day! This allowed me to use straight tips on the circlip pliers which seem to work better than 90 or 45 degree tips. 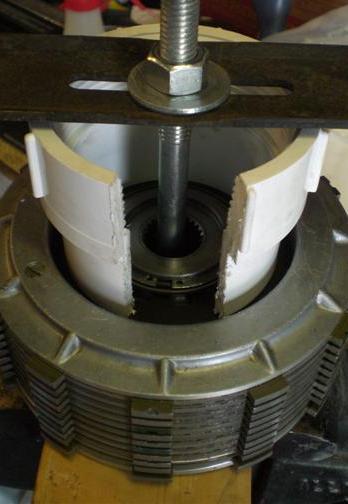 While I used an impact wrench to remove the big clutch nut, I wanted to torque the new one to the Honda spec. Here’s a simple clutch holder tool I made from another 2x4. Someone asked about all those nuts and spacers. I used them since two of the bolts were too long and I didn't want to go back to the hardware store.  |
|
|
|
« Last Edit: October 17, 2020, 07:46:00 AM by F6Dave »
|
Logged
|
|
|
|
|
F6Dave
|
|
« Reply #4 on: October 17, 2020, 07:41:30 AM » |
|
Here's a little more info. Since I had to remove the clutch anyway, I ordered more that the damper plate. I also ordered a set of the fiber plates, but not the steel plates. The manual said to use a new gasket, diaphragm spring, and the big nut, so I got those as well. However, the old gasket looked great and was glued so nicely to the cover that I left it alone. I measured the spring height and it was still within spec. The big nut looked fine too. And the old plates didn't look any different than the new ones. The bottom line is I replaced all those parts (except the gasket) as long as I had them, but in reality I could have simply replaced the damper plate. It's your call as the parts aren't that expensive.
|
|
|
|
|
Logged
|
|
|
|
gordonv
Member

Posts: 5766
VRCC # 31419
Richmond BC
|
|
« Reply #5 on: October 17, 2020, 07:56:16 AM » |
|
Wasn't this something that happened to a few early productions Valks. In other words, a production run of parts.
|
|
|
|
|
Logged
|
1999 Black with custom paint IS   |
|
|
|
F6Dave
|
|
« Reply #6 on: October 17, 2020, 08:08:13 AM » |
|
Wasn't this something that happened to a few early productions Valks. In other words, a production run of parts.
I remember reading that there was a bad batch of damper plates. I've only heard of rivets shearing on '97 and '98 models. I'm convinced the rear wheel bearing problems are also due to a bad batch. There was a rash of failures years ago. Mine failed at 50K, but the replacement from NAPA has been fine for 125K additional miles. My one year newer Interstate hasn't had the problem in over 100K miles. |
|
|
|
« Last Edit: October 17, 2020, 11:04:12 AM by F6Dave »
|
Logged
|
|
|
|
|
Jess from VA
|
|
« Reply #7 on: October 17, 2020, 11:29:23 AM » |
|
I lost the infamous single row rear left wheel bearing on my 99 interstate.
Not at all uncommon.
Did the double row mod (with cut spacer) on both interstates, and good for years now.
|
|
|
|
|
Logged
|
|
|
|
|
Hook#3287
|
|
« Reply #8 on: October 18, 2020, 03:50:06 PM » |
|
I've only heard of rivets shearing on '97 and '98 models. It happened to my 99 Tourer. |
|
|
|
|
Logged
|
|
|
|
|
The emperor has no clothes
|
|
« Reply #9 on: October 18, 2020, 05:07:07 PM » |
|
I've only heard of rivets shearing on '97 and '98 models. It happened to my 99 Tourer. 99 Interstate @ 130k |
|
|
|
|
Logged
|
|
|
|
|
F6Dave
|
|
« Reply #10 on: October 18, 2020, 06:25:17 PM » |
|
Make that 97, 98, and...
99!
It still sounds like a bad batch of damper plates, as the later years don't appear to be affected. And I've not heard of recurrences on bikes that were repaired. Honda has a good track record for updating parts that fail. For example, they redesigned the 4th and 5th gearsets in GL1800s due to a few complaints about 'ghost shifting'.
|
|
|
|
|
Logged
|
|
|
|
Valkpilot
Member
Posts: 2151
What does the data say?
Corinth, Texas
|
|
« Reply #11 on: October 18, 2020, 06:52:57 PM » |
|
98 STD 40,000 miles
So I think I've been driving around with sheared rivets. I've had the bike running for around a year, it's my daily driver, no real issues. My dad was in town this weekend and took the Valk for a spin. He thought it was shifting funny. It's shifting the same way it always has for me but that doesn't mean it hasn't had an issue this whole time.
I did some research on here and found that I have some symptoms of sheared rivets but not all of them. The one big symptom (besides my dad's reported rough shifting) is that occasionally my clutch lever will only pull about 3/4 of the way to the grip. This will happen once or twice, then the lever will pull to the grip again and be fine. The 3/4 pull appears to have no affect on the function of the clutch.
There is no noticeable clutch drag at stop lights and the bike drives fine, no clutch slipping, clutch always engages/disengages at the same point.
Some other oddities that might be relevant:
-When the engine is cold, if I engine brake in second it will sometimes slip into neutral. This only happened three times (then again I don't engine brake in second anymore...or much at all after reading that engine braking is thought to possibly cause the shearing)
-I cannot shift down to first when going over ten or fifteen mph. There is a grinding noise when I try and the bike only goes to neutral. Under ten it shifts right into first.
-Shifting up from first to second requires a good deal of force applied to the shifter to get it over neutral. Neutral to second is easy though.
So my question is: Is there anything else I should check before ordering a new damper plate and gasket?
Sounds like you've diagnosed correctly. Not a bad job as others have pointed out. http://www.valkyrieforum.com/bbs/index.php/topic,20870.0.htmlBTW, I have two clutch pack in their baskets. If you're interested in one, PM me. You could rebuild on the bench then do a quick swap in the bike. |
|
|
|
|
Logged
|
VRCC #19757 IBA #44686 1998 Black Standard 2007 Goldwing   |
|
|
|
F6Dave
|
|
« Reply #12 on: October 19, 2020, 06:35:31 AM » |
|
Valkpilot's detailed step by step instructions were posted several months before my damper plate failed, and were immensely helpful when I repaired mine. His warnings about aligning the plates caused my biggest concern, as I'd read another post about needing to go through the align/compress routine many times before the pack would fit into the basket. That's why I came up with my method of holding the clutch pack together. I used 2 screws, 4 large flat washers, and a pair of springs from a cheap Home Depot assortment. That held the pack together with enough pressure so you could only move the plates with determined effort. With the basket still in the bike I jiggled a few plates until the pack slid in perfectly. Then I pulled it out, still precisely aligned, and compressed it with my lawnmower blade compressor. The compressed pack fit perfectly on the first try. Unless you have a basked laying around I'd highly recommend this method. |
|
|
|
« Last Edit: October 19, 2020, 08:29:21 AM by F6Dave »
|
Logged
|
|
|
|
|
Morse
|
|
« Reply #13 on: October 25, 2020, 09:02:40 AM » |
|
Thanks Dave, all that info is greatly appreciated. Was out of town cruising the KLR in Arkansas and didn't get on here for a bit. Thanks for the clutch pack and basket offer Valkpilot, I just got my damper plate in and I'm going to attempt the swap with what I have at my disposal right now but will keep your offer in mind if I run into issues.
|
|
|
|
|
Logged
|
|
|
|
|
rug_burn
|
|
« Reply #14 on: October 28, 2020, 11:20:49 AM » |
|
I did that to my '97 which also had sheared rivets, but I pulled the swing arm off. I couldn't tell from some of the pictures, but is that always necessary?
If not, I'll fear it less next time.
|
|
|
|
|
Logged
|
...insert hip saying here..
|
|
|
|
The emperor has no clothes
|
|
« Reply #15 on: October 28, 2020, 11:49:57 AM » |
|
I did that to my '97 which also had sheared rivets, but I pulled the swing arm off. I couldn't tell from some of the pictures, but is that always necessary?
If not, I'll fear it less next time.
No, it's not necessary. (Hopefully there won't be a next time) |
|
|
|
|
Logged
|
|
|
|
|
F6Dave
|
|
« Reply #16 on: October 28, 2020, 01:07:56 PM » |
|
I only removed the side stand and the plastic center and side covers. Didn't even remove the tank. There's a surprising amount of room to work in there.
|
|
|
|
|
Logged
|
|
|
|
|
Morse
|
|
« Reply #17 on: October 28, 2020, 01:53:29 PM » |
|
Job was finished up last night. Overall it was much easier than it looked. I took the alternator, gas tank, kickstand, center cover(best to take this off before the alt), side covers, and seat off, which made access and view better. Particularly important since I did this on the ground (in the grass actually, using plywood and a loading ramp under the front tire with ratchet straps to hold the bike upright). Worst part for me was the snap ring. For anyone doing this in the future I would suggest getting a decent pair of pull-apart snap-ring pliers, 45 degree ones would have been best for the way I did it. Make sure they open wide too, over an inch at least. I tried first with those cheap, multi-headed ones from harbor freight but they couldn't open wide enough. I made a tool to hold down the spring which requires a minimal amount of cutting and finagling: A 2X4 with a hole through it, eight inches of threaded rod (must be 5/16" or smaller), one flat washer, one lock-type washer, two nuts, and a three legged oil filter wrench, the kind that expand and contract and go around the front of an oil filter (8 bucks at walmart). The 5/16" rod fits thought the 3/8" ratchet hole and the legs expand to sit where ever you need them, tighten it down from there. The best part of this is the access to the rear and sides of the snap-ring, which makes putting it back on much easier. This is the wrench I'm talking about: https://www.walmart.com/ip/Hyper-Tough-Adjustable-Oil-Filter-Wrench/797333184All I ended up needing was the damper plate. The gasket was still good, friction plates, basket and steels were fine. A few final notes for people doing this in the future: -The 14 bolts holding on the clutch cover are not all the same length(2 different lengths, I think). Make sure to keep them in order. -When the clutch cover comes off be prepared for a black, plastic circle with holes to come flying out. This is a sort of oil filter. If you look under the basket, on the brake-side of the case there is a hole where this filter goes. -The clutch center, damper plate, and the pressure plate all have an "o" marking that must line up when put back together. See 9-16 in the manual. -To get the clutch center nut off (staked on at 94 ft. lbs.) I did not use a tool to hold the clutch in place. With the bike in 5th and a big breaker bar (31mm socket but I used a 32mm with no problems) I held the rear brake and leaned over the bike to loosen the nut. The basket will spin a little before coming to a stop. The nut came off and went right back on the same way. -To align the plates (the part I most dreaded) I used two of the four bolts that hold the lifter plate on, two bushings, and washers. To me the bushings seemed easier than using springs and I wouldn't doubt just using washers would work in a pinch. With the two bolts back in the opposing holes they came from and the bushings/washers under them I was able to put the pack back in the basket and move the friction plates to where they needed to be. The bushings and bolts (don't crank these, a little pressure is enough) held the pack in position while I put the spring back on. They lined up and went back in the basket on the first try. -If you find the clutch pack will not come out of the basket and it feels as though there is suction holding it in, shift gears. This happened to me two times and both times a shift from 5th to 4th got it to come out. Thanks to F6Dave and Valkpilot for their write-ups and everyone else who chimed in. |
|
|
|
|
Logged
|
|
|
|
|
The emperor has no clothes
|
|
« Reply #18 on: October 28, 2020, 02:05:09 PM » |
|
Job was finished up last night. Overall it was much easier than it looked. I took the alternator, gas tank, kickstand, center cover(best to take this off before the alt), side covers, and seat off, which made access and view better. Particularly important since I did this on the ground (in the grass actually, using plywood and a loading ramp under the front tire with ratchet straps to hold the bike upright). Worst part for me was the snap ring. For anyone doing this in the future I would suggest getting a decent pair of pull-apart snap-ring pliers, 45 degree ones would have been best for the way I did it. Make sure they open wide too, over an inch at least. I tried first with those cheap, multi-headed ones from harbor freight but they couldn't open wide enough. I made a tool to hold down the spring which requires a minimal amount of cutting and finagling: A 2X4 with a hole through it, eight inches of threaded rod (must be 5/16" or smaller), one flat washer, one lock-type washer, two nuts, and a three legged oil filter wrench, the kind that expand and contract and go around the front of an oil filter (8 bucks at walmart). The 5/16" rod fits thought the 3/8" ratchet hole and the legs expand to sit where ever you need them, tighten it down from there. The best part of this is the access to the rear and sides of the snap-ring, which makes putting it back on much easier. This is the wrench I'm talking about: https://www.walmart.com/ip/Hyper-Tough-Adjustable-Oil-Filter-Wrench/797333184All I ended up needing was the damper plate. The gasket was still good, friction plates, basket and steels were fine. A few final notes for people doing this in the future: -The 14 bolts holding on the clutch cover are not all the same length(2 different lengths, I think). Make sure to keep them in order. -When the clutch cover comes off be prepared for a black, plastic circle with holes to come flying out. This is a sort of oil filter. If you look under the basket, on the brake-side of the case there is a hole where this filter goes. -The clutch center, damper plate, and the pressure plate all have an "o" marking that must line up when put back together. See 9-16 in the manual. -To get the clutch center nut off (staked on at 94 ft. lbs.) I did not use a tool to hold the clutch in place. With the bike in 5th and a big breaker bar (31mm socket but I used a 32mm with no problems) I held the rear brake and leaned over the bike to loosen the nut. The basket will spin a little before coming to a stop. The nut came off and went right back on the same way. -To align the plates (the part I most dreaded) I used two of the four bolts that hold the lifter plate on, two bushings, and washers. To me the bushings seemed easier than using springs and I wouldn't doubt just using washers would work in a pinch. With the two bolts back in the opposing holes they came from and the bushings/washers under them I was able to put the pack back in the basket and move the friction plates to where they needed to be. The bushings and bolts (don't crank these, a little pressure is enough) held the pack in position while I put the spring back on. They lined up and went back in the basket on the first try. -If you find the clutch pack will not come out of the basket and it feels as though there is suction holding it in, shift gears. This happened to me two times and both times a shift from 5th to 4th got it to come out. Thanks to F6Dave and Valkpilot for their write-ups and everyone else who chimed in. Glad it went well  could you post a pic of the tool you made ? I'm having a hard time visualizing it. |
|
|
|
|
Logged
|
|
|
|
gordonv
Member
Posts: 5766
VRCC # 31419
Richmond BC
|
|
« Reply #19 on: October 28, 2020, 05:15:24 PM » |
|
+1 on the tool. Also any pictures (too late) you might have taken.
You didn't expressly say that the rivets had sheared off, where there some in the bottom?
I like the note on the black filter. Just a strainer to keep chunks out of the engine block, and allow oil to drain back into the engine.
|
|
|
|
|
Logged
|
1999 Black with custom paint IS |
|
|
|
Bighead
|
|
« Reply #20 on: October 29, 2020, 06:14:08 AM » |
|
If that nut is indeed a 31mm and you used a 32mm. You got extremely lucky.
|
|
|
|
|
Logged
|
1997 Bumble Bee
1999 Interstate (sold)
2016 Wing
|
|
|
|
F6Dave
|
|
« Reply #21 on: October 29, 2020, 07:39:23 AM » |
|
I agree the snap ring is difficult to remove. I couldn't get it out with 90 degree tips on the pliers. That's why I used the lawnmower blade rather then another 2X4 to compress the pack, as it gave me the space to use straight tips on the pliers. I didn't need that cutout in the PVC after all. |
|
|
|
|
Logged
|
|
|
|
|


