John Schmidt
Member

Posts: 15372
a/k/a Stuffy. '99 I/S Valk Roadsmith Trike
De Pere, WI (Green Bay)
|
 |
« on: December 29, 2021, 02:51:51 PM » |
|
If I can get it warm enough in the garage to work then I want to pull the forks to change out the old oil. I'm sure it's been there since at least 2011 if not 1999. The trike conversion was in 2011, the bike is a '99 I/S. I was told by the factory they installed 2" fork extenders(conversions done at the factory) to maintain height to keep the trike level, but no mention of oil change or different springs.
So, I'm wondering what's involved in replacing the OEM with Progressive. I've done fork oil changes in the past but never springs, so wondering what's involved and the difficulty associated with the process. Does it take special tools, etc.?
|
|
|
|
|
 Logged
|
|
|
|
|
Chrisj CMA
|
|
« Reply #1 on: December 29, 2021, 02:54:49 PM » |
|
There are good YouTube videos for this
|
|
|
|
|
Logged
|
|
|
|
hubcapsc
Member
Posts: 16818
upstate
South Carolina
|
|
« Reply #2 on: December 29, 2021, 04:54:06 PM » |
|
I do it like the factory service manual says... works
great!
-Mike
|
|
|
|
|
Logged
|
|
|
|
John Schmidt
Member
Posts: 15372
a/k/a Stuffy. '99 I/S Valk Roadsmith Trike
De Pere, WI (Green Bay)
|
|
« Reply #3 on: December 29, 2021, 05:24:09 PM » |
|
I do it like the factory service manual says... works
great!
-Mike
Yes Mike, I have the factory manual but in many cases our membership has come up with better methods and also some new caveats. All I know at this time is the ride is harsh, if I hit a bump with the front wheel I can feel the jar clear to the upper body. Pretty hard on the arms and associated joints. I don't know if the springs were changed by the factory at trike kit install but doubt it. |
|
|
|
|
Logged
|
|
|
|
|
Warlock
|
|
« Reply #4 on: December 29, 2021, 08:11:31 PM » |
|
I do it like the factory service manual says... works
great!
-Mike
Yes Mike, I have the factory manual but in many cases our membership has come up with better methods and also some new caveats. All I know at this time is the ride is harsh, if I hit a bump with the front wheel I can feel the jar clear to the upper body. Pretty hard on the arms and associated joints. I don't know if the springs were changed by the factory at trike kit install but doubt it. Before changing anything remove 2 ozs from each side and try that. I have Goldwing 1800 springs in mine and with the oem fluid recommended mine felt like it would shock my hands every time I hit a bump. I removed 2 ozs from each side and now rides very well. David |
|
|
|
|
Logged
|
 I don't want to hear the labor pains, I just want to see the baby |
|
|
|
3W-lonerider
|
|
« Reply #5 on: December 30, 2021, 04:49:21 AM » |
|
i agree with warlock. before installing the progressive springs. or even after installing the springs. put 2 oz less oil in each fork when refilling them. if you put the regular amount of oil in the harshness isn't going to go away. it will be the same ride it was. also i ran 32# in my front tire. i ran bias ply tire in the front and not a radial. you will also need to re-install those fork extenders even if you switch springs. you will notice a difference using less oil.
|
|
|
|
|
Logged
|
|
|
|
|
Gideon
|
|
« Reply #6 on: December 30, 2021, 06:14:45 AM » |
|
I do it like the factory service manual says... works
great!
-Mike
Yes Mike, I have the factory manual but in many cases our membership has come up with better methods and also some new caveats. All I know at this time is the ride is harsh, if I hit a bump with the front wheel I can feel the jar clear to the upper body. Pretty hard on the arms and associated joints. I don't know if the springs were changed by the factory at trike kit install but doubt it. Before changing anything remove 2 ozs from each side and try that. I have Goldwing 1800 springs in mine and with the oem fluid recommended mine felt like it would shock my hands every time I hit a bump. I removed 2 ozs from each side and now rides very well. David  |
|
|
|
|
Logged
|
But they that wait upon the Lord shall renew their strength; they shall mount up with wings as eagles; they shall run and not be weary; they shall walk, and not faint. Isaiah 40:31
|
|
|
|
..
|
|
« Reply #7 on: December 30, 2021, 06:16:50 AM » |
|
If you decide to do the full strip these photos of when I did mine years ago might help. https://postimg.cc/gallery/7ZQt2pjThe following is from my memory - not always 100% Cover tank etc with towels/rags Bike on lift front wheel high enough to get a small jack under Undo pinch bolts at fork caps Loosen fork caps until completely unthreaded Raise front wheel so forks compress completely Remove right front fork cap. Have to try and grip the flat sided-round sided nut under the right fork cap. Can't use a wrench cause there are a couple of small flange parts sticking out. Hold this in place and undo fork cap. Count threads exposed Undo flat sided-round sided nut about half way up the threaded portion Thread bolt you have found in your workshop into hole Make sure it's a good fit Remove and wrap a coat hanger around it Screw back in Using a flat bladed screwdriver prise the flat sided-round sided nut away from the tube below to remove collar Remove collar that has a slot Slide the shiny bit up over your bolt and coat hanger Let front wheel jack down Now use another coat hanger with a slight hook on the end and fish down in the fork tube and remove the spring. SLOWLY to let the oil drain off. This is why you covered up in the beginning with towels/rags Slide new spring back over Raise front wheel back up Slide shiny bit back over wire and bolt Replace collar Remove bolt you have found in your workshop and turn flat sided-round sided nut down until you get to the amount of threads you counted earlier Left fork Insert special tool and undo completely remove Hook out fork spring SLOWLY to let oil drain off. Washer comes with it. Insert new spring AND then washer Now using special tool screw part back on. Needs 2 people cause you are pushing against the spring Lower front wheel Wait a couple of minutes for oil to drain down inside tube and then measure from top of fork tube. I did it with a bit of wood dowel as a dipstick. Adjust oil level as needed Screw on fork caps. Tighten pinch bolts. Bounce forks a couple of times Go for a short SLOW ride and test forks. If OK drink beer. |
|
|
|
« Last Edit: December 30, 2021, 06:18:58 AM by Britman »
|
Logged
|
|
|
|
hubcapsc
Member
Posts: 16818
upstate
South Carolina
|
|
« Reply #8 on: December 30, 2021, 06:57:21 AM » |
|
Filling the damper is a step that should not be skipped... https://www.youtube.com/watch?v=Tikm2dBQ56II wish I had taken a shot that showed it dropping like a rock before I had it pumped full... -Mike |
|
|
|
|
Logged
|
|
|
|
|
turtle254
|
|
« Reply #9 on: December 30, 2021, 08:14:21 AM » |
|
With out taking the springs out, how can you measure the oil level ? If so what do you use for a level to top of fork in inches. With the springs in and caps off, wheel up off ground, i cant see any oil level in the tubes.
|
|
|
|
|
Logged
|
|
|
|
|
..
|
|
« Reply #10 on: December 30, 2021, 08:17:01 AM » |
|
With out taking the springs out, how can you measure the oil level ? If so what do you use for a level to top of fork in inches. With the springs in and caps off, wheel up off ground, i cant see any oil level in the tubes.
I know some have used a piece of dowel and slowly dipped in and out until they touch oil. |
|
|
|
|
Logged
|
|
|
|
hubcapsc
Member
Posts: 16818
upstate
South Carolina
|
|
« Reply #11 on: December 30, 2021, 08:41:28 AM » |
|
With out taking the springs out, how can you measure the oil level ? If so what do you use for a level to top of fork in inches. With the springs in and caps off, wheel up off ground, i cant see any oil level in the tubes.
I don't think there's any way to know how much oil you have in there, especially using the "measure from the top" method in the factory service manual, unless you disassemble your forks, clean all the parts, and begin reassembling them per the manual... when you get to the "measure now" step, stick a ruler down in there and measure how far away the oil is. At the time you're supposed to measure, there's no springs or other stuff in the way. My friends sometimes give me grief for taking my car to the dealer for service. I like working on the Valkyrie, though... I rebuilt one of my forks in the parking lot at InZane when it was 100 degrees once...  There's a lot of shortcuts. I don't know anyone who has used a shortcut and also used the manual and said "MAN! ... the forks are a lot better when you use the shortcut!" Valkyrie forks are "ok" at best. Refurbished per the manual and with Progressive springs, they're pretty good. There's a couple of special tools that really help. I've had my Valkyrie since 2006 and have about $200 worth of special tools from jobs I've done. I use everything from this busted $4 chair to the low profile Valkyrie toolkit wrench to the special Honda fork tool and have had good luck each time I've done it for myself or others... 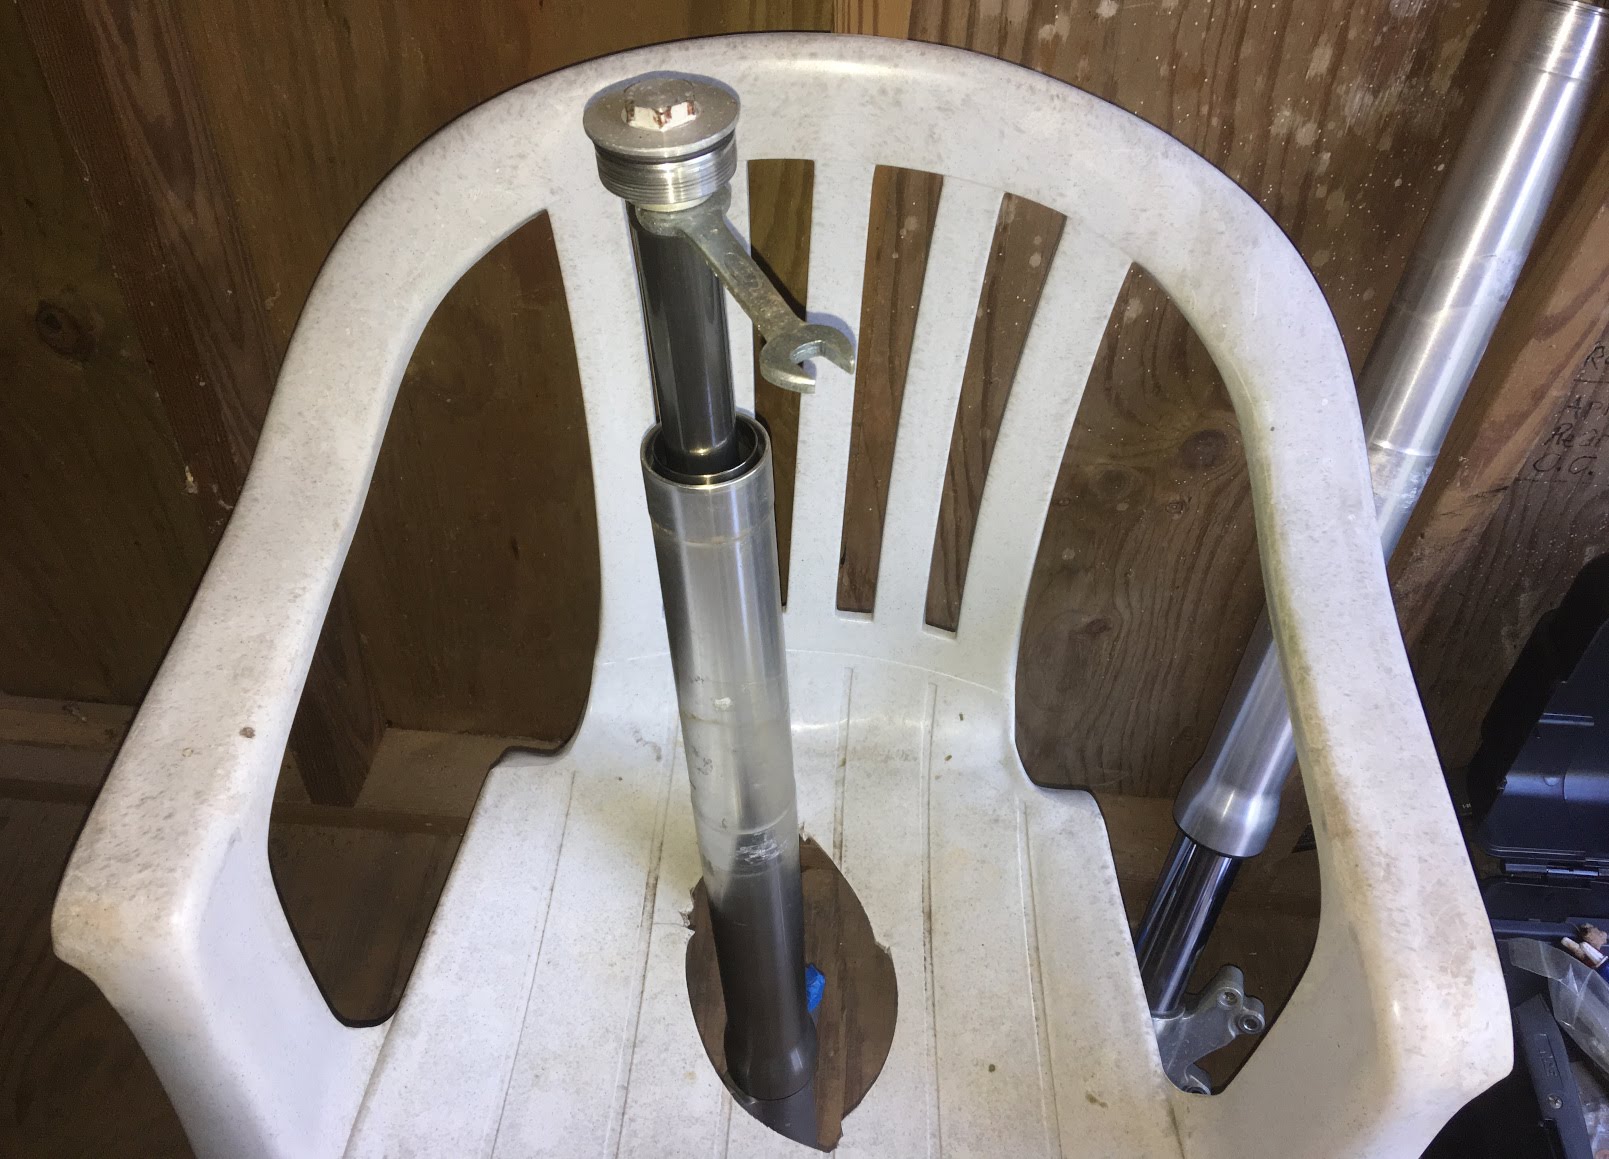 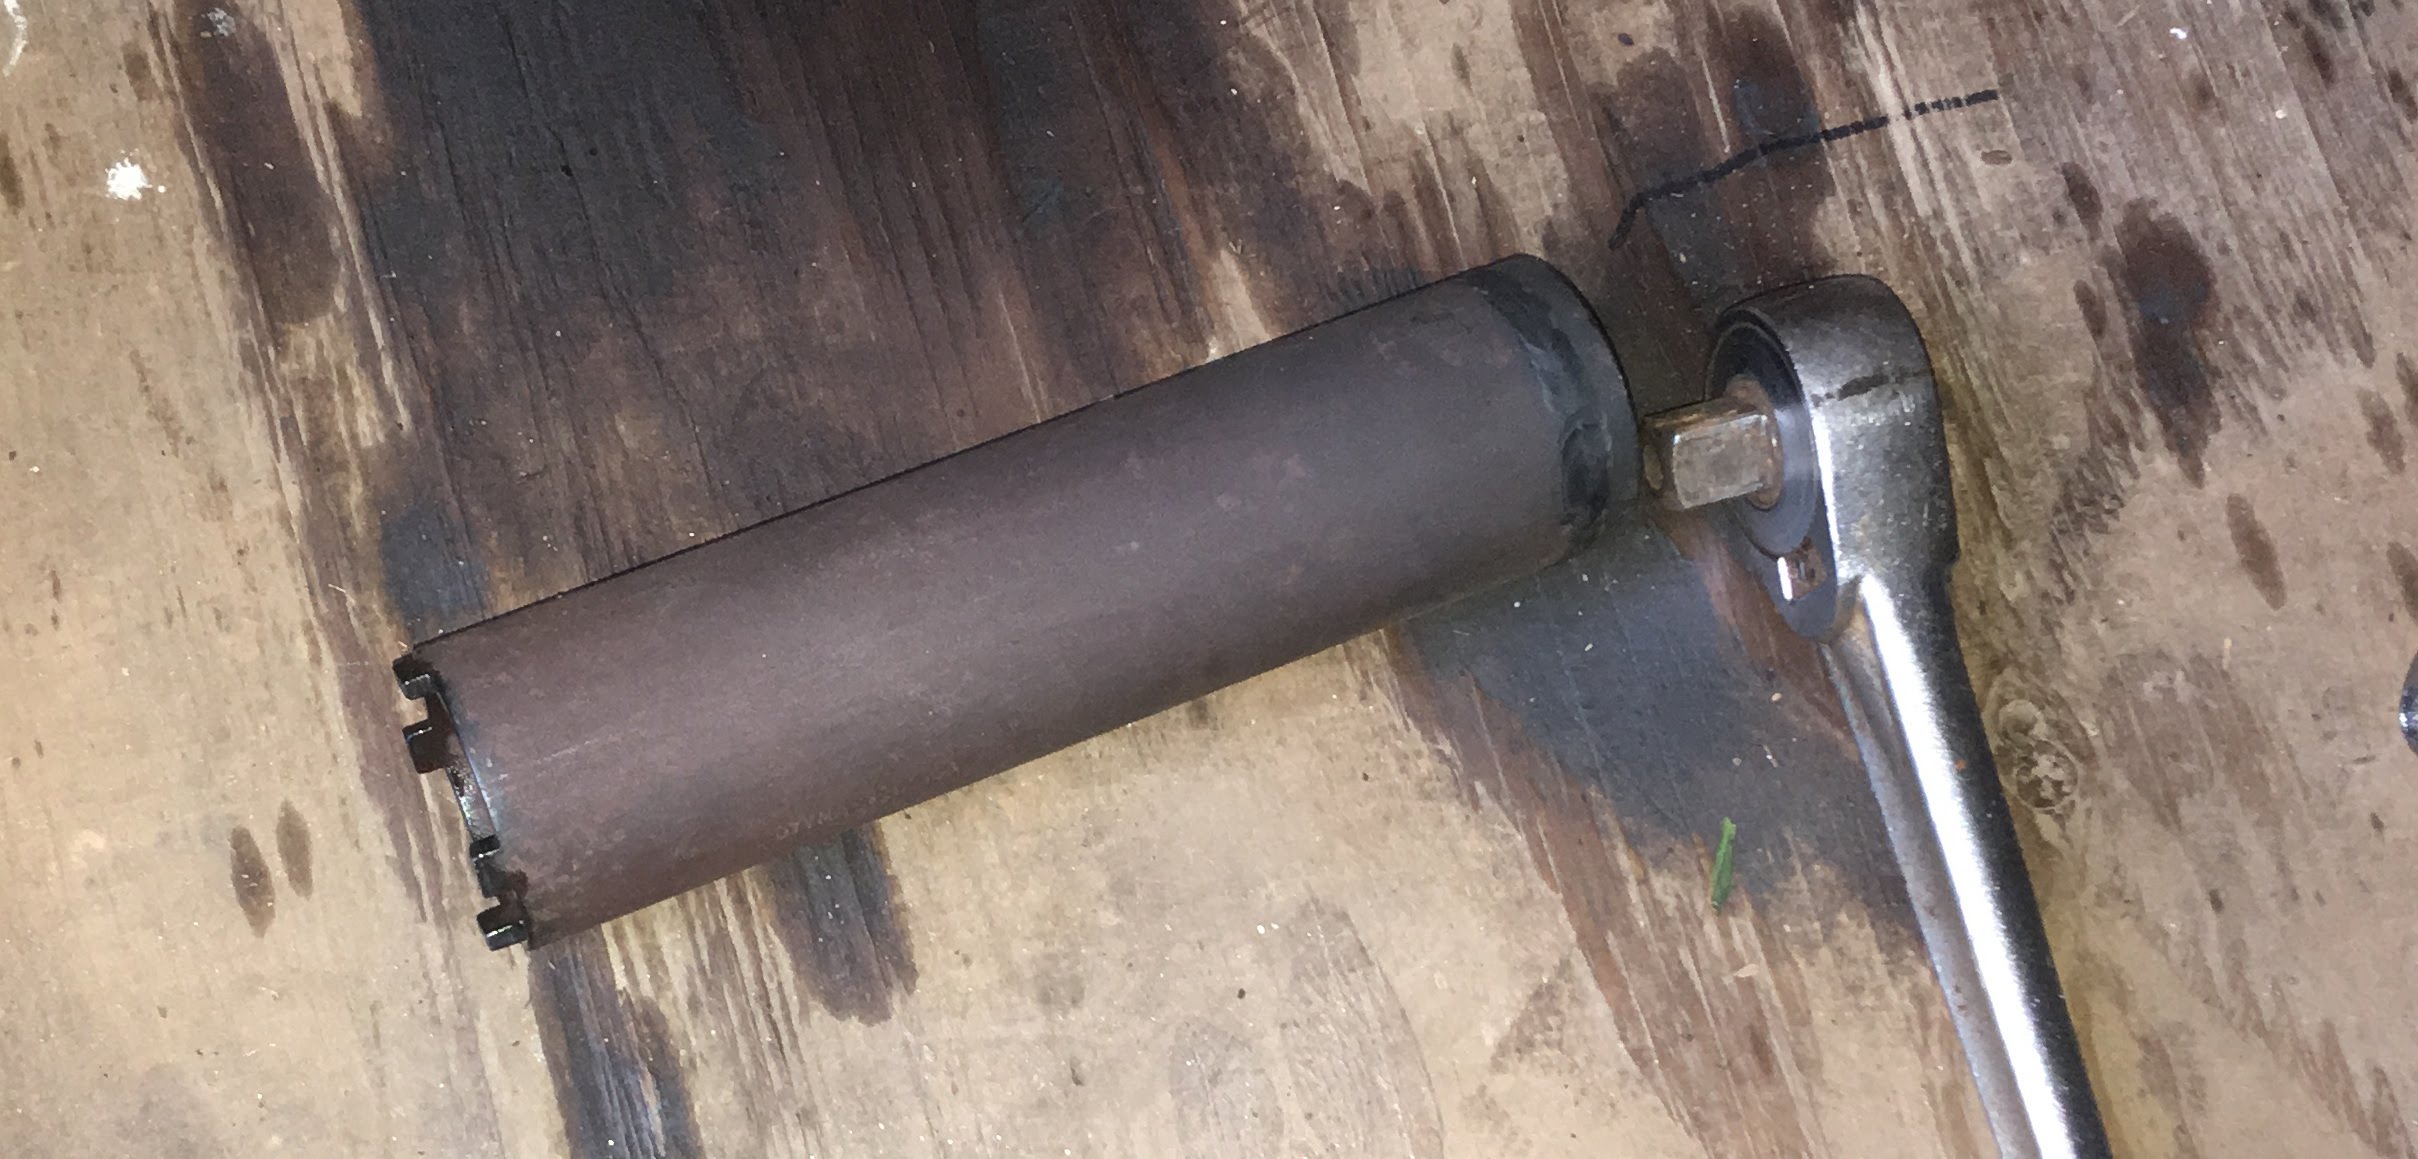 -Mike |
|
|
|
|
Logged
|
|
|
|
|
turtle254
|
|
« Reply #12 on: December 30, 2021, 09:10:35 AM » |
|
Who knows one or more of the shortcuts. Would like to try one.
Must be some way to do it.
|
|
|
|
|
Logged
|
|
|
|
|
Jess from VA
|
|
« Reply #13 on: December 30, 2021, 09:17:20 AM » |
|
You don't need to know the fork oil volume present, just get about 2 ounces out.
|
|
|
|
|
Logged
|
|
|
|
|
turtle254
|
|
« Reply #14 on: December 30, 2021, 09:28:58 AM » |
|
You don't need to know the fork oil volume present, just get about 2 ounces out.
Not sure its right to start with. |
|
|
|
|
Logged
|
|
|
|
|
Jess from VA
|
|
« Reply #15 on: December 30, 2021, 09:47:11 AM » |
|
You don't need to know the fork oil volume present, just get about 2 ounces out.
Not sure its right to start with. I'm only talking about reducing harshness from otherwise good forks. |
|
|
|
|
Logged
|
|
|
|
|
turtle254
|
|
« Reply #16 on: December 30, 2021, 09:52:04 AM » |
|
Still looking for one of the shortcuts, if anyone out their knows some of them.
|
|
|
|
|
Logged
|
|
|
|
John Schmidt
Member
Posts: 15372
a/k/a Stuffy. '99 I/S Valk Roadsmith Trike
De Pere, WI (Green Bay)
|
|
« Reply #17 on: December 30, 2021, 11:26:38 AM » |
|
Ok, thanks everyone for sharing your experience. I plan to dump all the oil first after removing the forks, but removing them is a bit more involved due to the 6 deg. trees installed. The forks go into the top tree which covers the fork cap, and removing the forks themselves involves accessing some set screws on the front and covered by the fairing. Not the best design. If needed, I'll probably replace the shims, seals, etc., since those forks have about 11 yrs. worth of wear on them already.
Mike, is that socket/tool in your pictures the one used on the nut at the top of the top tree?
|
|
|
|
|
Logged
|
|
|
|
|
Warlock
|
|
« Reply #18 on: December 30, 2021, 11:48:41 AM » |
|
Ok, thanks everyone for sharing your experience. I plan to dump all the oil first after removing the forks, but removing them is a bit more involved due to the 6 deg. trees installed. The forks go into the top tree which covers the fork cap, and removing the forks themselves involves accessing some set screws on the front and covered by the fairing. Not the best design. If needed, I'll probably replace the shims, seals, etc., since those forks have about 11 yrs. worth of wear on them already.
Mike, is that socket/tool in your pictures the one used on the nut at the top of the top tree?
If you have the spacers they will be right under the fork caps. They actually screw into the fork caps. I used the 1800 springs to raise my front end up. I did order some extensions from Daryl and plan on installing them and removing the 1800 springs. Only reason is once the springs start to give way my front end will sag more. Trying to decide stock springs or progressive stock springs when I do this. Will take a measurement on the stock set. I have a extra set that I'm going to use. I also used a lighter wt oil when I redid my forks and still had to remove 2 oz from each side. David |
|
|
|
|
Logged
|
I don't want to hear the labor pains, I just want to see the baby |
|
|
hubcapsc
Member
Posts: 16818
upstate
South Carolina
|
|
« Reply #19 on: December 30, 2021, 11:55:25 AM » |
|
Mike, is that socket/tool in your pictures the one used on the nut at the top of the top tree? Yes... I also got a seal driver, but once used a driver I made out of a PVC coupling that worked OK. And it is good to have a way (other than your palm ouch) to mash this rod down against its spring... 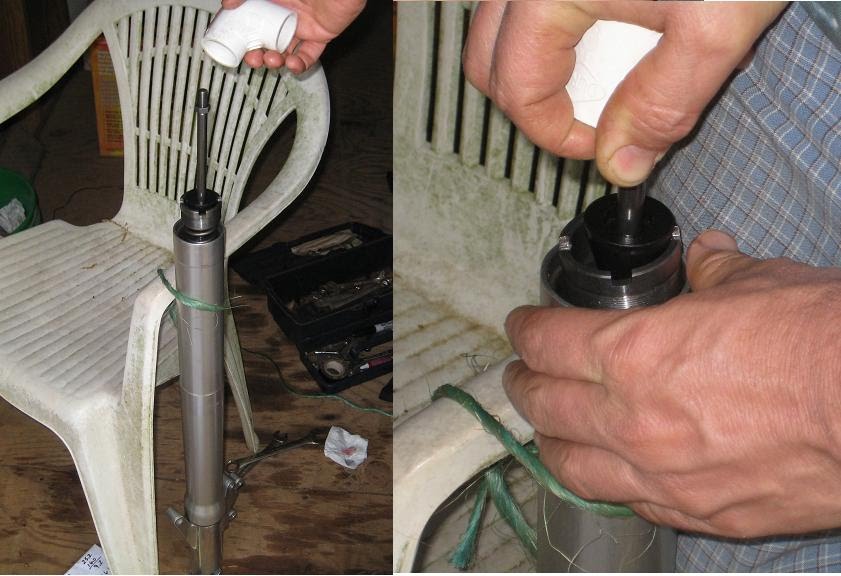 -Mike
|
|
|
|
|
Logged
|
|
|
|
|
Avanti
|
|
« Reply #20 on: December 30, 2021, 12:22:00 PM » |
|
If you are using Daryl’s trees from VTX-treme, they can be removed without removing the fairing.
|
|
|
|
|
Logged
|
|
|
|
John Schmidt
Member
Posts: 15372
a/k/a Stuffy. '99 I/S Valk Roadsmith Trike
De Pere, WI (Green Bay)
|
|
« Reply #21 on: December 30, 2021, 02:33:34 PM » |
|
If you are using Daryl’s trees from VTX-treme, they can be removed without removing the fairing.
The conversion was done at the Roadsmith factory by the prior owner in 2011 so I have no idea what source was used for the 6 deg. change. |
|
|
|
|
Logged
|
|
|
|
|
turtle254
|
|
« Reply #22 on: December 30, 2021, 03:34:58 PM » |
|
Right side is only side with forks on bike to access oil level. Measured collapse at 5" from top. Remove 2oz and measured 6" from top: so 1" = 1oz. Left side is impossible to see or get too with anything because of spring and hardware. So is the cartilage side "oil level" that important, or just needs lubrication ?
|
|
|
|
|
Logged
|
|
|
|
|
RonW
|
|
« Reply #23 on: December 30, 2021, 03:39:32 PM » |
|
the forks or ride would be lopsided if the fluid volume isn't followed than deducted from that reference.
|
|
|
|
|
Logged
|
2000 Valkyrie Tourer
|
|
|
|
RonW
|
|
« Reply #24 on: December 30, 2021, 05:02:56 PM » |
|
Still looking for one of the shortcuts, if anyone out their knows some of them.
you could pull the tubes from the bottom instead of taking the entire forks off the bike like Dag does. Imho, the term "shortcuts" sets off alarm bells. Of course there are steps that you can skip or fast track if they are redundant etc. Other than that "shortcuts" are something the dealership would like to do. Perhaps a typo or nomenclature. Anyways, here's some tips and tricks ..... You'll have to remove a certain spring seat stopper on the Right fork. The stopper is under tension so it can't just be pulled out. The stopper is captured between the lock nut and the spring collar tube as pictured.  The obvious method is to stick a screwdriver into the slot (arrow) and pry the locknut up against the tension to free the stopper. You actually can pull the spring collar tube down using your hand if your grip is strong enough. However, both these methods are cumbersome when assembling the parts back together.  I've found a ¼-inch ratchet makes things civilized when pushing the spring collar tube down to reinstall the stopper wafer. The square lug on the wrench keeps the wrench from slipping in the round hole.  When the stopper is removed the damper rod will fall back into the tube which is annoying since you don't have a third hand to hold the damper rod up to slip in the stopper wafer on reinstall. To facilitate the rigmarole, tie the damper rod to the ceiling.  Make sure to measure the amount the damper rod initially protrudes above the locknut. I'm not knowledgeable on the specific mm, but both forks have to have the same protruding length for the forks to line up with the axle.  |
|
|
|
|
Logged
|
2000 Valkyrie Tourer
|
|
|
|
Warlock
|
|
« Reply #25 on: December 30, 2021, 10:23:59 PM » |
|
Still looking for one of the shortcuts, if anyone out their knows some of them.
you could pull the tubes from the bottom instead of taking the entire forks off the bike like Dag does. Imho, the term "shortcuts" sets off alarm bells. Of course there are steps that you can skip or fast track if they are redundant etc. Other than that "shortcuts" are something the dealership would like to do. Perhaps a typo or nomenclature. Anyways, here's some tips and tricks ..... You'll have to remove a certain spring seat stopper on the Right fork. The stopper is under tension so it can't just be pulled out. The stopper is captured between the lock nut and the spring collar tube as pictured. The obvious method is to stick a screwdriver into the slot (arrow) and pry the locknut up against the tension to free the stopper. You actually can pull the spring collar tube down using your hand if your grip is strong enough. However, both these methods are cumbersome when assembling the parts back together. I've found a ¼-inch ratchet makes things civilized when pushing the spring collar tube down to reinstall the stopper wafer. The square lug on the wrench keeps the wrench from slipping in the round hole. When the stopper is removed the damper rod will fall back into the tube which is annoying since you don't have a third hand to hold the damper rod up to slip in the stopper wafer on reinstall. To facilitate the rigmarole, tie the damper rod to the ceiling. Make sure to measure the amount the damper rod initially protrudes above the locknut. I'm not knowledgeable on the specific mm, but both forks have to have the same protruding length for the forks to line up with the axle. I always measure both of them and fine tune it with the left side (clutch side). You can install the axle and if it doesn't line up you loosen the lock nut under the fork cap and move up or down depends on what is needed to make the axle line up with no problem. David |
|
|
|
|
Logged
|
I don't want to hear the labor pains, I just want to see the baby |
|
|
|
RonW
|
|
« Reply #26 on: December 31, 2021, 12:58:17 AM » |
|
I always measure both of them and fine tune it with the left side (clutch side). You can install the axle and if it doesn't line up you loosen the lock nut under the fork cap and move up or down depends on what is needed to make the axle line up with no problem.
As simple as that is, for some reason, I would never have thought of that in a million years.
|
|
|
|
|
Logged
|
2000 Valkyrie Tourer
|
|
|
MarkT
Member
Posts: 5196
VRCC #437 "Form follows Function"
Colorado Front Range - elevation 2.005 km

|
|
« Reply #27 on: January 01, 2022, 02:28:29 PM » |
|
I have Daryl's 4° trees. Same problem as John - the top tree covers over the top of the forks. Though it looks great that impedes access to the top of the forks. I need to lower the fluid - put in the specified level of 10wt oil with new Progressive springs and the ride is harsh. Might try lowering the level by 2 oz. & see if that's good w/o lowering the oil wt. Prefer to do it w/o removing the forks. Been a little while since I did this so some detail on the work is forgotten. These are the tools besides the usual ones, I used & made for assembling the forks with new springs and seals. I also used a ratchet strap with the hook you see there, to deal with the left fork problem (I would have to dig up the detail on that). Used the Honda manual and Clymer's and Wood Butcher's write-up. Often helps to get multiple viewpoints & explanations. 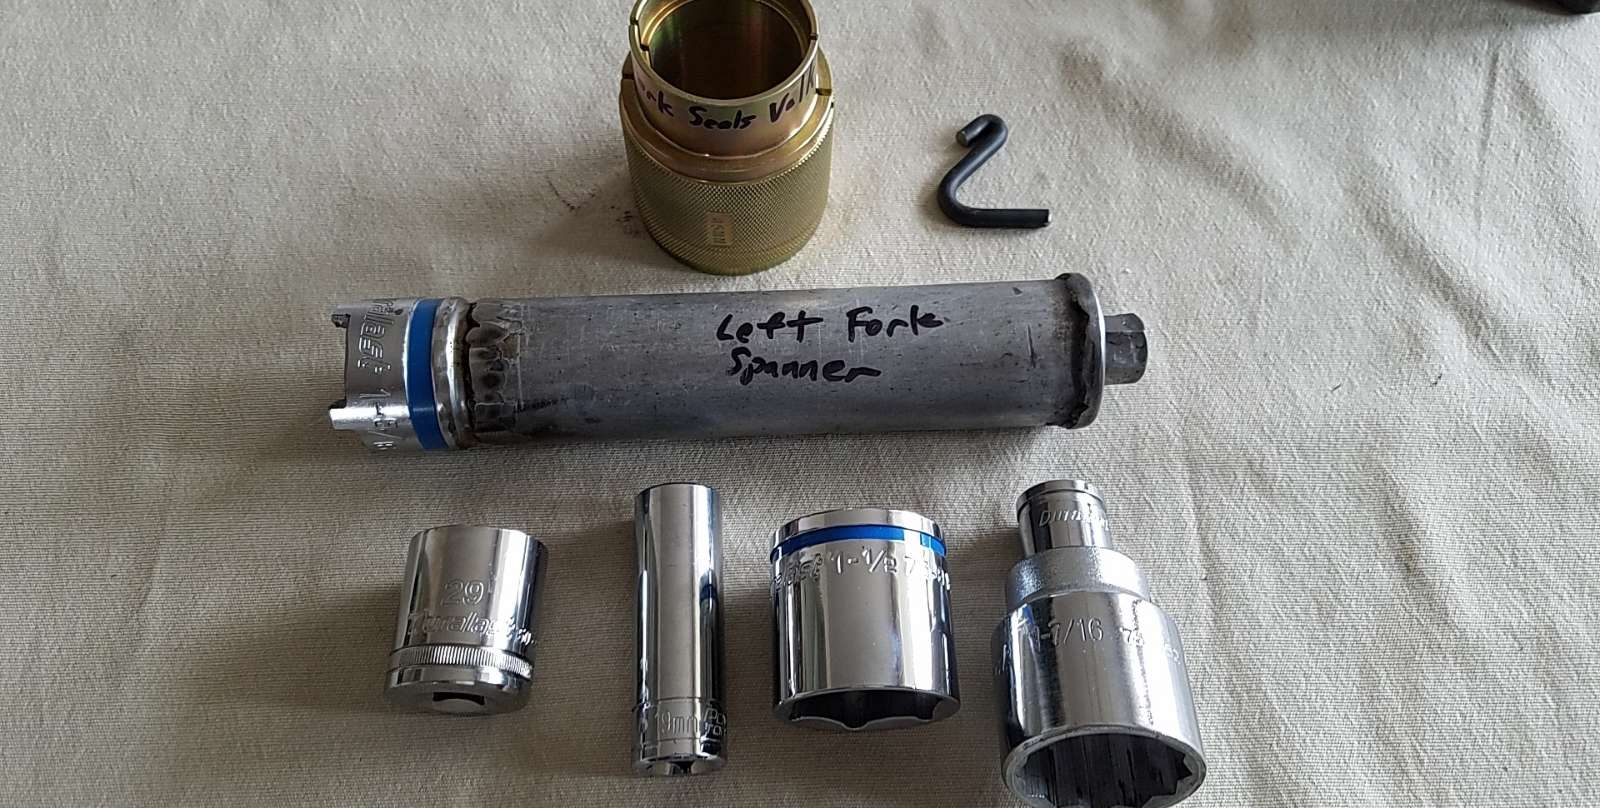 I posted the following remarks on fork work April last year. I'm not finding Wood Butcher's write-up on front fork work on FB or mewe now. Or even my copy on this computer. Unclear what happened online or my digital copy. Found my printed copy. Weird. "I'm just now completing a fork overhaul with all new All Balls parts, Progressive springs, and VTXtreme 4° triple trees. While I had it apart I polished the tubes and lower ends and tried to clear powdercoat them but that failed. I got a mottled finish which ruined my polish job - fortunately I had done only one fork tube so I lost a day chemically stripping and repolishing it. Found the All Balls dust seals are a bear to install - even the Motion Pro 45mm oil seal tool won't put it in there. Never mind "using your fingers to work it in". Not happening. I used a steel drift and hammer and struggled for awhile but finally got it in there. Wood Butcher's homemade PVC tool won't work on All Balls oils seals for me. It simply is too flimsy and has no weight. You use the proper tool as a slide hammer to put it in - I borrowed a Motion Pro tool for that. I also made the custom spanner wrench needed for the left fork. Torque on that is 72 ft/lbs - can't imagine a homemade tool of plastic would work as I saw recommended - made mine out of converting a socket wrench and welding it to a piece of exhaust tube, with a plate on the other end and a 3/4" bolt. Also there's an error in Wood Butcher's install sequence, right fork. I'll be advising him on that shortly. I came across several needed techniques to do this in my project, made notes and will attach them to my copy of WB's procedure. I also used both the Honda shop manual and Clymer's. There were differences between them which helped clarify when you have multiple author's procedures to get a better understanding. This is by far the most complex routine procedure I've done on the Valk. With the possible exception of the Rostra electronic cruise control installation. I have avoided it in the past. As Daryl says, having done it now I see why the $450 labor cost for it. (I had Aurora Honda install the Progressive springs on Deerslayer as I didn't want to go into the forks.) But having done it once now, the learning curve is done though I'm not relishing a repeat of it. However doing just the seals is a smaller job. And another thing - pretty sure the All Balls seals are a much tighter fit - might last longer but what a PITA to install them - especially the dust seals. I have done the seal mate leak fix and re-installing the OEM dust seals was no problem. Maybe the AB seals will install easier after they aren't new, next time I need to fix a leak. Oh Yeah, gotta mention Daryl at VTXtreme is super helpful. Every company should follow his example. I had issues I wasn't getting anywhere even after hours of struggle and thoroughly digging into 3 manuals. He stepped up with phone support and loaning tools. Attaboy, Daryl." |
|
|
|
« Last Edit: January 01, 2022, 03:34:40 PM by MarkT »
|
Logged
|
|
|
|
h13man
Member
Posts: 1892
To everything there is an exception.
Indiana NW Central Flatlands
|
|
« Reply #28 on: January 02, 2022, 06:50:51 AM » |
|
A thought I have  on this matter of oil volume, weigh the difference between the springs and break that down into percentage and adjust fork oil accordingly? |
|
|
|
|
Logged
|
|
|
|
|


