|
WintrSol
|
 |
« on: January 11, 2022, 08:05:31 PM » |
|
I was going to clean and replaces the brushes when I spotted the leak. Problem is, I can't get it apart. After soaking the seams with penetrating oil and heating the cases, I finally got the one with the brushes to move, but only about 1/16". I can turn it a bit, but it's like it is hitting something. Anyone else have (and solve) this problem. Yes, all the screws and nuts are off; I even removed the terminal and the insulator around it.
The article in the tech section just says use a long, thin screwdriver to separate them, but doesn't say where to pry with it, and I can't find anywhere beside the seams to use one.
|
|
|
|
|
 Logged
|
98 Honda Valkyrie GL1500CT Tourer
Photo of my FIL Jack, in honor of his WWII service
|
|
|
|
pancho
|
|
« Reply #1 on: January 12, 2022, 02:31:41 AM » |
|
You need to remove ALL the nuts from the rear cover before the cover will come off! Otherwise you will break the wires from the stator, or break the diode mounting plate! It will become apparent when the cover is removed. To remove the front cover, the nut holding the adapter must be removed. Also, mark the front case and stator before removing to aid in reassembly. If you are assured that EVERYTHING holding the case is removed, it is the brush side bearing holding you up. Put the adapter into a vice to secure the rotor and wiggle and pry the rear case, it will come off. Rear bearing is a bit hard to find, 2002 if memory serves me, but probably on it's way out as the commutator side lives a rough life being constantly bathed in graphite and carbon dust, and is nowhere near as beefy as the bearing on the other end.  I like to clean them up and paint the cases while they are apart.  |
|
|
|
« Last Edit: January 12, 2022, 03:09:01 AM by pancho »
|
Logged
|
The most expensive things you will purchase, are those things you would not have needed if you had listened and obeyed.
|
|
|
|
WintrSol
|
|
« Reply #2 on: January 12, 2022, 09:05:41 AM » |
|
Sounds like I have the rear bearing issue then. I've tried pulling back on the case while turning the rotor, and didn't feel any resistance, but maybe the bearing doesn't put any pressure on the rotor; at least, not enough to feel. Maybe I'll just put it back together and ride with it, until the brushes fail.
I may just have to get a replacement; anyone have the part number? From previous discussions, I believe I'll have to get the Goldwing alternator and re-clock the housing.
Partzilla lists the alternator for about $648, showing a price increase from $607; is that preferred?
|
|
|
|
« Last Edit: January 12, 2022, 09:08:21 AM by WintrSol »
|
Logged
|
98 Honda Valkyrie GL1500CT Tourer
Photo of my FIL Jack, in honor of his WWII service
|
|
|
|
Avanti
|
|
« Reply #3 on: January 12, 2022, 10:42:00 AM » |
|
|
|
|
|
|
Logged
|
|
|
|
|
WintrSol
|
|
« Reply #4 on: January 12, 2022, 01:57:45 PM » |
|
If all that one needs is the front housing rotated, that's a lot less than the one listed for the Valk. Thanks for the link.
|
|
|
|
|
Logged
|
98 Honda Valkyrie GL1500CT Tourer
Photo of my FIL Jack, in honor of his WWII service
|
|
|
|
pancho
|
|
« Reply #5 on: January 13, 2022, 05:48:32 AM » |
|
I've tried pulling back on the case while turning the rotor, and didn't feel any resistance, but maybe the bearing doesn't put any pressure on the rotor; at least, not enough to feel.
It's the outer race of the rear bearing into the rear case that is holding you up, so it will still rotate freely, it's a tight fit so there is no wobble when operating,, it will come off.
These alternators are easy to refurb, save you hundreds to spend on things you need to spend money on, like a new pair of shoes.
|
|
|
|
« Last Edit: January 13, 2022, 05:51:53 AM by pancho »
|
Logged
|
The most expensive things you will purchase, are those things you would not have needed if you had listened and obeyed.
|
|
|
|
WintrSol
|
|
« Reply #6 on: January 13, 2022, 11:07:05 AM » |
|
I've tried pulling back on the case while turning the rotor, and didn't feel any resistance, but maybe the bearing doesn't put any pressure on the rotor; at least, not enough to feel.
It's the outer race of the rear bearing into the rear case that is holding you up, so it will still rotate freely, it's a tight fit so there is no wobble when operating,, it will come off.
These alternators are easy to refurb, save you hundreds to spend on things you need to spend money on, like a new pair of shoes.
So, force it? I was wondering how you determined the fault. Did the bearing come out, race and all? And, how did you apply enough force to pull it apart? |
|
|
|
|
Logged
|
98 Honda Valkyrie GL1500CT Tourer
Photo of my FIL Jack, in honor of his WWII service
|
|
|
|
Chrisj CMA
|
|
« Reply #7 on: January 13, 2022, 01:22:26 PM » |
|
I've tried pulling back on the case while turning the rotor, and didn't feel any resistance, but maybe the bearing doesn't put any pressure on the rotor; at least, not enough to feel.
It's the outer race of the rear bearing into the rear case that is holding you up, so it will still rotate freely, it's a tight fit so there is no wobble when operating,, it will come off.
These alternators are easy to refurb, save you hundreds to spend on things you need to spend money on, like a new pair of shoes.
So, force it? I was wondering how you determined the fault. Did the bearing come out, race and all? And, how did you apply enough force to pull it apart? Use a heat gun on the back of the alternator. The aluminum should expand more than the steel and maybe lose its grip on the bearing. |
|
|
|
|
Logged
|
|
|
|
|
WintrSol
|
|
« Reply #8 on: January 13, 2022, 01:48:32 PM » |
|
OK, I'll try that. If I do get it apart, do I need to replace the bearing, or just press it back in? I'm guessing that, if it's locked onto the end of the rotor shaft, I'd have to replace that, too.
|
|
|
|
|
Logged
|
98 Honda Valkyrie GL1500CT Tourer
Photo of my FIL Jack, in honor of his WWII service
|
|
|
|
pancho
|
|
« Reply #9 on: January 14, 2022, 04:40:17 AM » |
|
What Jeff said, don't know why I didn't say that. The bearing will still be on the shaft when it comes out and will still spin, it takes a small bearing puller to remove the bearing from the rotor shaft. The bearing is a 2RS so it has protection, but check it carefully for smoothness of rotation, I have replaced most of them that I have done so I can trust the unit for another 100K. If you do replace the bearing, it must have the same suffix, I think it is a 6000DU, it will be stamped into the rubber side like any other bearing. I remember when I first started doing this, I bought some 6000 bearings, and although they both claimed to be 10X26X8, the 6000 was a slip fit onto the shaft and not a press fit, the 6000DU ID measured 9.95mm for a press fit on the shaft. I have had good luck with the NSK6000DU and NSK6000DDU bearings for this application if you decide to replace it.
|
|
|
|
« Last Edit: January 14, 2022, 08:15:17 AM by pancho »
|
Logged
|
The most expensive things you will purchase, are those things you would not have needed if you had listened and obeyed.
|
|
|
|
WintrSol
|
|
« Reply #10 on: January 14, 2022, 08:47:07 AM » |
|
So, the bearing is supposed to press onto the shaft, and slide into the housing? I would have thought that it presses into the housing, and slides onto the shaft. Could explain why it's so hard to get apart, though, if both are press fit.
Looking back at the how-to from Shop Talk, I see the bearing should remain on the rotor; something I didn't pick up on before. I guess mine has 'glued' itself into the housing, just like the housing 'glued' itself together. Heat it is!
|
|
|
|
« Last Edit: January 14, 2022, 08:49:59 AM by WintrSol »
|
Logged
|
98 Honda Valkyrie GL1500CT Tourer
Photo of my FIL Jack, in honor of his WWII service
|
|
|
|
TrapperAH1G
|
|
« Reply #11 on: January 15, 2022, 10:08:18 PM » |
|
|
|
|
|
|
Logged
|
|
|
|
gordonv
Member

Posts: 5766
VRCC # 31419
Richmond BC
|
|
« Reply #12 on: January 15, 2022, 10:31:33 PM » |
|
With all the nuts off and the 3 screws removed, I used a rubber mallet to strike the one half of the housing while the alternator sat in my hand.
As already mentioned, heat should all things to expand a little. I know the 2 halves along that green section, where "corroded" and rusted on. That was what was holding my halves together.
It sounds like there is still nuts holding it together. You describing it as moving 1/16 is like my first alt, when I pried it apart, till the wires stretched and broke, because I hadn't remove all the fasteners.
|
|
|
|
|
Logged
|
1999 Black with custom paint IS   |
|
|
|
WintrSol
|
|
« Reply #13 on: January 16, 2022, 09:29:03 AM » |
|
I have all 3 screws and 5 nuts removed, along with the insulator around the output stud. That leaves the bearing, as far as I can see. Since I plan to replace the brushes, I wonder if soaking it in a detergent to soften the crud built up around the bearing will give a head start on heating the housing. Don't know if that could penetrate the electronics, but they should be sealed (I think).
|
|
|
|
|
Logged
|
98 Honda Valkyrie GL1500CT Tourer
Photo of my FIL Jack, in honor of his WWII service
|
|
|
|
Avanti
|
|
« Reply #14 on: January 16, 2022, 10:16:34 AM » |
|
|
|
|
|
« Last Edit: January 16, 2022, 10:36:58 AM by Avanti »
|
Logged
|
|
|
|
|
WintrSol
|
|
« Reply #15 on: January 16, 2022, 02:48:33 PM » |
|
If so, I would expect to feel an increase in resistance to rotation when I put force on the housing, as the grooves pressed against the brushes. Then, the brushes may jump the grooves during the rotation, freeing the rotor. |
|
|
|
|
Logged
|
98 Honda Valkyrie GL1500CT Tourer
Photo of my FIL Jack, in honor of his WWII service
|
|
|
|
pancho
|
|
« Reply #16 on: January 16, 2022, 04:14:21 PM » |
|
You're just not getting the force where you need it. Put the adapter on the drive end of the alternator in a vice for stability.  Pry the stator from the front case working around the three screw holes until the rear bearing releases from the rear case and remove the stator and rear case as an assembly from the front case and rotor. Then pry the rear cover from the stator-diode-brush assembly. Be careful not to insert your pry tool far enough to damage the stator wires.  |
|
|
|
« Last Edit: January 16, 2022, 04:17:36 PM by pancho »
|
Logged
|
The most expensive things you will purchase, are those things you would not have needed if you had listened and obeyed.
|
|
|
|
Avanti
|
|
« Reply #17 on: January 16, 2022, 04:23:06 PM » |
|
Because the rear bearing is designed to float in and out as the alternator expands and contracts, due to heating and cooling cycles, it would seem to me that sense you have all the bolts removed that the case seams are the only thing interfering with separation.
|
|
|
|
« Last Edit: January 16, 2022, 04:26:54 PM by Avanti »
|
Logged
|
|
|
|
|
WintrSol
|
|
« Reply #18 on: January 16, 2022, 08:10:09 PM » |
|
Pancho's illustration is almost what I'm doing, except I have the mountings on the front housing clamped in the vise, and prying the rear housing away from the stator. That way, I can still freely turn the rotor drive end while putting force between the housing and stator; housing moves just about 1/16" off the stator before stopping, but the rotor still turns freely while force is applied. As noted above, it is likely the bearing is frozen in the rear housing; going to blast it with the heat gun next time I'm in the shop, and apply prying force at the same time. Fingers crossed. Never got the front housing free of the stator, but I don't think it has to for access to the brushes.
|
|
|
|
|
Logged
|
98 Honda Valkyrie GL1500CT Tourer
Photo of my FIL Jack, in honor of his WWII service
|
|
|
|
pancho
|
|
« Reply #19 on: January 17, 2022, 06:45:30 AM » |
|
Pancho's illustration is almost what I'm doing, except...
I am constantly amazed!
|
|
|
|
|
Logged
|
The most expensive things you will purchase, are those things you would not have needed if you had listened and obeyed.
|
|
|
hubcapsc
Member
Posts: 16818
upstate
South Carolina
|
|
« Reply #20 on: January 17, 2022, 07:29:52 AM » |
|
I've never taken an alternator apart, but when I replaced mine, I had a hard time getting the old one off... I used hard plastic wedges from a cheap toolkit for people who work on dashboards and stuff instead of screwdrivers because I was afraid I'd crack or break the case... 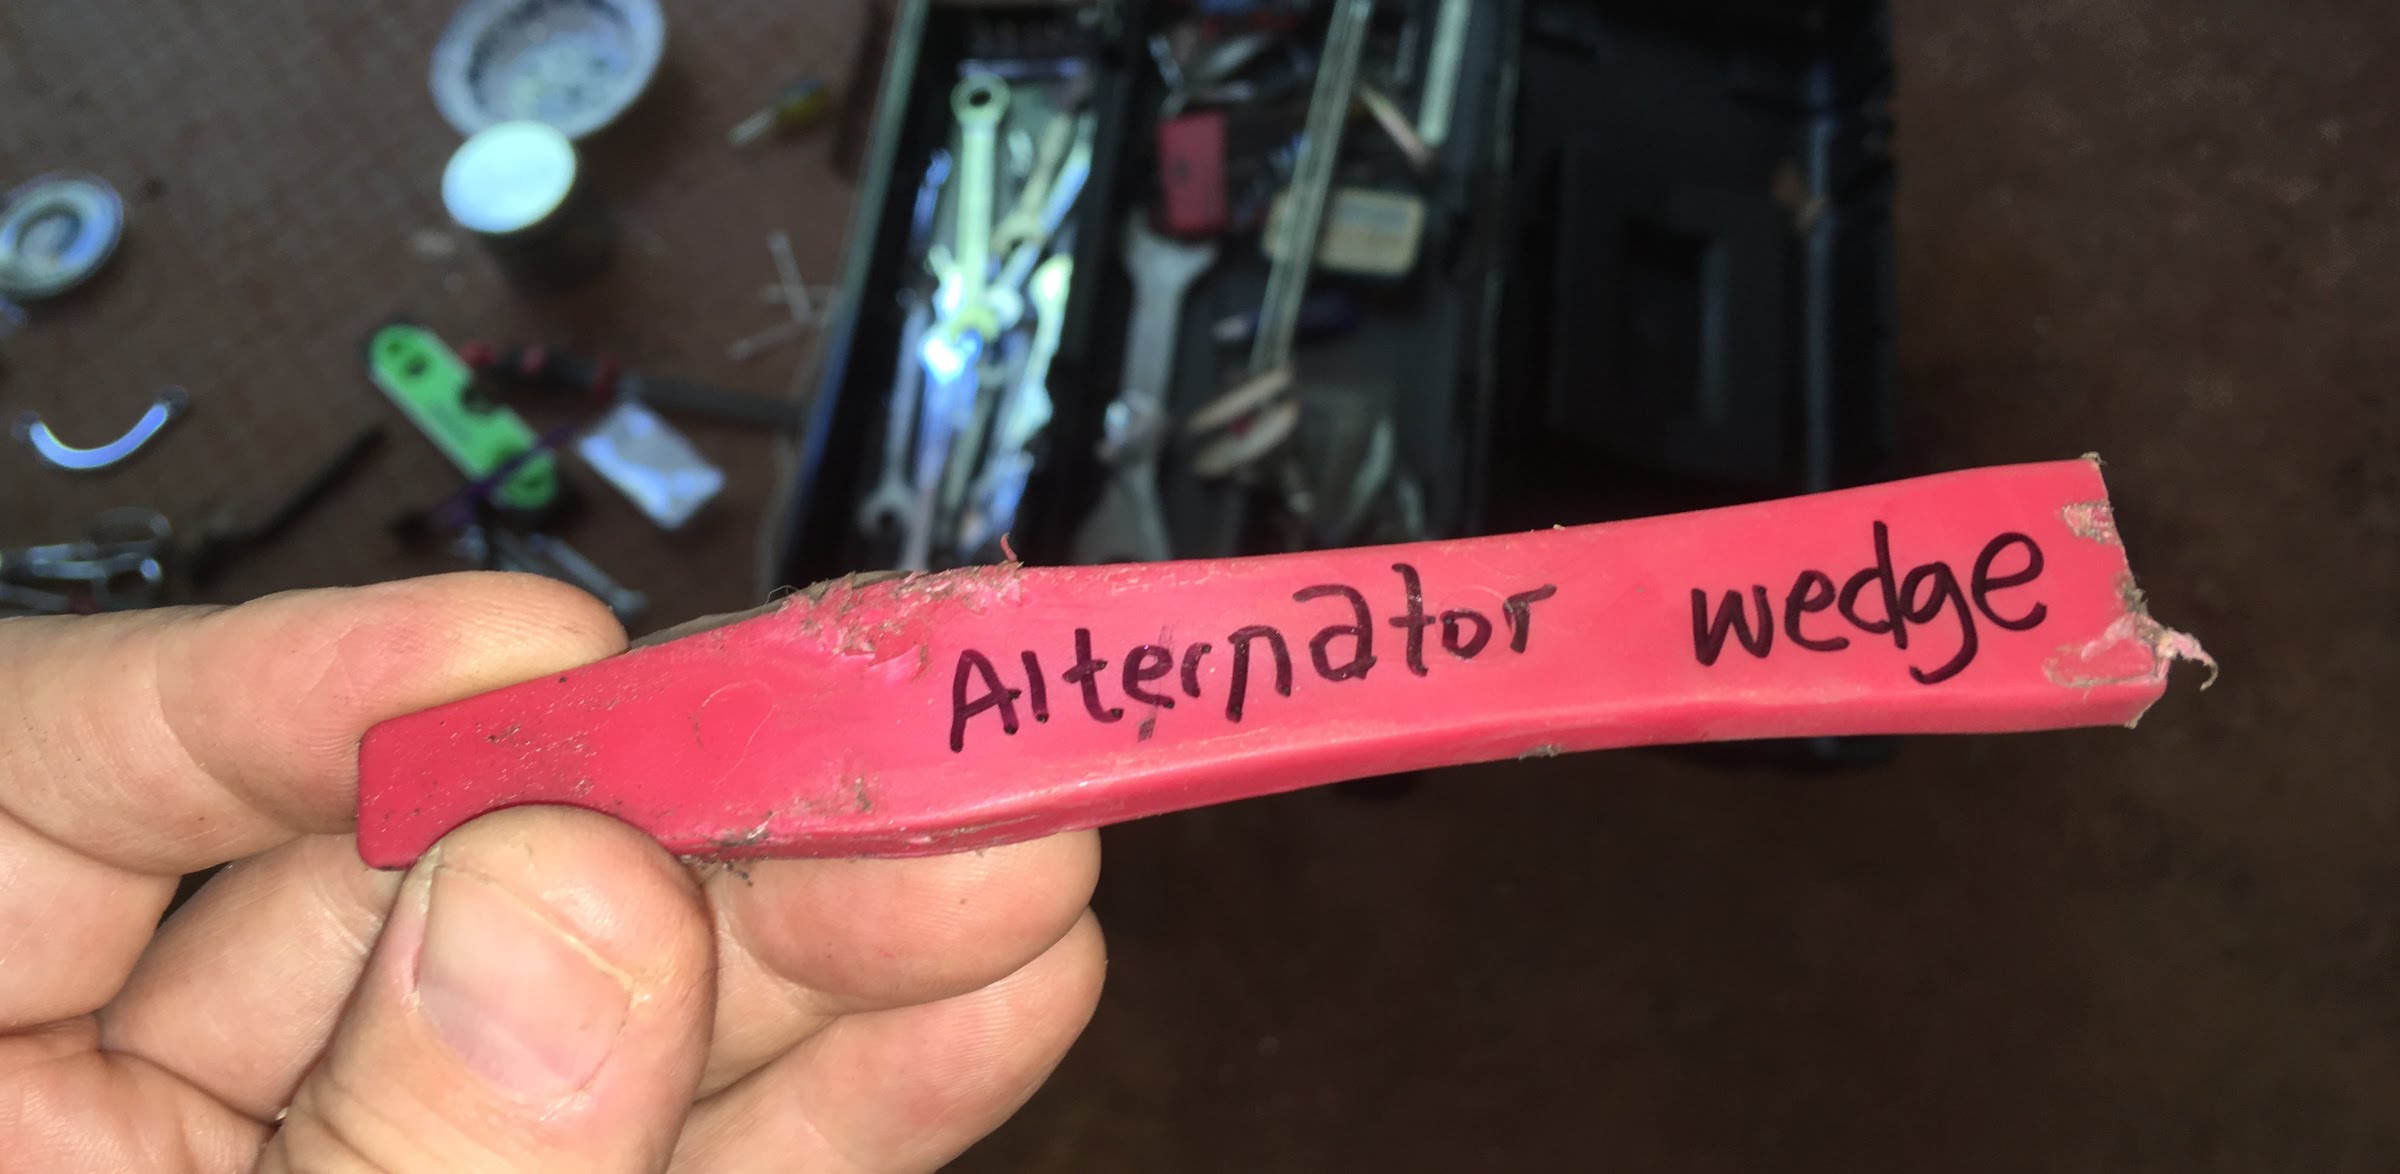 -Mike |
|
|
|
|
Logged
|
|
|
|
|
pancho
|
|
« Reply #21 on: January 17, 2022, 08:16:51 AM » |
|
I understand we are a hardheaded lot, and I don't just mean motorcycle guys. Try it my way WInterSol, it will come apart and save you a lot of time and energy, maybe tearing your stuff up. Since the assembly is hanging, continuing to pry on the rear case, puts you in danger of breaking the stator coil wires to the diode plate as happened to GOrdonv
If the stator and rear housing come off easily as an assembly and you still cannot get the rear case off the stator, tap the studs with a soft mallet while holding the rear case, it will come out.
|
|
|
|
« Last Edit: January 17, 2022, 08:42:24 AM by pancho »
|
Logged
|
The most expensive things you will purchase, are those things you would not have needed if you had listened and obeyed.
|
|
|
|
WintrSol
|
|
« Reply #22 on: January 19, 2022, 12:50:19 PM » |
|
Well, I tested your assumption that it was gravity working against me. Put it in the vise vertically, clamping the rotor. No change. I could still rotate the housing some, and all the studs move freely in their holes. It was heating the housing enough that finally broke it free. When I got the bearing out, it was coated with something like lacquer where it contacted the housing, probably from oil smoke. It cleaned off well with some acetone and a little polishing. I had to heat the front housing, too; having it in the vise like that made it easier to hit all sides by rotating it in the air from the heat gun. When it was hot enough, it popped right out. The brushes were almost gone, so this needed to be done. One thing not mentioned in the Shop Talk write-up is which way to face the new brushes. Both old an new are angled, but no mention of direction that I can tell.  |
|
|
|
« Last Edit: January 19, 2022, 01:49:22 PM by WintrSol »
|
Logged
|
98 Honda Valkyrie GL1500CT Tourer
Photo of my FIL Jack, in honor of his WWII service
|
|
|
|
Chrisj CMA
|
|
« Reply #23 on: January 19, 2022, 02:34:55 PM » |
|
I probably would have changed those brushes as well. I don’t like them getting to the holes. However, the hole is not the wear mark. There is a line well beyond the hole. If the brushes were installed properly they had lots more miles to go. But good job!
|
|
|
|
|
Logged
|
|
|
|
|
WintrSol
|
|
« Reply #24 on: January 19, 2022, 03:15:04 PM » |
|
Yeah, the wear marks weren't visible yet, but comparing them, they were over 1/2 worn. I found the info about orientation in the service manual - go figure.  |
|
|
|
|
Logged
|
98 Honda Valkyrie GL1500CT Tourer
Photo of my FIL Jack, in honor of his WWII service
|
|
|
|
Avanti
|
|
« Reply #25 on: January 19, 2022, 04:01:52 PM » |
|
Nice job! Took your time, figured it out, and now your good to go for many more (smiles).
|
|
|
|
|
Logged
|
|
|
|
|
pancho
|
|
« Reply #26 on: January 19, 2022, 04:32:13 PM » |
|
Good to hear that things came apart without serious problems, I was concerned that the diode plate might be hung in the rear case. When you're installing it all in good condition, think about 3 four or five hundred dollars you didn't spend. Woo Hoo
|
|
|
|
|
Logged
|
The most expensive things you will purchase, are those things you would not have needed if you had listened and obeyed.
|
|
|
|
Bighead
|
|
« Reply #27 on: January 22, 2022, 04:38:36 PM » |
|
8 days? I myself would have went and got a GW alt and had it put back together that day. And if the replacing brushes was that important I would have figured out how to take that one apart and use it as a spare. But that is just me. Not nearly patient enough to spend 8hrs must less 8 days to take apart an alternator.
|
|
|
|
|
Logged
|
1997 Bumble Bee
1999 Interstate (sold)
2016 Wing
|
|
|
|


